
If you own an iPhone, you might’ve seen the dreaded “iPhone is disabled. Try again in 1 minute” error message before. This pop-up is incredibly persistent and can even snowball into a full-on “iPhone is disabled. Connect to iTunes” error. Fret not, as we’re here to help you diagnose and fix the problem to get your iPhone back up and running.
Why Does “iPhone Is Disabled. Connect to iTunes” Error Show Up?
iPhones usually have a passcode that you use to unlock them. If Face ID isn’t working or requires the passcode, then you use that to access your iPhone. However, sometimes you could mistakenly enter the wrong passcode. Maybe you entered 7 instead of 8. Or perhaps you’ve forgotten the passcode entirely.
As a result, you try out different passcodes that you think your past self might have entered. You enter your birth date, phone digits, and whatever else you might have thought of — but no luck. When you get it wrong enough times, the iPhone will begin to suspect that something isn’t right.
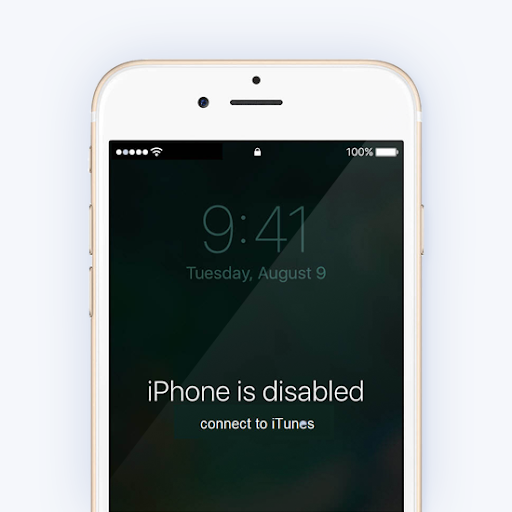
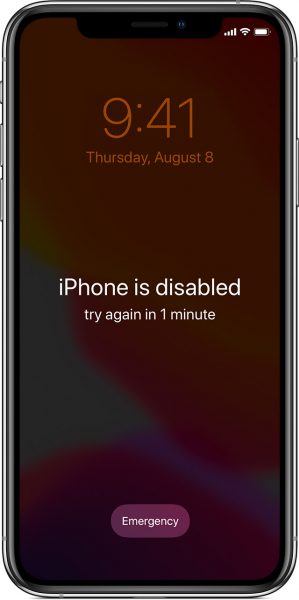
Hence, you get the dreaded “iPhone is disabled. Try again in 1 minute” message. If you wait it out and try enough times, that minute increases to 5, 15, and even 30 minutes. However, once you enter 10 incorrect guesses, then you finally get the dreaded “iPhone is disabled. Connect to iTunes” error.
It doesn’t matter whether you’re the one who guessed incorrectly or not. You might have lent your phone to someone else like a friend or your kids who forgot the passcode. Regardless, the iPhone has decided to lock itself to prevent potential hacking or theft. The “iPhone is disabled connect to iTunes” error is the protection against such events.
Overall, the “iPhone is disabled. Connect to iTunes” error is a good thing because it protects from theft. If there was no guess limit, then anyone could enter all the numbers from 0001 to 9999 to get in.
How to Fix “iPhone Is Disabled. Connect to iTunes” Error
Now, you might find yourself already with the “iPhone is disabled. Connect to iTunes” error on hand. If you’re using iOS 14, the error message might show up as “Connect to a Mac/PC” instead. Regardless, it’s a big problem and one that we have to address to help you access your iPhone again.
However, do note that this process isn’t a painless one. That’s because your iPhone will wipe your data if you try to unlock your phone. Hence, why many people dread the ‘iPhone is disabled connect to iTunes’ error so much. Of course, you can restore your iPhone’s data with your backup from a computer or iCloud. However, that’s only if you backed up your data beforehand.
Tools to Prepare
So, you’ve entered “iPhone is disabled connect to iTunes how to unlock” in a Google search. However, before getting into the recovery process, there are few tools you need on hand first. That is your computer and a compatible cable.
The computer doesn’t have to be a Mac. You can also use your PC to recover your iPhone as well. Afterward, you need to prepare a lightning-to-USB cable. However, the only problem would be if your Mac or PC doesn’t have regular USB ports. That’s because some modern computers only use USB-C now, as is the case for most modern Macs. In this case, you might also need an adaptor for the cable.
Step 1: Recovery Mode
After getting all your tools ready, it’s time to get started. To do this, you have to get your phone into recovery mode by connecting it to the computer. This process differs depending on the iPhone model you’re using.
iPhone 8 & Later
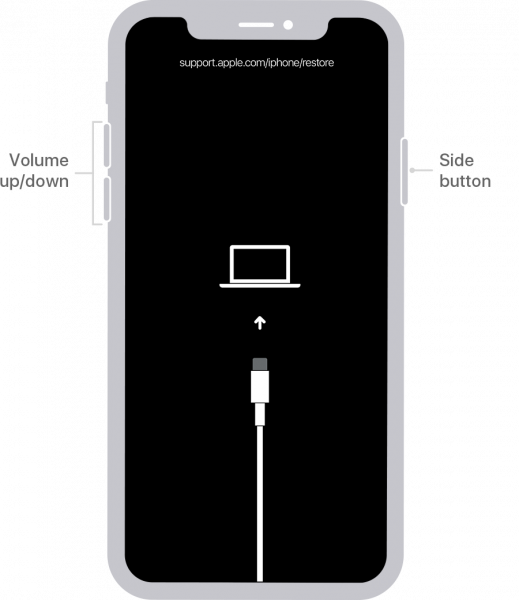
To put an iPhone 8 or later in recovery mode, you need to follow these steps:
- Press and hold the side and volume down button
- Wait until your iPhone displays the power off slider
- Drag the slider and turn your iPhone off
- Press and hold the side button of your iPhone while it is plugged into your computer
- Maintain your hold on the side button until it displays the recovery screen
iPhone 7, 7 Plus, and 7th-Gen iPod Touch

- Turn off your iPhone by long-pressing on the side or top button
- Drag the slider to turn off your iPhone
- Press and hold the volume down button while connecting the iPhone to your computer
- Keep the volume down button held until you see the recovery screen
iPhone 6s & Earlier
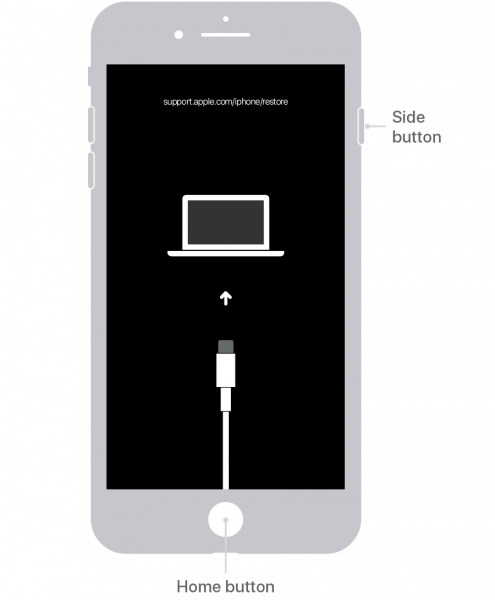
- Turn off your iPhone by pressing and holding the power (side or top) button
- Drag the slider and turn your iPhone off
- Hold down the Home button while connecting the iPhone to your computer
- Keep the Home button held down until the recovery screen appears
iPad (Face ID)
- Press and hold the top button along with a volume button until the power off slider shows up
- Drag the slider and turn off your iPad
- Hold the top button while connecting your iPad to your computer
- Maintain your hold on the top button until the recovery screen appears
iPad (Home Button)
- Press and hold the top button to show the power off slider
- Drag the slider and turn off the iPad
- Press and hold the Home button while connecting it to your computer
- Keep the Home button held down until the recovery screen shows up
Step 2: Find Your iPhone/iPad With Your Computer
Now let’s move on to locating your mobile device using your computer. You can do this through Finder (on macOS Catalina) or iTunes (on PC or older macOS version). The process will again depend on your macOS version or if you’re using a PC.
macOS Catalina

- Open Finder
- Under Locations, you should find your mobile device listed with other connected devices
- Select your mobile device’s name
macOS Mojave & Earlier / Windows PC
Open iTunes. Depending on the iTunes version you have, locate your mobile device. You can do this by clicking on the upper-left iPhone icon in iTunes 12. However, you should select the iPhone tab on the right side if you’re running iTunes 11. If you’re running an even older iTunes 10 version, then it should be in the left sidebar.
Step 3: Restore Your iPhone/iPad
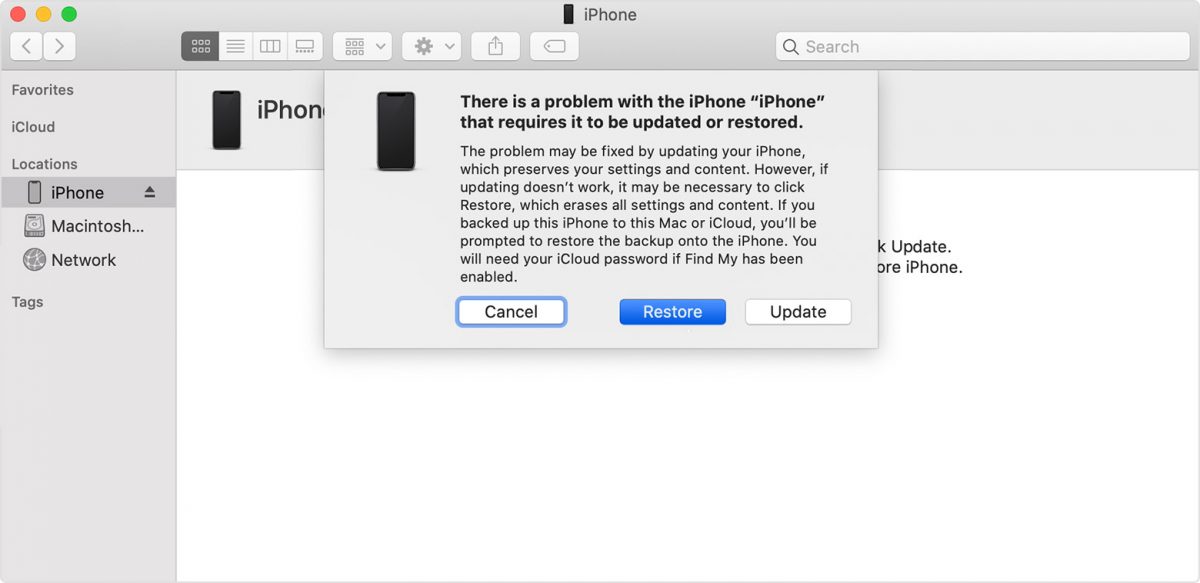
After locating your mobile device, click Restore to begin the recovery process. This should get rid of that pesky “iPhone is disabled. Connect to iTunes” error message. Moreover, it’ll also download the software you need to restore your device.
However, this process can take a bit of time. You might have to wait for a couple of minutes for it to finish. Conversely, if the time exceeds 15 minutes, then try reconnecting your iPhone to your computer.
If everything goes smoothly, the download should finish. Afterward, just follow the on-screen instructions to restore your device. However, there’s also some waiting time because you have to wait until it completely erases your iPhone’s data.
Step 4: Set Up
Once the process is complete, it’s time to set up your iPhone or iPad once again. After you restore your device, your iPhone should feel like new. It won’t have any of the data you stored inside previously. Hence, you should restore your data using your backup from iCloud or whichever device you stored your data in.
My iPhone Is Disabled and Won’t Connect to iTunes
It isn’t always a smooth process to fix the “iPhone is disabled. Connect to iTunes” error. Sometimes, your iPhone won’t even connect to iTunes despite following the steps above. If this happens, you can still fix the problem by restoring your phone via iCloud. However, this step will also wipe your data.
What You Need
Like the previous method, you’ll need to set up a couple of things before getting started.
Firstly, your iPhone should have Find My iPhone enabled. That means it should have iCloud connected as well. Moreover, you have to remember your iCloud account’s details. It’s the only way you’ll be able to fix the error without using a computer or iTunes.
Secondly, your iPhone must have an internet connection.
Lastly, you’ll need a separate device to access icloud.com. This website is where you’ll be able to wipe your data to restore your iPhone. Hence, you’ll need a device that can access the internet, whether it’s a computer, phone, or tablet. Moreover, you’ll need to remember your Apple account details to be able to access your iPhone.
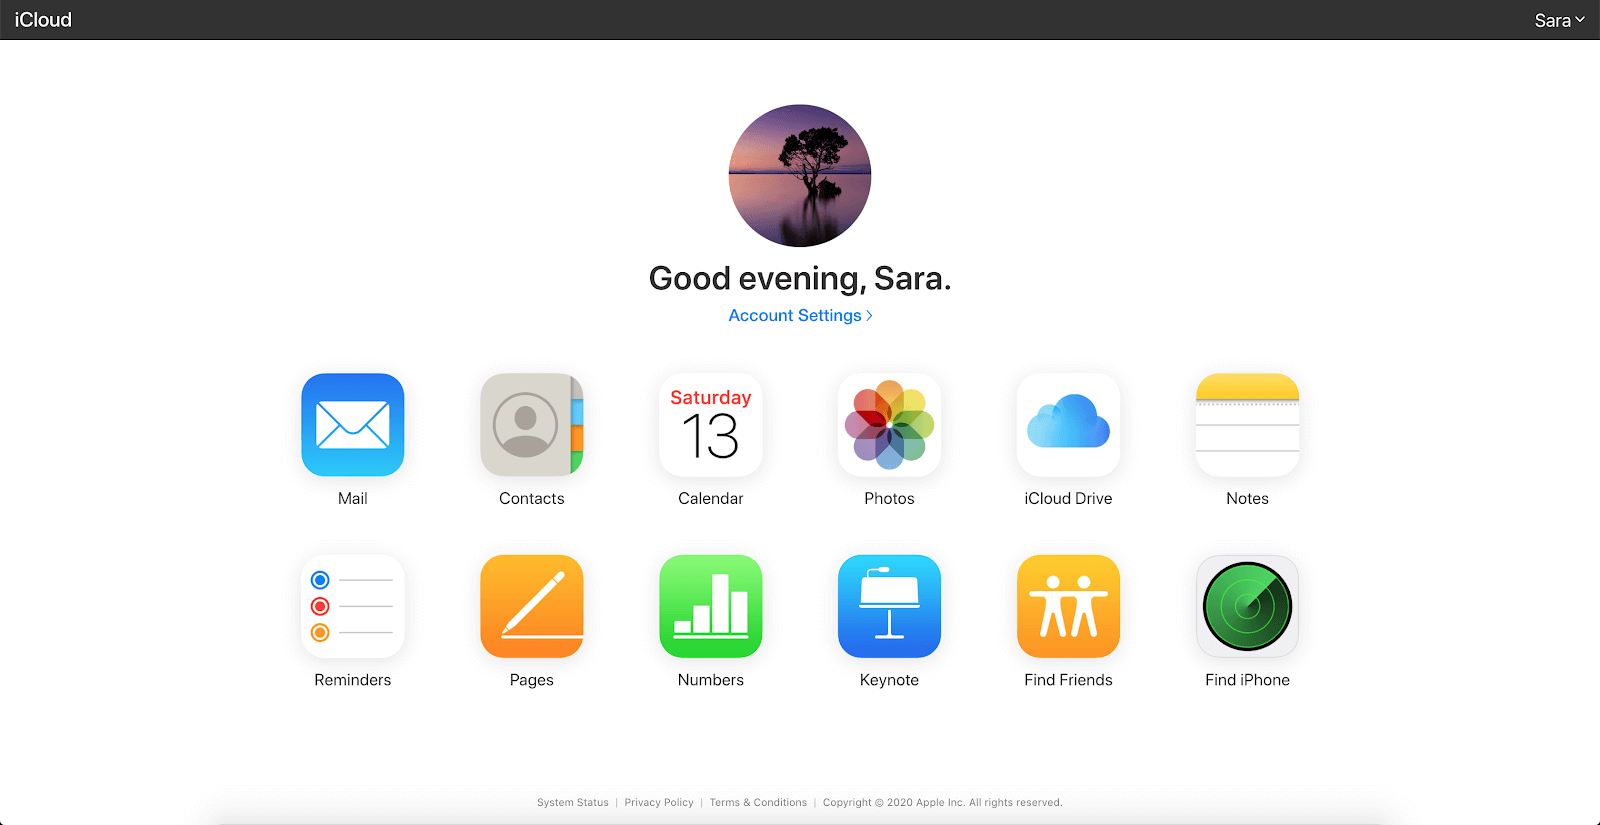
How to Wipe Your Data Using iCloud
Once you have all the requirements, it’s just a matter of going into iCloud’s website. Just log in with your Apple ID and password. Then, go to the Find iPhone tab and select it. Afterward, go to All Devices and then choose the iPhone or iPad you want to unlock. Then, click Erase iPhone and then confirm the action. Afterward, you can set up your iPhone or iPad again as you would a brand new device.
Final Word
When you find an error message on your iPhone, don’t panic. There’s always a solution to recover or unlock your device, although it may require a bit of effort. All you need is iTunes, a computer, and a cable to do the job. You can also use iCloud to restore your phone, provided it has the prerequisites. Just make sure to have your phone backed up beforehand.