
Apple automatically backs up your iPhone to iCloud, but there are still several reasons why some would require an extra or alternative backup of their iPhones. A popular go-to method is backing up the iPhone to an external hard drive. This is not only a smart move but also an important safety precaution if you want your files and media secured and protected. Well, it’s not a particularly easy task and definitely not for beginners, but if you follow the steps in this guide, the whole process would be tremendously breezier.
Inside This Article
- Why Is Backing Up Your iPhone Important?
- Why Should You Choose to Back Up Using a Hard Drive?
- How to Backup iPhone to External Hard Drive via Mac?
- Backup iPhone to External Hard Drive via Older Mac OS Versions
- How to Backup iPhone to External Hard Drive Using only Your iPhone?
- Pros and Cons of Backing Up Your iPhone Using a Hard Drive
- Alternatives
Why Is Backing Up Your iPhone Important?

The primary reason why it’s crucial to backup your iPhone externally, in addition to your iCloud backup, is because when you accidentally delete an item from iCould — permanently, there is no way you can recover it. You are at a dead end here.
An extra, external backup would also come in handy if your iPhone breaks or stops working, and your latest iCloud backup does not include the files that are equally important to you. Remember, automatic iPhone backups occur at intervals. You may have an auto backup at 10 am, but you will lose any additional files at 1 pm if something goes wrong.
Some people may also want an extra backup simply as an additional safeguard. They’d like to have as many backups as possible, especially if they’ve lost important data before.
If you’re looking for a guide on how to create a backup on iCloud or how to create a backup for Android devices, we have some articles that might help you out.
Why Should You Choose to Back Up Using a Hard Drive?
Aside from the key points stated in the previous section, backing up your iPhone to an external hard drive will save you some storage space. If you’ve been an iPhone user for a long time, you would know that Apple only offers limited free storage space. Inevitably, you’d have to pay extra for additional storage. Long-term Apple users are well aware of this issue and it’s a highly frustrating one.
If you are a Mac user, your automatic backups will also eat up your Mac’s storage space — even if you have selected the option to optimize your storage. What a frustrating downside but there is a way around it.
iCloud Storage Plans & Pricing
- Automatic 5GB storage space – Free
- 50GB – $0.99 per month
- 200GB – $2.99 per month
- 2TB – $9.99 per month
Photos and videos eat up most of your storage. So, if you are fond of taking a lot of them, you would run out of storage space pretty quickly.
You may ask yourself. You’ve learned how to back up your iOS device onto a hard drive and proceeded to do so. But the problem is that your iPhone still created a backup of your files on iCloud. How does that even help save you storage space?
The key here is to delete your large files from iCloud after you’ve secured a backup to an external hard drive. This will free up some storage space from your iCloud and you can easily retrieve your files from your hard drive whenever you need to.
Related: What Is iCloud Plus?
How to Backup iPhone to External Hard Drive via Mac?
Here’s a step-by-step guide on how to back up your iPhone to an external hard drive. Remember that this is an advanced operation. You must follow the instructions below so it won’t falter or fail.
To make this complicated process simple, you need to understand where your backups are originally stored on your Mac. Where are iPhone backups stored?
The original location of your iPhone backups is in the iTunes app; which in turn will be stored in a folder within your Mac called ‘MobileSync’. This folder is not readily viewable in your ‘Finder’. You will have to access this folder to backup your iPhone to an external hard drive and this comprehensive guide will show you how.
The process may slightly differ based on your Mac’s OS version. Here’s the process for the latest macOS update, Catalina:
Step 1. Locate and View Your Original Backup Location
Before proceeding to back up your iPhone to an external hard drive on Mac, it’s a good idea to first locate and view your backup’s original location. This will make the next steps smoother.
First, connect your phone to your Mac/computer using a charger or lightning cable. If your phone is running on an older update, the computer might ask you to update it. However, you can skip this process.
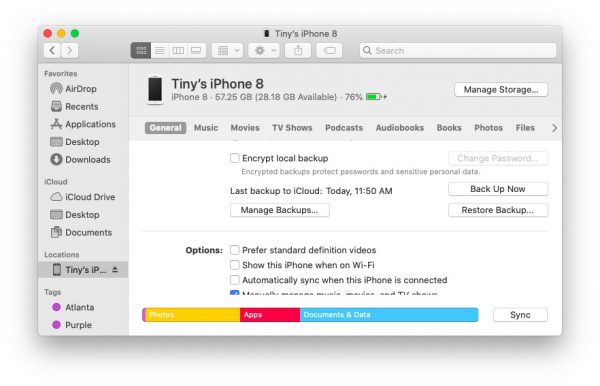
Open ‘Finder’ and click/tap on your iPhone’s name or icon under ‘Locations’. In this example and the image below, the iPhone’s name is Tiny’s iPhone 8. Scroll down and click on ‘Manage Backups’. From there, you will see the backups that you’ve made, if there are any, within your Mac.
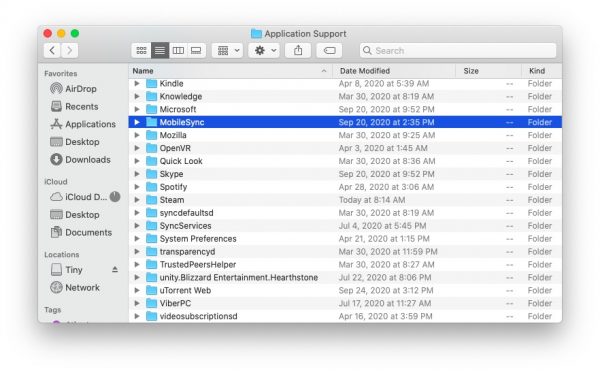
Now, view where this backup is stored within its folder. To do this, stay on the same Finder window. Press and hold ‘Option’, click on ‘Go’ (5th item on the top-most part of the screen), tap on ‘Library’, then click on ‘Application Support’.
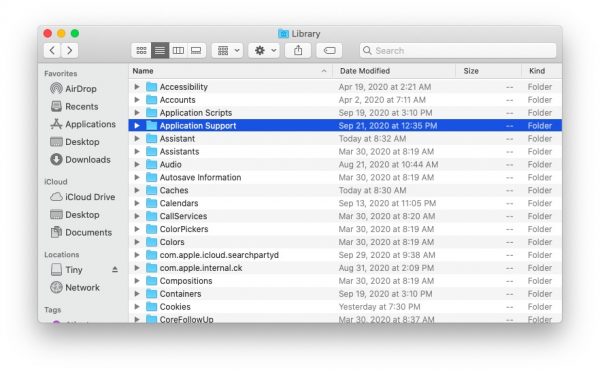
Subsequently, click on ‘MobileSync’, and from there, you will see the folder called ‘backup’. That’s where your iPhone backup files are stored.
Note: Do not close this window!
You will need this window to remain open separately once you are ready to back up your iPhone to an external hard drive. Now, to open a new Finder window for the rest of the steps, simply hold ‘Command’ and press the N key on your keyboard (Command + N).
Step 2. Connect Your External Hard Drive
This is self-explanatory. Connect your hard drive to the computer or Mac you are using.
Step 3. Rename the Original Backup Folder
Once you’re in the MobileSync folder, rename the ‘backup’ folder to ‘oldiosbackup’. Take note that this is only an example and you can change it later. The purpose of this is to prevent your Mac’s system from confusing it from the new backup folder that you will create. You may delete this old backup folder once the process is complete.
Step 4. Provide Permission to Make Administrative Changes
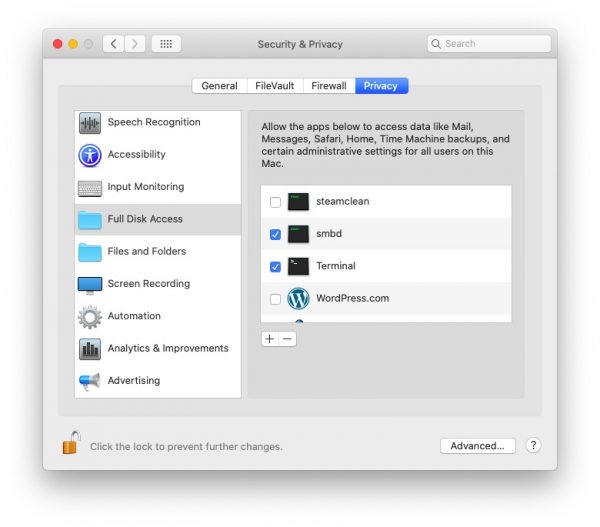
Next, click the Apple icon on your home screen then go to ‘System Preferences’. Press the ‘Security and Privacy’ option, then select ‘Privacy’. Toggle the lock icon to unlock this option and you will need to input your Mac’s lock code.
If ‘Terminal’ is not yet on the list, click on the plus (+) button and then select Terminal from the applications list. Now, tick the box beside Terminal so that you’ll see a blue check which means you’ve permitted it to make administrative changes to your Mac.
Step 5. Create a Backup Folder in Your External Hard Drive Using the Terminal
Now that you’ve given full access to your Mac’s Terminal, you will create your iPhone’s new backup folder within your external hard drive.
Launch the Terminal either by using Spotlight and typing terminal on the search bar or by accessing it from the Launchpad under the folder named ‘Other’.
Now, here’s the tricky part. You are going to type in a series of commands in the Terminal to instruct your Mac to backup your iPhone to the external hard drive. Note that it’s crucial that you type in the exact commands, otherwise the process will fail!
To make this easier, it is recommended that you open your TextEdit app or notes, whichever you prefer; then copy and paste the commands from there to the Terminal. To make it even simpler, we will teach you how to use the drag-and-drop method below:
 Note
Note
Do not hit the return key until it is indicated in this guide. Include all spaces as shown in the commands listed here. In this guide, spaces will be shown as the low line or underscore.
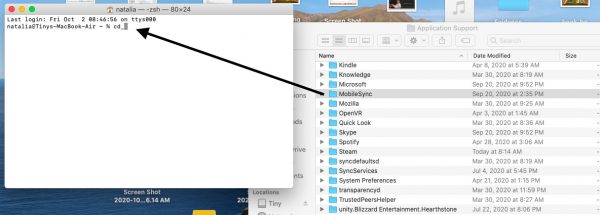
1. Once you’re in the Terminal, type cd_
2. Go to the Finder window where the MobileSync folder is located. All you have to do is to drag the folder into it.
3. Hit the return key.
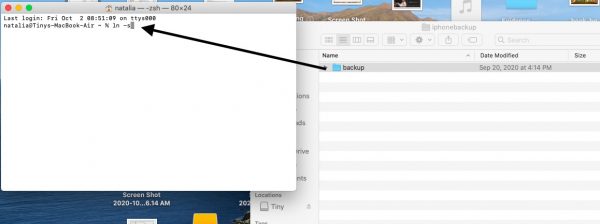
4. Don’t close the terminal just yet. In the same Terminal window, type ln_-s
5. Without closing the Terminal, open your external hard drive and create a folder named ‘iPhone backup’. Within that folder, create a folder named ‘backup’. Make sure that it’s in lowercase.
6. Drag and drop the newly created ‘backup’ folder into the terminal. Go back to the Finder window of your external hard drive where the MobileSync folder is located. Then, drag and drop the MobileSync folder into the Terminal.
7. Type /backup at the end of the command.
8. Hit the return key.
The actual command will look like this:
ln -s /Volumes/NameofExternalDrive/iOSBackup/backup/ ~/Library/Application\ Support/MobileSync/backup
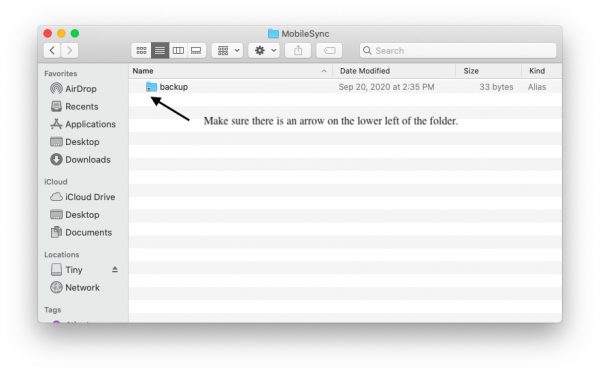
9. Now, go back to the Finder window you opened in Step 1. You should see the new backup folder within the MobileSync folder named ‘backup’. If you have done this correctly, this folder will show a return arrow icon. If that arrow does not appear, you may have missed a step or typed a command incorrectly. Repeat everything from Step 1.
10. You have now successfully created an external backup folder that will allow you to back up your iPhone to an external hard drive.
Step 6. Backup iPhone to External Hard Drive
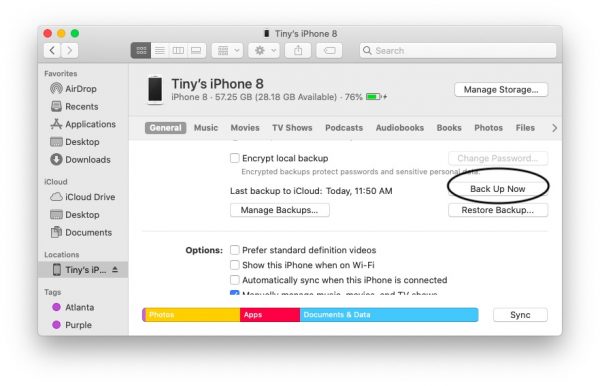
Now, you’re all set to back up your iPhone to your external hard drive. From another Finder window, click on your iPhone’s name and click ‘Back Up Now’.
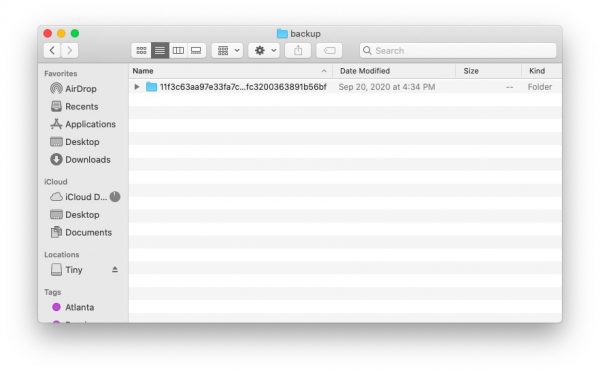
Once you backup your iPhone, you will see another folder created automatically. It will be located inside the folder you created on the hard drive. The folder’s name will just be a series of letters and numbers. Do not change this file name. This is how you back up your iPhone on an external hard drive on Mac.
Backup iPhone to External Hard Drive via Older Mac OS Versions
As for older OS versions such as Mojave, the process is pretty similar except for two things:
First, instead of accessing your iPhone from the Finder, you would need to open iTunes.
Second, the backup folder name that you will be creating will be slightly different. Instead of naming the folder in lowercase, the first letter should be capitalized: Backup.
How to Backup iPhone to External Hard Drive Using only Your iPhone?
Unfortunately, you cannot directly backup your iPhone into a hard drive without the help of other programs. The only way to do this, for now, is through your computer.
Pros and Cons of Backing Up Your iPhone Using a Hard Drive
While backing up your iPhone to an external hard drive is a great extra precaution and a way to save space, there are some downsides to it as well. Is it worth doing? Here are a few factors that might sway you into doing so:
Pros
- You will have an extra backup of files and media that you can delete from your iCloud.
- Freeing up a lot of storage space both in your iCloud and iPhone.
- Files and media are still available on your hard drive when you switch from iPhone to Android.
- The backup also includes iMessages, notes, calendar events, and your downloaded apps
- Allows you to restore files and previously installed apps automatically.
Cons
- The whole ordeal can be tricky and cumbersome.
- You may still lose your data should anything go wrong with your external hard drive.
- It is time-consuming.
- If you miss a step or make a mistake on any of the steps, you will have to start from Step 1.
- Very unlikely but possible: you may accidentally make changes to your devices that may cause malfunction.
Alternatives
If you find that this process is too difficult for you, there are some alternatives to backing up your iPhone.
1. Backup Using iTunes/Computer
This is one of the two default backup methods. If you don’t prefer your iPhone backing up automatically each time you connect it to your Mac, you can do so manually.
Note: You need to have enough storage space on your computer to store your iPhone backup. If you have a lot of photos and videos, your backup file may come up to approximately 15GB or so.
However, the backup option for iPhone via iTunes is no longer available in the latest Mac OS version, Catalina. iTunes has now been renamed ‘Apple Music’. Notice that if you open the Music app while your iPhone is connected, the only option you will see is ‘Sync Settings’. If you click this, it will open the Finder window and thus, prompt you to backup your iPhone using the steps above.
Backing up your iPhone via iTunes is only an option if your Mac is running on Mojave or lower. Now, how do you backup your iPhone to iTunes?
1. Connect your iPhone to your computer using a compatible connection cable. You may be asked to enter your passcode. Alternatively, you may use Touch ID/Face ID to begin.
2. Open iTunes and depending on the iTunes version you are running, select your iPhone using these steps:
- iTunes 10 – Visit the Devices section and click on your iPhone’s name.
- 11 – On the upper right corner of your iTunes window, click on Devices and select your iPhone’s name under the dropdown menu.
- 12 – Click on the iPhone icon in the upper left corner of the top menu and select your iPhone.
3. Once you have selected your iPhone, the ‘Backups’ page will appear. There is also an option to automatically backup your iPhone. If you select this, your Mac will create a backup every time you connect your phone to it.
4. On the Backups page, choose ‘This computer’ and click ‘Back Up Now’.
2. Backing Up iPhone Using iCloud
You can backup your iPhone to your iCloud either from your Mac or directly from your phone.
Mac
- Using your lightning cable or USB, connect your device to the computer.
- Open a Finder window and select your iPhone on the left sidebar.
- Select ‘iCloud’ under the backup locations.
- Click on ‘Back Up Now’.
iPhone
- Go to ‘Settings’ and tap on your name.
- Scroll down until you find your iPhone. It may take a few seconds to get to the next screen.
- Tap on ‘iCloud Backup’.
- Tap ‘Back Up Now’.
3. Back Up iPhone Files with Other Cloud Storage Options
As another option, you can backup your iPhone to other cloud services. However, you may have to pay for a plan; usually, it will be a monthly subscription. Also, you cannot do this directly from your iPhone or Mac. You will still have to follow the steps above on how to backup your iPhone to an external hard drive. From your hard drive, you can upload your files and images to the cloud service of your choice.
Google Drive
Though it is ideal for Android users, you can also upload your iPhone backup to the cloud from the backup you created using your external hard drive. You can subscribe to a yearly plan for 2 terabytes (TB) of storage for approximately $100 per year.
Microsoft One Drive
If you are a heavy Microsoft Office (MS Office) user, this is a great option so all your files are secured in one place. You have a free tier of up to 5GB and you can subscribe annually for a storage capacity of 6TB for around the same price as Google Drive.
Dropbox
Annual subscriptions range from approximately $10 up to around $15 a month for 2TB of storage space. Dropbox also has a mobile app that allows you to seamlessly share files with your friends.
This is just one of the most popular options of cloud storage services that you can use to backup your iPhone. Again, you cannot do this directly from your Apple device. You will still have to back up your iPhone to an external hard drive before you can upload it to the cloud.
Conclusion
Backing up your iPhone to an external hard drive is an excellent extra layer of protection for your files. Is it necessary? That depends. If you are using a Mac with low storage capacity, it is definitely recommended in order to save some space. You may also need it if your computer is already malfunctioning and you have to secure your files before it completely breaks down. Ultimately, it is just a good measure, especially for those who are very particular about keeping as many backups of their important files as possible.