
Sure, here's the introduction for the article:
html
So, you’ve got your hands on the latest iPhone 12, and you want to keep it safe from the perils of everyday life. You’ve wisely chosen a Lifeproof case to protect your investment, but now you’re faced with a new challenge – how to take it off when needed. Whether it’s to clean your phone, switch cases, or simply give your device a breather, removing a Lifeproof case from your iPhone 12 requires a delicate touch. In this article, we’ll guide you through the process step by step, ensuring that you can safely and easily remove your Lifeproof case without causing any damage to your prized iPhone.
Inside This Article
- Tools Needed
- Step 1: Locate the Notch
- Step 2: Use a Coin or Flathead Screwdriver
- Step 3: Gently Pry Open the Case
- Step 4: Remove the Case
- Conclusion
- FAQs
Tools Needed
When it comes to removing a Lifeproof case from your iPhone 12, having the right tools at your disposal can make the process much smoother. Here are the essential tools you’ll need to successfully take off a Lifeproof case from your iPhone 12:
1. Coin or Flathead Screwdriver: This versatile tool can be used to carefully pry open the Lifeproof case without causing any damage to your iPhone 12. The coin can be especially handy for this purpose, as it provides a flat edge that can be inserted into the notch of the case to initiate the removal process.
2. Soft Cloth: While not necessarily a tool in the traditional sense, a soft cloth can be immensely helpful in ensuring that your iPhone 12 remains free of smudges and scratches during the case removal process. It can also be used to gently clean the case itself, preparing it for future use or storage.
**
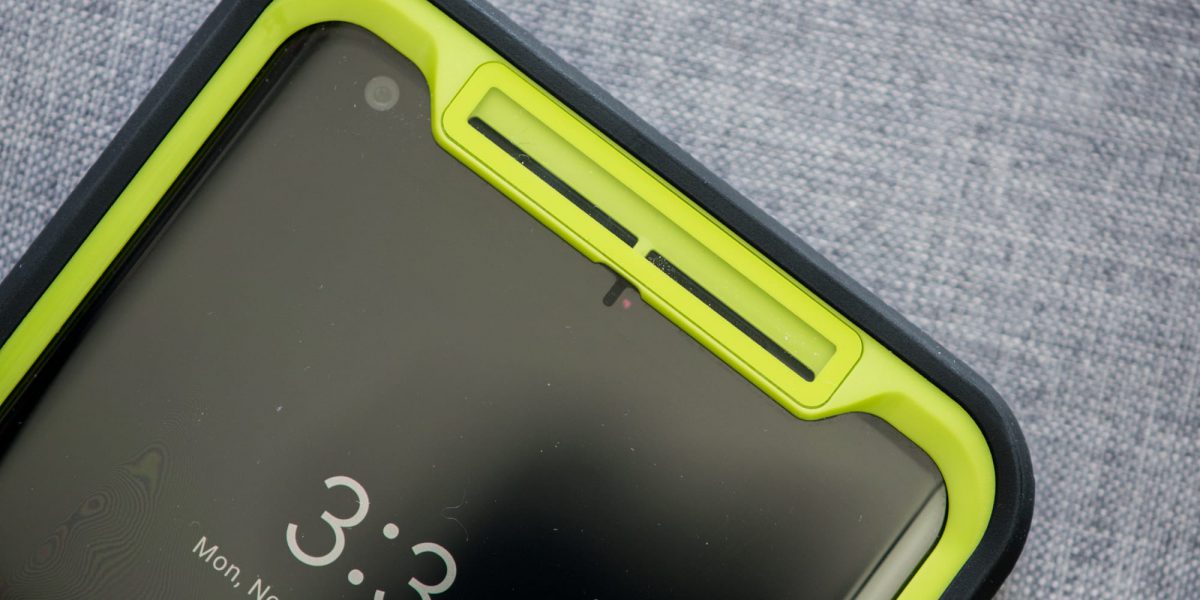
Step 1: Locate the Notch
**
Before you begin the process of removing your Lifeproof case from your iPhone 12, it’s essential to locate the notch on the case. The notch is a small indentation or gap usually found at the bottom or the side of the case. It serves as the entry point for prying the case open. The location of the notch may vary depending on the specific Lifeproof case model you have, so take a moment to carefully inspect the case and identify the exact position of the notch.
Once you’ve identified the notch, you’re one step closer to successfully removing the Lifeproof case from your iPhone 12. The notch is the key to initiating the removal process, so make sure you have a clear understanding of its location before proceeding to the next steps. This initial step sets the stage for safely and effectively taking off the Lifeproof case without causing any damage to your device.
Step 2: Use a Coin or Flathead Screwdriver
Once you’ve located the notch on your Lifeproof case, it’s time to gather the necessary tools to proceed. You’ll need a coin or a flathead screwdriver to release the locking mechanism. The choice between a coin and a screwdriver depends on personal preference and the availability of tools at your disposal.
Using a coin is the simpler option, as most people have one readily available in their pockets or bags. However, a flathead screwdriver can provide better leverage and precision, making it easier to release the locking mechanism without causing damage to the case.
When using a coin, ensure that it fits into the notch securely. Apply firm and even pressure to turn the coin counterclockwise, following the directional arrow on the case. If you opt for a flathead screwdriver, insert it into the notch and gently twist it to unlock the case.
Step 3: Gently Pry Open the Case
Once you have located the notch and loosened the screws, it’s time to gently pry open the Lifeproof case. Begin by placing your fingertips on the edge of the case where the notch is located. Apply gentle pressure to the edge to start separating the two halves of the case. It’s important to be patient and gentle to avoid damaging the case or your phone.
As you start to pry open the case, be mindful of any resistance. If you encounter significant resistance, stop and reassess your approach. You may need to readjust your grip or the angle at which you are prying open the case. It’s crucial to proceed with caution to prevent any accidental damage to the case or your iPhone.
Using a rocking motion can help gradually release the seal between the two halves of the case. Rock the case back and forth, applying even pressure to each side. This method can help loosen the seal without exerting excessive force in one area, reducing the risk of causing damage to the case or your iPhone.
Continue to apply gentle and even pressure as you work your way around the edges of the case. Take your time and ensure that the case is opening evenly on all sides. By maintaining a patient and methodical approach, you can safely and effectively pry open the Lifeproof case without risking any harm to your iPhone.
Step 4: Remove the Case
Once you have successfully loosened the Lifeproof case from your iPhone 12, carefully lift it away from the device. Start from one corner and work your way around to the opposite corner to ensure an even release. Be gentle to avoid damaging the case or your phone. As you lift the case, listen for the distinct “pop” sound, indicating that the seal is breaking. This sound confirms that the case is coming off smoothly without any resistance.
After hearing the reassuring “pop,” continue to gently slide the case off the iPhone 12. Pay close attention to any areas that may still be clinging to the device, and use your fingers to carefully detach them. Take your time and proceed with caution to prevent any accidental slips or sudden movements that could potentially harm your phone or the case. Once the case is completely removed, set it aside in a safe place, and inspect your iPhone 12 for any signs of damage or debris that may have accumulated during the removal process.
Conclusion
Removing a LifeProof case from your iPhone 12 is a simple process that doesn’t require any special tools. By following the steps outlined in this guide, you can safely remove the case without damaging your device. Whether you’re looking to clean your phone, change the case, or simply enjoy the sleek design of your iPhone 12 without the added bulk, knowing how to remove a LifeProof case is essential. Remember to handle your iPhone with care throughout the process to avoid any accidental drops or damage. With these steps, you can confidently remove your LifeProof case and make the most of your iPhone 12’s stunning design and features.
FAQs
Q: How do I remove a Lifeproof case from my iPhone 12?
A: To remove a Lifeproof case from your iPhone 12, start by locating the small notch on the bottom right corner of the case. Then, use a coin or flathead screwdriver to gently pry open the case from that notch. Once the corner is lifted, carefully work your way around the edges until the case is completely separated from the device.
Q: Will removing the Lifeproof case affect the waterproof feature of my iPhone 12?
A: No, removing the Lifeproof case from your iPhone 12 will not affect its waterproof feature. The waterproofing of the iPhone 12 is inherent to the device itself and is not reliant on the case.
Q: Can I reuse a Lifeproof case after removing it from my iPhone 12?
A: Yes, Lifeproof cases are designed for multiple uses. Once removed from your iPhone 12, you can clean the case and use it again, provided that it is still in good condition and free from any damage.
Q: Is there a specific method to remove a Lifeproof case without damaging my iPhone 12?
A: Yes, it’s essential to be gentle and patient when removing a Lifeproof case from your iPhone 12. Using a coin or flathead screwdriver, carefully pry open the case from the designated notch, ensuring that you do not apply excessive force that could potentially damage the device.
Q: Can I remove a Lifeproof case from my iPhone 12 without any tools?
A: While using a coin or flathead screwdriver provides leverage, it is possible to remove a Lifeproof case from your iPhone 12 without tools. However, it may require a bit more effort and patience to carefully separate the case from the device’s edges using your fingers.