
The MacBook Dock is one of the most prominent and versatile features of Apple’s line of laptops. This sleek and convenient tool allows users to easily access their favorite apps, files, and folders with just a few clicks. While the default set of icons on the Dock provides quick access to commonly used applications, customizing the Dock can help personalize and streamline your workflow. In this article, we will explore various methods to customize your MacBook Dock, providing you with the ability to tailor it to your specific needs and preferences. Whether you want to add or remove icons, change the size and position of the Dock, or even enable additional features, we will guide you through the step-by-step process of making your Dock truly your own.
Inside This Article
- Getting Started: Choosing the Right MacBook Dock
- Customization Options – Changing the Position of Your Dock, Adding or Removing App Icons, Adjusting the Dock Size and Magnification, Enabling or Disabling Animation and Transparency
- Personalizing the Appearance: Changing the Dock Theme and Background, Using Custom Icons for App Shortcuts, Adding Folders and Organizing Apps within the Dock
- Using Stacks and Recent Items – Utilizing the Stacks feature for better organization – Accessing recent applications and documents quickly
- Conclusion
- FAQs
Getting Started: Choosing the Right MacBook Dock
When it comes to personalizing your MacBook, one of the first things you may want to customize is the dock. The dock is a handy feature that allows you to access your favorite apps with just a click. However, not all docks are created equal. In this guide, we’ll explore how to choose the right MacBook dock and the basic configuration options available.
Choosing the right MacBook dock depends on your specific needs and preferences. There are several options to consider, from the default dock provided by Apple to third-party alternatives. Each option has its own set of features and advantages.
The default dock, also known as the Apple dock, is included with your MacBook and provides a simple and sleek design. It allows you to easily access your most used apps and documents. If you prefer a minimalist and consistent look, the Apple dock is an excellent choice.
On the other hand, if you’re looking for more customization options and advanced features, you may want to explore third-party docks. These docks often offer additional features such as animations, customization of appearance, and the ability to add widgets or shortcuts to the dock. Some popular third-party dock options include uBar, DragThing, and ObjectDock.
Once you’ve decided on the type of dock you want to use, it’s time to configure it to your liking. The basic configuration options for your MacBook dock include:
- Choosing the position: The dock can be placed either at the bottom or on the sides of the screen. Consider your personal preference and the layout of your desktop when deciding on the position.
- Adding or removing app icons: You can customize the dock by adding or removing app icons. Simply drag and drop the app icons to the dock to add them, or drag them off the dock to remove them.
- Adjusting the dock size and magnification: You can resize the dock to make it smaller or larger to fit your needs. Additionally, you can enable magnification to make the icons larger when you hover over them.
- Enabling or disabling animation and transparency: The dock’s animation and transparency effects can be adjusted according to your preference. You can choose to have the dock animate when opening or closing apps, and adjust the level of transparency.
By exploring these basic configuration options, you can customize your MacBook dock to match your workflow and aesthetic preferences. Whether you prefer a clean and minimalistic look or a dock packed with features, the choice is yours. So go ahead, choose the perfect dock for your MacBook and make it truly yours.
Customization Options – Changing the Position of Your Dock, Adding or Removing App Icons, Adjusting the Dock Size and Magnification, Enabling or Disabling Animation and Transparency
When it comes to personalizing your MacBook, customizing the dock is a great way to make it truly your own. The dock is a convenient and central location on your screen where you can access your favorite applications, folders, and files with just a click. In this section, we will explore various customization options for your MacBook dock, including changing its position, adding or removing app icons, adjusting its size and magnification, and enabling or disabling animation and transparency.
Changing the position of your dock is a simple yet effective way to optimize your workflow and make better use of your screen real estate. By default, the dock is located at the bottom of the screen, but you have the flexibility to move it to the left or right side. To do this, simply click and hold on the dock’s dividing line, then drag it to your preferred position. Experiment with different positions to find the one that suits your needs and enhances your productivity.
Adding or removing app icons from your dock allows you to customize it to display your most-used applications. To add an app icon, simply locate the app in your Applications folder or Launchpad, then drag and drop it onto the dock. Conversely, to remove an app icon from the dock, click and hold the icon, then drag it out of the dock until you see a small puff of smoke, indicating it has been removed.
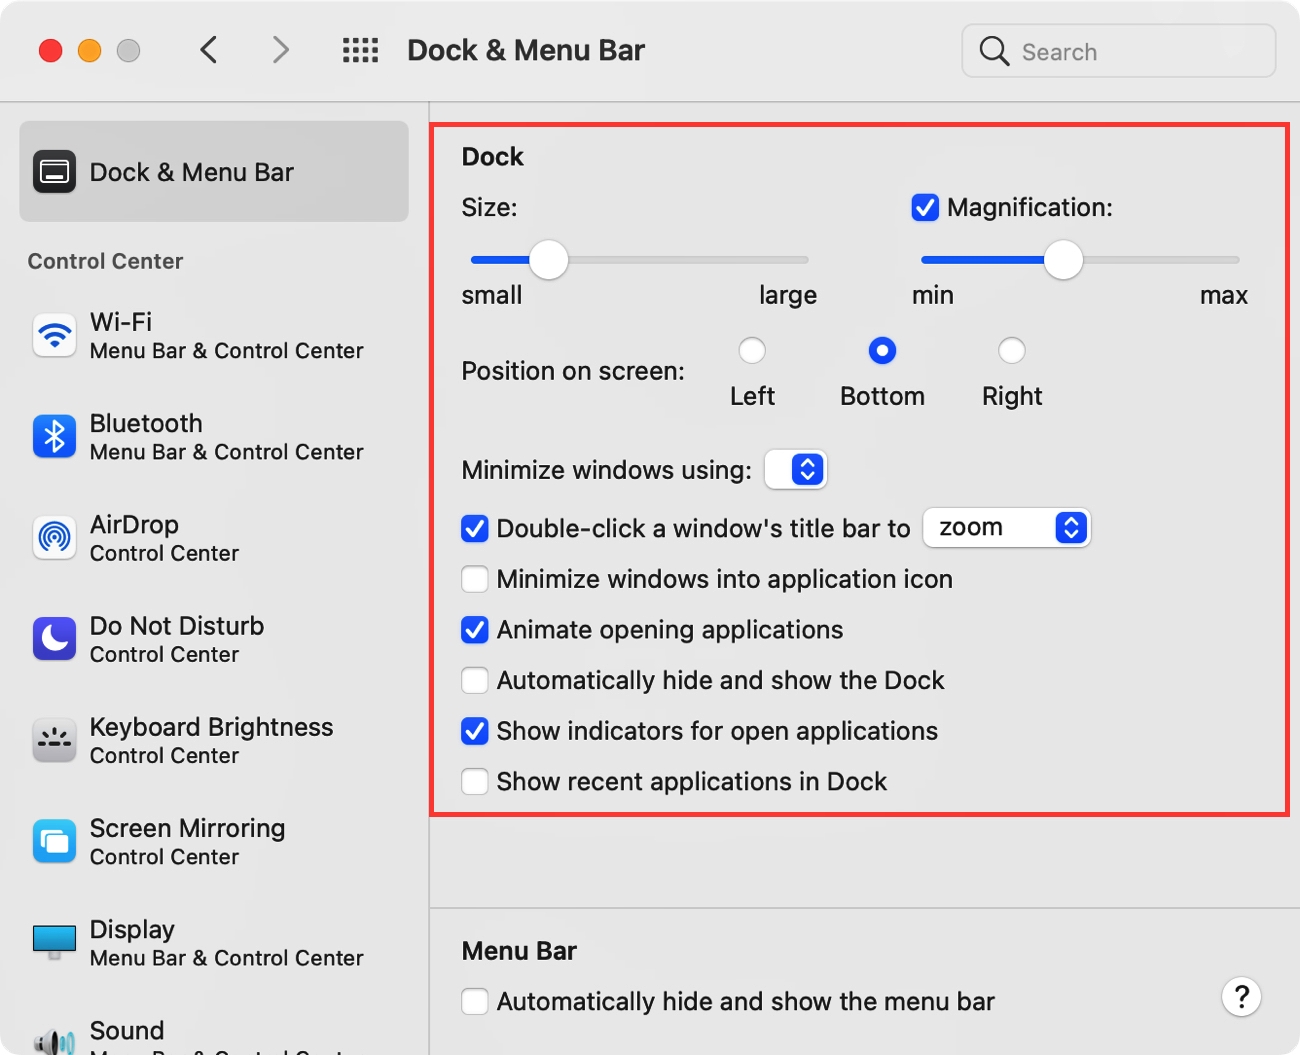
Adjusting the dock size and magnification can greatly affect its visual appearance and usability. To change the size of the dock, move your cursor to the dividing line and click and hold while dragging it up or down to increase or decrease its height. Additionally, you can enable magnification, which allows the icons in the dock to grow in size when you hover over them. To enable magnification, go to System Preferences, click on Dock, and check the “Magnification” box. Adjust the slider to control the level of magnification that suits your preferences.
Animation and transparency add a touch of visual flair to your dock. By default, macOS provides animations when you open or close applications or when you minimize or expand windows. Additionally, the dock has a transparent background, allowing your desktop wallpaper to show through. However, if you prefer a more minimalist look, you can disable these effects. Go to System Preferences, click on Dock, and uncheck the “Animate opening applications” and “Automatically hide and show the Dock” options to disable the animations and transparency.
By exploring these customization options, you can transform your MacBook dock into a personalized productivity hub. Adjusting its position, adding or removing app icons, modifying its size and magnification, and enabling or disabling animation and transparency allows you to create a tailored dock that enhances your workflow and complements your aesthetic preferences. Take some time to experiment with these options, and make your MacBook truly your own.
Personalizing the Appearance: Changing the Dock Theme and Background, Using Custom Icons for App Shortcuts, Adding Folders and Organizing Apps within the Dock
When it comes to personalizing your MacBook, the appearance of your dock plays a crucial role. The dock is not just a place to access your favorite applications; it is also a reflection of your style and preferences. In this section, we will explore various ways to customize the appearance of your dock and make it truly yours.
One of the easiest ways to personalize your dock is by changing the theme and background. macOS offers a range of pre-installed themes that can instantly transform the look of your dock. To change the theme, simply go to System Preferences, click on Dock, and choose a theme from the available options. Whether you prefer a dark and sleek look or a vibrant and colorful one, there’s a theme that will suit your taste.
Another way to add a personal touch to your dock is by using custom icons for your app shortcuts. You can find a wide variety of icon sets available online that can completely revamp the look of your dock. To change an app’s icon, simply select the app in the dock, go to its properties, and click on the current icon. Then, choose the new icon you’d like to use from your collection or download one from the internet. This simple change can make a big difference in the overall aesthetic of your dock.
In addition to changing icons, you can also customize the organization of your apps within the dock by adding folders. Folders allow you to group similar apps together, making them easier to find and access. To create a folder in the dock, simply drag and drop one app icon onto another. You can then rename the folder and add more apps to it by dragging them into the folder. This helps keep your dock neat and tidy, and gives you quick access to a larger number of apps without cluttering the interface.
Furthermore, you can easily organize the apps within your dock by arranging them in a specific order. You can arrange the apps manually by dragging and dropping them into the desired position. This gives you the flexibility to prioritize the apps that you use the most and ensure that they are easily accessible from the dock. You can also remove unnecessary apps from the dock by simply dragging them out of the dock area.
By personalizing the appearance of your dock and customizing it to your liking, you can enhance both the visual appeal and functionality of your MacBook. Experiment with different themes, icons, and organization techniques to create a dock that truly reflects your personality and workflow. Don’t be afraid to get creative and have fun with it!
Using Stacks and Recent Items – Utilizing the Stacks feature for better organization – Accessing recent applications and documents quickly
One of the most useful features of the MacBook dock is the ability to utilize stacks for better organization. Stacks allow you to group related app icons or files together, making it easier to locate and access them quickly. To use the Stacks feature, follow these steps:
- Right-click on the empty space in the dock to bring up the context menu.
- Navigate to the “Stacks” option and select the type of stacking you prefer – you can choose from “Folder,” “Date added,” or “Date modified.”
- Once you’ve selected the desired stacking option, your dock will automatically rearrange the icons into stacks based on the chosen criteria.
By utilizing stacks, you can declutter your dock and keep it well-organized. It’s especially useful if you have a large number of app icons or frequently accessed files.
In addition to using stacks, the MacBook dock also provides easy access to recent applications and documents. This can be incredibly helpful when you need to quickly jump back into a recent project or file. Follow these steps to access recent items:
- Click on the “Apple” menu in the top-left corner of the screen.
- Navigate to the “Recent Items” submenu and select either “Applications” or “Documents.”
- A list of your recent applications or documents will appear, allowing you to choose the one you need.
By utilizing the recent items feature, you can save time and effort by avoiding the need to search through your files or applications manually. It’s an efficient way to stay productive and keep your workflow streamlined.
Whether you’re using stacks to organize your app icons or accessing recent items for quick retrieval of applications and documents, the MacBook dock offers a range of features to enhance your productivity and workflow. Take advantage of these customization options to create a dock that is personalized and tailored to your needs.
Conclusion
Customizing your MacBook Dock is a great way to personalize your Mac experience and streamline your workflow. With a few simple steps, you can add or remove apps, arrange icons, and even change the appearance of your Dock to suit your preferences. Whether you want to boost productivity, create a sleek aesthetic, or simply make your MacBook feel more like your own, the Dock customization options are there to help you achieve your desired look and functionality.
Remember, the Dock is a central tool on your MacBook, providing quick access to your most-used applications and files. By taking the time to customize it to your liking, you can enhance your overall user experience and make your daily tasks more efficient and enjoyable. So go ahead, get creative, and make your MacBook Dock truly yours!
FAQs
1. How do I customize my MacBook Dock?
To customize your MacBook Dock, you can follow these steps:
- Click on the Apple logo in the top-left corner of your screen and select “System Preferences.”
- In the System Preferences window, click on “Dock.”
- From here, you can adjust various settings, such as the position of the Dock, the size of icons, and the magnification effect.
- You can also add or remove apps from the Dock by dragging and dropping them.
- To further personalize your Dock, you can change its appearance by selecting different themes or choose to automatically hide and show the Dock.
2. Can I change the order of apps in the Dock?
Yes, you can change the order of apps in the Dock. Simply click and hold on an app icon in the Dock, then drag it to the desired position. Release the mouse or trackpad button to place the app in its new position.
3. How do I remove apps from the Dock?
To remove an app from the Dock, click and hold on its icon, then drag it away from the Dock. When the icon starts to shake, release it to remove the app from the Dock. Alternatively, you can right-click on the app icon and select “Remove from Dock.”
4. Can I add documents or folders to the Dock?
Yes, you can add documents or folders to the Dock. Simply locate the document or folder in Finder, then click and hold on it. Drag the item to the position in the Dock where you want it to appear. Release the mouse or trackpad button to place the document or folder in the Dock.
5. What is the purpose of the magnification effect in the Dock?
The magnification effect in the Dock enlarges the icons when you hover your mouse over them. This can make it easier to see and select the desired app or document. You can adjust the magnification level in the Dock preferences, allowing you to find a balance between magnification and icon size that suits your preference.