
Are you struggling to connect your Panasonic Viera TV to the wireless internet? Don’t worry, you’re not alone. Many people find the process confusing and frustrating. However, with a little guidance and know-how, you can easily get your Panasonic Viera TV hooked up to the wireless internet in no time.
In this article, we’ll walk you through the step-by-step process of connecting your Panasonic Viera TV to the wireless internet. We’ll cover everything from checking your TV’s compatibility to configuring network settings and troubleshooting common issues. Whether you’re a tech novice or an experienced user, this guide will ensure that you can enjoy your favorite online content on the big screen of your Panasonic Viera TV.
Inside This Article
- Setting up Wireless Connection on Panasonic Viera TV
- Connecting Panasonic Viera TV to your Wi-Fi Network
- Troubleshooting Wireless Connection Issues on Panasonic Viera TV
- Additional Tips for Wireless Internet Connectivity on Panasonic Viera TV
- Conclusion
- FAQs
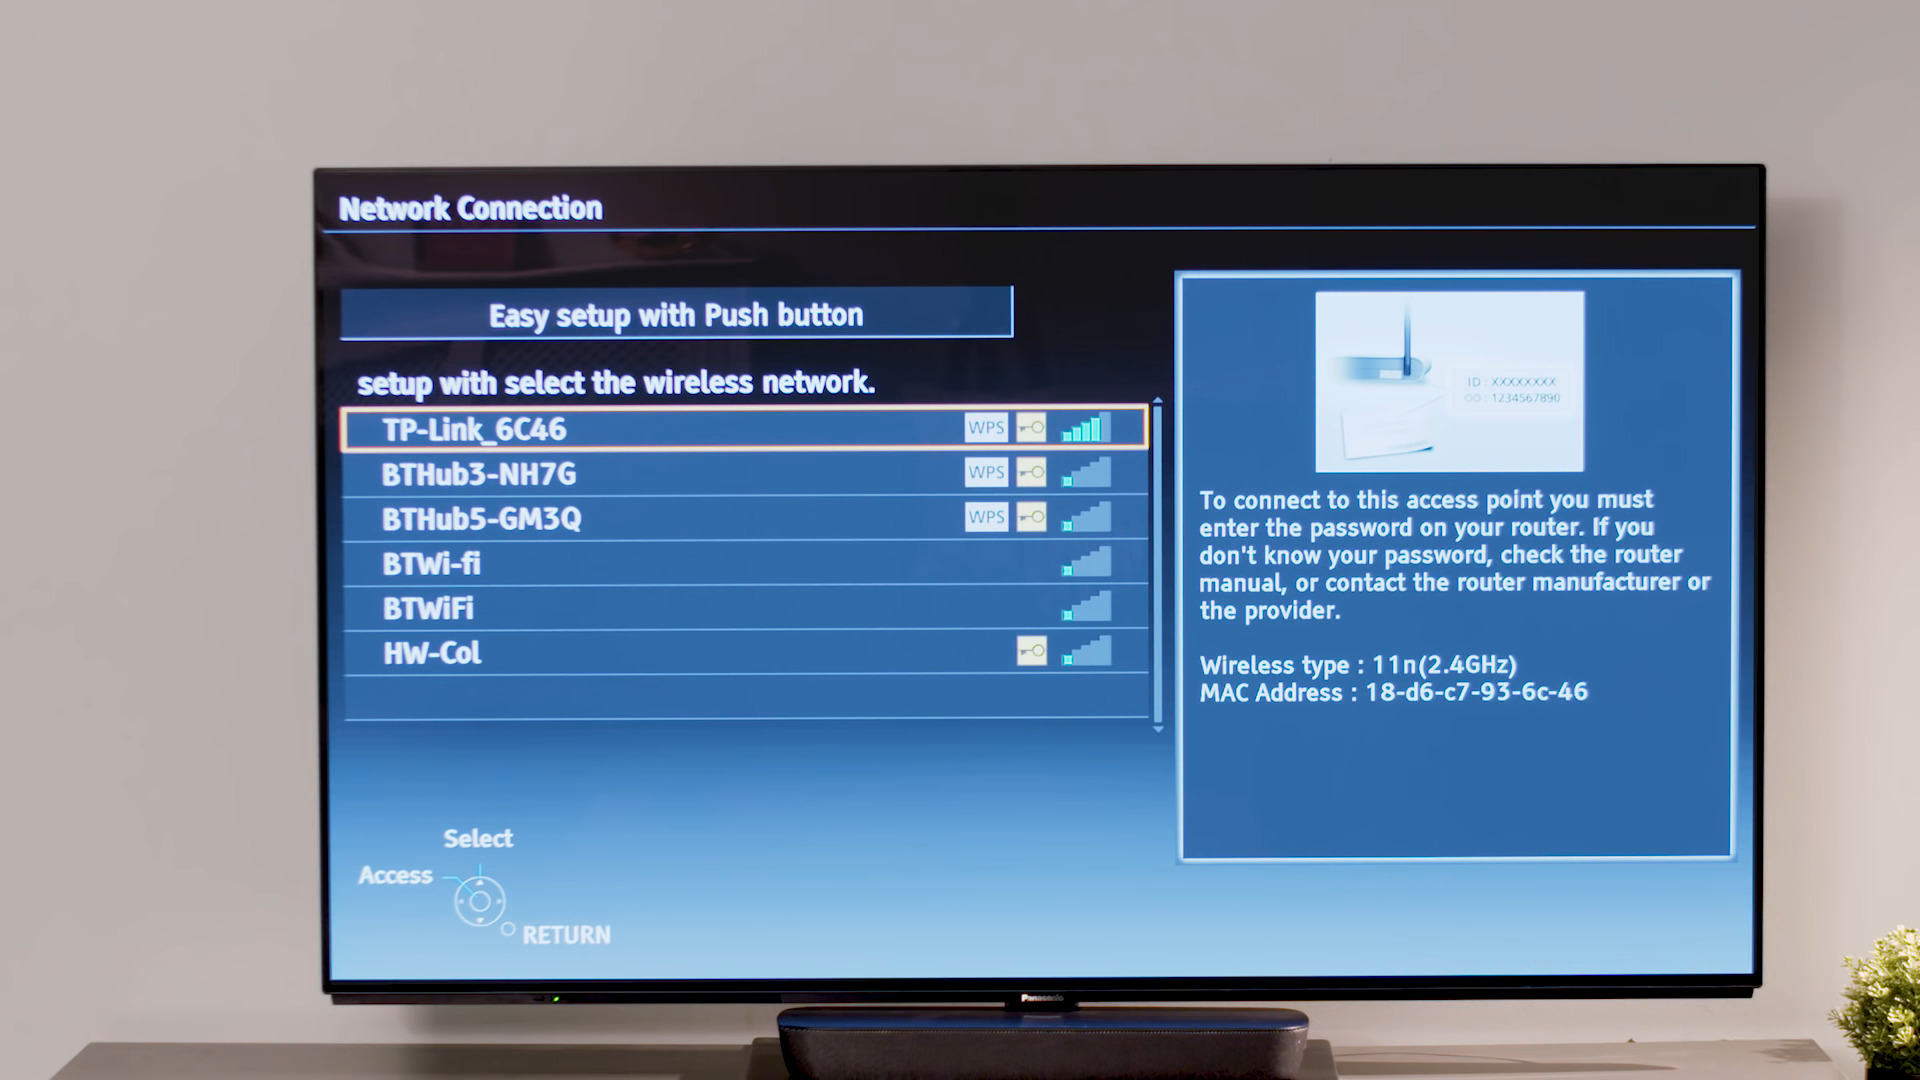
Setting up Wireless Connection on Panasonic Viera TV
Setting up a wireless connection on your Panasonic Viera TV allows you to enjoy a seamless streaming experience, access online content, and enjoy smart TV features. Follow these simple steps to connect your Panasonic Viera TV to your wireless internet:
- Start by turning on your Panasonic Viera TV and the wireless router.
- Using the TV remote, navigate to the main menu and select “Setup.”
- From the “Setup” menu, select “Network Settings.”
- Choose “Wireless Connection” and select “OK.”
- A list of available Wi-Fi networks will appear. Select your network from the list.
- If your network is password-protected, enter the Wi-Fi password using the on-screen keyboard. Double-check the password to ensure accuracy.
- After entering the password, select “Connect” to establish a wireless connection with your Panasonic Viera TV.
- Wait for the TV to connect to the network. Once connected, you will see a confirmation message on the screen.
- Test the connection by accessing the internet browser or streaming app on your Panasonic Viera TV. Enjoy your favorite online content!
Congratulations! You have successfully set up a wireless connection on your Panasonic Viera TV. Now you can easily access the internet and stream your favorite shows and movies without any hassle.
Connecting Panasonic Viera TV to your Wi-Fi Network
Connecting your Panasonic Viera TV to your Wi-Fi network opens up a world of streaming content, online apps, and internet browsing right on your big screen. Whether you want to watch your favorite shows on Netflix, stream music on Spotify, or access social media apps, setting up a wireless connection is essential. Follow these simple steps to get your Panasonic Viera TV connected to your Wi-Fi network in no time:
- Power on your Panasonic Viera TV and navigate to the Settings menu. You can usually find it by pressing the “Menu” button on your TV remote.
- In the Settings menu, look for the Network or Wi-Fi option and select it. This will take you to the network settings page.
- On the network settings page, choose the “Network Setup” or “Wireless Setup” option. This will initiate the process of searching for available Wi-Fi networks.
- Wait for the TV to detect available Wi-Fi networks. It may take a moment, so be patient.
- Once the available networks are displayed, select your Wi-Fi network from the list. If your network is password-protected, you will be prompted to enter the Wi-Fi password.
- Use the on-screen keyboard to enter your Wi-Fi password, making sure to double-check for accuracy.
- After entering the password, select the “Connect” or “Join” option. Your Panasonic Viera TV will attempt to connect to the Wi-Fi network.
- Wait for the TV to establish the Wi-Fi connection. This process may take a few seconds to a minute.
- Once the connection is successful, you will see a confirmation message on your TV screen.
- Lastly, test the connection by opening a streaming app or accessing the internet browser on your Panasonic Viera TV. If everything is working properly, you are now connected to your Wi-Fi network.
It’s important to note that the exact steps may vary slightly depending on the model of your Panasonic Viera TV. However, the general process should be similar across most models. If you encounter any issues or have difficulty connecting to your Wi-Fi network, refer to the user manual or contact Panasonic customer support for assistance.
Now that your Panasonic Viera TV is connected to your Wi-Fi network, you can enjoy a wide range of online entertainment options without the need for any additional cables or devices. Sit back, relax, and enjoy the seamless streaming experience right from your couch!
Troubleshooting Wireless Connection Issues on Panasonic Viera TV
Having trouble with the wireless connection on your Panasonic Viera TV? Don’t worry, you’re not alone. Wireless connectivity issues can be frustrating, but with a few troubleshooting steps, you can get your TV connected to the internet in no time. Here are some common problems and their solutions:
1. Weak Wi-Fi signal: If you’re experiencing a weak Wi-Fi signal or frequent dropouts, try moving your router closer to your TV. Additionally, make sure there are no obstacles blocking the signal, such as walls or furniture. If the problem persists, consider using a Wi-Fi extender or upgrading to a more powerful router.
2. Incorrect Wi-Fi credentials: Double-check the Wi-Fi credentials you’ve entered on your Panasonic Viera TV. Make sure the SSID (network name) and password are correct. Keep in mind that passwords are case-sensitive, so be mindful of uppercase and lowercase letters.
3. IP address conflicts: Sometimes, IP address conflicts can prevent your TV from connecting to the internet. To resolve this, access your router’s settings and change the DHCP range or enable DHCP reservation for your TV’s MAC address. This will ensure that your TV gets a unique IP address.
4. Firmware updates: Outdated firmware can sometimes cause connectivity issues. Check for firmware updates for your Panasonic Viera TV and install them if available. These updates often include bug fixes and improvements that can resolve wireless connection problems.
5. External interference: Wireless signals can be affected by other electronic devices, such as cordless phones or microwave ovens, which can cause interference. Make sure your TV is placed away from these devices to minimize signal disruptions.
6. Resetting network settings: If all else fails, you can try resetting the network settings on your Panasonic Viera TV. Go to the TV’s settings menu, find the network settings, and choose the option to reset them. This will erase all saved Wi-Fi networks and start fresh with the setup process.
By following these troubleshooting steps, you should be able to resolve most wireless connection issues on your Panasonic Viera TV. However, if the problem persists, it may be worth contacting Panasonic customer support for further assistance.
Additional Tips for Wireless Internet Connectivity on Panasonic Viera TV
Connecting your Panasonic Viera TV to the wireless internet opens up a whole new world of entertainment possibilities. However, if you’re experiencing any issues with your wireless connection, don’t worry. Here are some additional tips to help you troubleshoot and optimize your wireless internet connectivity on your Panasonic Viera TV.
1. Position your router and TV: The placement of your wireless router can greatly affect the strength and stability of your Wi-Fi signal. Ensure that your router is placed in a central location, away from any obstructions, and at an optimal height for better signal distribution. Similarly, make sure your Panasonic Viera TV is placed within a reasonable distance from the router to ensure a stable connection.
2. Update your TV’s firmware: An outdated firmware can cause compatibility issues, including wireless connectivity problems. Check for any available firmware updates for your Panasonic Viera TV. Updating the firmware can not only address any known connectivity issues but can also provide new features and enhancements.
3. Check your network strength: Before blaming your TV for connection issues, it’s essential to check the Wi-Fi network strength itself. You can use a smartphone or laptop in the same location as your TV to determine if the signal strength is adequate. If the network is weak, consider using a Wi-Fi range extender or relocating your router for better coverage.
4. Adjust the Wi-Fi frequency band: Some Panasonic Viera TVs offer dual-band Wi-Fi support, operating on both the 2.4GHz and 5GHz frequencies. If you’re experiencing interference or a weak signal, try switching between the 2.4GHz and 5GHz bands to see if it improves your wireless connection stability.
5. Use a wired connection: If your Panasonic Viera TV is located near your router, consider using a wired connection instead of relying on wireless connectivity. Ethernet connections provide a more stable and reliable internet connection, especially for streaming high-definition content or online gaming.
6. Update your router’s firmware: Just like your TV, routers also receive firmware updates. Check for any available updates for your router and install them if necessary. Updating your router’s firmware can fix bugs, improve security, and enhance overall performance, resulting in better wireless internet connectivity.
7. Reduce wireless interference: Other electronic devices or neighboring Wi-Fi networks can interfere with your wireless signal, leading to a weaker or unstable connection. Try to minimize interference by placing your router away from other electronics, avoiding dense areas with multiple Wi-Fi networks, and using wireless repeaters or mesh systems to extend and strengthen your network’s coverage.
8. Assign a static IP address: In some cases, assigning a static IP address to your Panasonic Viera TV can help stabilize the wireless connection. Consult your TV’s user manual or the manufacturer’s website for instructions on how to assign a static IP address to your TV.
9. Reset your network settings: If all else fails, you can try resetting your network settings on the Panasonic Viera TV. This will erase any saved network settings and force the TV to search for available networks again. Refer to your TV’s user manual for instructions on how to perform a network reset.
By following these additional tips, you can improve the wireless internet connectivity on your Panasonic Viera TV and enjoy uninterrupted streaming, online gaming, and access to a wide range of online content.
Conclusion
Connecting your Panasonic Viera TV to wireless internet opens up a world of possibilities and convenience. By following the steps outlined in this guide, you can enjoy streaming your favorite shows, accessing online apps, and even browsing the web from the comfort of your couch.
Remember to check the compatibility of your TV with the wireless network you are connecting to and ensure that you have the necessary login credentials. Once connected, you will have a seamless and convenient TV viewing experience.
With the ability to connect your Panasonic Viera TV to wireless internet, you no longer have to rely on traditional cable or satellite services. Take advantage of the wealth of streaming options available and enjoy the flexibility and freedom to watch what you want, when you want.
So, dive into the world of smart TV connectivity and make the most out of your Panasonic Viera TV today!
FAQs
1. How do I connect my Panasonic Viera TV to wireless internet?
To connect your Panasonic Viera TV to wireless internet, follow these steps:
– Press the “Menu” button on your remote control
– Navigate to “Network” and select it
– Choose “Network Settings”
– Select “Wireless Network”
– Choose your Wi-Fi network from the list of available networks
– Enter your Wi-Fi password if prompted
– After successfully connecting to the network, select “OK” to save the settings
– Your Panasonic Viera TV is now connected to wireless internet.
2. What if my Panasonic Viera TV does not detect any wireless networks?
If your Panasonic Viera TV does not detect any wireless networks, try the following solutions:
– Ensure that your Wi-Fi router is turned on and functioning properly
– Make sure that your TV is within range of the Wi-Fi signal
– Check if there are any obstructions between the TV and the router
– Restart both the TV and the router
– Reset the network settings on your TV and try again
If these troubleshooting steps do not resolve the issue, it may be best to consult the manufacturer’s support or contact a professional.
3. Can I connect my Panasonic Viera TV to the internet using an Ethernet cable?
Yes, you can connect your Panasonic Viera TV to the internet using an Ethernet cable. Simply plug one end of the Ethernet cable into the LAN port on the back of your TV, and the other end into an available LAN port on your router. This provides a more stable and reliable internet connection compared to Wi-Fi.
4. What should I do if I forget my Wi-Fi password?
If you forget your Wi-Fi password, you can retrieve it by accessing your router’s settings. Follow these steps:
– On a device that is already connected to the Wi-Fi network, open a web browser
– Enter your router’s IP address in the address bar
– Log in to your router’s settings using the admin username and password (check your router’s documentation if you don’t know these credentials)
– Navigate to the wireless settings section and look for the Wi-Fi password
– Retrieve the password and use it to connect your Panasonic Viera TV to the network.
5. Can I use a wireless adapter to connect my Panasonic Viera TV to the internet?
Yes, you can use a wireless adapter to connect your Panasonic Viera TV to the internet if it does not have built-in Wi-Fi capabilities. The wireless adapter plugs into the USB port on your TV and allows you to connect to your Wi-Fi network. Make sure to choose a wireless adapter that is compatible with your TV model and follow the manufacturer’s instructions for installation and setup.