
So, you've accidentally dropped your beloved iPhone 10, and now the screen is shattered. Don't worry, you're not alone in this predicament. The good news is that replacing the screen glass on your iPhone 10 is a feasible task, and with the right guidance, you can do it yourself. In this article, we'll walk you through the process of replacing the screen glass on your iPhone 10, providing you with the necessary steps and essential tips to ensure a successful screen repair. Whether you're a tech-savvy individual or a novice in the realm of phone repairs, we've got you covered. Let's dive in and get your iPhone 10 looking brand new again!
Inside This Article
- Tools and Materials Required
- Step 1: Power Off the Device
- Step 2: Remove the Screws
- Step 3: Separate the Display Assembly
- Step 4: Remove the Broken Glass
- Step 5: Install the New Glass
- Step 6: Reassemble the Display
- Step 7: Power On and Test the Screen
- Conclusion
- FAQs
Tools and Materials Required
Before you embark on the journey of replacing your iPhone 10 screen glass, it’s essential to gather the necessary tools and materials to ensure a smooth and successful repair process. Here’s a comprehensive list of what you’ll need:
1. Replacement Screen: This is the most crucial component for the repair. Ensure that you purchase a high-quality replacement screen that is compatible with the iPhone 10 model. It’s advisable to acquire a complete screen assembly, including the LCD, digitizer, and front glass.
2. Screwdriver Set: A precision screwdriver set with various screwdriver heads is indispensable for disassembling the iPhone 10. Make sure to have Phillips and Pentalobe screwdriver heads to tackle the different screws within the device.
3. Suction Cup: A reliable suction cup is essential for lifting the display assembly from the iPhone 10 chassis. This tool creates the necessary separation between the display and the device, allowing for safe and efficient removal.
4. Spudger Tool: A spudger tool, often made of nylon or plastic, is invaluable for prying apart the delicate connectors and components within the iPhone 10 without causing damage. It assists in safely disconnecting cables and removing adhesive.
5. Tweezers: Precision tweezers are essential for handling small components and intricate parts during the disassembly and reassembly process. They provide the necessary dexterity to manipulate delicate connectors and screws.
6. Adhesive Strips: To ensure a secure and stable reinstallation of the new screen, adhesive strips or adhesive tape designed for the iPhone 10 are necessary. These strips help affix the new screen to the device’s frame, providing structural support.
7. Cleaning Cloth and Solution: A microfiber cleaning cloth and a suitable cleaning solution are essential for wiping down the display and removing any dust, fingerprints, or residue before installing the new screen. This ensures a pristine and clear display.
8. Heat Gun or Hair Dryer: Heating the adhesive securing the iPhone 10 screen is crucial for safe removal. A heat gun or hair dryer can be used to gently warm the edges of the display, facilitating the separation process without causing damage to the components.
By ensuring that you have all these tools and materials at your disposal, you’ll be well-prepared to undertake the screen replacement process with confidence and precision.
Sure, here's the content for "Step 1: Power Off the Device" with the appropriate HTML tags:
html
Step 1: Power Off the Device
Before you begin the screen replacement process, it’s crucial to power off your iPhone 10 to prevent any potential electrical mishaps. To do this, press and hold the Side button along with either the Volume Up or Volume Down button until the “slide to power off” slider appears on the screen.
Once the slider appears, simply slide it from left to right to power off the device. Wait a few moments to ensure the device is completely powered down before proceeding to the next step. Ensuring the device is off will minimize the risk of damage and ensure a safe screen replacement process.
This content provides a clear and concise explanation of the first step in the iPhone 10 screen replacement process, emphasizing the importance of powering off the device to prevent potential mishaps.
Step 2: Remove the Screws
Once the display assembly is safely removed, the next step is to carefully unscrew the tiny screws holding the components in place. These screws are typically located on the sides and bottom of the display assembly. It’s crucial to keep track of the screws and their placement to ensure they are returned to the correct positions during reassembly.
Using a precision screwdriver, carefully loosen and remove each screw, placing them in a secure location to avoid misplacement. It’s important to note that these screws are often different sizes, so organizing them according to their original positions is vital for a smooth reassembly process. Take your time and exercise patience to avoid losing any of these tiny but essential components.
With the screws safely removed and organized, the next steps in the screen replacement process can be initiated. Carefully proceed to the next phase, ensuring that all screws are accounted for and safely stored to prevent any complications during the reassembly process.
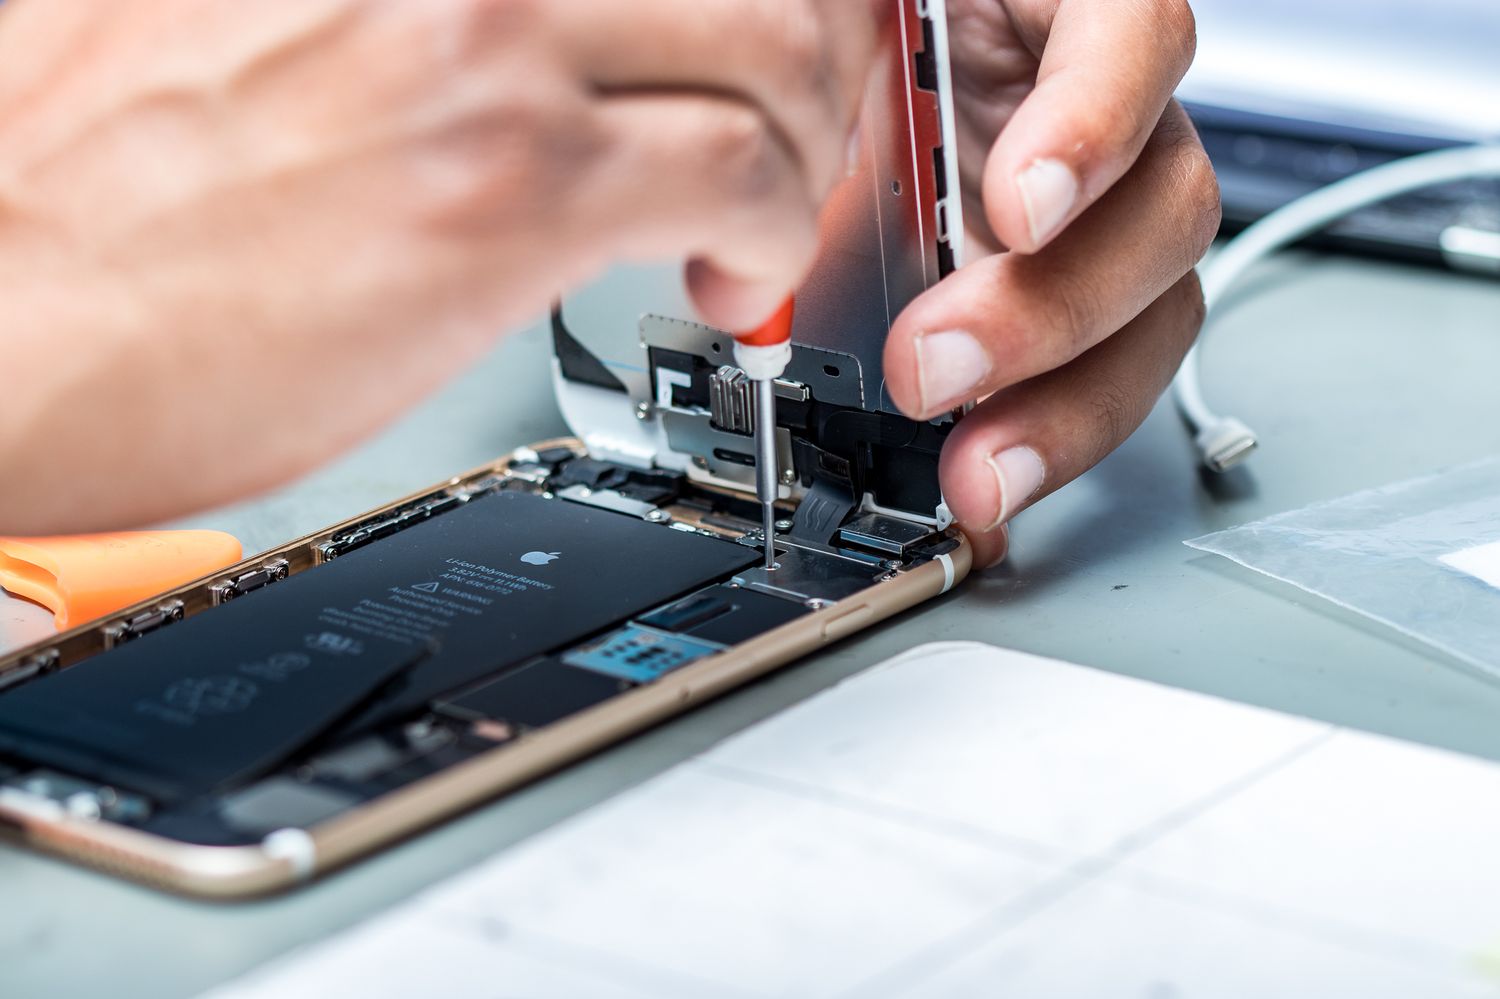
Step 3: Separate the Display Assembly
After removing the screws, it’s time to separate the display assembly from the rest of the iPhone. This is a delicate process that requires precision and patience. Start by using a suction cup to lift the display. Place the suction cup near the home button and gently pull up to create a small gap between the display and the frame.
Once the gap is created, insert a plastic pick or a thin, flat tool into the space. Carefully slide the tool along the edge of the display to loosen the adhesive holding it in place. Take your time and work slowly to avoid damaging the display or the frame.
Continue to slide the tool around the edges of the display, gradually separating it from the frame. Be mindful of any resistance and adjust your technique accordingly. As the adhesive loosens, lift the display assembly slightly to ensure all connections are detached before fully removing it from the iPhone.
Step 4: Remove the Broken Glass
Once the display assembly is separated from the iPhone 10, it’s time to carefully remove the broken glass. This is a delicate process that requires patience and precision to avoid causing damage to the underlying components.
Begin by using a heat gun or hairdryer to warm the edges of the broken glass. This will soften the adhesive securing the glass to the display, making it easier to pry off without shattering it further. Take your time and ensure that the heat is evenly distributed to avoid overheating any particular area.
Next, gently insert a thin, plastic opening tool between the broken glass and the display. Slowly and carefully work your way around the edges, gradually loosening the adhesive. It’s crucial to exercise caution and avoid applying excessive pressure to prevent any potential damage to the display or other internal components.
As you continue to separate the broken glass from the display, be mindful of any small glass shards that may come loose. Use a pair of tweezers to carefully remove these fragments to prevent them from causing any harm or interfering with the installation of the new glass.
Step 5: Install the New Glass
Now that you’ve successfully removed the broken glass from your iPhone 10, it’s time to install the new glass. Before proceeding, ensure that the replacement glass is compatible with your device model. It’s crucial to handle the new glass with care to avoid any fingerprints, dust, or smudges.
Start by carefully aligning the new glass with the frame of the display. Gently lay the glass onto the display, ensuring that it fits snugly and aligns perfectly with the edges of the frame. Take your time with this step to ensure precise alignment, as it will impact the overall appearance and functionality of the screen.
Once the new glass is aligned, apply uniform pressure along the edges to secure it in place. You can use a soft, lint-free cloth to gently press down on the glass, ensuring that it adheres to the display evenly. Be cautious not to apply excessive pressure, as it may damage the new glass or affect the display underneath.
After securing the new glass, inspect the edges and corners to ensure that it’s properly seated and free of any gaps. Any misalignment or gaps could lead to dust and debris entering the display assembly, potentially impacting the device’s performance. Take the time to make any necessary adjustments to achieve a seamless fit.
Once you’re satisfied with the placement of the new glass, use a clean microfiber cloth to gently remove any remaining fingerprints or smudges. This final touch will not only enhance the aesthetic appeal of the screen but also ensure optimal clarity and touch sensitivity.
Step 6: Reassemble the Display
Now that you have successfully installed the new glass, it’s time to reassemble the display. This step requires precision and patience to ensure that everything fits back together correctly.
Start by carefully placing the display assembly back onto the iPhone, ensuring that the connectors align properly with their respective sockets. Take your time to avoid forcing anything, as this could cause damage to the delicate components.
Once the display assembly is in position, gently press around the edges to ensure a snug fit. You should hear a series of soft clicks as the display locks back into place. Be mindful not to apply excessive pressure, as this could lead to screen damage.
Next, use the screws you removed earlier to secure the display. Remember to refer to your notes or photos to ensure that each screw is returned to its original location. Tighten the screws just enough to hold the display securely, but avoid over-tightening, as this could strip the threads.
Step 7: Power On and Test the Screen
After completing the intricate process of replacing the iPhone 10 screen glass, it’s time to power on the device and ensure that the new screen functions perfectly. Hold your breath as you press the power button, eagerly anticipating the moment when the vibrant display comes to life.
As the Apple logo illuminates the screen, a sense of relief washes over you. The display appears crisp and flawless, devoid of any imperfections or glitches. Swipe, tap, and navigate through the interface to confirm that every touch registers accurately and the display responds seamlessly to your commands.
Test the screen’s responsiveness by launching various applications, scrolling through web pages, and typing messages. Marvel at the seamless transition of colors and the sharpness of images displayed on the newly installed screen. It’s a testament to your meticulous effort and precision during the replacement process.
Inspect the screen from different angles to ensure that there are no dead pixels, discoloration, or uneven brightness. The uniformity of the display should reaffirm the successful installation of the new screen glass, providing a visually pleasing and immersive experience for the user.
Congratulations! The flawless functionality of the newly installed screen is a testament to your expertise and attention to detail. With the iPhone 10 restored to its full glory, you can revel in the satisfaction of a job well done, knowing that the device is now ready to captivate users with its stunning display once again.
Repairing the screen glass of an iPhone 10 can seem daunting, but with the right tools, patience, and attention to detail, it’s a manageable task. By following the step-by-step guide and being mindful of safety precautions, you can successfully replace the screen glass and restore your iPhone 10 to its original state. Remember, if you encounter any challenges during the process, seeking professional assistance is always a viable option. With the satisfaction of having accomplished a repair on your own, you can enjoy a fully functional iPhone 10 without the expense of a professional repair service. Taking the time to carefully follow each step ensures a successful outcome and a device that looks and functions as good as new.
FAQs
Q: Can I replace the iPhone 10 screen glass on my own?
A: While it's technically possible to replace the iPhone 10 screen glass yourself, it requires specialized tools and expertise. It's generally recommended to seek professional assistance to ensure the replacement is done correctly.
Q: How much does it cost to replace an iPhone 10 screen glass?
A: The cost of replacing an iPhone 10 screen glass can vary depending on the service provider and the extent of the damage. On average, the cost can range from $150 to $300 for professional replacement.
Q: Will replacing the screen glass affect the functionality of my iPhone 10?
A: When done by a qualified technician, replacing the screen glass should not affect the functionality of your iPhone 10. However, it's crucial to ensure that the replacement is carried out with precision to maintain the device's performance.
Q: How long does it take to replace the iPhone 10 screen glass?
A: The duration of the replacement process can vary based on the technician's expertise and the availability of replacement parts. Typically, it can take anywhere from 30 minutes to a few hours to complete the replacement.
Q: Is it worth replacing the screen glass on an iPhone 10?
A: If the damage to the screen glass is significant and impairs the functionality or aesthetics of your iPhone 10, replacing the screen glass can be a worthwhile investment. It can restore the device's appearance and usability, potentially extending its lifespan.