
Popsockets have become a popular accessory for smartphones, providing users with a convenient and secure grip. They allow for better handling, texting, and taking selfies without the risk of dropping your phone. However, there may come a time when you need to take apart your popsocket, either for cleaning or replacement. Understanding how to dismantle your popsocket properly is essential to avoid any damage or potential issues. In this article, we will guide you through the process of taking apart a popsocket step by step. Whether you’re a popsocket enthusiast or just curious about how they work, keep reading to learn the secrets of disassembling this handy little accessory!
Inside This Article
- Introduction
- Tools required
- Step 1: Remove the adhesive base
- Step 2: Separate the Popsocket Socket from the Top Disc
- Step 3: Detach the collapsible accordion mechanism
- Step 4: Disassemble the popsocket socket
- Step 5: Remove the adhesive residue
- Conclusion
- Conclusion
- FAQs
Introduction
Popsockets have become a popular accessory that adds functionality and style to our smartphones. With their convenient collapsible design, they can be easily attached to the back of your phone, providing a secure grip for one-handed use and acting as a stand for watching videos. However, there may come a time when you need to take apart your popsocket. Whether it’s to replace a damaged part or to clean it thoroughly, knowing how to disassemble your popsocket can come in handy. In this article, we will guide you through the process of taking apart a popsocket.
But before we dive into the disassembly process, it’s important to note that disassembling a popsocket may void any warranty it may have, so proceed with caution. Additionally, keep in mind that the process may vary slightly depending on the model and manufacturer of your popsocket.
To successfully take apart your popsocket, you will need a few tools and some patience. Let’s take a look at the tools you’ll need.
Tools required
Before you begin the process of taking apart your Popsocket, it’s important to gather the necessary tools. Here are the items you will need:
1. Small flathead screwdriver or a thin prying tool – This will be used to carefully lift and separate the different components of the Popsocket.
2. Clean cloth or adhesive remover – This will help in removing any adhesive residue left behind after disassembling the Popsocket.
3. Tweezers – These will come in handy for handling small parts and removing any stubborn adhesive.
4. Safety goggles or protective eyewear – It’s always a good idea to protect your eyes while working with tools.
5. Gloves – Optional, but wearing gloves can help protect your hands during the disassembly process.
Once you have gathered these tools, you will be ready to start dismantling your Popsocket and exploring its inner workings.
Step 1: Remove the adhesive base
Removing the adhesive base of a popsocket is the first step in taking it apart. To accomplish this, you’ll need a few tools to help you along the way:
- Heat source (hairdryer or heat gun)
- Plastic opening tools or guitar pick
- Isopropyl alcohol or adhesive remover
- Clean cloth or paper towels
Now that you have the necessary tools, follow these steps to remove the adhesive base:
- Start by heating the area around the adhesive base with a hairdryer or heat gun. The heat will soften the adhesive and make it easier to remove.
- Once the adhesive becomes pliable, use a plastic opening tool or a guitar pick to gently pry up the edges of the adhesive base. Be careful not to apply too much pressure, as you could damage the popsocket.
- Continue working your way around the adhesive base, slowly peeling it off from the surface. If you encounter resistance, apply more heat to soften the adhesive further.
- After removing the adhesive base, you may notice some residue left on the surface. To clean it off, dampen a clean cloth or paper towel with isopropyl alcohol or adhesive remover, and gently rub the residue until it is gone.
- Once the surface is clean and free of residue, allow it to dry completely before moving on to the next step.
By following these steps, you can successfully remove the adhesive base of a popsocket, allowing you to proceed with the disassembly process.
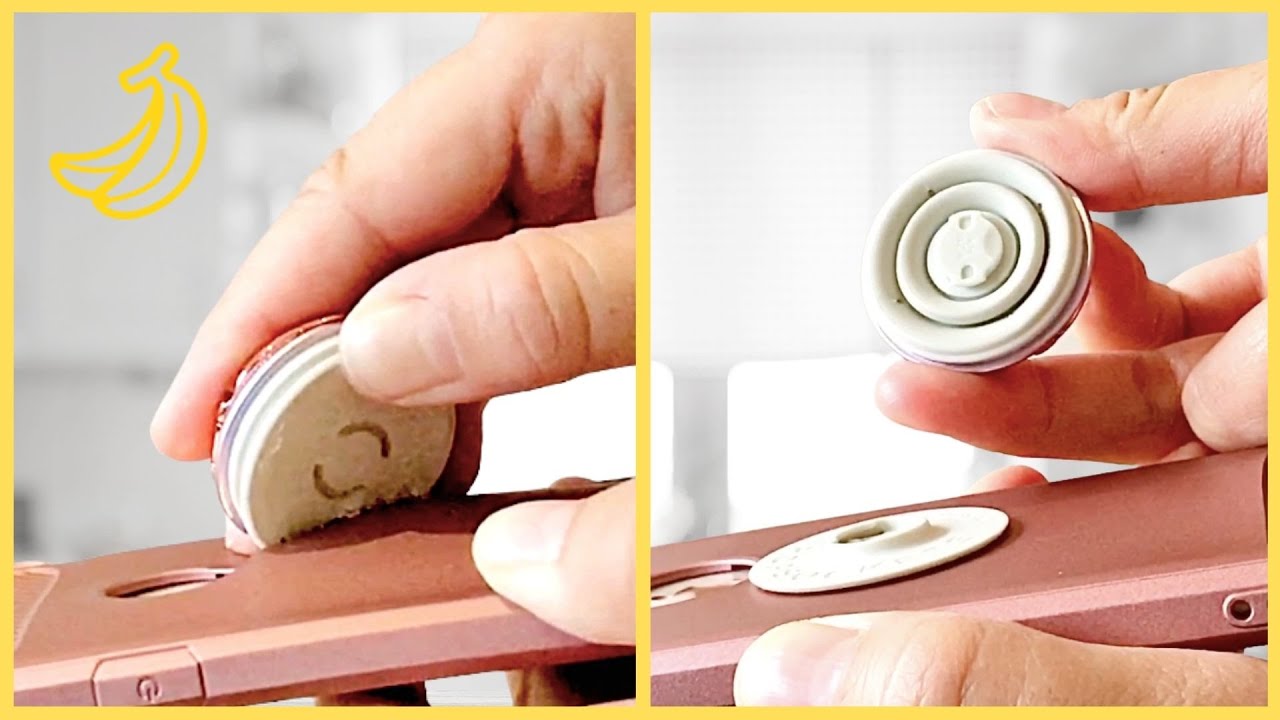
Step 2: Separate the Popsocket Socket from the Top Disc
After successfully removing the adhesive base, the next step is to separate the popsocket socket from the top disc. This is an important step as it allows you to clean the different components individually and ensures that you can reassemble the Popsocket easily later on.
To separate the popsocket socket from the top disc, follow these steps:
- Hold the top disc firmly with one hand to prevent it from rotating.
- Using your other hand, gently twist and unscrew the popsocket socket in a counterclockwise direction.
- Continue unscrewing until the socket is completely detached from the top disc.
Be careful not to apply too much force as it may damage the socket or the top disc. If you encounter any resistance, try twisting it with a little more force, but always be cautious not to cause any damage.
Once the popsocket socket is separated from the top disc, you can proceed to clean and maintain each component separately. This allows for a thorough cleaning and ensures that any dirt or residue are effectively removed.
Remember to handle the popsocket socket and top disc with care to avoid accidentally dropping or damaging them. Place them in a safe location where they won’t roll or get lost.
By successfully separating the popsocket socket from the top disc, you are one step closer to disassembling the Popsocket completely and ensuring a smooth reassembly process.
Step 3: Detach the collapsible accordion mechanism
Once you have separated the popsocket socket from the top disc, the next step is to detach the collapsible accordion mechanism. This mechanism allows the popsocket to expand and collapse when not in use.
To detach the collapsible accordion mechanism, you will need to carefully pry it away from the socket section. Start by locating the small tabs or notches on the sides of the socket. These tabs hold the collapsible accordion mechanism in place.
Take a small, flat-headed tool like a screwdriver or a plastic pry tool, and gently insert it into one of the tabs. Apply gentle pressure while twisting the tool to lift the tab and release it from the socket. Repeat this step for all the tabs on the socket.
Be cautious while detaching the accordion mechanism as it is delicate and can break if not handled carefully. Take your time and make sure to apply even pressure to avoid any damage.
Once all the tabs are released, you should be able to easily remove the accordion mechanism from the popsocket socket. Set it aside for now as we move on to the next step of the disassembly process.
Step 4: Disassemble the popsocket socket
Once you have separated the popsocket socket from the top disc, it’s time to disassemble the socket itself. Here’s how you can do it:
- Look for the small groove or ridge along the sides of the socket. This is where you will insert your tool to pry it open.
- Insert a thin and sturdy tool, such as a plastic spudger or a flathead screwdriver, into the groove.
- Gently apply pressure to the tool and start prying the socket open. Be careful not to apply too much force as you don’t want to break the socket.
- Work your way around the socket, slowly prying it open bit by bit. You may hear some snapping sounds as the internal clips release.
- Continue to pry open the socket until you can separate the two halves completely.
- Once the socket is open, you can remove the internal components if necessary. This may include the button mechanism or any other small parts that need to be replaced or repaired.
Remember to handle the internal components with care, as they can be delicate. If you are unsure about removing any specific parts, it’s best to consult the manufacturer’s instructions or seek professional help.
Disassembling the popsocket socket can be a bit tricky, especially if you haven’t done it before. Take your time, be patient, and make sure to keep track of the parts you remove.
With the socket disassembled, you can now clean the individual components or replace any faulty parts. Once you’ve completed the necessary repairs or modifications, you can reverse the steps to reassemble the socket.
Disassembling and reassembling your popsocket socket can give you a better understanding of its inner workings and allow you to customize or repair it as needed. Just remember to proceed with caution and always refer to the manufacturer’s guidelines.
Step 5: Remove the adhesive residue
After disassembling the popsocket socket and separating its components, you may be left with some adhesive residue on the surfaces. It’s important to remove this residue before reassembling or replacing the popsocket.
To effectively remove the adhesive residue, you’ll need the following:
- Isopropyl alcohol or adhesive remover
- Cotton swabs or a soft cloth
- Disposable gloves (optional)
Here’s how you can remove the adhesive residue:
- Put on disposable gloves, if desired, to protect your hands.
- Dampen a cotton swab or soft cloth with isopropyl alcohol or adhesive remover. Make sure not to soak it excessively.
- Gently rub the adhesive residue in a circular motion. Apply gentle pressure to lift and dissolve the residue.
- Continue rubbing until the residue starts to loosen and come off.
- If the residue is stubborn, you can leave the alcohol or adhesive remover on it for a few minutes to dissolve it further.
- Once the adhesive residue is removed, wipe the surface clean with a dry cloth or paper towel.
Make sure to check the manufacturer’s instructions for specific cleaning recommendations for your popsocket model, as some materials may require different cleaning methods.
If you are using adhesive remover, it’s important to note that some removers may leave behind an oily residue. In such cases, you can use a mild soap and water solution to clean the surface after removing the adhesive residue.
Once the adhesive residue is completely removed and the surfaces are dry, you can proceed to reassemble or replace the popsocket. Ensure that all the components are securely connected and aligned properly.
Remember to dispose of any used cotton swabs, cloth, or gloves properly based on local regulations for waste disposal.
Removing adhesive residue can bring back the clean and smooth look of your popsocket, making it ready for reuse or replacement.
Conclusion
Disassembling a popsocket may seem like a daunting task, but with the right tools and steps, it can be easily done. Remember to be patient and gentle while removing the adhesive base and separating the different components. By following the steps outlined in this guide, you can safely take apart your popsocket without causing any damage.
Once you’ve successfully disassembled the popsocket, you can clean the different components and even customize them to suit your preferences. Whether you want to change the socket design or replace the adhesive, the disassembly process allows you to modify your popsocket in various ways.
However, it’s important to note that taking apart your popsocket may void any warranty or guarantee that came with it. If you’re unsure about disassembling it yourself, it’s always recommended to reach out to the manufacturer for assistance or consult a professional.
In conclusion, disassembling a popsocket can be a fun and rewarding experience. It allows you to customize your popsocket and clean it thoroughly. By following the step-by-step instructions and utilizing the right tools, you can safely take apart your popsocket and unleash your creativity.
Remember to exercise caution and not force any parts during the disassembly process. Take your time and enjoy the process of exploring the inner workings of your popsocket. With a little patience and careful handling, you’ll be able to successfully disassemble your popsocket and uncover its hidden secrets.
Conclusion
In conclusion, learning how to take apart a Popsocket can be a useful skill for those who want to personalize or customize their mobile accessories. By disassembling the Popsocket, you can not only switch out the top disc design but also clean the adhesive and ensure a secure attachment to your phone. Whether you want to match your Popsocket with your outfit or simply want to give it a fresh look, taking it apart allows for endless possibilities.
Remember to handle the disassembly process with care and follow the steps outlined in this article to avoid any potential damage. By using the right tools and following the instructions, you can safely dismantle your Popsocket and explore the different customization options available.
So, the next time you find yourself wanting to change the style of your Popsocket, don’t hesitate to give it a go. With a little bit of patience and some creativity, you can transform your mobile accessory into a unique and personalized statement piece.
FAQs
Q: How do I take apart a Popsocket?
A: Taking apart a Popsocket is actually quite simple. Start by placing your fingers on the adhesive base of the Popsocket and firmly pull it away from the surface of your phone or case. Apply gradual pressure until the adhesive releases. Once the base is removed, you can easily detach the top disc or design by twisting it counterclockwise.
Q: Can I reuse a Popsocket once it has been taken apart?
A: Yes, you can reuse a Popsocket even after taking it apart. Once you have removed the adhesive base, you can clean it with mild soap and warm water to remove any dirt or residue. Allow it to dry completely before reattaching it to a new surface. In some cases, you may need to replace the adhesive if it loses its stickiness.
Q: Will taking apart a Popsocket damage my phone or case?
A: When removing a Popsocket, it is unlikely to cause any damage to your phone or case if done correctly. However, it’s essential to use gentle and gradual pressure to avoid any accidental damage. If you experience resistance or difficulty, stop pulling and reevaluate your approach to prevent potential harm to your device or case.
Q: Can I customize my Popsocket design?
A: Yes, you can customize your Popsocket design. Popsockets come with a removable top disc or design that you can interchange with other designs or even create your own. Simply twist the top disc counterclockwise to remove it, and then replace it with your desired design or photo. There are also various pre-made designs available for purchase or the option to create a custom design online.
Q: Are there any safety precautions to keep in mind when using a Popsocket?
A: While Popsockets are generally safe to use, it’s important to follow a few safety precautions. Avoid attaching a Popsocket to fragile or easily damaged surfaces, as it may cause them to break or crack. Additionally, make sure the adhesive base is securely attached to your phone or case before using the Popsocket. Lastly, avoid using excessive force when removing or reattaching a Popsocket to prevent any accidental damage.