
Have you ever wanted to take your biking experience to the next level? Look no further than building your own joystick bike from scratch! This exciting project allows you to combine your love for biking with your DIY skills, resulting in a unique and thrilling ride.
A joystick bike, as the name suggests, replaces the traditional handlebars with a joystick that allows you to control the direction of your bike. It adds a touch of adventure and innovation to your cycling adventures, making it a captivating conversation starter.
In this article, we will guide you through the step-by-step process of building your own joystick bike. From acquiring the necessary materials and tools to assembling the components, we will cover every aspect to ensure you have a smooth and successful DIY biking experience. So, put on your gears and get ready to embark on an exciting journey towards your very own customized joystick bike!
Inside This Article
- Materials Needed
- Step 1: Preparing the Bike
- Step 2: Building the Joystick Mechanism
- Step 3: Mounting the Joystick to the Bike
- Step 4: Testing and Adjustments
- Conclusion
- FAQs
Materials Needed
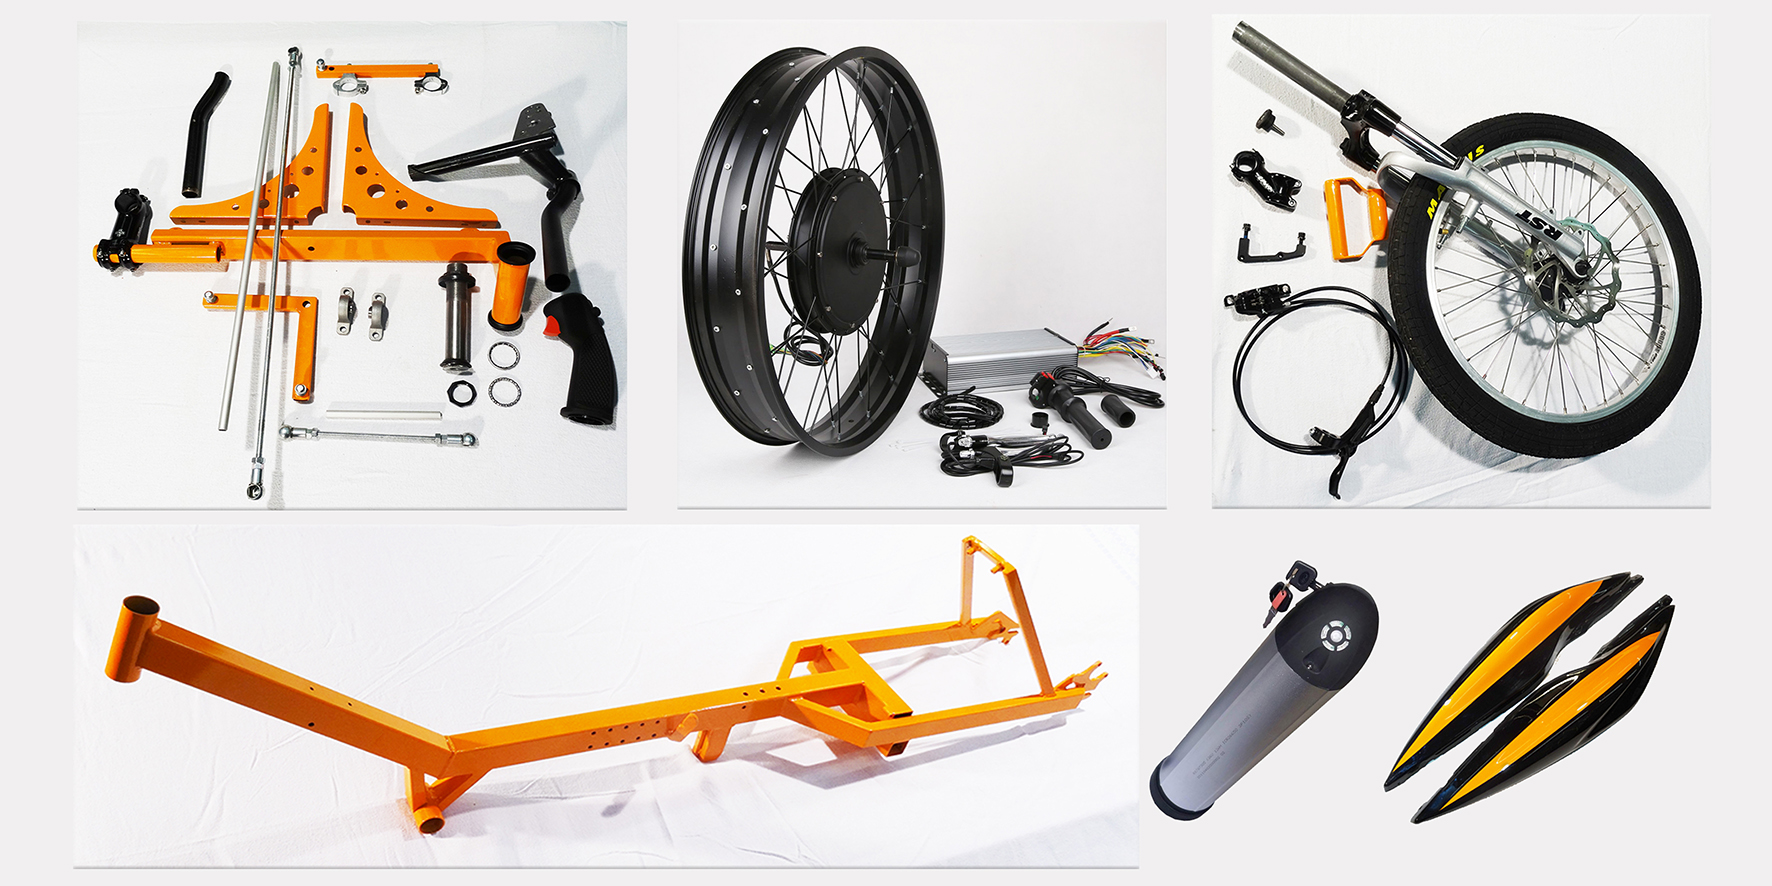
To build a joystick bike from scratch, you will need the following materials:
- 1 bicycle frame
- 2 bicycle wheels
- 1 joystick controller
- 1 electric motor
- 1 battery pack
- 1 throttle
- 1 motor controller
- Assorted cables and connectors
- Tools: wrenches, screwdrivers, pliers, wire cutters, and soldering iron
The bicycle frame will serve as the foundation for your joystick bike. Make sure it is sturdy and in good condition. The size and type of frame will depend on your personal preference and the level of customization you want to achieve.
The bicycle wheels are essential for mobility. Choose wheels that are durable and suitable for the terrain you intend to ride on. Make sure they are compatible with the frame and have sturdy spokes and axles.
The joystick controller is the main component that will enable you to control the movement of the bike. It should have a comfortable grip and responsive buttons or levers for intuitive control.
The electric motor will provide the power needed to propel the bike. Select a motor that is appropriate for your desired speed and torque requirements. Consider factors such as power output, efficiency, and durability.
The battery pack is necessary to store and supply energy to the motor. Choose a battery pack with sufficient capacity and voltage to meet your desired range and power requirements. Consider factors such as battery chemistry, weight, and charging time.
The throttle is the interface between the joystick controller and the motor. It regulates the speed and acceleration of the bike. Choose a throttle that is compatible with your controller and offers smooth and precise control.
The motor controller acts as the intermediary between the joystick controller, the motor, and the battery pack. It converts the signals from the joystick controller into commands that control the motor’s speed and direction. Make sure the motor controller is compatible with your joystick controller and motor.
In addition to the main components, you will also need various cables and connectors to make the necessary electrical connections. Make sure to choose high-quality cables and connectors that are suitable for the voltage and current requirements of your system.
Lastly, ensure that you have the necessary tools for the assembly process. Wrenches, screwdrivers, pliers, wire cutters, and a soldering iron will be essential for assembling and connecting the different components of your joystick bike.
Step 1: Preparing the Bike
Before you can start building your joystick bike, you need to properly prepare the bike itself. Here are the steps to follow:
1. Choose the right bike: Select a bike that is suitable for your project. It’s best to choose a bike with a sturdy frame and good stability to ensure the joystick mechanism can be mounted securely.
2. Clean the bike: Give the bike a thorough cleaning to remove any dirt or debris. This will make it easier to work with and ensure proper attachment of the joystick mechanism.
3. Remove unnecessary accessories: Strip the bike of any unnecessary accessories such as baskets, lights, or reflectors. This will create a clean surface for mounting the joystick mechanism.
4. Check the brakes and gears: Inspect the brakes and gears of the bike to make sure they are in good working condition. If any adjustments or repairs are needed, take the bike to a professional bike shop for assistance.
5. Assess the handlebars: Take a close look at the handlebars to determine if any modifications are necessary. Depending on the design of your joystick mechanism, you may need to make adjustments to the handlebars or replace them with a different style.
6. Consider the seat position: Evaluate the seat position and make any necessary adjustments. Keep in mind that the joystick mechanism will require some space, so ensure there is enough clearance between the seat and the joystick.
7. Secure loose components: Check for any loose screws or components on the bike and tighten them. This will prevent any unnecessary vibrations or movement while riding your joystick bike.
By following these steps, you will have a properly prepared bike ready for the next phase of building your joystick bike. Now, let’s move on to step 2: Building the Joystick Mechanism.
Step 2: Building the Joystick Mechanism
Once you have gathered all the necessary materials, it’s time to move on to building the joystick mechanism for your joystick bike. This step is crucial as it determines the smoothness and efficiency of your bike’s steering system.
Here is a breakdown of the process:
- Measure and mark the center: Start by measuring and marking the center point on the handlebar of your bike. This will serve as the reference point for installing the joystick mechanism.
- Attach the pivot plate: Using the drill and screws, attach a pivot plate to the marked center point on the handlebar. Ensure that the plate is securely fastened to provide stability.
- Mount the joystick base: Take the base of the joystick and attach it to the pivot plate. Make sure it is positioned in a way that allows for easy movement without any obstructions. Use the screws provided to secure the base firmly in place.
- Connect the joystick arm: Attach the joystick arm to the base of the joystick. This arm will be responsible for controlling the steering of the bike. Make sure it is aligned properly and securely connected to the base.
- Install the joystick handle: Slide the joystick handle onto the joystick arm. This handle is what you will grip and use to steer the bike. It should fit snugly and allow for smooth movements.
- Test the joystick mechanism: Once all the components are securely in place, test the joystick mechanism to ensure it is functioning correctly. Gently move the joystick handle from side to side and observe the bike’s steering response. Make any necessary adjustments to ensure smooth and precise control.
Remember to follow the manufacturer’s instructions for the specific joystick mechanism you are using. This will help you ensure proper installation and functionality.
With the joystick mechanism built and installed, your joystick bike is one step closer to being ready for a thrilling ride. Move on to the next step to learn how to mount the joystick to your bike.
Step 3: Mounting the Joystick to the Bike
Once you have completed building the joystick mechanism, it’s time to mount it securely to your bike. Follow these steps to ensure a proper and stable installation:
1. Determine the Mounting Position: Choose a suitable location on your bike’s handlebar or frame to mount the joystick. It should be within easy reach and not obstruct your view while riding.
2. Prepare the Mounting Surface: Use a damp cloth to clean the area where you will be attaching the joystick. This will ensure a strong adhesion and prevent any dirt or debris from interfering with the mounting process.
3. Apply Adhesive or Clamp: There are two common methods for mounting the joystick – using adhesive or clamping it in place. If your joystick comes with adhesive backing, ensure it is a strong adhesive suitable for the bike’s material. If not, you can use clamps designed for bike accessories to securely fasten the joystick in place.
4. Position and Align the Joystick: Carefully place the joystick in the desired position on the mounting surface. Ensure it is aligned properly with your hand’s natural grip when holding the handlebar. Take your time to find the most comfortable and ergonomic placement.
5. Secure the Joystick: If using adhesive, firmly press the joystick onto the mounting surface and hold it in place for the recommended duration specified by the adhesive manufacturer. If using clamps, tighten them securely, ensuring the joystick is stable and doesn’t wobble.
6. Double-Check Stability: Once the joystick is mounted, give it a gentle tug and wiggle to ensure it is securely attached. Make any necessary adjustments or tighten the clamps further if needed.
7. Test the Joystick: Before taking your bike for a ride, test the joystick to ensure it responds accurately to your movements. Move the joystick in all directions and check that it smoothly controls the bike’s steering mechanism.
By following these steps, you can confidently mount the joystick to your bike and enjoy the added convenience and control it brings. Remember to regularly check the joystick’s stability and make any necessary adjustments to maintain optimal performance.
Step 4: Testing and Adjustments
Once you have successfully built the joystick bike, it’s time to put it to the test and make any necessary adjustments. This step is crucial to ensure that your bike functions properly and provides a smooth and comfortable riding experience.
Here are the important steps to follow when testing and making adjustments to your joystick bike:
- Test the Joystick: Begin by testing the joystick mechanism. Move the joystick in different directions to check if the bike responds accordingly. Make sure the joystick is responsive and provides smooth control over the bike’s movement.
- Check the Brakes: Test the braking system. Ensure that the brakes are properly adjusted and working effectively. Your safety is of utmost importance, so make any necessary adjustments to ensure that the brakes respond promptly and provide sufficient stopping power.
- Experiment with Sensitivity: Adjust the sensitivity of the joystick if needed. Some riders may prefer a more sensitive joystick, while others may prefer a less sensitive one. Find the right balance that suits your riding style and comfort level.
- Test Different Terrain: Take your joystick bike for a ride on various terrains—such as roads, gravel, and uneven surfaces—to see how it performs. Pay attention to how the joystick responds and how the bike handles different surfaces.
- Ensure Proper Alignment: Check the alignment of the joystick and handlebars. Make sure they are properly aligned and secure. If there are any issues, adjust and tighten the bolts or screws as needed.
- Make Personalized Adjustments: Every rider has their own preferences when it comes to bike setup. Experiment with seat height, handlebar position, and any other adjustments that will enhance your comfort and riding experience.
- Practice and Refine: Spend some time practicing with your joystick bike to get familiar with its controls and capabilities. Pay attention to any areas where you feel the bike can be improved and make the necessary adjustments to further enhance its performance.
It’s important to note that testing and adjustments may require multiple iterations. Be patient and take the time needed to fine-tune your joystick bike until you are satisfied with its performance.
Conclusion
In conclusion, building a joystick bike from scratch can be a rewarding and exciting project for bike enthusiasts. It allows you to customize your ride, improve your biking experience, and showcase your creativity. By following the step-by-step instructions, gathering the necessary materials and tools, and taking the time to understand the mechanics behind the joystick system, you can create a unique and functional bike that stands out from the crowd.
Remember, building a joystick bike requires careful attention to detail, patience, and a basic knowledge of bike mechanics. Take your time, don’t rush the process, and don’t be afraid to ask for help or seek expert advice when needed. Once your joystick bike is complete, be prepared for the thrill and satisfaction of riding a one-of-a-kind creation that you can truly call your own.
FAQs
1. Can I build a joystick bike from scratch even if I don’t have much technical expertise?
Absolutely! Building a joystick bike from scratch can be a fun and rewarding project for anyone, regardless of their technical expertise. There are plenty of online resources, tutorials, and step-by-step guides available to help you through the process. By following these resources and having a willingness to learn, you can successfully build a joystick bike from scratch.
2. What tools and materials do I need to build a joystick bike?
To build a joystick bike, you will need various tools and materials, including a bicycle frame, joystick handlebars, cables, brake levers, wheels, pedals, gears, and other bike components. In terms of tools, you will require wrenches, screwdrivers, pliers, cable cutters, and a bike repair stand, among others. It’s essential to have the proper tools and materials before starting the project to ensure a smooth building process.
3. How much time does it take to build a joystick bike from scratch?
The time required to build a joystick bike from scratch can vary depending on your level of experience, the complexity of the design, and the availability of tools and materials. On average, it can take anywhere from several hours to a few days or even weeks. It’s important to allocate enough time for the project and not rush the process to ensure a well-constructed and safe joystick bike.
4. Are there any safety considerations to keep in mind while building a joystick bike?
Yes, safety should always be a priority when building a joystick bike. It’s important to wear appropriate safety gear, such as gloves and goggles, to protect yourself during the construction process. Additionally, make sure to double-check the stability of all components, tighten all screws and bolts properly, and ensure the brakes and steering mechanisms are functional. Regularly inspect the bike for any signs of wear and tear after completion, and always follow safe riding practices when using the joystick bike.
5. Can I customize the design and features of my joystick bike?
Absolutely! One of the exciting aspects of building a joystick bike from scratch is the ability to customize it according to your preferences. You can choose the color scheme, the style of the handlebars, the type of gears, and even add additional accessories such as lights or a basket. Personalizing your joystick bike allows you to create a unique and tailored riding experience that reflects your personality and style.