
Traveling by plane can be an exciting experience, but it can also present challenges when it comes to carrying your camera equipment, including a tripod. Whether you are a professional photographer or an amateur looking to capture the perfect shots on your vacation, knowing how to safely transport your tripod in a flight is crucial. In this article, we will explore some essential tips and techniques to help you carry your tripod with ease and ensure it arrives at your destination intact. From understanding airline regulations to choosing the right case and securing your tripod, we will cover everything you need to know to have a hassle-free experience while traveling with your tripod. So, sit back, relax, and discover how to carry your tripod in a flight without any worries.
Inside This Article
- Choosing the Right Travel Bag
- Securing the Tripod Properly
- Storing Tripod in Carry-On Luggage
- Checking Tripod as Special or Oversized Baggage
- Conclusion
- FAQs
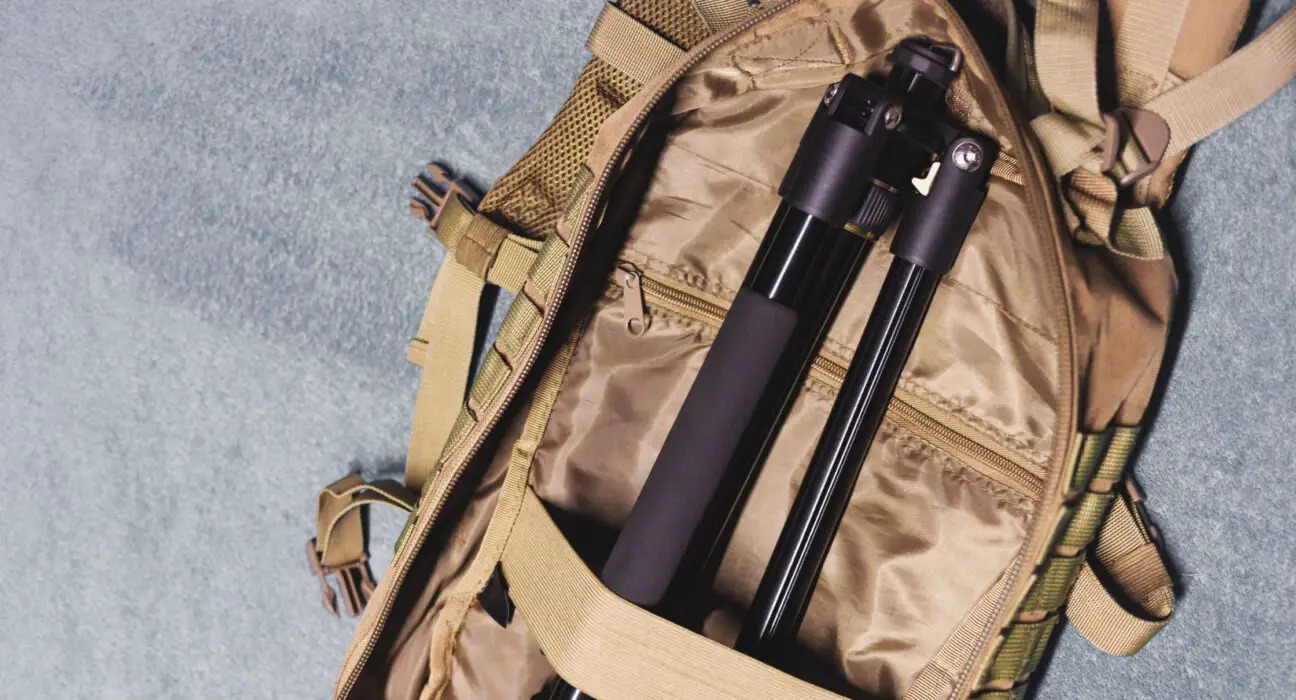
Choosing the Right Travel Bag
When it comes to carrying your tripod during air travel, selecting the right travel bag is crucial. Your chosen bag should provide adequate protection for your tripod while also complying with airline regulations. Here are some factors to consider when choosing a travel bag:
1. Size: The bag should be large enough to comfortably accommodate your tripod while still meeting the size restrictions for carry-on luggage. Check the airline’s guidelines for carry-on dimensions to ensure your bag fits within the allowed limits.
2. Padding: Look for a bag that offers ample padding to protect your tripod from any bumps or impact during transit. Quality padding will help absorb shock and prevent damage to your equipment.
3. Durability: Opt for a bag made from sturdy materials, such as nylon or polyester, which can withstand the rigors of travel. Reinforced stitching and strong zippers are also important for ensuring the bag’s longevity.
4. Compartments: Consider a bag with multiple compartments or pockets. This will allow you to store additional accessories, such as camera lenses or batteries, along with your tripod.
5. Carrying Options: Look for a bag that offers various carrying options, such as a shoulder strap, handles, or even backpack-style straps. This will give you flexibility and comfort when transporting your tripod.
6. Water Resistance: While not essential, a water-resistant bag can provide an added layer of protection for your tripod, especially if you anticipate traveling in inclement weather.
Remember to pack your tripod securely inside the bag, ensuring it is properly stored and protected before you embark on your journey. Taking the time to choose the right travel bag will give you peace of mind knowing that your tripod is safe and secure throughout your trip.
Securing the Tripod Properly
When traveling with a tripod, it is essential to secure it properly to ensure its safety during the journey. Here are some tips to help you securely fasten your tripod:
1. Use a Tripod Bag: Investing in a tripod bag can provide an extra layer of protection. Look for a bag specifically designed for tripods that offers padded compartments and straps to keep your tripod secure.
2. Detach the Tripod Head: If your tripod allows it, remove the tripod head and pack it separately. This will reduce the size and weight of the tripod, making it easier to transport and less susceptible to damage.
3. Secure the Legs: Extend the tripod legs fully and lock them in place. Double-check that the locking mechanisms are tight and secure. This will prevent any accidental collapsing of the tripod during transit.
4. Protect the Feet: Cover the feet of the tripod with rubber caps or leg wraps. This will prevent any scratches or damage to the tripod legs and other items in your luggage.
5. Wrap the Tripod: Wrap the tripod with a sturdy, cushioned material such as bubble wrap or foam padding. This will add an extra level of protection against impacts and vibrations during transport.
6. Secure with Straps: Use adjustable straps or bungee cords to secure the wrapped tripod. Ensure the straps are tight enough to keep the tripod in place but not overly tight to avoid causing stress or damage to the tripod.
7. Position in Luggage: When packing the tripod in your carry-on or checked luggage, place it in a central position to distribute the weight evenly. Avoid placing heavy items on top of the tripod.
8. Consider TSA Guidelines: If you are traveling by air, be aware of the Transportation Security Administration (TSA) guidelines regarding tripods. Some airports may require you to remove the tripod from your bag during security checks, so ensure easy access if needed.
By following these tips, you can securely fasten your tripod, minimizing the risk of damage during your journey. Remember to always check the specific guidelines of your airline or transportation authority to ensure compliance with their regulations.
Storing Tripod in Carry-On Luggage
If you’re a professional photographer or an avid traveler, you know that a tripod is an essential accessory to capture stunning photos. But when it comes to flying, carrying a tripod can be a bit challenging. The good news is that it is possible to store your tripod in your carry-on luggage – allowing you to bring it with you on the flight and keep it safe and secure.
When storing your tripod in your carry-on luggage, it’s crucial to consider some key factors. First and foremost, you need to ensure that your tripod fits within the airline’s size restrictions for carry-on items. Most airlines have specific dimensions for carry-on luggage, so it’s best to check their guidelines before packing.
Once you’re aware of the size restrictions, the next step is to protect your tripod from any potential damage during the flight. Start by disassembling the tripod and removing any detachable parts, such as the camera mount or the center column. This helps reduce the overall size of the tripod and prevents any fragile components from coming loose or getting damaged.
Investing in a padded tripod bag or case is highly recommended to provide extra protection during travel. These specialized bags come with additional padding and compartments to keep your tripod safe from bumps and scratches. Make sure to choose a bag that fits the dimensions of your tripod and offers secure fastenings to prevent any accidental openings.
When packing your tripod in the carry-on luggage, it’s essential to distribute the weight evenly. Place the heavier parts, such as the tripod head or the center column, at the bottom of the bag to avoid any imbalance and ensure stability. If your tripod bag has separate compartments, utilize them to keep the tripod parts organized and prevent them from shifting during transit.
Additionally, it’s advisable to wrap your tripod in a soft cloth or bubble wrap for added protection. This helps cushion it against any sudden jolts or impacts that may occur during the flight. Remember to secure the wrapped tripod tightly to prevent it from moving around inside the bag.
Once you have securely packed your tripod, it’s time to fit it into your carry-on luggage. Depending on the size of your tripod and the available space in your bag, you may need to adjust the other items in your carry-on to make room for it. Packing your tripod strategically in a way that maximizes space utilization will ensure that it fits perfectly without causing any damage to other items.
While most airlines allow tripods in carry-on luggage, it’s always a good idea to check with the specific airline’s regulations before your flight. Some airlines may have specific restrictions or requirements when it comes to carrying tripods on the plane.
By following these tips, you can safely and conveniently store your tripod in your carry-on luggage when flying. This way, you’ll have your crucial photography gear with you, ready to capture breathtaking shots wherever your travels take you!
Checking Tripod as Special or Oversized Baggage
When traveling with a tripod, you may find that it is too large to fit inside your carry-on luggage. In such cases, you may need to check your tripod as special or oversized baggage. Here are a few important things to consider when checking your tripod:
1. Contact the Airline: Before your trip, it’s a good idea to contact the airline you will be flying with to inquire about their specific policies regarding special or oversized baggage. Each airline may have different rules and regulations, so it’s best to confirm the requirements in advance.
2. Packing the Tripod: When checking your tripod, make sure to pack it securely to prevent any damage during transit. Consider investing in a durable tripod bag or case that provides adequate protection. You can also use bubble wrap or foam padding to cushion the tripod and any detachable parts.
3. Labeling and Identification: It is essential to clearly label your tripod with your contact information. Attach a sturdy luggage tag or use a permanent marker to write your name, phone number, and email address on the bag or case. This will help in identifying your tripod in case it gets lost or misplaced.
4. Check-In Process: When you arrive at the airport, proceed to the designated check-in counter for oversized or special baggage. Inform the airline staff about your tripod and follow their instructions. They may provide you with a special tag or label to attach to your tripod to ensure proper handling.
5. Additional Fees: Depending on the airline and the weight or size of your tripod, there may be additional fees associated with checking it as special or oversized baggage. Be prepared to pay any applicable charges, and familiarize yourself with the airline’s fee structure beforehand to avoid any surprises at the airport.
6. Fragile Item Declaration: If your tripod is particularly delicate or prone to damage, consider declaring it as a fragile item during the check-in process. Airlines may handle fragile items with extra care and provide additional protection during transport.
7. Insurance Coverage: Consider purchasing travel insurance that covers any potential damage or loss of your tripod during the flight. This way, you can have peace of mind knowing that you are financially protected in case of any mishaps.
Remember, each airline may have different rules and requirements for checking tripods as special or oversized baggage. It’s essential to familiarize yourself with these guidelines before your trip to ensure a smooth and hassle-free travel experience.
Conclusion
In conclusion, knowing how to carry a tripod in flight is essential for photographers and travelers who want to capture stunning shots during their journeys. The right approach to packing and transporting your tripod ensures its safety and minimizes the risk of damage during the flight. By following the tips and guidelines provided in this article, you can confidently bring your tripod on board without any hassle or concerns. Remember to consider the airline’s policies regarding carry-on luggage and dimensions to avoid any issues at the airport. With a well-protected and securely packed tripod, you have the freedom to explore new destinations and capture incredible moments, making your travel experience even more memorable. So, pack your tripod properly and embark on your photography adventures with peace of mind and creativity.
FAQs
1. Can I carry a tripod in my carry-on bag during a flight?
Yes, you can generally carry a tripod in your carry-on bag during a flight. However, it is always a good idea to check with the airline you are flying with for any specific restrictions or guidelines they may have regarding the size and weight of carry-on items.
2. Are there any airline-specific rules for carrying a tripod on a flight?
Yes, some airlines may have specific rules or restrictions regarding the size and weight of carry-on items, including tripods. It is advisable to check the airline’s website or contact their customer service for any such regulations that may apply to your specific flight.
3. Can I carry a tripod in my checked baggage?
Yes, you can usually carry a tripod in your checked baggage. However, it is important to ensure that the tripod is properly secured or packed to prevent any potential damage during transit. Wrapping it with padding or using a tripod bag can help protect it from any rough handling.
4. Are there any restrictions on the length of the tripod that I can carry on a flight?
While there are no specific limitations on the length of a tripod that can be carried on a flight, it is advisable to consider the size restrictions of your carry-on bag. If your tripod is too long to fit inside your carry-on, you may have to check it in instead. Again, it is recommended to check with your airline for any specific guidelines.
5. Can I use a tripod during the flight for photography or filming?
The use of tripods during a flight is generally not allowed, especially during takeoff and landing. It is best to follow the instructions provided by the airline and the cabin crew regarding the use of electronic devices and photography equipment. Always prioritize safety and comply with any rules or regulations in place.