
Connecting a gimbal to your phone can greatly enhance your photography and videography experience. Whether you’re a professional content creator or simply an amateur enthusiast, a gimbal allows you to capture smooth, stabilized footage on your mobile device. But how exactly do you connect a gimbal to your phone?
In this comprehensive guide, we will walk you through the step-by-step process of connecting a gimbal to your phone. From choosing the right gimbal for your device to configuring the settings, we’ll cover all the necessary information to ensure a seamless connection. So, grab your smartphone and let’s get started on unlocking the full potential of your mobile photography and videography with a gimbal!
Inside This Article
- Step 1: Check compatibility- Compatible devices- Supported operating systems
- Step 2: Install the gimbal app- Download the app- Installation process
- Step 3: Power on the gimbal- Charge the gimbal- Power on/off instructions
- Step 4: Connect gimbal to phone- Bluetooth pairing process- Wi-Fi connection instructions
- Step 5: Calibrate and customize settings- Calibrating the gimbal- Adjusting settings for optimal performance
- Step 6: Test and troubleshoot – Testing the connection – Common troubleshooting tips
- Conclusion
- FAQs
Step 1: Check compatibility- Compatible devices- Supported operating systems
Before connecting your gimbal to your phone, it is important to ensure that your devices are compatible with each other. This will ensure a seamless and efficient connection, allowing you to make the most out of your gimbal’s capabilities.
First, check if your phone is compatible with the gimbal. Most modern smartphones are compatible, but it’s always a good idea to double-check. Look for the compatibility information on the gimbal’s product page or user manual. It will usually list the specific phone models that are known to work well with the gimbal.
Additionally, be aware of any specific requirements mentioned by the gimbal manufacturer. They may specify certain hardware or software specifications that are necessary for a smooth connection. This could include minimum processor speed, available RAM, or specific operating system versions.
Speaking of operating systems, it is crucial to verify that your phone’s OS is supported by the gimbal. Whether you are using iOS or Android, check the gimbal’s documentation for the minimum OS version required. Make sure your phone meets the requirements in order to avoid any compatibility issues.
It’s important to note that just because a device is compatible with the gimbal doesn’t necessarily mean it will be able to take advantage of all the gimbal’s features. Some older or lower-end phones may have limited functionality when connected to a gimbal. Keep this in mind when purchasing a gimbal or when considering upgrading your phone.
By checking the compatibility of your devices and ensuring they meet the necessary requirements, you can ensure a smooth and hassle-free connection between your gimbal and phone, allowing you to capture steady and professional-looking footage.
Step 2: Install the gimbal app- Download the app- Installation process
Installing the gimbal app on your phone is an essential step to connect and control your gimbal effectively. Here, we will guide you through the process of downloading and installing the app.
1. Download the app: Start by searching for the gimbal app in your phone’s app store. Whether you are using an iPhone or an Android device, you can easily find the app by searching for the gimbal’s brand name or model.
2. Installation process: Once you have located the gimbal app, tap on the “Download” or “Install” button to initiate the installation process. The app will begin downloading and installing on your phone automatically.
3. Grant necessary permissions: During the installation process, you may be prompted to grant certain permissions to the app. These permissions may include access to your camera, microphone, and storage. It is important to grant these permissions to ensure the smooth functioning of the gimbal app.
4. Sign in or create an account: After the app is installed, open it on your phone. You may be required to sign in with your existing account or create a new one. Follow the on-screen instructions to complete this step.
5. Update the app: It is always a good idea to check for any available updates for the gimbal app. Developers often release updates to improve performance, add new features, and fix any bugs. Look for the “Update” or “Check for Updates” option within the app and follow the prompts to update it to the latest version.
6. Launch the app: Once the app is installed and updated, you are ready to connect your gimbal to your phone. Launch the gimbal app from your phone’s app menu or home screen.
Important Note: Some gimbals may have their own specific companion apps, so it is important to refer to the manufacturer’s instructions to ensure you download the correct app for your gimbal model.
By following these steps, you can easily download and install the gimbal app on your phone, setting the stage for a seamless connection between your gimbal and your mobile device.
Step 3: Power on the gimbal- Charge the gimbal- Power on/off instructions
Before connecting your gimbal to your phone, it is important to ensure that the gimbal is powered on and properly charged. Here are the steps to follow:
1. Charge the gimbal: Most gimbals come with a built-in rechargeable battery. To charge the gimbal, locate the charging port on the gimbal and connect it to the included USB cable. Plug the other end of the cable into a power source, such as a USB port on your computer or a wall adapter. Allow the gimbal to charge for the recommended amount of time, usually indicated in the user manual.
2. Power on the gimbal: Once the gimbal is fully charged, it’s time to power it on. Different gimbals have different power buttons or switches, so refer to the user manual for your specific model. Typically, the power button is located on the handle or the back of the gimbal. Press and hold the power button until the LED indicators or the display screen on the gimbal turn on. This indicates that the gimbal is powered on and ready to be connected to your phone.
3. Power off the gimbal: When you’re done using the gimbal, it’s important to properly power it off to conserve battery life. To power off the gimbal, locate the power button and press and hold it until the LED indicators or the display screen turn off. Some gimbals may have a dedicated power off button or a specific sequence of button presses to power off. Refer to the user manual to ensure you power off the gimbal correctly.
By following these simple steps, you can ensure that your gimbal is properly powered on and ready to be connected to your phone. It is always a good idea to refer to the user manual that comes with your gimbal for any specific instructions or additional features related to power on/off functions.
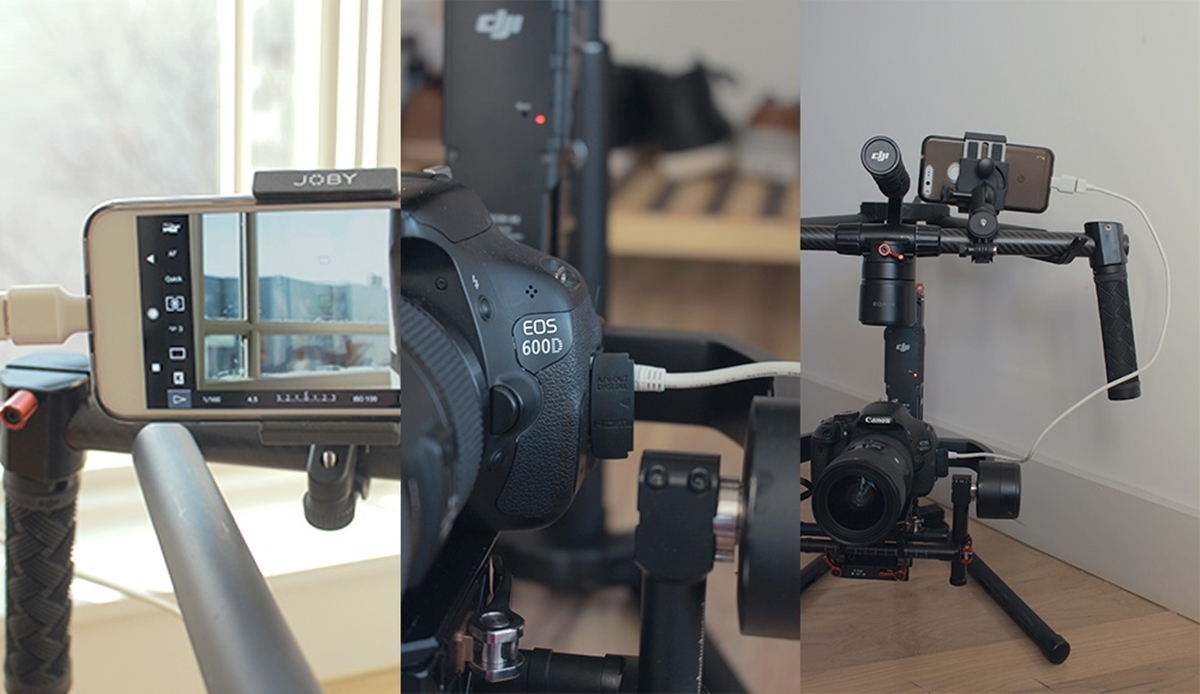
Step 4: Connect gimbal to phone- Bluetooth pairing process- Wi-Fi connection instructions
Connecting your gimbal to your phone is a crucial step to access its full functionality and unlock the creative possibilities it offers. There are two common methods to establish a connection: Bluetooth pairing and Wi-Fi connection. Let’s explore both options below:
Bluetooth pairing process:
To connect your gimbal to your phone via Bluetooth, follow these steps:
- Ensure that both your phone and gimbal have Bluetooth functionality enabled.
- Open the settings menu on your phone and navigate to the Bluetooth settings.
- Turn on the gimbal and activate its Bluetooth pairing mode. Refer to the gimbal’s user manual for specific instructions.
- On your phone, select the gimbal from the list of available Bluetooth devices.
- Once the pairing is successful, you will receive a notification or prompt indicating a successful connection.
Wi-Fi connection instructions:
In some cases, you may need to establish a Wi-Fi connection between your gimbal and phone for additional features or advanced controls. Here’s how you can connect your gimbal to your phone via Wi-Fi:
- Check if your gimbal supports Wi-Fi connectivity. Some gimbals have built-in Wi-Fi capabilities, while others may require an additional Wi-Fi module.
- If your gimbal supports Wi-Fi, download the companion app provided by the manufacturer and install it on your phone.
- Follow the app’s instructions to connect to the gimbal via Wi-Fi. This usually involves selecting the gimbal’s Wi-Fi network from your phone’s Wi-Fi settings.
- Enter the password or key provided by the gimbal to establish a secure connection.
- Once the connection is established, open the app and start using the gimbal’s advanced features and controls.
It’s important to note that the specific steps may vary depending on the brand and model of your gimbal. Always refer to the user manual or documentation provided by the manufacturer for accurate instructions.
Step 5: Calibrate and customize settings- Calibrating the gimbal- Adjusting settings for optimal performance
Once you have successfully connected your gimbal to your phone, it’s time to calibrate and customize the settings to ensure optimal performance. Calibrating the gimbal is an essential step to make sure it is properly balanced and ready to capture smooth and stable footage.
To calibrate the gimbal, follow the instructions provided by the manufacturer. This usually involves placing the gimbal on a flat surface and allowing it to auto-calibrate. Some gimbals may require manual adjustments, such as adjusting the roll, pitch, or yaw axes using the provided knobs or buttons.
Calibrating the gimbal ensures that it accurately responds to your movements, providing a more seamless and stable shooting experience. It also helps prevent any potential imbalances that could affect the quality of your footage.
In addition to calibrating the gimbal, you’ll also have the option to customize the settings according to your preferences and shooting requirements. These settings may vary depending on the specific gimbal model and accompanying app.
Some common settings you can adjust include the following:
- Follow mode: This mode allows the gimbal to smoothly follow your movements. You can adjust the sensitivity of the follow mode to better suit your shooting style.
- Pan speed: Control the speed at which the gimbal pans horizontally.
- Tilt speed: Adjust the speed at which the gimbal tilts vertically.
- Smoothness: This setting determines the level of smoothness in your footage. Increasing the smoothness can help eliminate any jerkiness or abrupt movements.
- Exposure control: Some gimbals have the ability to control the exposure settings of your camera, allowing you to manually adjust the brightness, ISO, and shutter speed.
Experimenting with these settings will help you achieve the desired effect and capture professional-looking footage. It’s important to note that every gimbal model may have its own unique set of customizable options, so make sure to explore the app and familiarize yourself with all the available settings.
Once you have customized the settings, take some time to test out the gimbal and see how it responds to your movements. Make any necessary adjustments to ensure the footage is smooth and stable.
If you encounter any issues or believe that the gimbal is not performing as expected, refer to the manufacturer’s troubleshooting guide or reach out to their customer support for assistance.
Remember, calibrating and customizing the settings of your gimbal is crucial to achieving professional-quality footage. So take the time to explore the options, experiment with the settings, and enjoy capturing smooth and stabilized videos with your gimbal and phone combination.
Step 6: Test and troubleshoot – Testing the connection – Common troubleshooting tips
Once you have successfully connected your gimbal to your phone and customized the settings, it’s time to test the connection and ensure everything is working smoothly. Here are some simple steps to follow and common troubleshooting tips if you encounter any issues.
1. Start by checking the stability of the connection. Move your phone around while it is attached to the gimbal and observe if it stays firmly in place. If you notice any wobbling or instability, it may indicate a loose connection. Try reconnecting the gimbal to your phone and ensure it is securely attached.
2. Next, test the movement of the gimbal. Rotate it in different directions and observe if your phone adjusts accordingly. Make sure the gimbal is responding accurately to your movements and providing smooth stabilization. If there are any jerky or uneven motions, you may need to recalibrate the gimbal.
3. Check the functionality of the gimbal controls. Test each button and switch to see if they are responsive and performing their intended functions. Ensure that you can adjust the tilt, pan, and other settings smoothly without any delays or malfunctions.
4. Take your gimbal-phone setup for a test video recording. Capture some footage while moving your phone around in various directions. Check if the stabilization is effective, providing steady and smooth footage. Monitor for any shakiness or excessive vibrations that could impact the overall quality of the recording.
5. If you encounter any issues during the testing phase, don’t worry. Here are some common troubleshooting tips to help you resolve them:
- Make sure your phone is fully charged and has enough storage space. Running low on battery or storage can affect the performance of the gimbal.
- Restart both your gimbal and your phone. Sometimes, a simple restart can resolve any temporary glitches.
- Update the firmware of your gimbal and the app on your phone. Manufacturers often release updates to improve performance and address any bugs or issues.
- Check for compatibility issues. Ensure that your gimbal and phone are compatible and meet the necessary requirements.
- Verify that you have followed the pairing and connection instructions correctly. Sometimes, a small oversight can prevent a successful connection.
By following these troubleshooting tips, you should be able to identify and resolve most common issues with connecting your gimbal to your phone. If, despite your best efforts, you continue to experience problems, it may be worth reaching out to the manufacturer’s support team for further assistance.
Remember, testing and troubleshooting are essential steps to ensure that your gimbal and phone work seamlessly together, providing you with stable and smooth footage for your videos.
Conclusion
Connecting a gimbal to your phone can greatly enhance your photography and videography skills. With the ability to stabilize your phone’s movements, capture smooth footage, and unlock creative possibilities, a gimbal is a valuable accessory to have. In this article, we explored the various steps and methods to connect a gimbal to your phone, including the use of Bluetooth, cable connections, and dedicated apps.
Whether you’re a professional photographer or a casual content creator, a gimbal can take your mobile photography to the next level. By following the instructions provided and ensuring compatibility with your phone, you can start enjoying the benefits of using a gimbal for smoother and more professional-looking videos and photos.
Remember to always refer to the user manual and guidelines provided by the gimbal manufacturer for specific instructions and troubleshooting. So, get your gimbal and start capturing stunning, stabilized footage with your phone!
FAQs
1. How do I connect a gimbal to my phone?
Connecting a gimbal to your phone is a simple process. Firstly, ensure that your phone is compatible with the gimbal you own. Then, attach your phone to the gimbal’s mounting bracket using the provided clamp or holder. Once securely attached, power on the gimbal and follow the manufacturer’s instructions to establish a Bluetooth or Wi-Fi connection between your phone and the gimbal. This connection will allow you to control the gimbal’s movements and access additional features through a dedicated app or the gimbal’s interface.
2. Can I use any gimbal with any phone?
While many gimbals are designed to be compatible with a wide range of phones, it’s essential to check the gimbal’s specifications and requirements before making a purchase. Factors such as phone size, weight, and operating system compatibility may vary between different gimbals. Additionally, some gimbals are intended for specific phone models or brands. To ensure a proper fit and optimum performance, it’s advisable to choose a gimbal that is specifically designed for your phone or one that offers compatibility with a wide range of phone models.
3. Do I need a separate app to connect my phone to the gimbal?
Most gimbals have dedicated apps that enhance the functionality and control options when using your phone with the gimbal. These apps can offer features like advanced movement control, time-lapse functions, subject tracking, and more. To connect your phone to the gimbal and access these additional features, you may need to download and install the specific app recommended by the gimbal’s manufacturer. However, basic gimbal control can often be achieved without the app, as many gimbals have manual control buttons on the gimbal itself.
4. Are there any specific settings I need to adjust on my phone before connecting it to the gimbal?
Before connecting your phone to the gimbal, it’s essential to ensure that certain settings are adjusted correctly. First, disable any image stabilization or anti-shake features that may be enabled on your phone’s camera settings. These features can interfere with the gimbal’s stabilization and result in undesirable effects. Additionally, check that your phone’s Bluetooth or Wi-Fi is enabled and that it is set to connect with the gimbal. Lastly, make sure that any automatic screen rotation or lock features are disabled, as these can affect the gimbal’s performance during operation.
5. Can I use the gimbal to charge my phone?
In general, gimbals are not designed to charge your phone. Their primary function is to stabilize your phone while capturing smooth videos or photos. However, some gimbals may offer limited charging capabilities through their built-in battery. These gimbals typically have a small power output that can be used to provide a slight charge to your phone in emergency situations. It’s important to note that relying on the gimbal to charge your phone extensively may drain the gimbal’s battery quickly, affecting its stability and performance.