
Are you looking to add a touch of ambiance and style to your home or workspace? LED lights are a popular choice due to their energy efficiency, versatility, and vibrant colors. But connecting LED lights with a connector may seem like a daunting task, especially for those who are not familiar with electrical wiring.
In this article, we will guide you through the process of connecting LED lights with a connector, step by step. Whether you’re looking to install LED strip lights, connect LED light bulbs, or create a custom lighting setup, we’ve got you covered. So, let’s dive in and bring some luminous magic to your space!
Inside This Article
- Types of LED Lights Connectors
- Steps to Connect LED Lights with Connectors
- Troubleshooting Common Issues with LED Lights Connection
- Conclusion
- FAQs
Types of LED Lights Connectors
LED lights come in a wide variety of styles and designs, and each type requires a specific connector to connect them to power sources. Here are some of the most common types of LED lights connectors:
1. 2-Pin Connectors: These connectors are the simplest and most basic type of LED light connectors. They usually consist of two pins, one positive and one negative, and are used for single-color LED lights.
2. 4-Pin Connectors: These connectors are commonly used for RGB (Red, Green, Blue) LED lights, which can produce a wide range of colors. The four pins correspond to the positive and negative terminals for each color channel.
3. 5-Pin Connectors: These connectors are similar to 4-pin connectors, but with an additional pin used for controlling different lighting effects or functions of the LED lights. They are often found in addressable LED strips and panels.
4. Barrel Connectors: Barrel connectors are cylindrical in shape and are commonly used to connect LED lights to power supplies. They have a male and female end, allowing for easy connection and disconnection.
5. Wire Connectors: Wire connectors, also known as butt connectors, are used to join two or more wires together. They are often used for custom installations or when extending the length of LED light strips.
6. Screw Terminal Connectors: These connectors have screw terminals that clamp down on the stripped ends of the LED light wires. They provide a secure and reliable connection and are commonly used in permanent installations.
7. Quick Connectors: Quick connectors are designed for easy and quick installation. They typically feature a push-in or snap-in design, allowing for a hassle-free connection without the need for any tools.
It’s important to note that different LED lights manufacturers may use their own proprietary connectors, so it’s always a good idea to check the specifications of your LED lights and ensure you have the correct connector for your specific model.
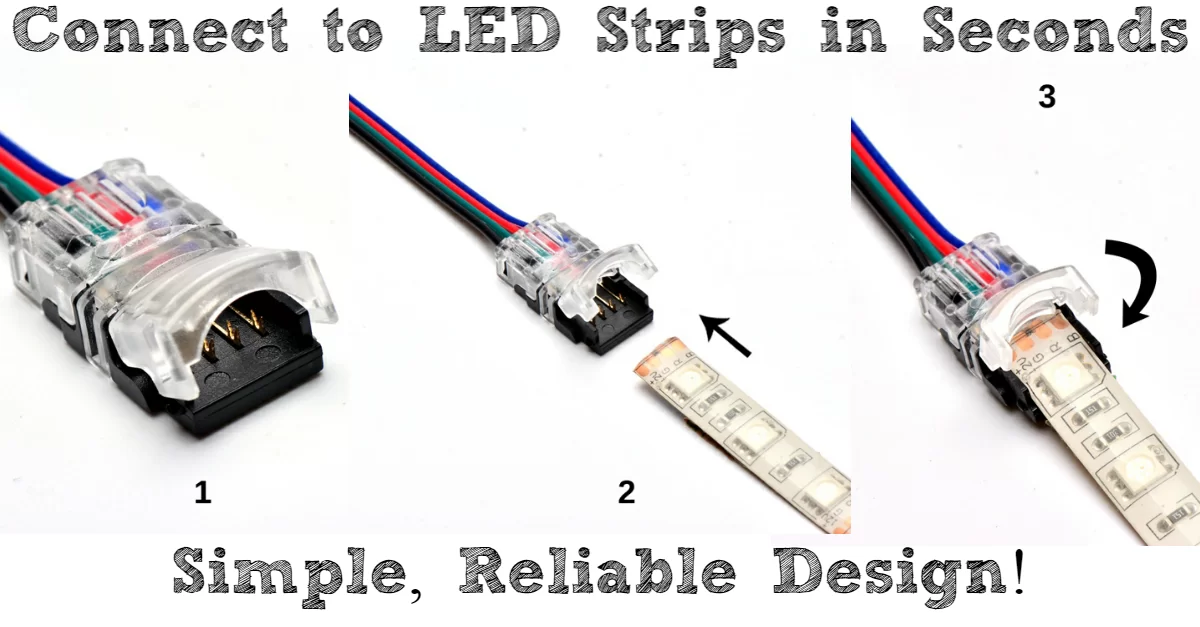
Steps to Connect LED Lights with Connectors
LED lights have become immensely popular for their energy efficiency and versatility in lighting up homes, offices, and outdoor spaces. One of the key aspects of installing LED lights is connecting them with the appropriate connectors. In this guide, we will walk you through the steps to connect LED lights with connectors, ensuring a seamless and reliable connection.
- Gather the necessary materials: Before you start, make sure you have all the required materials at hand. This includes LED lights, connectors, a screwdriver, wire strippers, and electrical tape.
- Prepare the LED lights: Begin by preparing the LED lights for connection. Cut the LED strip at the designated cutting points, if necessary, and remove the protective covering from the adhesive side of the strip.
- Strip the wires: Use wire strippers to remove a small portion of the insulation from the ends of the LED light strip’s wires. This will expose the bare copper wires, allowing for easier connection.
- Prepare the connector: Take the connector that is compatible with your LED lights and ensure it is in the open position. Some connectors may require you to unscrew or slide a cover to access the connection terminals.
- Insert the wires: Insert the exposed wires of the LED light strip into the designated terminals of the connector. Make sure to match the positive (+) and negative (-) terminals correctly to ensure proper electrical flow.
- Secure the connection: Once the wires are inserted into the connector, secure the connection by tightening screws or closing the cover, depending on the type of connector you are using. This will ensure a secure and reliable electrical connection.
- Test the connection: Before finalizing the installation, it is crucial to test the connection to ensure everything is working correctly. Connect the LED lights to a power source and check if they light up as expected. If not, double-check the wiring connections.
- Repeat and extend: If you are installing multiple LED light strips, repeat the above steps for each connection. To extend the length of the LED lights, use additional connectors to join the strips together.
- Secure and hide the wires: After confirming that all the connections are working properly, secure and hide the wires using electrical tape or cable management solutions. This will provide a neat and tidy appearance for your LED light installation.
By following these simple steps, you can easily connect LED lights with connectors, creating a well-lit and visually appealing space. Whether you are installing LED lights for ambient lighting, accent lighting, or decorative purposes, proper connection is essential for optimal performance and longevity.
Troubleshooting Common Issues with LED Lights Connection
LED lights can be a great addition to any space, bringing brightness and energy efficiency. However, just like any electrical connection, LED lights can sometimes encounter issues. If you’re facing problems with your LED lights connection, don’t worry. In this section, we’ll cover some common issues and provide troubleshooting solutions.
1. Lights not turning on: If your LED lights are not turning on, the first thing to check is the power source. Ensure that the power supply is connected properly and that there is a power output. If the power source is fine, check the connection between the LED lights and the power supply. Make sure the connectors are securely attached and that there are no loose or damaged cables.
2. Flickering lights: Flickering LED lights can be frustrating. One possible cause of this issue is a faulty connection. Check if the connectors are tightly secured and that there are no loose connections. Another cause of flickering lights could be an incompatible dimmer switch. LED lights require a specific dimmer switch designed for their needs. If you’re using a regular dimmer switch, it may not be compatible with LED lights and can cause flickering.
3. Uneven brightness: If you notice that your LED lights have uneven brightness, the issue may lie in the connection. Check if the connectors are properly aligned and securely attached. Sometimes, a loose connection can cause fluctuations in brightness. Additionally, ensure that the LED lights are compatible with the power supply. Mismatched voltage or wattage can also cause variations in brightness.
4. Lights turning on and off randomly: Randomly turning on and off LED lights can be a sign of a loose connection or a faulty power supply. Inspect the connectors for any loose or damaged parts and make sure they are securely connected. If the issue persists, try using a different power supply to determine if the problem lies in the original one.
5. Overheating: Overheating LED lights can be a safety concern. If your LED lights are getting excessively hot, it could be due to a poor connection. Make sure the connectors are properly attached and that there are no loose or damaged wires. Additionally, check for any obstructions or blockages around the LED lights that may be causing heat buildup.
Remember to always follow safety guidelines when troubleshooting LED lights connections. If you are unsure about handling electrical connections, it’s best to consult a professional electrician to ensure your safety and avoid any damage to your LED lights or property.
By identifying and addressing these common issues, you can enjoy your LED lights without any interruptions. Troubleshooting the connection problems will not only improve the performance of your LED lights but also extend their lifespan.
Conclusion
Connecting LED lights with a connector is a simple and convenient way to enhance the lighting options in your home or workspace. Whether you’re looking to add some ambiance to a room or improve task lighting, LED lights offer a versatile and energy-efficient solution. With the right connector, you can easily install and connect multiple LED light strips or fixtures without the need for complex wiring.
By following the step-by-step guide outlined in this article, you can ensure a successful connection and enjoy the benefits of LED lighting. Remember to choose the appropriate type of connector based on your LED light setup and consult the manufacturer’s instructions for any specific requirements. With a little bit of effort and the right equipment, you can transform your space with beautiful and customizable LED lighting.
So why wait? Start exploring the possibilities of LED lights today and create the perfect ambiance for any occasion!
FAQs
1. How do I connect LED lights with a connector?
To connect LED lights with a connector, follow these steps:
- Ensure that the power is turned off before starting the installation process.
- Choose the right connector for your LED lights. There are various types of connectors available, such as strip-to-strip connectors, strip-to-power connectors, and corner connectors.
- Align the positive and negative terminals of the LED strip with the corresponding terminals of the connector.
- Gently insert the LED strip into the connector, making sure it is fully seated and secure.
- Repeat the process for the additional LED strips or connectors, if needed.
- Once all the connections are made, double-check that everything is securely connected and aligned.
- Finally, turn on the power to test the LED lights and ensure they are functioning properly.
2. What if my LED lights do not come with a connector?
If your LED lights do not come with a connector, you have a few options:
- Purchase the appropriate connector separately. Determine the type of connector needed for your LED lights and then acquire it from a trusted supplier or retailer.
- Consider using wire nuts or soldering to make the connections. This option requires some electrical knowledge and expertise. Ensure that you properly insulate the connections to avoid any potential hazards.
- Consult a professional electrician or an LED light specialist who can assist you in finding the best solution for connecting your LED lights without a connector.
3. Can I cut LED lights and still use a connector?
Yes, you can cut LED lights and still use a connector. Many LED light strips are designed to be cut at specific intervals, usually marked with cut lines. To use a connector after cutting the LED lights:
- Cut the LED light strip along the designated cut line.
- Prepare the ends of the cut strips by removing the protective coating, if any.
- Insert the prepared ends into the connector, ensuring the positive and negative terminals are aligned correctly.
- Secure the connection by gently pushing the LED strip into the connector until it is fully seated.
4. What if I encounter difficulties connecting the LED lights with a connector?
If you encounter difficulties connecting LED lights with a connector, consider the following troubleshooting steps:
- Ensure that both the LED lights and the connector are compatible.
- Carefully check the alignment of the positive and negative terminals. Improper alignment can prevent a secure connection.
- Clean the ends of the LED strips and the connector to remove any dust or debris that may hinder the connection.
- Check the power source and make sure it is providing adequate power to the LED lights.
- If you are still having trouble, consult the manufacturer’s instructions or reach out to customer support for further assistance.
5. Can I use different types of connectors for my LED lights?
It depends on the specific LED lights and connectors you are using. Different types of connectors are designed for specific purposes and may not be interchangeable. It is important to ensure that the connector you choose is compatible with your LED lights. Consult the manufacturer’s instructions or seek professional advice if you are unsure about using different types of connectors for your LED lights.