
Motorcycle enthusiasts often enjoy listening to their favorite music while cruising down the open road. The best way to do this is by installing Bluetooth speakers on their motorcycles. Bluetooth speakers not only provide a convenient and wireless audio experience but also ensure that the rider can stay focused on the road while enjoying their favorite tunes.
In this article, we will guide you through the process of installing Bluetooth speakers on a motorcycle. From choosing the right speakers to connecting them to your motorcycle”s electrical system, we will cover all the essential steps. So, whether you are a seasoned rider looking to upgrade your audio system or a beginner seeking to enhance your riding experience, this article has got you covered. Get ready to hit the road with the perfect soundtrack!
Inside This Article
- Necessary Preparations
- Mounting the Bluetooth Speakers
- Power Connection
- Finalizing the Installation
- Troubleshooting Tips
- Conclusion
- FAQs
Necessary Preparations
Prior to installing Bluetooth speakers on your motorcycle, there are a few necessary preparations you need to make. These steps will ensure a smooth and hassle-free installation process, allowing you to fully enjoy the benefits of having wireless audio on your rides. Here are the essential preparations:
1. Choose the Suitable Bluetooth Speakers: Selecting the right Bluetooth speakers for your motorcycle is crucial. Consider factors such as size, sound quality, durability, and waterproofing capabilities. Look for speakers that are specifically designed for motorcycles and offer features suited for outdoor use.
2. Check Compatibility: Verify that the Bluetooth speakers you choose are compatible with your motorcycle’s audio system. Some speakers may require additional adapters or connectors to connect seamlessly with your existing setup. Ensure that the speakers can be easily integrated with your bike’s electrical system.
3. Gather the Necessary Tools: To successfully install Bluetooth speakers on your motorcycle, you’ll need a set of basic tools. These typically include a screwdriver, wire cutter/stripper, electrical tape, zip ties, and a drill (if required for mounting). Having these tools ready beforehand will make the installation process more efficient.
4. Read the User Manual: Before you begin the installation, carefully read the user manual that comes with the Bluetooth speakers. Familiarize yourself with the instructions, diagrams, and warnings provided by the manufacturer. Following the manual’s guidelines will help you avoid any potential mistakes or accidents during the installation process.
5. Plan the Speaker Placement: Determine where you want to mount the Bluetooth speakers on your motorcycle. Consider factors such as visibility, accessibility, and avoiding interference with other parts of the bike. It’s also essential to ensure that the speakers won’t obstruct your vision or the functionality of your bike’s controls.
6. Prepare the Mounting Surface: Clean and prepare the surface where you will be mounting the speakers. Ensure that it is free from dust, dirt, or any other debris that could affect the adhesive or mounting process. If necessary, use a suitable cleaner to wipe down the surface and let it dry completely before proceeding.
By following these necessary preparations, you are setting yourself up for a successful installation of Bluetooth speakers on your motorcycle. Taking the time to choose the right speakers, gather the proper tools, and plan the installation will help ensure a seamless process and optimal performance once the speakers are installed.
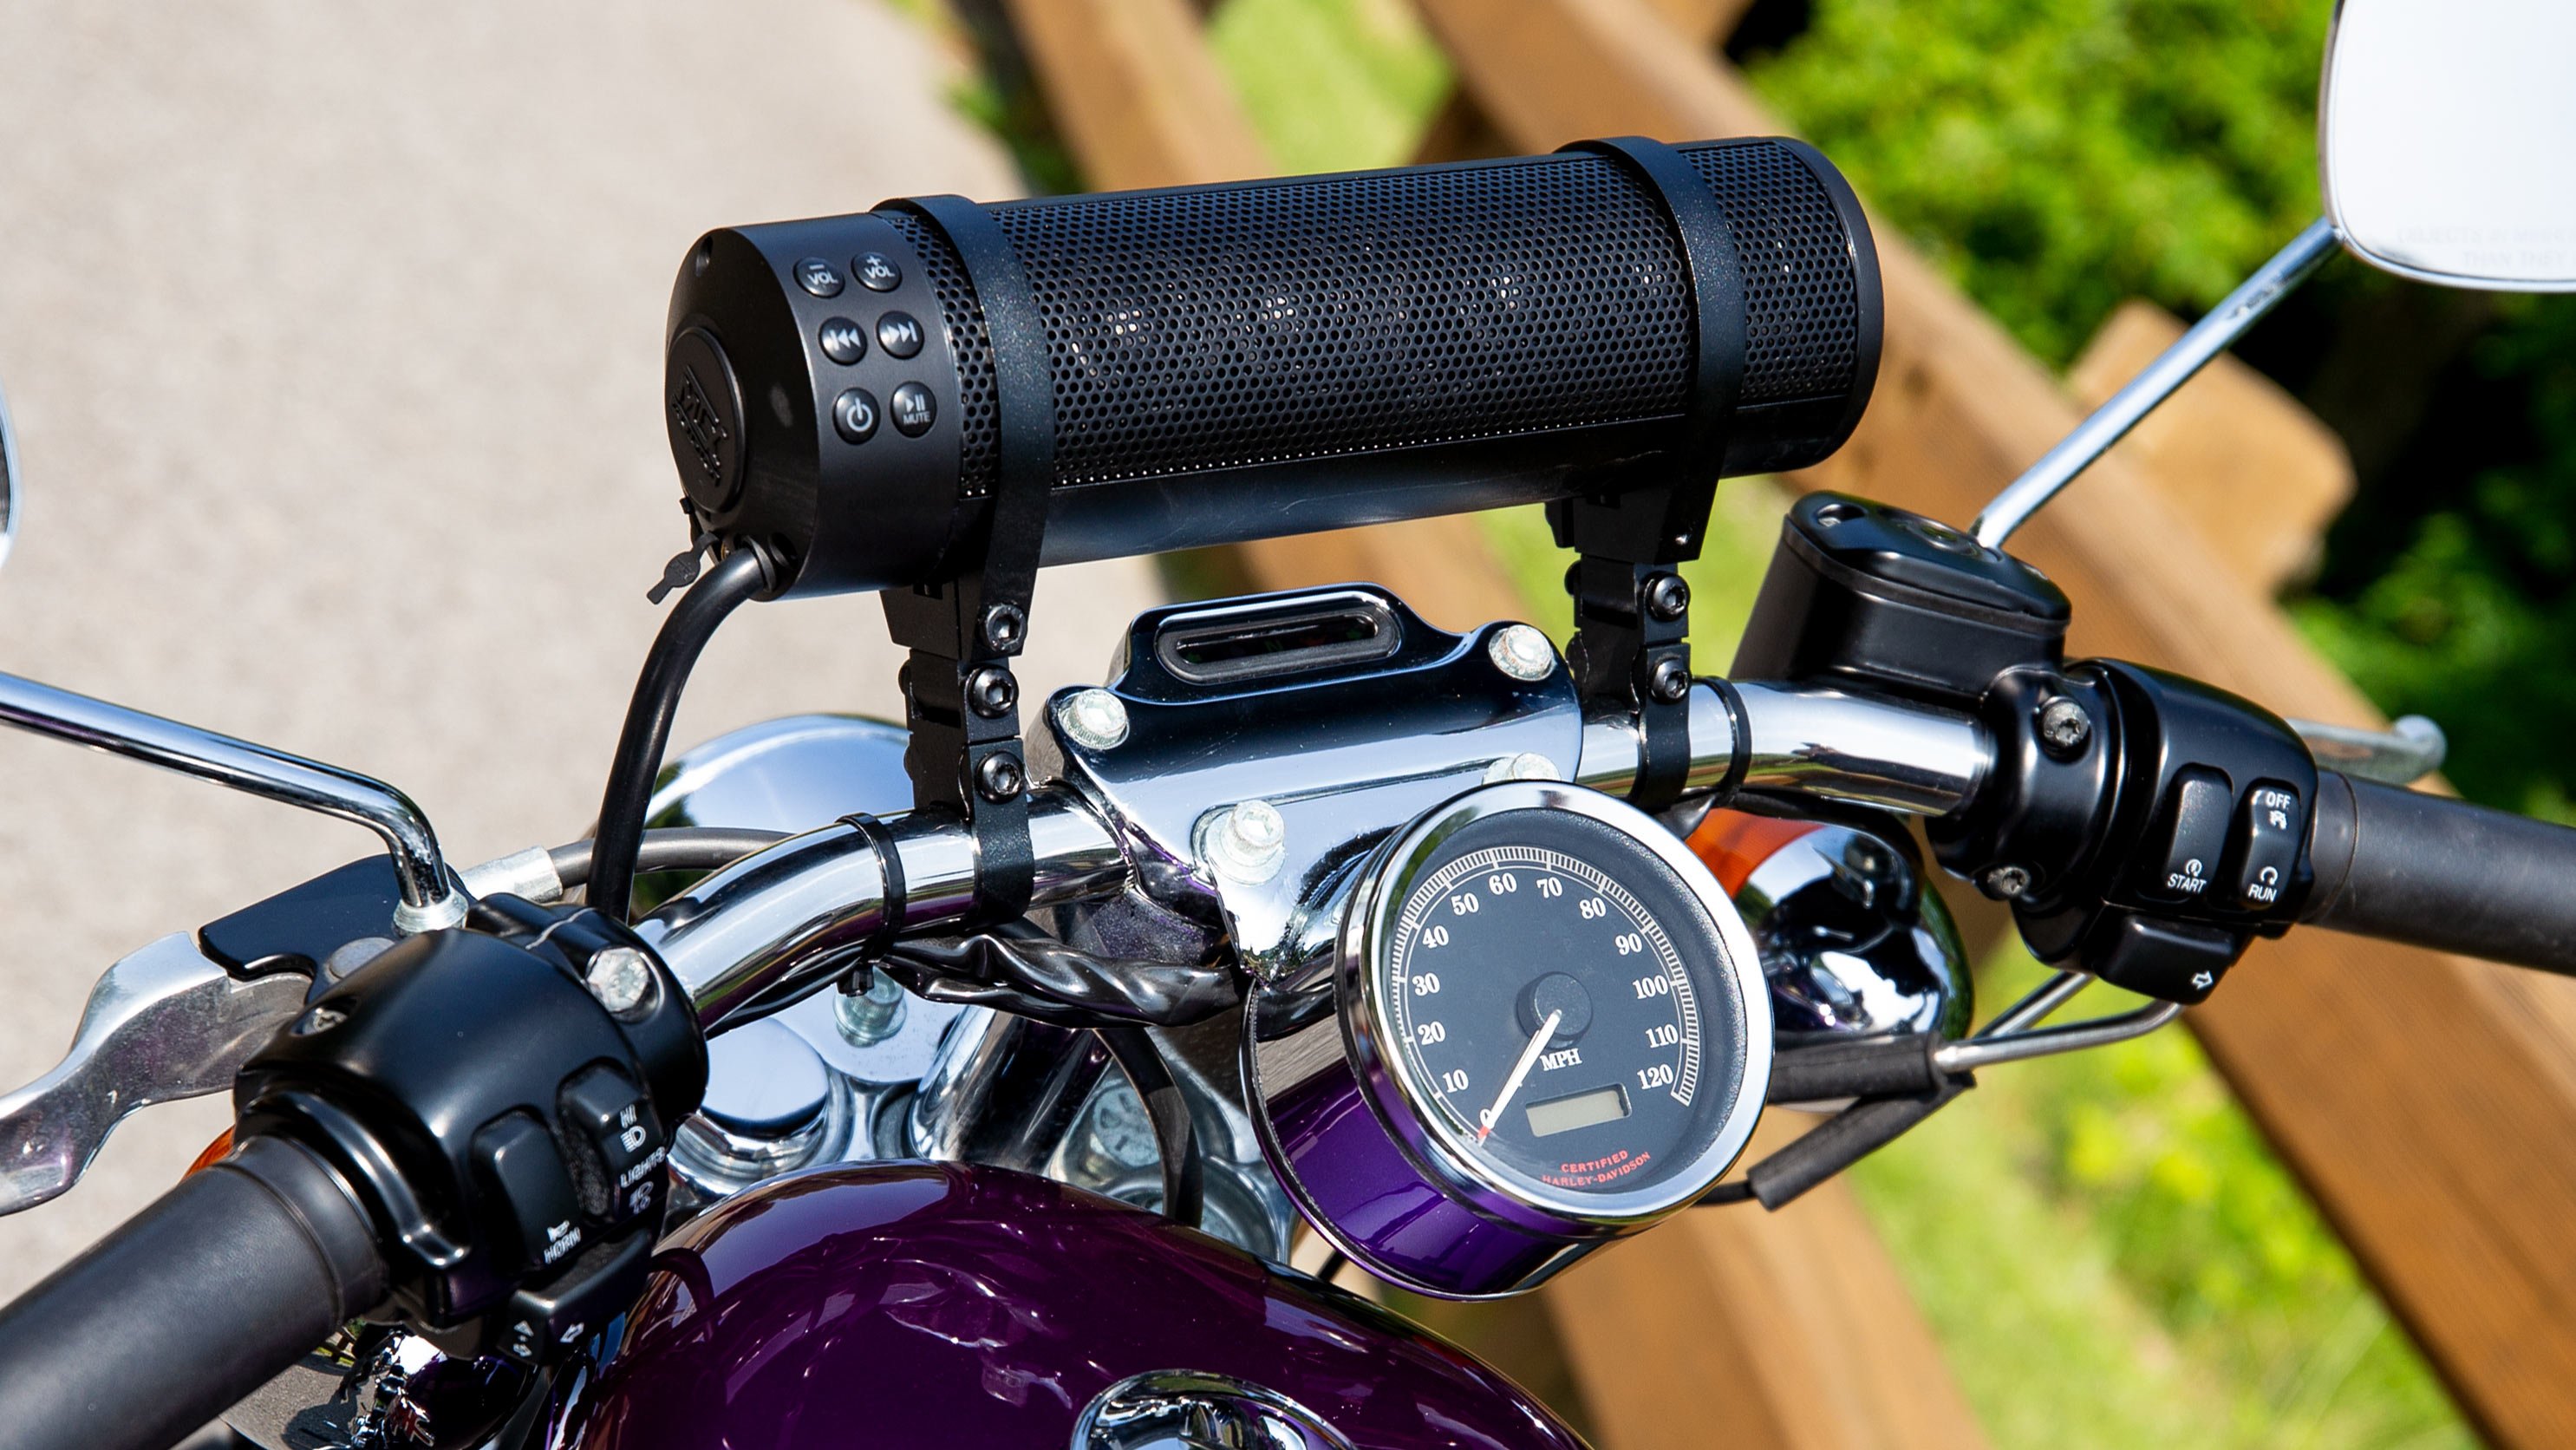
Mounting the Bluetooth Speakers
Mounting the Bluetooth speakers on your motorcycle is a crucial step in the installation process. It ensures that the speakers are securely in place and won’t move or fall off during your rides. Here are some steps to follow for a successful mounting:
1. Choose the Ideal Location: Begin by selecting the best location on your motorcycle to mount the speakers. Consider factors such as visibility, accessibility, and aesthetic appeal. Most commonly, riders prefer to mount the speakers on the handlebars, the rearview mirrors, or the saddlebags.
2. Check Compatibility: Before mounting the speakers, make sure they are compatible with your motorcycle model. Check the specifications provided by the manufacturer to ensure a proper fit. In case you have any doubts, consult a professional or contact customer support for guidance.
3. Clean the Surface: Clean the mounting surface thoroughly to ensure optimal adhesion. Use a mild cleaner or rubbing alcohol to remove any dirt, debris, or grease. This step will help the adhesive or mounting bracket to adhere firmly to the surface.
4. Use Adhesive or Mounting Brackets: Depending on the mounting options provided with your Bluetooth speakers, you can choose between adhesive strips or mounting brackets. Adhesive strips are generally used for smooth surfaces, while mounting brackets provide additional stability and flexibility.
5. Apply Adhesive or Install Mounting Brackets: If using adhesive strips, carefully peel off the backing and apply the strips to the desired location on your motorcycle. Press firmly to ensure a secure bond. If using mounting brackets, follow the instructions provided by the manufacturer to install them correctly.
6. Attach the Speakers: Once the adhesive has set or the mounting brackets are installed, attach the Bluetooth speakers to the designated area. Make sure the speakers are properly aligned and firmly secured in place. Keep in mind that the speakers should be angled towards the rider for optimal sound projection.
7. Test the Stability: After mounting the speakers, give them a gentle tug to ensure they are securely attached. Shake your motorcycle lightly to check for any movement or instability. If the speakers feel loose or wobbly, reposition them or tighten the mounting hardware as needed.
8. Double-Check Connectivity: Before completing the installation, double-check the connectivity of your Bluetooth speakers. Ensure that they are properly paired with your mobile device or motorcycle’s audio system. This step will help you avoid any troubleshooting later on.
Remember, proper mounting of Bluetooth speakers is essential for optimal performance and durability. Take your time during this step to ensure a secure and stable installation. Once the speakers are mounted, you can move on to the next step in the installation process – the power connection.
Power Connection
Once you have successfully mounted the Bluetooth speakers on your motorcycle, the next step is to establish the power connection. This is crucial as it will ensure that your speakers receive the necessary power to function properly.
Before you begin the power connection process, it’s important to review your motorcycle’s electrical system to determine the available power source options. Most motorcycles have a few different power sources, such as the battery, ignition switch, or accessory terminal.
If your motorcycle has an accessory terminal, it is usually the easiest and most convenient option to use for powering your Bluetooth speakers. The accessory terminal is specifically designed to power additional accessories, making it a reliable choice for your speakers.
To connect the speakers to the accessory terminal, you will need to locate the terminal, typically located near the battery or fuse box. Once you have identified it, use a suitable wire gauge to connect the positive terminal of the speakers to the corresponding positive terminal of the accessory terminal. Similarly, connect the negative terminals together.
If your motorcycle does not have an accessory terminal, you can still connect the speakers to the battery directly. Keep in mind that this method requires extra caution to avoid any damage to your motorcycle’s electrical system.
To connect the speakers to the battery, you will need to find a suitable location nearby to mount a fuse holder. This will protect your speakers and your motorcycle’s electrical system from any power surges. Connect the positive terminal of the speakers to the fuse holder, and then connect the fuse holder to the positive terminal of the battery. Repeat the same process for the negative terminals.
It’s essential to ensure that the power connection is secure and free from any loose connections. Additionally, you may want to consider using wire loom or cable ties to neatly secure the wires and prevent them from interfering with other components of your motorcycle.
After the power connection is complete, it’s recommended to double-check all the connections and ensure that everything is properly insulated to prevent any short circuits or electrical issues while riding.
Remember, if you are unsure about the power connection process, it is always recommended to consult a professional or seek assistance from someone with experience in motorcycle electrical systems. Safety should always be the top priority.
Finalizing the Installation
Once the Bluetooth speakers are securely mounted and the power connection has been completed, it’s time to finalize the installation. Here are a few key steps to ensure everything is set up correctly:
- Pairing the Speakers: Before you can start enjoying your music on the go, you need to pair the Bluetooth speakers with your mobile device. Refer to the user manual of your speakers for detailed instructions on how to do this. Generally, you’ll need to put the speakers in pairing mode and then search for them on your device’s Bluetooth settings.
- Testing the Audio: Once the pairing process is complete, it’s important to test the audio to ensure the speakers are working as expected. Play some music or any audio of your choice from your mobile device and verify that the sound is clear and loud enough. Adjust the volume levels on both your mobile device and the speakers to achieve the desired listening experience.
- Securing Loose Wiring: Double-check all the wiring connections to make sure they are secure and free from any loose connections. Loose wiring can cause audio interruptions or result in the speakers not functioning properly. Secure any loose wires with zip ties or electrical tape, ensuring that they are tightly fastened and will not interfere with the operation of your motorcycle.
- Adjusting the Speaker Angle: While testing the audio, you may want to adjust the angle of the speakers to optimize the sound projection. Most Bluetooth speakers come with adjustable mounts, allowing you to tilt or rotate them for the best audio experience. Experiment with different angles to find the one that works best for you, ensuring that the sound is directed towards you while riding.
- Testing the Waterproofing: If you have chosen waterproof Bluetooth speakers, it’s vital to verify their water resistance capabilities. This can be done by either exposing the speakers to light rain or splashing water on them. Ensure that no water penetrates the speaker housing or any exposed wiring connections. If there are any signs of water damage, it may be necessary to reseal or replace the speakers.
- Proper Maintenance: To ensure the longevity and optimal performance of your Bluetooth speakers, it’s important to take proper care of them. Clean the speakers regularly using a soft cloth to remove any dust or dirt that may accumulate. Avoid using harsh cleaning agents that could potentially damage the speaker housing or components. Additionally, protect the speakers from extreme temperatures or direct sunlight when not in use, as these factors can impact their performance over time.
By following these final steps, you can confidently enjoy your favorite tunes while cruising on your motorcycle. Keep in mind that each speaker model may have unique features and installation requirements, so always refer to the manufacturer’s instructions for specific guidelines. Ride safe and rock on!
Troubleshooting Tips
While installing Bluetooth speakers on a motorcycle can greatly enhance your riding experience, there may be instances where you encounter some issues. Don’t worry, though, as we have compiled a list of common troubleshooting tips to help you get your speakers up and running smoothly.
1. Check the power source: If you’re experiencing issues with your Bluetooth speakers, the first thing to check is the power source. Ensure that the speakers are receiving proper voltage and that the power connections are securely in place.
2. Confirm Bluetooth pairing: If you can’t establish a connection between your smartphone and the speakers, double-check that both devices are in pairing mode. Ensure that the Bluetooth settings on your smartphone are enabled and set to discoverable.
3. Reset the speakers: If you’re still having trouble connecting, performing a factory reset on your Bluetooth speakers can often resolve the issue. Refer to the user manual for instructions on how to complete this process.
4. Update firmware: Outdated firmware can cause connectivity problems. Check for any available firmware updates for your Bluetooth speakers and follow the manufacturer’s instructions for updating the firmware.
5. Verify Bluetooth range: Bluetooth has a limited range, so if you’re experiencing intermittent connections or dropouts, ensure that the distance between your smartphone and the speakers is within the specified range. Objects such as buildings or large electronic devices can also interfere with the Bluetooth signal.
6. Ensure compatibility: Check that your smartphone and Bluetooth speakers are compatible with each other. Some older devices may not support the latest Bluetooth technology, leading to compatibility issues. Upgrading to a newer smartphone or speakers may be necessary.
7. Recharge or replace batteries: If your Bluetooth speakers are battery-powered, ensure that the batteries are charged or replace them if they are old or no longer holding a charge. Weak batteries can result in poor sound quality or a loss of connectivity.
8. Adjust volume and audio settings: If you’re experiencing distorted or low-quality sound, check the volume settings on your smartphone and speakers. Make sure they are set to an appropriate level and that any audio enhancements or equalizer settings are properly configured.
9. Seek professional assistance: If you have exhausted all troubleshooting options and are still unable to resolve the issues, consider reaching out to a professional technician or the customer support of the Bluetooth speaker manufacturer. They may be able to offer specialized assistance or guidance.
By following these troubleshooting tips, you can overcome common challenges and ensure that your Bluetooth speakers provide you with an immersive and enjoyable audio experience while riding your motorcycle.
As we come to the end of this article, it is clear that installing Bluetooth speakers on a motorcycle can greatly enhance your riding experience. Not only do they allow you to enjoy your favorite music or podcasts while on the road, but they also provide the convenience of hands-free communication.
By following the steps outlined in this article and choosing the right set of Bluetooth speakers that are compatible with your motorcycle, you can easily enjoy high-quality sound and stay connected with ease.
Remember to consider factors such as durability, waterproofing, and ease of installation when selecting your Bluetooth speakers. Additionally, ensure that you take proper safety precautions and follow local laws and regulations regarding the use of audio devices while riding.
So, gear up and ride to the rhythm of your favorite tunes by installing Bluetooth speakers on your motorcycle. Let the music elevate your ride to a whole new level of enjoyment!
FAQs
1. Can I install Bluetooth speakers on any motorcycle model?
Yes, Bluetooth speakers can be installed on almost any motorcycle model as long as there is enough space to mount the speakers and a power source to connect them to. However, it is recommended to check the compatibility of the Bluetooth speakers with your specific motorcycle model before making a purchase.
2. Do I need any special tools to install Bluetooth speakers on a motorcycle?
The tools required for installing Bluetooth speakers on a motorcycle may vary depending on the specific installation process and the type of speakers being used. In general, you may need basic hand tools such as screwdrivers, wrenches, and pliers, along with electrical connectors and wiring tools. It is advisable to refer to the installation instructions provided by the speaker manufacturer for the specific tools required.
3. How do I connect my Bluetooth speakers to my motorcycle’s audio system?
Connecting Bluetooth speakers to your motorcycle’s audio system typically involves pairing the speakers with a Bluetooth-enabled device such as a smartphone or a Bluetooth transmitter. Once the speakers are paired, you can stream music or other audio content wirelessly from your device to the speakers. Some advanced speaker models may also have the option to connect directly to the motorcycle’s audio system via auxiliary inputs or other audio connections.
4. Are Bluetooth speakers water-resistant or waterproof for motorcycle use?
While not all Bluetooth speakers are specifically designed for motorcycle use, there are many options available that are water-resistant or waterproof. These speakers are built to withstand exposure to various weather conditions, including rain and moisture. When purchasing Bluetooth speakers for your motorcycle, look for those that have an IPX rating, which indicates their level of water resistance. Higher IPX ratings, such as IPX7, offer better protection against water ingress.
5. Can I use Bluetooth speakers while wearing a helmet?
Yes, it is possible to use Bluetooth speakers while wearing a helmet. Many Bluetooth speakers for motorcycles are designed to be helmet-compatible, allowing you to connect the speakers to your helmet’s integrated communication system or directly to your smartphone. This enables you to listen to music, receive GPS instructions, or take phone calls hands-free while riding. However, it is important to ensure that the volume levels are set at a safe level to maintain situational awareness on the road.