
Are you struggling with removing the screen protector from your Otterbox Defender? You’re not alone! Many users find it challenging to remove the screen protector without causing any damage. Fortunately, with the right approach and some handy tips, you can easily remove the screen protector from your Otterbox Defender without any hassle.
In this article, we will guide you through the step-by-step process of removing the Otterbox Defender screen protector. Whether you want to replace it with a new one or simply remove it for cleaning purposes, we’ve got you covered. With our expert tips and tricks, you’ll be able to remove the screen protector smoothly and protect the integrity of your device.
So, let’s dive in and discover the best methods for removing the screen protector from your Otterbox Defender, ensuring that you can enjoy a clear and crisp display on your mobile device.
Inside This Article
- Introduction
- Overview of the Otterbox Defender Screen Protector
- Step-by-Step Guide on Removing the Otterbox Defender Screen Protector
- Alternative Methods for Removing the Otterbox Defender Screen Protector
- Conclusion
- FAQs
How To Remove Otterbox Defender Screen Protector
Introduction
So, you’re the proud owner of an Otterbox Defender case, known for its exceptional protection for your mobile device. However, you might find yourself wanting to remove the screen protector that comes with it. Whether it’s because you prefer the naked touch of your phone’s original screen or you want to replace it with a different screen protector, removing the Otterbox Defender screen protector requires a few simple steps. In this article, we will guide you through the process of safely and effectively removing the Otterbox Defender screen protector.
Before we dive into the details, it’s important to note that removing the screen protector can void any warranty or protection offered by Otterbox. It is always recommended to consult the manufacturer’s guidelines or customer support before attempting any modifications to their products. With that in mind, let’s get started!
Firstly, gather the necessary tools for the removal process. You will need a microfiber cloth, a plastic card or similar object with a thin and flat edge, and a hairdryer (optional).
Having the right tools in hand, let’s move on to removing the Otterbox Defender screen protector. Take your mobile device out of the case and lay it on a clean and flat surface. Ensure that your hands are clean and free from any dirt or oils to avoid transferring them to the screen during the removal process.
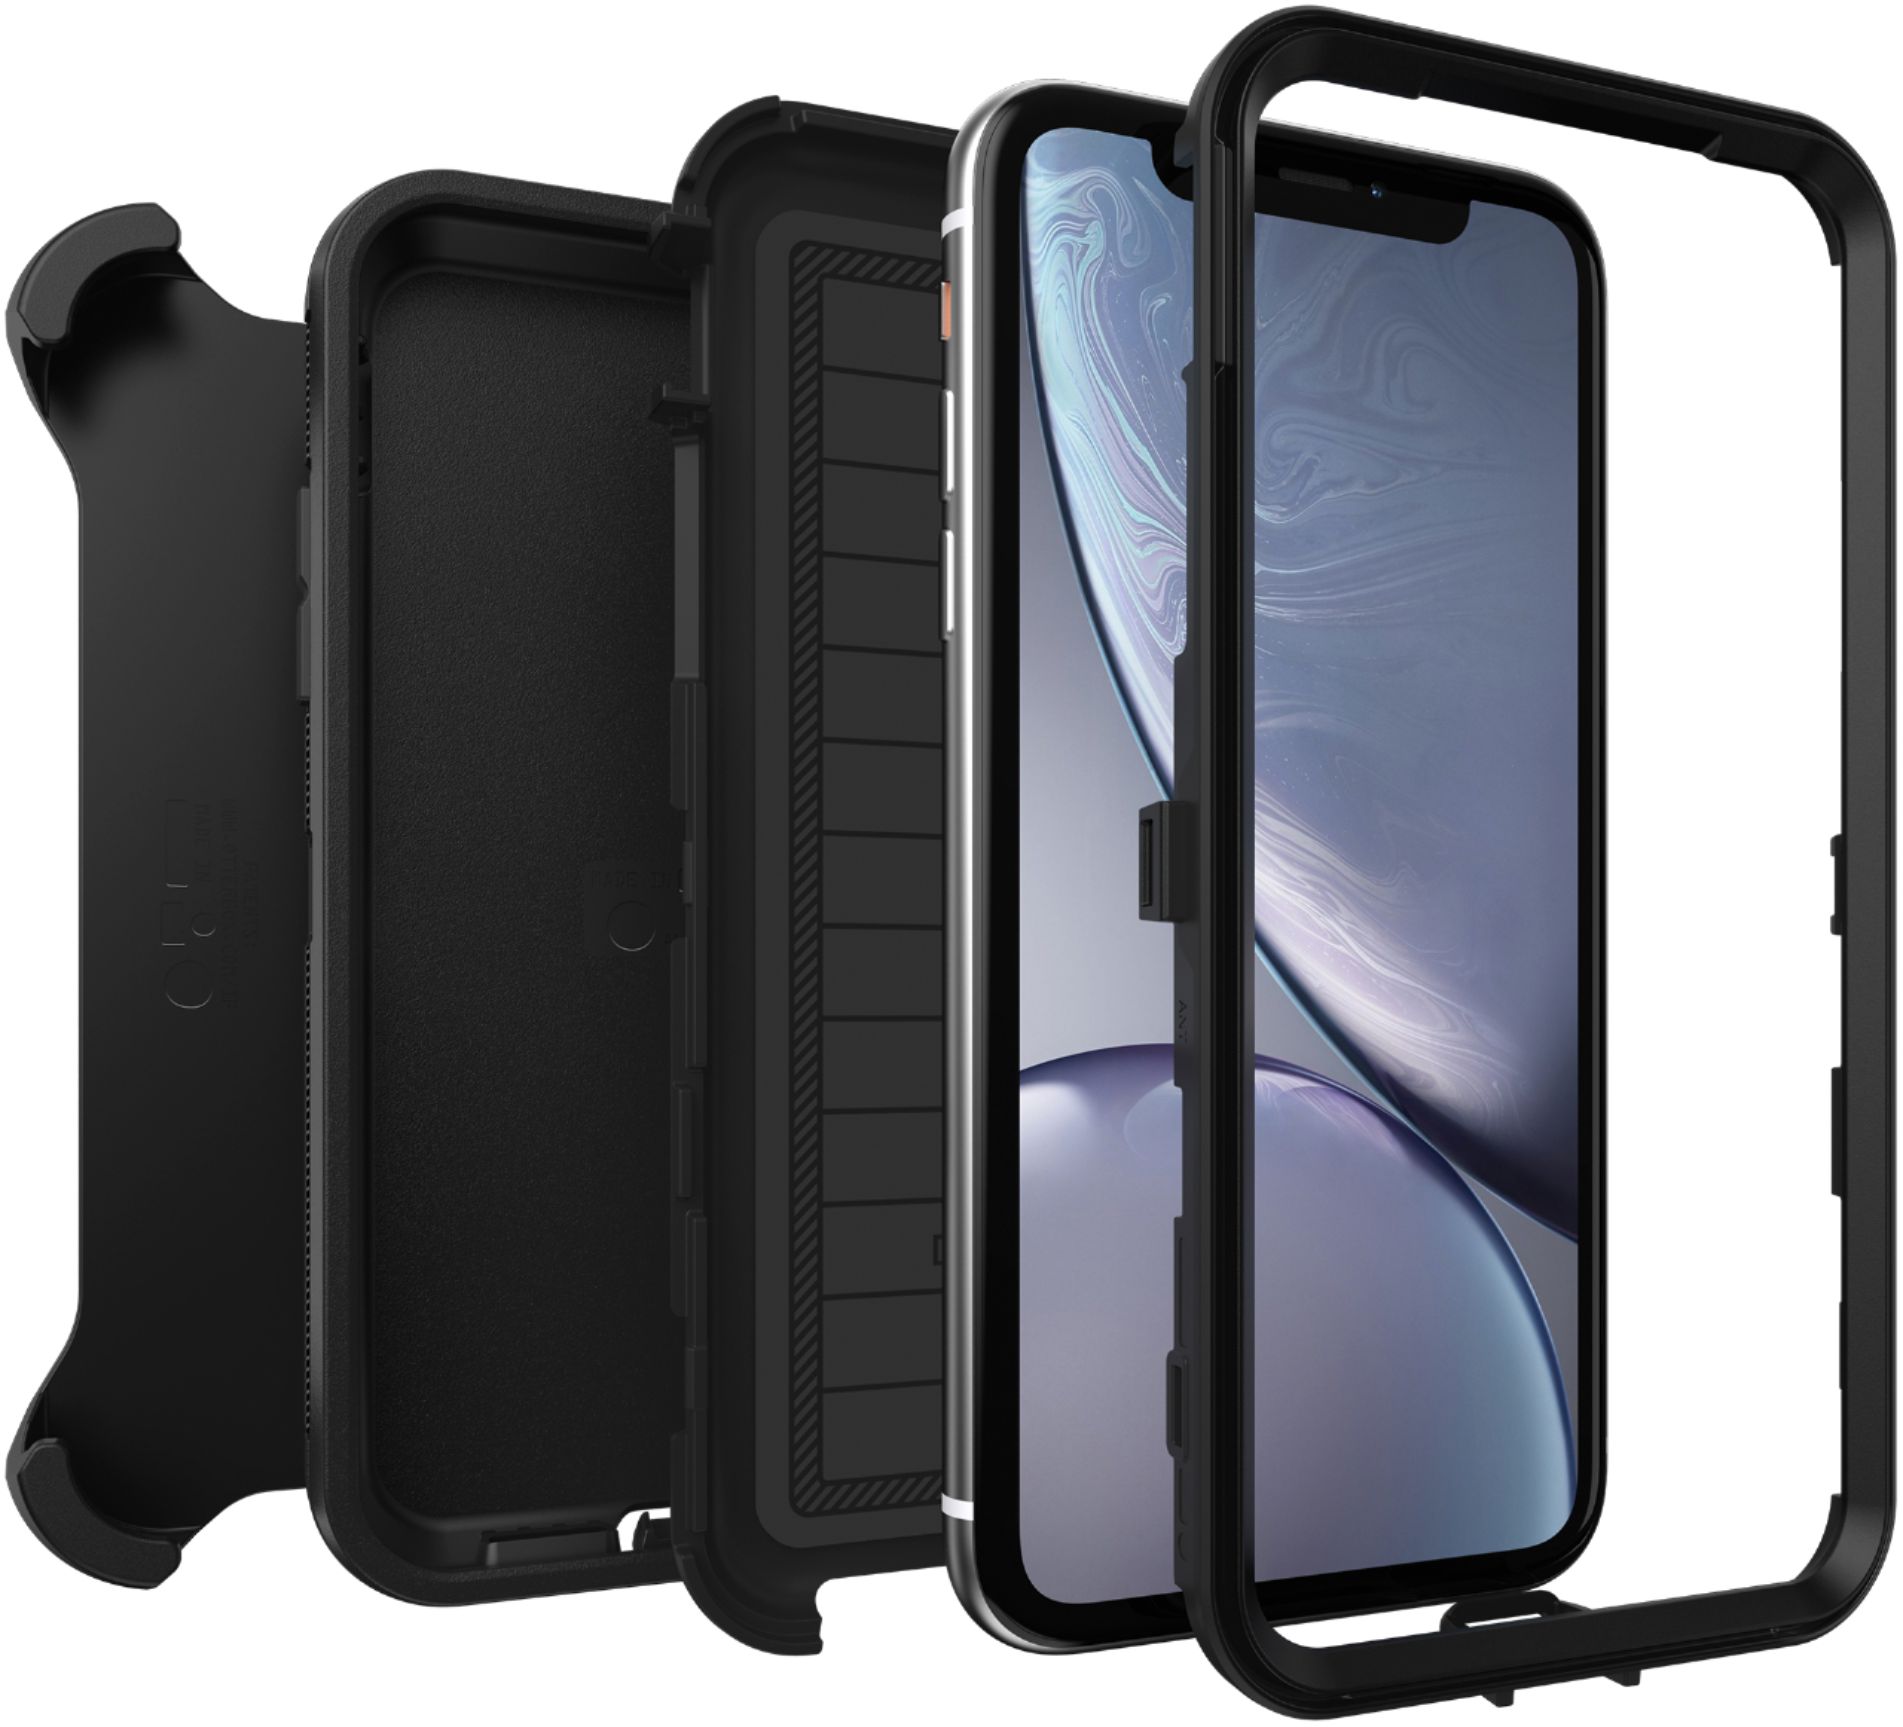
The Otterbox Defender screen protector is attached directly to the inner part of the case, not to the phone’s screen. Therefore, you should start by separating the case from the device. Gently pry open the edges of the case using your fingers or a plastic card. Take your time and proceed with caution to avoid any accidental damage to the device or the case.
Once you have successfully detached the case, focus your attention on the screen protector itself. If the screen protector has started to peel off on its own, carefully peel it back using your fingers. If it’s still firmly attached, insert the edge of the plastic card beneath one corner of the protector and gently lift it away from the screen. Slowly and evenly work the card around the edges of the screen protector, applying light pressure to detach it from the case. Take care not to scratch the screen or apply excessive force that could cause damage.
If the screen protector proves stubborn and doesn’t easily lift off, you can try using a hairdryer to warm the adhesive. Set the hairdryer to low heat and blow it on the screen protector for a few seconds. Then, using the plastic card, try to lift the softened protector away from the screen. The heat will help loosen the adhesive, making it easier to remove.
After successfully removing the Otterbox Defender screen protector, take a moment to clean the phone’s screen using a microfiber cloth. Wipe away any residue or debris left behind by the protector or adhesive.
And there you have it! By following these steps, you can safely remove the Otterbox Defender screen protector from your mobile device. Remember to proceed with caution and always refer to the manufacturer’s guidelines. Whether you decide to go screen-free or replace the protector with a different one, enjoy the clear and pristine display of your phone!
Overview of the Otterbox Defender Screen Protector
The Otterbox Defender Screen Protector is a popular accessory that offers additional protection to your mobile device’s screen. Known for its durability and reliability, the Defender Screen Protector is designed to shield your device from scratches, smudges, and even accidental drops. With its high-quality materials and advanced technology, this screen protector ensures that your phone’s display remains clear, vibrant, and free from damage.
One of the standout features of the Otterbox Defender Screen Protector is its precise fit and seamless installation process. It is custom-made to perfectly fit your device model, giving you peace of mind knowing that your screen is completely covered and protected. The screen protector is engineered with precision to maintain touch sensitivity, ensuring an effortless and smooth user experience.
Another important aspect of the Otterbox Defender Screen Protector is its exceptional clarity. It is designed to be highly transparent, allowing you to enjoy the true colors and vibrancy of your device’s screen. Whether you are browsing the internet, watching videos, or playing games, the screen protector will not compromise the visual quality or clarity of your device’s display.
In addition to its protective and visual advantages, the Otterbox Defender Screen Protector also features an oleophobic coating. This coating helps to repel fingerprints and smudges, making it easier to clean and maintain the pristine condition of your screen. With this screen protector, you can say goodbye to annoying fingerprint marks and enjoy a crystal-clear display at all times.
The Otterbox Defender Screen Protector is compatible with a wide range of mobile devices, including popular brands like Apple, Samsung, and Google. It offers full coverage and protection for your device’s screen, ensuring that it remains scratch-free and safe from daily wear and tear. Whether you are a busy professional, a frequent traveler, or someone who simply wants to protect their investment, this screen protector is an ideal choice.
With its unbeatable combination of durability, precision fit, clarity, and fingerprint resistance, the Otterbox Defender Screen Protector is a must-have accessory for anyone looking to safeguard their mobile device. It not only enhances the longevity of your device but also ensures that you can enjoy a seamless and vibrant visual experience. Whether you use your phone for work or leisure, this screen protector is sure to provide the ultimate protection and peace of mind.
Step-by-Step Guide on Removing the Otterbox Defender Screen Protector
Removing the Otterbox Defender screen protector may seem daunting at first, but with the right technique, it can be a simple and hassle-free process. Here is a step-by-step guide on how to remove the screen protector from your Otterbox Defender case:
- Gather the necessary tools: Before you begin, make sure you have all the tools you need. You will require a microfiber cloth, a plastic card or similar object with a flat edge, and a small amount of rubbing alcohol.
- Clean the screen protector: Start by cleaning the surface of the screen protector using a microfiber cloth. This will remove any dust, fingerprints, or smudges that may be present. Make sure to clean both sides of the protector thoroughly.
- Identify the edge of the screen protector: Look for a small gap or joint along the edge of the screen protector. This is usually located near the corner of the device. Use your fingernail or the edge of a plastic card to carefully lift the corner of the protector.
- Peel off the screen protector: Once you have lifted the corner, continue to peel off the protector gradually by applying gentle pressure. Take your time and be cautious to avoid any damage to the device’s screen.
- Remove any adhesive residue: After removing the screen protector, you may notice some adhesive residue left on the screen. Dampen a corner of the microfiber cloth with a small amount of rubbing alcohol and gently rub the residue until it is completely removed.
- Check for any remaining residue: Inspect the screen carefully to ensure that all adhesive residue has been removed. If you spot any stubborn residue, repeat the process with rubbing alcohol until the screen is clean and residue-free.
- Apply a new screen protector (optional): If you want to protect your device’s screen, you can consider applying a new screen protector after removing the Otterbox Defender protector. Make sure to clean the screen again before installing the new protector to ensure a smooth and bubble-free application.
By following these simple steps, you can successfully remove the Otterbox Defender screen protector without causing any damage to your device. Remember to take your time and be gentle during the process to avoid any mishaps.
Alternative Methods for Removing the Otterbox Defender Screen Protector
If the previous methods did not work for you or if you prefer to try something different, here are a few alternative methods that you can try to remove the Otterbox Defender screen protector:
- Using a Credit Card: One method you can try is using a credit card or any thin, plastic card to gently pry the screen protector off. Start by inserting the edge of the card between the screen protector and the phone’s screen. Apply slight pressure and slowly slide the card along the edges to loosen the adhesive. Be careful not to scratch your phone’s screen during this process.
- Using Adhesive Remover: If the screen protector is proving to be particularly stubborn, you can try using an adhesive remover. Apply a small amount of adhesive remover to a cloth or cotton swab and gently rub it along the edges of the screen protector. This should help dissolve the adhesive and make it easier to remove. Remember to read the instructions on the adhesive remover carefully and use it in a well-ventilated area.
- Heating the Screen Protector: Another method you can try is using heat to loosen the adhesive. You can use a hairdryer on low heat setting or a heat gun to warm up the screen protector. Hold the device about 6 inches away from the screen protector and move it in a circular motion. Heat the screen protector for a few minutes until it becomes slightly warm to the touch. Use a cloth or gloves to protect your hands, then try to peel off the screen protector gently.
- Taking it to a Professional: If all else fails or if you are still hesitant to remove the screen protector yourself, it might be best to take your device to a professional. They have the experience and necessary tools to remove the screen protector safely without causing any damage to your phone. They can also give you advice on the best course of action depending on the specific model of your phone and the type of screen protector you have.
Remember, while these alternative methods may be effective, always proceed with caution and take care not to damage your phone during the removal process. If you are unsure or uncomfortable with any of the methods, it is always a good idea to seek professional assistance to ensure the safety of your device.
Conclusion
In conclusion, removing the Otterbox Defender screen protector can be a straightforward and hassle-free process if you follow the right steps. Being a protective layer, the screen protector plays a crucial role in safeguarding your device’s screen from scratches, smudges, and other damages. However, there may come a time when you need to replace or remove it. By carefully peeling off the screen protector and applying a gentle, upward motion, you can successfully remove it without causing any damage to your device. Remember to clean the screen thoroughly before applying a new screen protector to ensure a seamless fit. With a little patience and attention to detail, you can quickly remove an Otterbox Defender screen protector and keep your device looking and functioning at its best.
FAQs
1. Why should I remove the Otterbox Defender screen protector?
There can be several reasons for wanting to remove the Otterbox Defender screen protector. One common reason is that the screen protector may have become scratched or damaged over time, affecting the visibility and usability of your device’s screen. Additionally, some users may prefer the feel and look of their device’s screen without a screen protector, or they may want to replace it with a different type of protector that better suits their needs.
2. How do I remove the Otterbox Defender screen protector?
To remove the Otterbox Defender screen protector, start by using a fingernail or a small flat tool to gently lift the edge of the protector from one corner. Slowly peel back the protector, applying gentle pressure to avoid damaging the screen. If needed, you can use a piece of scotch tape to help lift the protector off the screen. Take your time and be careful to avoid any accidental damage to your device in the process.
3. Can I reuse the Otterbox Defender screen protector?
Generally, it is not recommended to reuse the Otterbox Defender screen protector once it has been removed. The adhesive on the back of the protector may lose its effectiveness when it is peeled off, making it difficult to reapply it securely. Additionally, the screen protector may have accumulated dirt, oils, or scratches during its use, which can affect its performance if reused. It is always best to use a fresh screen protector for optimal protection and clarity.
4. Will removing the screen protector void my warranty?
Removing the Otterbox Defender screen protector should not void your device’s warranty, as long as you follow the proper removal instructions and do not cause any damage to your device in the process. However, it is always a good idea to refer to the warranty terms and conditions provided by your device manufacturer or Otterbox to ensure that you are not in conflict with any specific guidelines regarding screen protectors or modifications to the device.
5. How do I clean my device’s screen after removing the Otterbox Defender screen protector?
After removing the Otterbox Defender screen protector, it is recommended to use a microfiber cloth or a screen cleaning solution specifically designed for electronic displays to clean your device’s screen. Gently wipe the screen in a circular motion to remove any smudges, fingerprints, or debris. Avoid using harsh chemicals or abrasive materials that could potentially damage the screen. It is always a good idea to follow the device manufacturer’s guidelines for screen cleaning to ensure the best results.