
**
So, you've just invested in the sleek and powerful iPhone 11, and now you're on the hunt for the perfect protective case to keep it safe from life's inevitable bumps and drops. Look no further than the Otterbox Defender Pro, a rugged and reliable option that provides top-notch defense without sacrificing style. In this comprehensive guide, we'll walk you through the step-by-step process of installing the Otterbox Defender Pro on your iPhone 11, ensuring that your device remains safeguarded while exuding a touch of personal flair. Whether you're a tech novice or a seasoned enthusiast, this article has got you covered with all the essential tips and tricks. Let's dive in and ensure your iPhone 11 stays safe and secure in style!
Inside This Article
- Unboxing the Otterbox Defender Pro
- Assembling the Otterbox Defender Pro
- Installing the Otterbox Defender Pro onto your iPhone 11
- Conclusion
- FAQs
Unboxing the Otterbox Defender Pro
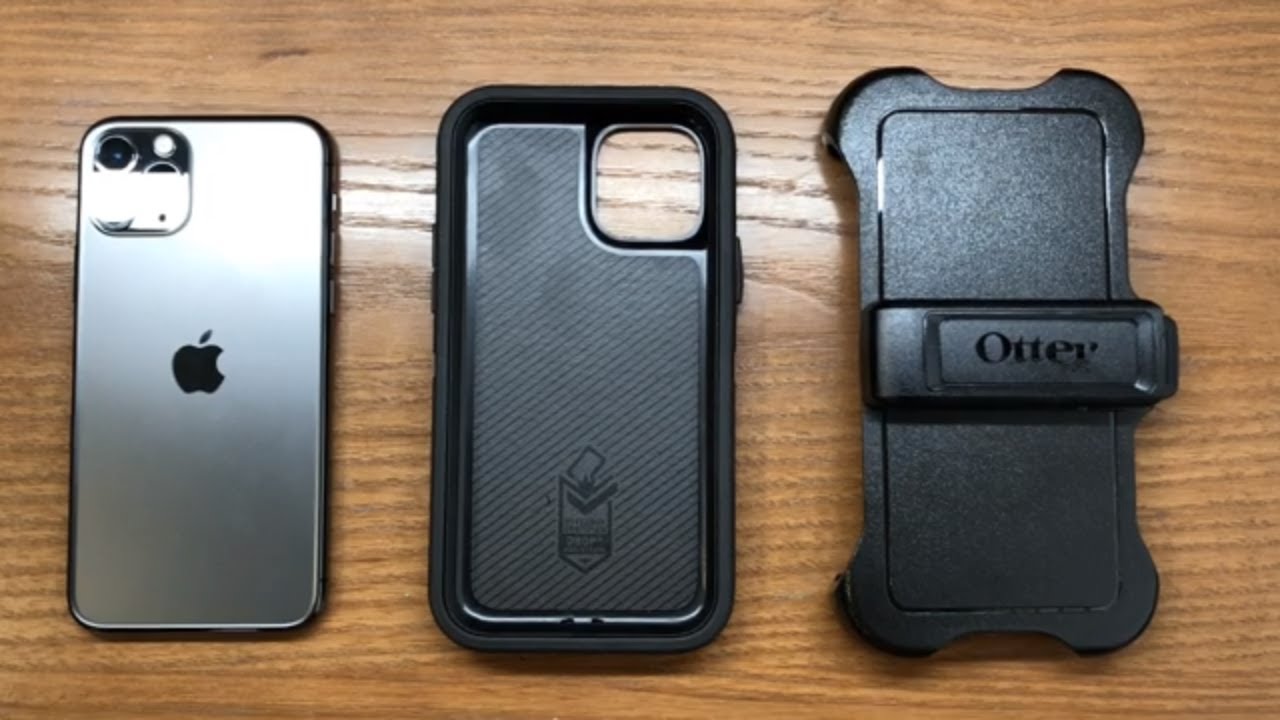
So, you’ve just received your brand new Otterbox Defender Pro for your iPhone 11. The excitement is palpable as you carefully peel back the packaging, eager to get your hands on this renowned protective case. As you slide the sturdy box open, you’re greeted by the sleek, rugged design of the Otterbox Defender Pro, exuding durability and reliability from the get-go.
As you lift the case out of the box, you can feel the weight and sturdiness of the materials, a reassuring sign of the robust protection it will offer your iPhone 11. The attention to detail is evident in every aspect of the packaging, from the secure placement of the case to the inclusion of additional components that further enhance its functionality.
Upon further exploration, you discover the accompanying holster, which provides convenient portability and quick access to your device. The holster complements the case perfectly, embodying the same rugged yet refined aesthetic that defines the Otterbox Defender Pro.
With the unboxing complete, you’re now ready to delve into the process of assembling and installing the Otterbox Defender Pro onto your iPhone 11, eager to experience the seamless integration of superior protection and stylish design.
Assembling the Otterbox Defender Pro
Assembling the Otterbox Defender Pro is a straightforward process that ensures your iPhone 11 is well-protected without compromising its functionality. The first step is to align the front and back pieces of the case, ensuring that the screen protector is properly positioned. Once aligned, gently press the two pieces together, starting from the edges and working your way around the entire perimeter. This ensures a secure fit and prevents any gaps that could compromise the case’s protective capabilities.
After the front and back pieces are securely joined, the next step is to snap the rubber outer layer over the case. This outer layer provides additional shock absorption and enhances the grip of the case. Start by placing the bottom of the iPhone into the rubber outer layer, then gently stretch the edges of the rubber around the case, ensuring that it fits snugly without covering any ports or buttons. Once the rubber outer layer is in place, double-check all the edges to ensure a proper fit.
With the Otterbox Defender Pro fully assembled, take a moment to inspect the case and ensure that all components are securely in place. Check the alignment of the screen protector, the fit of the front and back pieces, and the snugness of the rubber outer layer. This meticulous approach guarantees that your iPhone 11 is not only protected from everyday wear and tear but also maintains its sleek appearance and functionality.
Installing the Otterbox Defender Pro onto your iPhone 11
Once you have unboxed and assembled your Otterbox Defender Pro, it’s time to install it onto your iPhone 11. The installation process is straightforward and can be completed in just a few simple steps. Let’s walk through the process to ensure your iPhone 11 is well-protected with the Otterbox Defender Pro.
First, ensure that your iPhone 11 is free from any dust, dirt, or debris. Wipe the device clean using a microfiber cloth to provide a smooth and clean surface for the Otterbox Defender Pro to adhere to.
Next, separate the layers of the Otterbox Defender Pro case. Start by removing the outer slipcover, followed by the inner hard shell. Lay your iPhone 11 on a flat surface, and carefully place the inner hard shell over the device, ensuring that all ports and buttons align properly.
Once the inner hard shell is in place, gently snap the outer slipcover over the hard shell, ensuring that all edges and corners are securely fastened. The built-in screen protector should align perfectly with the iPhone 11 screen, providing complete protection against scratches and cracks.
After the outer slipcover is securely in place, double-check all the edges and corners to ensure a snug fit. Press along the edges to confirm that the Otterbox Defender Pro is properly installed and that there are no gaps between the case and your iPhone 11.
Finally, test the functionality of the buttons, ports, and camera to ensure that they are easily accessible and fully operational with the Otterbox Defender Pro installed. Once you have confirmed everything is in working order, your iPhone 11 is now safely and securely protected by the Otterbox Defender Pro.
Conclusion
Installing an Otterbox Defender Pro case on your iPhone 11 is a worthwhile investment in protecting your device from everyday wear and tear. Not only does it provide rugged protection, but it also offers a sleek and stylish design that complements your iPhone’s aesthetics. By following the simple steps outlined in this guide, you can ensure that your iPhone 11 remains safeguarded without compromising on functionality or style. With the Otterbox Defender Pro case, you can enjoy peace of mind knowing that your device is shielded from accidental drops, scratches, and impacts. Embrace the durability and reliability of the Otterbox Defender Pro and keep your iPhone 11 looking and performing at its best.
FAQs
Q: Can I install the Otterbox Defender Pro on my iPhone 11 without any special tools?
A: Yes, the Otterbox Defender Pro for iPhone 11 is designed for easy installation without the need for any special tools. The package includes all the components required for a hassle-free installation.
Q: Does the Otterbox Defender Pro for iPhone 11 provide screen protection?
A: Absolutely! The Otterbox Defender Pro features a built-in screen protector that shields your iPhone 11 display from scratches, cracks, and other potential damage.
Q: Will the Otterbox Defender Pro make my iPhone 11 bulky and heavy?
A: While the Otterbox Defender Pro offers robust protection, it is designed to maintain a balance between durability and sleekness. The case provides exceptional defense without adding unnecessary bulk to your iPhone 11.
Q: Is the Otterbox Defender Pro for iPhone 11 compatible with wireless charging?
A: Yes, the Otterbox Defender Pro is engineered to support wireless charging, allowing you to power up your iPhone 11 conveniently without removing the case.
Q: Can I customize the appearance of my Otterbox Defender Pro for iPhone 11?
A: Otterbox offers a selection of color options for the Defender Pro series, enabling you to choose a style that suits your preferences and personalizes the look of your iPhone 11 while ensuring top-tier protection.