
In this guide, we will show you how to tie a sturdy and reliable bamboo tripod. Whether you’re an outdoor enthusiast, a DIY enthusiast, or a professional photographer, knowing how to construct a bamboo tripod can come in handy for a variety of purposes. A bamboo tripod offers stability and versatility, making it a popular choice for those looking for an eco-friendly and affordable option. By following our step-by-step instructions, you’ll be able to assemble a bamboo tripod that can support your camera, hang a hammock, or even elevate your outdoor lighting for an enchanting ambiance. So, grab your bamboo poles and let’s get started on creating your very own bamboo tripod!
Inside This Article
- Materials needed
- Step 1: Setting up the tripod legs
- Step 2: Arranging the bamboo poles
- Step 3: Tying the tripod together
- Step 4: Securing the tripod junctions
- Conclusion
- FAQs
Materials needed
Before you embark on the journey of building a bamboo tripod, there are a few essential materials that you will need. These materials will ensure that you have a sturdy and reliable tripod that can support your camera or other equipment. Here are the materials you’ll need:
- Bamboo poles: Look for straight and sturdy bamboo poles that are approximately 6 to 8 feet long. These will serve as the legs of your tripod.
- Twine or rope: You will need a strong and durable twine or rope to securely tie the bamboo poles together.
- Scissors or a knife: You’ll need a sharp cutting tool to trim the excess twine or rope.
- Optional: Rubber bands or zip ties: These can be used to provide extra stability and reinforcement to the tripod joints.
Having these materials ready before you start building your bamboo tripod will make the process smoother and more efficient. Make sure to gather all the necessary materials so that you can dive into the steps with confidence!
Step 1: Setting up the tripod legs
Setting up the tripod legs is the first essential step in creating a sturdy bamboo tripod. Follow these instructions to ensure proper placement and stability:
- Choose the right location: Find a suitable area where the ground is level and free from obstacles. This will provide a stable base for your tripod.
- Gather your materials: Collect three bamboo poles of equal length, preferably with a diameter of two inches or more. These poles will serve as the legs of your tripod.
- Position the first leg: Take one bamboo pole and drive one end into the ground. Make sure it is planted securely, ensuring it doesn’t wobble or shift.
- Place the second leg: Move to the opposite side of the first leg and position the second bamboo pole in the ground. Aim to create a triangle shape with the two legs, with equal distance between them.
- Set the third leg: Finally, position the third bamboo pole to complete the tripod. Ensure it is equidistant from the first two legs, forming a stable triangle. Adjust as necessary to achieve balance.
- Verify stability: Once all three tripod legs are in place, check for stability by gently shaking the tripod. It should remain firm and not sway or topple.
Following these steps will help you establish a solid foundation for your bamboo tripod. Next, move on to arranging the bamboo poles in the correct formation.
Step 2: Arranging the bamboo poles
Once you have set up the tripod legs in step 1, it’s time to move on to arranging the bamboo poles. This step is crucial as it ensures that your tripod is stable and properly balanced.
Start by selecting three bamboo poles that are similar in length and thickness. These poles will serve as the main support beams for your tripod. Position them so that they intersect at the top, forming a triangular shape.
Make sure that the poles are evenly spaced apart, with about an equal distance between each of them. This will help distribute the weight evenly and provide a sturdy foundation for your tripod.
Before securing the poles together, take a moment to adjust their positions if needed. Ensure that the ends of the poles are aligned and touching the ground firmly. This will help prevent any wobbling or instability once the tripod is fully assembled.
Once you are satisfied with the positions of the bamboo poles, it’s time to secure them together. You can use strong cords, ropes, or zip ties to fasten the poles at their intersection points.
Wrap the cord tightly around the poles, making sure to tie a secure knot to keep them in place. If you are using zip ties, slide them through the gaps between the poles and pull them tightly to secure the junction.
After securing the poles, give the tripod a gentle shake to ensure it is stable. If you notice any significant movement or wobbling, double-check the knots or ties and make the necessary adjustments.
Remember, arranging the bamboo poles properly is crucial for the stability and functionality of your tripod. Take your time to adjust and secure them correctly before moving on to the next step.
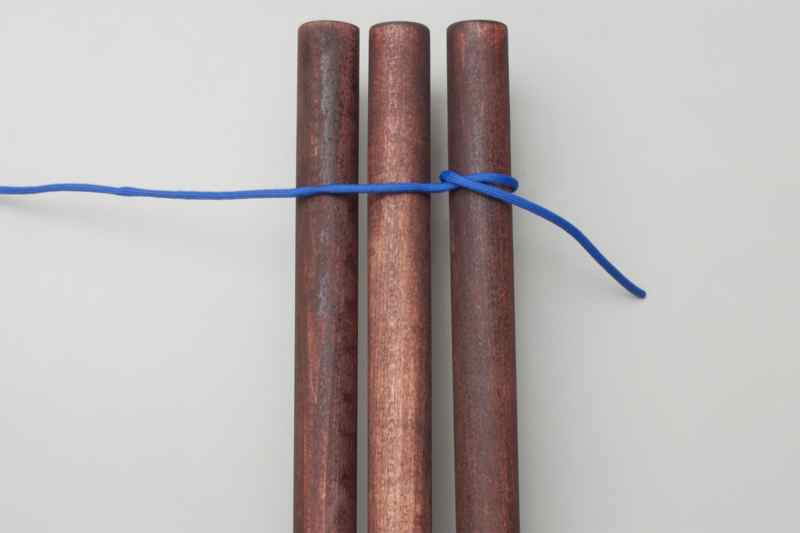
Step 3: Tying the tripod together
Now that you have set up the legs of the bamboo tripod and arranged the poles, it’s time to tie the tripod together. This step is crucial to ensure stability and prevent the tripod from collapsing. Follow these simple instructions to securely tie the tripod junctions:
1. Take a sturdy piece of rope or twine and cut it to a length that allows you to wrap it around the junction of the tripod legs comfortably. Make sure the rope is long enough to tie a knot securely.
2. Starting from the bottom of the tripod, wrap the rope tightly around the junction, overlapping the rope as you go. This will provide added stability and prevent any wobbling or shifting of the tripod.
3. After you have completely wrapped the rope around the junction, tie a secure knot to hold it in place. You can use a standard overhand knot or a more secure knot like a square knot or a clove hitch.
4. Once you have tied the first junction, move on to the remaining junctions and repeat the same process. Make sure to wrap the rope tightly and tie secure knots for each junction to ensure the overall stability of the tripod.
5. After all the junctions have been tied, double-check the tightness of the knots and give the tripod a gentle shake to ensure that it is stable and firmly held together. If there is any wobbling or movement, adjust the rope and knots as necessary.
Tying the tripod together is a critical step in setting up a bamboo tripod. It adds strength and stability to the structure, making it safe and secure for various purposes such as photography, camping, or even as a decorative piece. Take your time to tie the junctions properly, ensuring that the tripod is well-balanced and able to withstand any weight or external forces.
Remember, the quality of the rope or twine you use can also impact the stability of the tripod. Choose a strong and durable material that can handle the weight and strain applied to the junctions. With proper tying and a reliable rope, your bamboo tripod will be ready for whatever adventure or purpose you have in mind.
Step 4: Securing the tripod junctions
Though you have successfully set up the legs and arranged the bamboo poles, your tripod won’t be stable unless you secure the junctions properly. Here’s how you can do it:
1. Take a sturdy piece of twine or rope and loop it around one of the junctions where two bamboo poles meet. Make sure the loop is tight but not too tight that it causes the bamboo to snap.
2. Tie a knot to secure the loop. You can use a square knot or a double knot for added security. This will prevent the tripod from wobbling or collapsing while you use it.
3. Repeat this process for all the remaining junctions. Make sure to evenly distribute the tension and keep the tripod balanced.
4. Once you have tied the knots on all the junctions, check the stability of the tripod by gently shaking it. If you feel any wobbling or insecurity, re-adjust the knots and tighten them further.
5. To further strengthen the tripod, you can wrap additional twine or rope around the junctions, creating a tighter bond. This is especially useful if you are planning to hang heavy objects from the tripod.
6. Inspect the entire setup and ensure that all the knots are secure and the tripod is steady. Pay attention to any weak or loose sections and reinforce them as needed.
Remember, the stability and safety of the tripod rely heavily on how well you secure the junctions. Take your time during this step to guarantee a sturdy and reliable structure.
Conclusion
In conclusion, learning how to tie a bamboo tripod is a valuable skill that can be useful in many outdoor activities such as camping, fishing, or photography. By following the step-by-step instructions outlined in this article, you can confidently construct a sturdy and reliable tripod using bamboo poles and rope.
Tying a bamboo tripod requires patience, practice, and a basic understanding of knot tying techniques. With time, you will become more proficient in creating different types of tripod configurations to suit your specific needs.
Remember to prioritize safety while working with bamboo and always inspect the integrity of the tripod before use. By mastering this technique, you can enhance your outdoor experiences and capture amazing moments with stability and precision.
So go ahead, gather your supplies, and start exploring the world with your trusty bamboo tripod by following the steps and tips provided in this guide. Happy tying!
FAQs
1. What is a bamboo tripod?
A bamboo tripod is a simple structure made from bamboo poles that are used to support objects, such as cameras or pots, providing stability and balance. It is commonly used in various settings, including photography, camping, and gardening.
2. Why would I need to tie a bamboo tripod?
Tying a bamboo tripod is essential to ensure the stability and safety of the structure. By securely fastening the bamboo poles together, the tripod becomes more rigid and capable of withstanding the weight and movement of the object it supports.
3. What materials do I need to tie a bamboo tripod?
To tie a bamboo tripod, you will need some sturdy rope or twine. Natural fibers like jute or hemp work well, but any strong and durable material that can handle tension will suffice. Additionally, you might need scissors or a cutting tool to trim the excess rope.
4. How do I tie a bamboo tripod?
The specific method of tying a bamboo tripod may vary depending on your needs and the object you are supporting. However, a common technique involves creating a tripod shape with three bamboo poles and using a square lashing knot to secure them together at the top. You can find step-by-step guides and video tutorials online for different tying methods.
5. Are there any safety precautions to consider when tying a bamboo tripod?
Yes, it is important to take certain safety precautions when tying a bamboo tripod. Ensure that the bamboo poles are in good condition and free from any defects that could compromise their strength. Be mindful of the tension in the rope and avoid over tightening, as it could weaken the bamboo or cause it to snap. Always test the stability of the tied tripod before placing valuable or fragile items on it.