
Gimbals have revolutionized the way we capture videos and photos on our smartphones. These nifty devices allow us to achieve smooth, cinematic shots by eliminating shaky footage and giving us the ability to pan, tilt, and rotate our cameras with ease. Whether you’re a seasoned videographer or a beginner looking to up your content creation game, learning how to use a gimbal can greatly enhance the quality of your mobile photography and videography. In this article, we will dive into the world of gimbals, exploring what they are, how they work, and providing you with essential tips and techniques to get the most out of your gimbal. So grab your smartphone and let’s explore the exciting possibilities that await you with a gimbal!
Inside This Article
- What is a Gimbal?
- Types of Gimbals
- Getting Started with Your Gimbal
- Balancing Your Gimbal
- How to Mount Your Camera
- Adjusting the Gimbal Settings
- Controlling the Gimbal Movement
- Smooth and Steady Panning
- Tilting and Rolling Techniques
- Using the Follow Mode
- Handling Common Challenges
- Tips and Tricks for Using a Gimbal
- Recommended Accessories
- Conclusion
- FAQs
What is a Gimbal?
A gimbal is a mechanical device used to stabilize and control the movement of a camera or other equipment. It consists of three or more axes that allow for smooth and steady rotation, making it perfect for capturing stable footage, especially when filming on the move.
At its core, a gimbal uses a system of motors and sensors to counteract any unwanted movements or vibrations. It keeps the camera level and balanced, ensuring that your footage remains steady, even in challenging conditions or while moving briskly.
Gimbals are widely used in videography, photography, and cinematography, allowing professionals and enthusiasts alike to capture stunning, cinematic shots with ease. Whether you’re shooting a fast-paced action scene or simply want to add a touch of professionalism to your vlogs, a gimbal is an essential tool to have.
With its versatile design and advanced stabilization technology, a gimbal is not just restricted to cameras. It can also be used to stabilize other devices, such as smartphones and action cameras, making it suitable for a wide range of creative applications.
Overall, a gimbal is a must-have accessory for anyone looking to elevate their video and photography skills. Its ability to provide stable footage, smooth rotations, and precise control makes it an indispensable tool for capturing professional-quality content.
Types of Gimbals
When it comes to gimbals, there are several types available, each designed to cater to different needs and preferences. Let’s explore the most common types:
- Handheld Gimbals: Handheld gimbals are compact and portable, perfect for videographers on the go. They are operated by holding the gimbal handle and provide stabilization for cameras and smartphones. Handheld gimbals often offer features like object tracking and timelapse functionality.
- Satellite Gimbals: Satellite gimbals are specifically designed for use with drones. They provide stability and smooth movement for aerial footage. These gimbals are lightweight and often come with features like follow mode and 360-degree rotation to capture breathtaking shots from above.
- Motorized Gimbals: Motorized gimbals use electric motors to stabilize the camera or smartphone. They offer precise control over camera movements and are commonly used in professional filmmaking. Motorized gimbals come with advanced features like 3-axis stabilization and automatic leveling.
- Wearable Gimbals: Wearable gimbals are designed to be worn or mounted on the body. They are commonly used in action sports and vlogging. Wearable gimbals provide stabilization while allowing the user to have their hands free for activities like cycling, running, or performing stunts.
- Vehicle Gimbals: Vehicle gimbals are mounted on various types of vehicles, such as cars, motorcycles, or boats. They are used to capture stable footage while the vehicle is in motion. Vehicle gimbals are often used in sports videography, automotive photography, or documentary filmmaking.
These are just a few examples of the different types of gimbals available. Each type has its own advantages and is suited for specific shooting scenarios. When selecting a gimbal, consider your filming needs and the equipment you plan to use to ensure you choose the right one for your purposes.
Getting Started with Your Gimbal
So, you’ve just purchased a gimbal and you’re eager to start capturing smooth and professional-looking footage. Congratulations! A gimbal is a valuable tool that can greatly enhance the quality of your videos and bring your creative vision to life. But before you begin, it’s important to familiarize yourself with the basic steps to get started with your gimbal.
The first thing you need to do is to ensure that your gimbal is fully charged. Most gimbals come with rechargeable batteries that need to be powered up before use. Check the manufacturer’s instructions for the recommended charging time to ensure maximum battery life.
Once your gimbal is charged, the next step is to attach your camera or smartphone. Gimbals typically come with a mounting plate or holder that securely holds your device in place. Make sure to properly attach your camera or smartphone to ensure stability and avoid any mishaps while filming.
After attaching your camera, the next crucial step is to balance your gimbal. Balancing is essential to ensure smooth movement and prevent any unnecessary vibration or shakiness in your footage. Most gimbals have adjustable arms or sliding plates that allow you to achieve proper balance. Follow the manufacturer’s instructions to find the correct balance point for your specific gimbal model.
Once your gimbal is balanced, you can power it on. Gimbals typically have an on/off switch or a button that needs to be pressed to activate them. Take a moment to familiarize yourself with the gimbal’s controls and settings. Knowing how to navigate through the different modes and adjust the settings will greatly enhance your shooting experience.
Now that your gimbal is powered on, it’s time to test it out. Start with basic movements, such as panning or tilting, to get a feel for how the gimbal responds and how it affects the smoothness of your footage. Experiment with different speeds and angles to see what works best for your shooting style.
As you become more comfortable with your gimbal, you can explore additional features and shooting modes. Some gimbals offer follow modes where the gimbal automatically tracks the subject’s movement, while others have time-lapse or slow-motion features for creative effects. Take the time to familiarize yourself with these functions and practice using them.
Keep in mind that using a gimbal requires practice and patience. It’s not uncommon to experience a learning curve in the beginning, but with time and practice, you’ll be able to achieve professional-looking results. Don’t be afraid to experiment and try different techniques to find your unique style and creative voice.
Remember to always consult the manufacturer’s instructions and guidelines for your specific gimbal model to ensure safe and proper usage. Additionally, it’s a good idea to invest in a carrying case or bag for your gimbal to protect it during transportation and storage.
Now that you’re equipped with the basic knowledge and steps to get started with your gimbal, it’s time to go out there and unleash your creativity. So grab your gimbal, charge up your batteries, and embark on a journey of capturing stunning, cinematic footage.
Balancing Your Gimbal
One of the most important steps in using a gimbal effectively is to ensure that it is properly balanced. If your gimbal is not balanced correctly, it may result in shaky footage or make it difficult to control the movement smoothly.
To balance your gimbal, start by adjusting the sliding plate or mounting bracket to securely attach your camera. The camera should be centered and level on the gimbal. Use the locking mechanisms to hold it in place.
Next, check the balance of the gimbal by slowly loosening the tilt and roll axis locks. The gimbal should stay level and free from any unwanted movement. If it tilts or rolls to one side, you will need to make adjustments.
Begin by adjusting the tilt axis. Use the balance adjustment knobs or sliding plates to shift the camera forward or backward until it stays level on its own. You may need to make small incremental adjustments until you achieve the desired balance.
Once the tilt balance is achieved, move on to the roll axis. Adjust the sliding plates or balance adjustment knobs to ensure that the camera remains level when the gimbal is powered on. Again, make small adjustments until the balance is perfect.
Lastly, check the balance on the pan axis. The gimbal should stay level when moved horizontally. If it tilts to one side, make adjustments to the sliding plates or balance adjustment knobs until it remains level.
Remember to tighten the locks securely after balancing each axis to ensure that the camera stays in place. It may take some practice and trial-and-error to achieve optimal balance, but once you have it, you will notice a significant improvement in the stability of your shots.
Balancing your gimbal is crucial to getting smooth, professional-looking footage. Take the time to properly balance your gimbal before each use, and you’ll be rewarded with steady, shake-free videos.
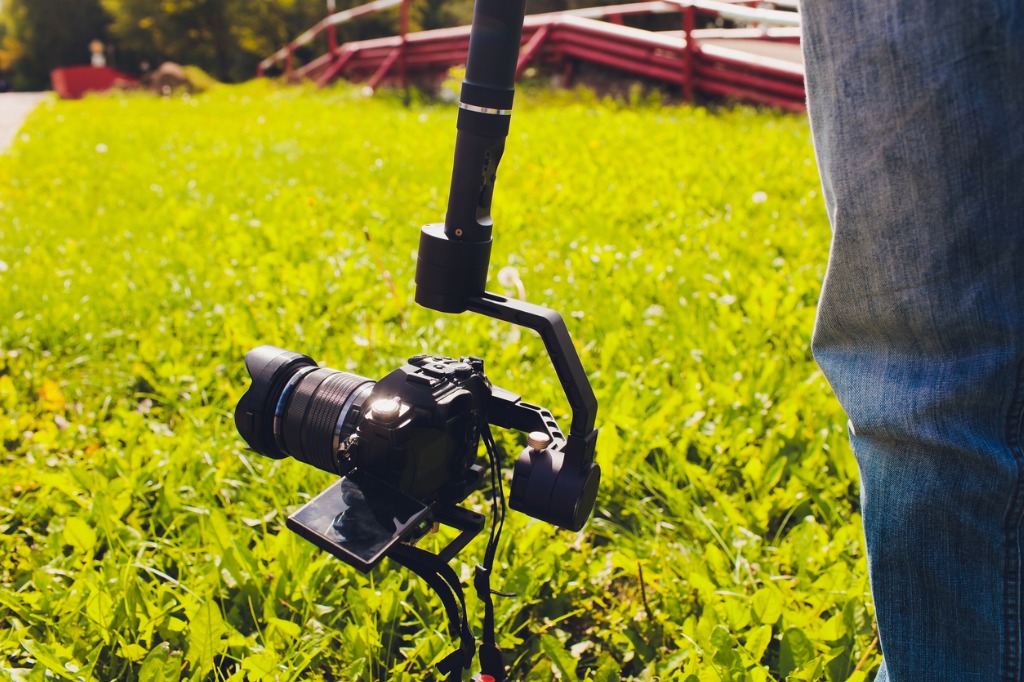
How to Mount Your Camera
Mounting your camera onto a gimbal is a crucial step in ensuring smooth and stable footage. Whether you’re using a DSLR, a mirrorless camera, or even a smartphone, the process is fairly similar. Here’s a step-by-step guide on how to mount your camera onto a gimbal:
1. Start by loosening the camera plate on the gimbal. This plate is where the camera will attach, so you’ll want to make sure it’s loose enough to slide in your camera.
2. Align the mounting plate on the camera with the gimbal’s camera plate. Most gimbals have a quick release system, so it should be relatively easy to line up the two plates.
3. Once aligned, gently slide the camera onto the gimbal’s mounting plate. Be careful not to force it or apply too much pressure, as this could damage the camera or the gimbal.
4. Make sure the camera is securely mounted onto the gimbal by tightening the camera plate. Use the provided tools or knobs to tighten the plate until the camera feels stable and secure.
5. Test the stability of the camera by gently moving the gimbal or giving it a slight shake. If the camera wobbles or feels loose, double-check the tightening of the camera plate and ensure it is properly secured.
6. Verify that the camera’s lens is not obstructed by any part of the gimbal. Depending on the size and shape of your camera, you may need to adjust the gimbal’s arms or brackets to avoid any interference.
7. Once your camera is securely mounted, you can power on the gimbal and start exploring its different modes and functionalities. Remember to calibrate the gimbal as per the manufacturer’s instructions before use, if required.
By following these steps, you can confidently mount your camera onto a gimbal and enjoy stable and professional-quality footage. Practice mounting and dismounting your camera a few times to become comfortable with the process, and soon you’ll be capturing stunning and smooth shots with your gimbal setup.
Adjusting the Gimbal Settings
Once you have successfully balanced your gimbal and mounted your camera, the next step is to adjust the gimbal settings to achieve the desired shooting experience. The settings on a gimbal can vary depending on the model and brand, but here are some common adjustments you may need to make:
1. Calibration: It’s essential to calibrate your gimbal before use, as it ensures accurate stabilization and smooth movement. Most gimbals come with a calibration process outlined in the user manual or through a corresponding smartphone app. Make sure to follow the instructions carefully to achieve optimal performance.
2. Stiffness and Responsiveness: Gimbals often have controls for adjusting the stiffness and responsiveness of the motors. These settings determine how tightly the gimbal holds the camera and how quickly it responds to movement. You can usually find these settings in the gimbal app or on the gimbal itself. Experiment with different settings to find the right balance for your needs.
3. Speed and Smoothness: The speed and smoothness of the gimbal’s movement can greatly impact the overall quality of your footage. Most gimbals offer the ability to adjust the speed at which the gimbal responds to your movements. Slower speeds provide more stable shots, while faster speeds allow for quick and dynamic movements. Find the speed that suits the shot you’re trying to capture.
4. Follow Modes: Gimbals often come with different follow modes that allow the gimbal to track your movements. These modes include pan follow, lock, and follow modes. Each mode offers unique capabilities and can be adjusted based on your shooting requirements. Experiment with different follow modes to determine which one works best for your specific needs.
5. Joystick Sensitivity: Many gimbals feature a joystick that allows you to control the gimbal’s movement manually. Adjusting the joystick sensitivity can make it easier to control the gimbal precisely. Higher sensitivity may result in faster movements, while lower sensitivity allows for more subtle adjustments. Find the sensitivity that feels most intuitive to you.
Controlling the Gimbal Movement
Once you have your gimbal properly balanced and your camera mounted, it’s time to learn how to control the movement of the gimbal. By mastering these movements, you’ll be able to capture smooth and professional-looking footage. Here are some key techniques to keep in mind:
1. Panning: Panning refers to the horizontal movement of the gimbal. To achieve a smooth pan, hold the gimbal handle with both hands and gently rotate it in the desired direction. Make sure to move with a slow and consistent motion. This technique is great for capturing wide-angle shots or following subjects as they move.
2. Tilting: Tilting is the vertical movement of the gimbal. To tilt the gimbal upwards or downwards, use your thumb to gently push or pull the joystick on the handle. This movement allows you to frame your subject from different angles and add depth to your shots. Remember to keep the tilt smooth and gradual for the best results.
3. Rolling: Rolling refers to the rotation of the camera on its roll axis. This movement is often used to create dynamic and cinematic shots. To perform a roll, use your index finger to rotate the joystick left or right. Experiment with different angles and perspectives to add visual interest to your footage.
4. Follow Mode: Many gimbals come with a follow mode, which allows the gimbal to automatically track your movements. In this mode, the gimbal will smoothly follow your panning and tilting motions. To activate the follow mode, check the gimbal’s user manual or use the corresponding button or switch on the handle.
5. Customizing Controls: Some gimbals offer the ability to customize the control settings. This allows you to adjust the sensitivity and speed of each movement according to your preference. Take the time to explore the gimbal’s menu or app to find the settings that work best for you and your shooting style.
6. Practice and Experiment: Controlling a gimbal requires practice and experimentation. Take the time to familiarize yourself with the movement controls and practice different techniques. Try out different speeds, angles, and combinations of movements to discover the unique effects you can achieve with your gimbal.
Remember, the key to mastering gimbal movement is to keep your movements smooth, steady, and deliberate. With time and experience, you’ll be able to capture stunning, cinematic footage that will elevate the quality of your videos.
Smooth and Steady Panning
One of the key skills to master when using a gimbal is smooth and steady panning. Panning refers to horizontally moving the camera from one side to another, creating a beautiful sweeping motion in your footage. Here are a few tips to help you achieve smooth and steady pans:
1. Slow and Controlled Movements: When panning, it’s important to move the gimbal slowly and in a controlled manner. Avoid jerky or abrupt movements, as they can result in shaky footage. Be gentle with your panning motion and maintain a consistent speed throughout.
2. Start and End Points: Before you start panning, identify your starting and ending points. This helps you maintain a smooth motion and ensures that your pan doesn’t go beyond its intended range. Take a moment to plan your pan, imagining the desired movement in your mind.
3. Use Two Hands: For better control over your gimbal’s panning movement, it’s recommended to use both hands. Keep one hand on the grip handle and support the bottom of the gimbal with the other hand. This provides stability and allows you to make precise adjustments during the pan.
4. Engage the Follow Mode: Most gimbals come with a follow mode, which helps to maintain a smooth pan while keeping the camera focused on the subject. Enable this mode to make panning more effortless and to achieve a consistent motion without any sudden changes.
5. Practice and Experiment: Achieving smooth and steady pans with a gimbal requires practice. Experiment with different speeds, angles, and techniques to find the perfect pan that suits your shot. Take your time and gradually improve your skills to create visually captivating footage.
6. Consider Using a Tripod: If you want to achieve absolutely smooth pans, consider using a tripod in combination with your gimbal. This combination eliminates any possibility of hand-induced shakes and ensures even smoother footage, especially for longer pans.
By incorporating these tips into your gimbal usage, you’ll be able to capture professional-looking footage with smooth and steady panning. Remember, practice makes perfect, so don’t be afraid to experiment and hone your skills to create stunning cinematic shots.
Tilting and Rolling Techniques
When using a gimbal, mastering the art of tilting and rolling can take your footage to the next level. These techniques allow you to capture dynamic and engaging shots that add depth and creativity to your videos. In this section, we will explore some essential tips and tricks for effectively tilting and rolling your gimbal.
1. Tilting: Tilting refers to the vertical movement of the camera, allowing you to capture shots from different angles. To tilt your gimbal, use the control dial or joystick to move the camera up or down smoothly. This technique is ideal for capturing reveal shots, showing a subject from a low angle to highlight their presence or capturing a scene from above for an aerial-like perspective.
2. Rolling: Rolling involves rotating the camera horizontally, which can add a dynamic and cinematic feel to your shots. It allows you to capture dramatic angles and create smooth transitions between different subjects or scenes. By rolling the camera, you can achieve shots like revealing a landscape from behind an object or capturing a subject in profile.
3. Determining the speed: When tilting or rolling, it’s crucial to pay attention to the speed at which you move the gimbal. Slow, controlled movements are generally preferred for achieving smooth and professional-looking shots. Experiment with different speeds to find the right balance that complements the mood and atmosphere of your video.
4. Using the follow mode: Utilizing the follow mode on your gimbal can greatly enhance your tilting and rolling techniques. In this mode, the gimbal will automatically adjust its positioning as you move, allowing for fluid and natural movements. This is particularly advantageous for capturing action sequences or tracking a subject’s movement.
5. Practice and experiment: Like any skill, mastering tilting and rolling techniques takes practice. Spend time experimenting with different angles, speeds, and subjects to find what works best for the type of videos you’re creating. Don’t be afraid to push your creative boundaries and try innovative approaches to achieve unique and visually stunning shots.
By mastering the art of tilting and rolling, you can unlock a world of creative possibilities with your gimbal. These techniques add depth, movement, and a professional touch to your videos, allowing you to capture captivating footage that resonates with your audience. So, grab your gimbal, explore different angles, and let your creativity soar.
Using the Follow Mode
One of the most valuable features of a gimbal is the follow mode. This mode allows the gimbal to smoothly track the movement of your subject as you move the camera. It is especially useful when capturing fast-paced action or dynamic shots where you need to follow the subject’s movement.
To activate the follow mode on your gimbal, simply locate the mode switch or button on the device. Once switched to follow mode, the gimbal will automatically adjust its movement to keep your subject in the frame. This makes it easier to capture smooth and professional-looking footage.
When using the follow mode, it’s important to keep the gimbal level and stable. This will ensure that your footage remains steady and free from any unwanted vibrations. It’s best to hold the gimbal with both hands and keep your movements as smooth as possible to maintain the desired effect.
If you want to change the subject or focus on something else while using the follow mode, you can simply reposition the gimbal by moving it in the desired direction. The follow mode will then adjust to the new subject, allowing you to capture a seamless transition between shots.
It’s also important to note that different gimbals may have slightly different follow modes and settings. Some gimbals offer advanced options like customizing the follow speed or sensitivity. It’s worth exploring these additional features to fully optimize your gimbal and achieve the desired results.
While the follow mode is great for tracking subjects in motion, it may not be suitable for all situations. It’s important to assess the scene and determine whether using the follow mode will enhance your footage or if another mode or technique would be more effective.
Experimenting with the follow mode and practicing different techniques will help you master its usage and unlock the full potential of your gimbal. With time and experience, you’ll be able to capture incredible shots with ease and precision.
Handling Common Challenges
Using a gimbal for the first time can come with its fair share of challenges. But fear not, as we’ve got you covered with some tips to handle these common hurdles:
1. Dealing with Weight Imbalance: One common challenge that users face is maintaining a proper weight balance on the gimbal. If your camera and lens combination is too heavy on one side, it can lead to stability issues. To overcome this, make sure to properly balance your gimbal by adjusting the sliding plate or the counterweights. This will ensure smoother operation and prevent strain on the motors.
2. Avoiding Shaky Footage: While gimbals are designed to provide steady shots, shaky footage can still occur if swift movements are made or if the gimbal settings are not properly adjusted. To minimize shake, try using slower movements and gradually increase your control over the gimbal. Additionally, take advantage of any stabilization features available on your camera or gimbal to further enhance the stability of your footage.
3. Overcoming Battery Limitations: Depending on the model of the gimbal, battery life can vary. Carrying spare batteries is always recommended, especially for longer shooting sessions. Also, familiarize yourself with the power-saving settings of your gimbal to maximize the usage of each charge. Keeping spare batteries charged and ready to go will ensure you never miss a shot due to power limitations.
4. Managing Arm Fatigue: Extended use of a gimbal can lead to arm fatigue, especially when shooting for long durations. To combat this, try using both hands to hold the gimbal, distributing the weight evenly on both arms. Alternatively, using a support vest or stabilizer arm can relieve stress on the arms and shoulders, allowing for more comfortable and longer shooting sessions.
5. Dealing with Wind Interference: When shooting outdoors, wind can pose a challenge as it can disrupt the stability of the gimbal. To minimize wind interference, consider using a windscreen or foam cover on the microphone to reduce wind noise. Additionally, using a heavier camera or attaching weights to the bottom of the gimbal can help stabilize it against strong gusts of wind.
6. Navigating Tight Spaces: Maneuvering a gimbal in tight spaces can be tricky, especially when filming in crowded areas or narrow hallways. In such situations, smaller gimbals or those with foldable arms can be advantageous. These compact designs allow for easy navigation and provide more flexibility when shooting in confined spaces.
7. Troubleshooting Connectivity Issues: If you experience connectivity issues between your gimbal and smartphone app or remote control, start by checking the Bluetooth or Wi-Fi settings on both devices. Ensure they are properly paired and take into account any applicable range limitations. In some cases, restarting both devices can help establish a stable connection.
By recognizing and addressing these common challenges, you’ll be able to unleash the full potential of your gimbal and capture professional-looking footage with ease. Don’t be discouraged by initial hurdles; practice, patience, and a bit of troubleshooting will go a long way in mastering your gimbal skills.
Tips and Tricks for Using a Gimbal
Using a gimbal can take your videography and photography to the next level, allowing you to capture smooth and stable footage. To make the most out of your gimbal, here are some tips and tricks:
1. Practice, practice, practice: Like any skill, mastering the use of a gimbal takes practice. Experiment with different movements, angles, and speeds to find what works best for you. The more you practice, the more natural and fluid your shots will become.
2. Start with basic movements: When starting out, it’s best to begin with basic movements such as panning and tilting. Focus on keeping the camera level and maintaining a smooth motion. Gradually, you can incorporate more complex movements like tracking and orbiting.
3. Use a wide-angle lens: A wide-angle lens is ideal for gimbal shots as it allows you to capture more of the scene while maintaining stability. It also helps create a sense of depth and immersion in your footage.
4. Use the rule of thirds: The rule of thirds is a fundamental principle in composition. When framing your shots, imagine a grid with two horizontal lines and two vertical lines dividing the frame into nine equal sections. Position your subject along these lines or at their intersections to create visually appealing and well-balanced shots.
5. Experiment with different modes: Most gimbals offer various shooting modes such as follow mode, lock mode, and pan mode. Each mode has a unique purpose and can help you achieve different types of shots. Take the time to explore and experiment with these modes to enhance your creativity.
6. Control your movements: Avoid jerky or sudden movements when operating the gimbal. Instead, use smooth and controlled motions to maintain stability. Gradually accelerate or decelerate your movements for a more cinematic effect.
7. Utilize the gimbal’s features: Gimbals often come with additional features such as time-lapse, hyperlapse, and selfie modes. Familiarize yourself with these features and incorporate them into your shoots to add variety and creativity to your footage.
8. Pay attention to balance: Properly balancing your gimbal is crucial for achieving stable shots. Ensure that your camera is well-balanced by adjusting the tilt, roll, and pan axes. A well-balanced gimbal will minimize vibrations and provide smoother footage.
9. Be mindful of battery life: Gimbals are powered by batteries, so it’s important to monitor your battery life to avoid running out of power during a shoot. Carry spare batteries and recharge them in-between takes to ensure uninterrupted filming.
10. Practice safety precautions: Always handle your gimbal with care and take necessary safety precautions to protect yourself and your equipment. Avoid placing excessive strain on the motors and avoid sudden shocks or impacts.
By following these tips and tricks, you’ll be able to maximize the potential of your gimbal and capture stunning, professional-looking footage. Remember, practice and experimentation are key to unlocking your creative potential with a gimbal!
Recommended Accessories
When it comes to maximizing the functionality and versatility of your gimbal, there are a few accessories that can enhance your shooting experience. Here are some recommended accessories to consider:
1. Extra Batteries: Investing in extra batteries is a smart move, especially if you plan on shooting for long periods of time. Having spare batteries ensures that you won’t run out of power in the middle of a shoot.
2. Carrying Case: A carrying case is essential for protecting your gimbal during transport. Look for a case that provides a snug fit and has compartments to store accessories like cables and batteries.
3. Smartphone Holder: If you frequently use your smartphone for shooting, a smartphone holder is a must-have accessory. It securely attaches your smartphone to the gimbal, allowing you to capture stable footage.
4. External Monitor: Adding an external monitor to your gimbal setup can give you a larger, clearer view of your shots. It helps you monitor your framing and focus more effectively, especially in bright sunlight.
5. Counterweights: Depending on the weight distribution of your camera setup, you may need counterweights to achieve proper balance. Counterweights attach to the gimbal and help stabilize your camera.
6. Quick Release Plate: A quick release plate enables you to attach and detach your camera quickly and easily. It saves time and makes it convenient to switch between different camera setups.
7. Lens Filters: If you’re shooting outdoors, lens filters can significantly enhance the quality of your footage. ND filters reduce the amount of light entering your lens, allowing you to shoot in bright conditions without overexposure.
8. Remote Control: Some gimbals offer compatibility with remote controls, allowing you to control the movement of the gimbal from a distance. This can be useful for capturing shots that require precise movements.
9. Tripod or Monopod: Using a tripod or monopod in conjunction with your gimbal can give you added stability, especially in situations where you need to keep the camera still for extended periods.
10. Microphone: If you’re shooting videos that require clear and high-quality audio, consider investing in a dedicated microphone. It can improve the overall audio experience and complement your visual footage.
By incorporating these accessories into your gimbal setup, you can take your videography skills to the next level. Remember to choose accessories that are compatible with your specific gimbal model and align with your shooting needs.
Conclusion
Using a gimbal can significantly enhance your videography and photography skills by providing smooth and stabilized shots. It allows you to capture professional-looking footage, whether you are shooting action sports, traveling, or simply documenting everyday moments. By following the proper techniques and practicing, you can master the art of using a gimbal to create stunning visuals that will impress your audience.
Remember to choose a gimbal that suits your needs, whether it’s for smartphone photography or professional camera work. Take the time to understand the different modes and settings offered by your gimbal, as this will help you achieve the desired results. Additionally, make sure to properly balance your camera or phone on the gimbal and take advantage of features like follow mode and tracking.
Investing in a good quality gimbal and dedicating time to learn and use it effectively will elevate your content creation, enabling you to capture breathtaking footage and images. So don’t hesitate to dive into the world of gimbals and take your photography and videography skills to the next level!
FAQs
Q: What is a gimbal?
A: A gimbal is a device used to stabilize cameras and other equipment to achieve smooth and steady footage. It consists of motors and sensors that counteract unwanted movements and vibrations, providing fluid motion and eliminating shakiness.
Q: How does a gimbal work?
A: Gimbals work by using three-axis stabilization. The motors inside the gimbal detect any movement and make instant adjustments to counteract it. This ensures that the camera or equipment stays level and steady, even if there are external factors such as uneven terrain or sudden jerks.
Q: What can I use a gimbal for?
A: Gimbals are commonly used in photography and videography to achieve professional-quality shots. They are ideal for capturing smooth video footage while walking or moving, making them perfect for action shots, vlogs, travel videos, and cinematic sequences. Gimbals can also be used for aerial photography or attached to vehicles for stunning stabilized shots.
Q: Are gimbals compatible with all cameras?
A: Gimbals are designed to be used with specific camera models or weight capacities. It’s important to check the specifications of a gimbal to ensure it is compatible with your camera or equipment. Many gimbals come with interchangeable mounting plates or adapters to accommodate a wide range of cameras.
Q: Do I need any special skills to use a gimbal?
A: While using a gimbal does require some practice to master, most gimbals are designed to be user-friendly, even for beginners. With a bit of practice and familiarization with the controls, you can achieve smooth and professional-looking footage. However, it’s always a good idea to refer to the user manual or online tutorials for specific instructions on balancing and operating your particular gimbal model.