
If you’re working on an electrical project, you’ve probably come across the term “Romex connector.” But what exactly is a Romex connector? In the world of electrical wiring, a Romex connector is a device used to secure and protect the Romex cable, also known as non-metallic sheathed cable. This cable is commonly used in residential and commercial electrical installations, providing power to outlets, switches, and appliances. The Romex connector serves as a crucial component in securing the cable and preventing any strain or damage to the electrical connections. By understanding how Romex connectors work and their importance in electrical installations, you can ensure a safe and efficient wiring system. Let’s delve deeper into the world of Romex connectors, their features, and their various applications.
Inside This Article
- Purpose of a Romex Connector
- Key Features of a Romex Connector
- Installation Process of a Romex Connector
- Safety Considerations for Using a Romex Connector
- Conclusion
- FAQs
Purpose of a Romex Connector
A Romex connector, also known as a cable connector or a non-metallic sheathed cable connector, is an essential component used in electrical installations. Its primary purpose is to securely attach and protect non-metallic sheathed cables, commonly known as Romex cables, to electrical boxes or enclosures.
One of the main functions of a Romex connector is to provide strain relief for the cables. When electrical cables enter an electrical box, they may be subject to pulling or twisting forces. The Romex connector helps prevent these cables from being damaged or pulled out, ensuring a secure and reliable connection.
Another important purpose of a Romex connector is to maintain the integrity of the electrical system. It acts as a barrier between the electrical box or enclosure and the cables, preventing any potential damage or insulation breaches. This protection helps reduce the risk of short circuits, electrical shocks, or fire hazards.
Additionally, a Romex connector provides a neat and professional appearance by covering the sharp edges of the knockout hole in the electrical box. This not only protects the cables from abrasion but also reduces the likelihood of accidental injuries for those working near the electrical box.
Overall, the purpose of a Romex connector is to ensure the safe and secure installation of non-metallic sheathed cables, protecting both the cables and the individuals working with the electrical system.
Key Features of a Romex Connector
A Romex connector is a crucial component used in electrical installations to secure and protect electrical wiring. These connectors play a vital role in ensuring the safety and efficiency of residential and commercial electrical systems. Here are the key features that make a Romex connector an indispensable accessory:
Durable Construction: Romex connectors are typically made of high-quality materials such as steel or zinc, which provides exceptional durability and resistance to corrosion. The sturdy construction ensures that the connector can withstand the rigors of daily use and maintain its effectiveness over the long term.
Secure Connection: One of the primary functions of a Romex connector is to securely fasten electrical cables to junction boxes or enclosures. The connector’s design includes a clamping mechanism that firmly holds the cables in place, reducing the risk of accidental disconnection or damage to the wiring.
Easy Installation: Romex connectors are designed to be user-friendly, allowing for quick and hassle-free installations. They typically feature a screw or compression-based mechanism that simplifies the connection process. This ease of installation saves time and effort for electricians and DIY enthusiasts alike.
Versatile Compatibility: These connectors are designed to accommodate a wide range of electrical cables, including common sizes such as 12/2 or 14/2 NM (non-metallic) sheathed cables. This versatility ensures that Romex connectors can be used in various electrical applications, making them an essential accessory for any installation project.
Code Compliance: Romex connectors are manufactured to meet or exceed industry standards and electrical codes. This ensures that they are safe to use and comply with regulations set forth by local governing bodies. Using a Romex connector helps maintain electrical system integrity and avoids potential code violations.
Enhanced Protection: The design of a Romex connector includes features that provide added protection to electrical cables. These connectors often feature built-in strain relief mechanisms that prevent excessive stress on the wires, reducing the risk of damage or wear over time.
Multiple Sizes and Types: Romex connectors are available in various sizes and types to cater to different installation requirements. From standard threaded connectors to snap-in connectors, there is a wide range of options to choose from based on the specific needs of the electrical project.
Cost-Effective Solution: Given their durability and versatility, Romex connectors offer a cost-effective solution for securing and protecting electrical wiring. They provide long-lasting performance, reducing the need for frequent replacements, and help prevent potential electrical malfunctions due to improper connections.
Installation Process of a Romex Connector
The installation process of a Romex connector is a relatively simple and straightforward task, even for those without professional electrical experience. The Romex connector is specifically designed to secure and protect electrical cables, providing a safe and reliable connection. Below, we’ll guide you through the step-by-step process of installing a Romex connector.
Step 1: Choose the Right Romex Connector
Before beginning the installation, it’s important to select the appropriate Romex connector for your application. The Romex connector should match the size and gauge of your electrical cable. It’s recommended to consult the manufacturer’s guidelines or seek advice from a knowledgeable professional to ensure the correct connector is chosen.
Step 2: Prepare the Electrical Cable
First, disconnect power to the electrical circuit and ensure it is completely turned off. It’s crucial to prioritize safety throughout the installation process. Next, strip approximately 3/4 to 1 inch of insulation from the end of each cable, exposing the individual conductors. Use an appropriate wire stripper tool to achieve clean and accurate cuts.
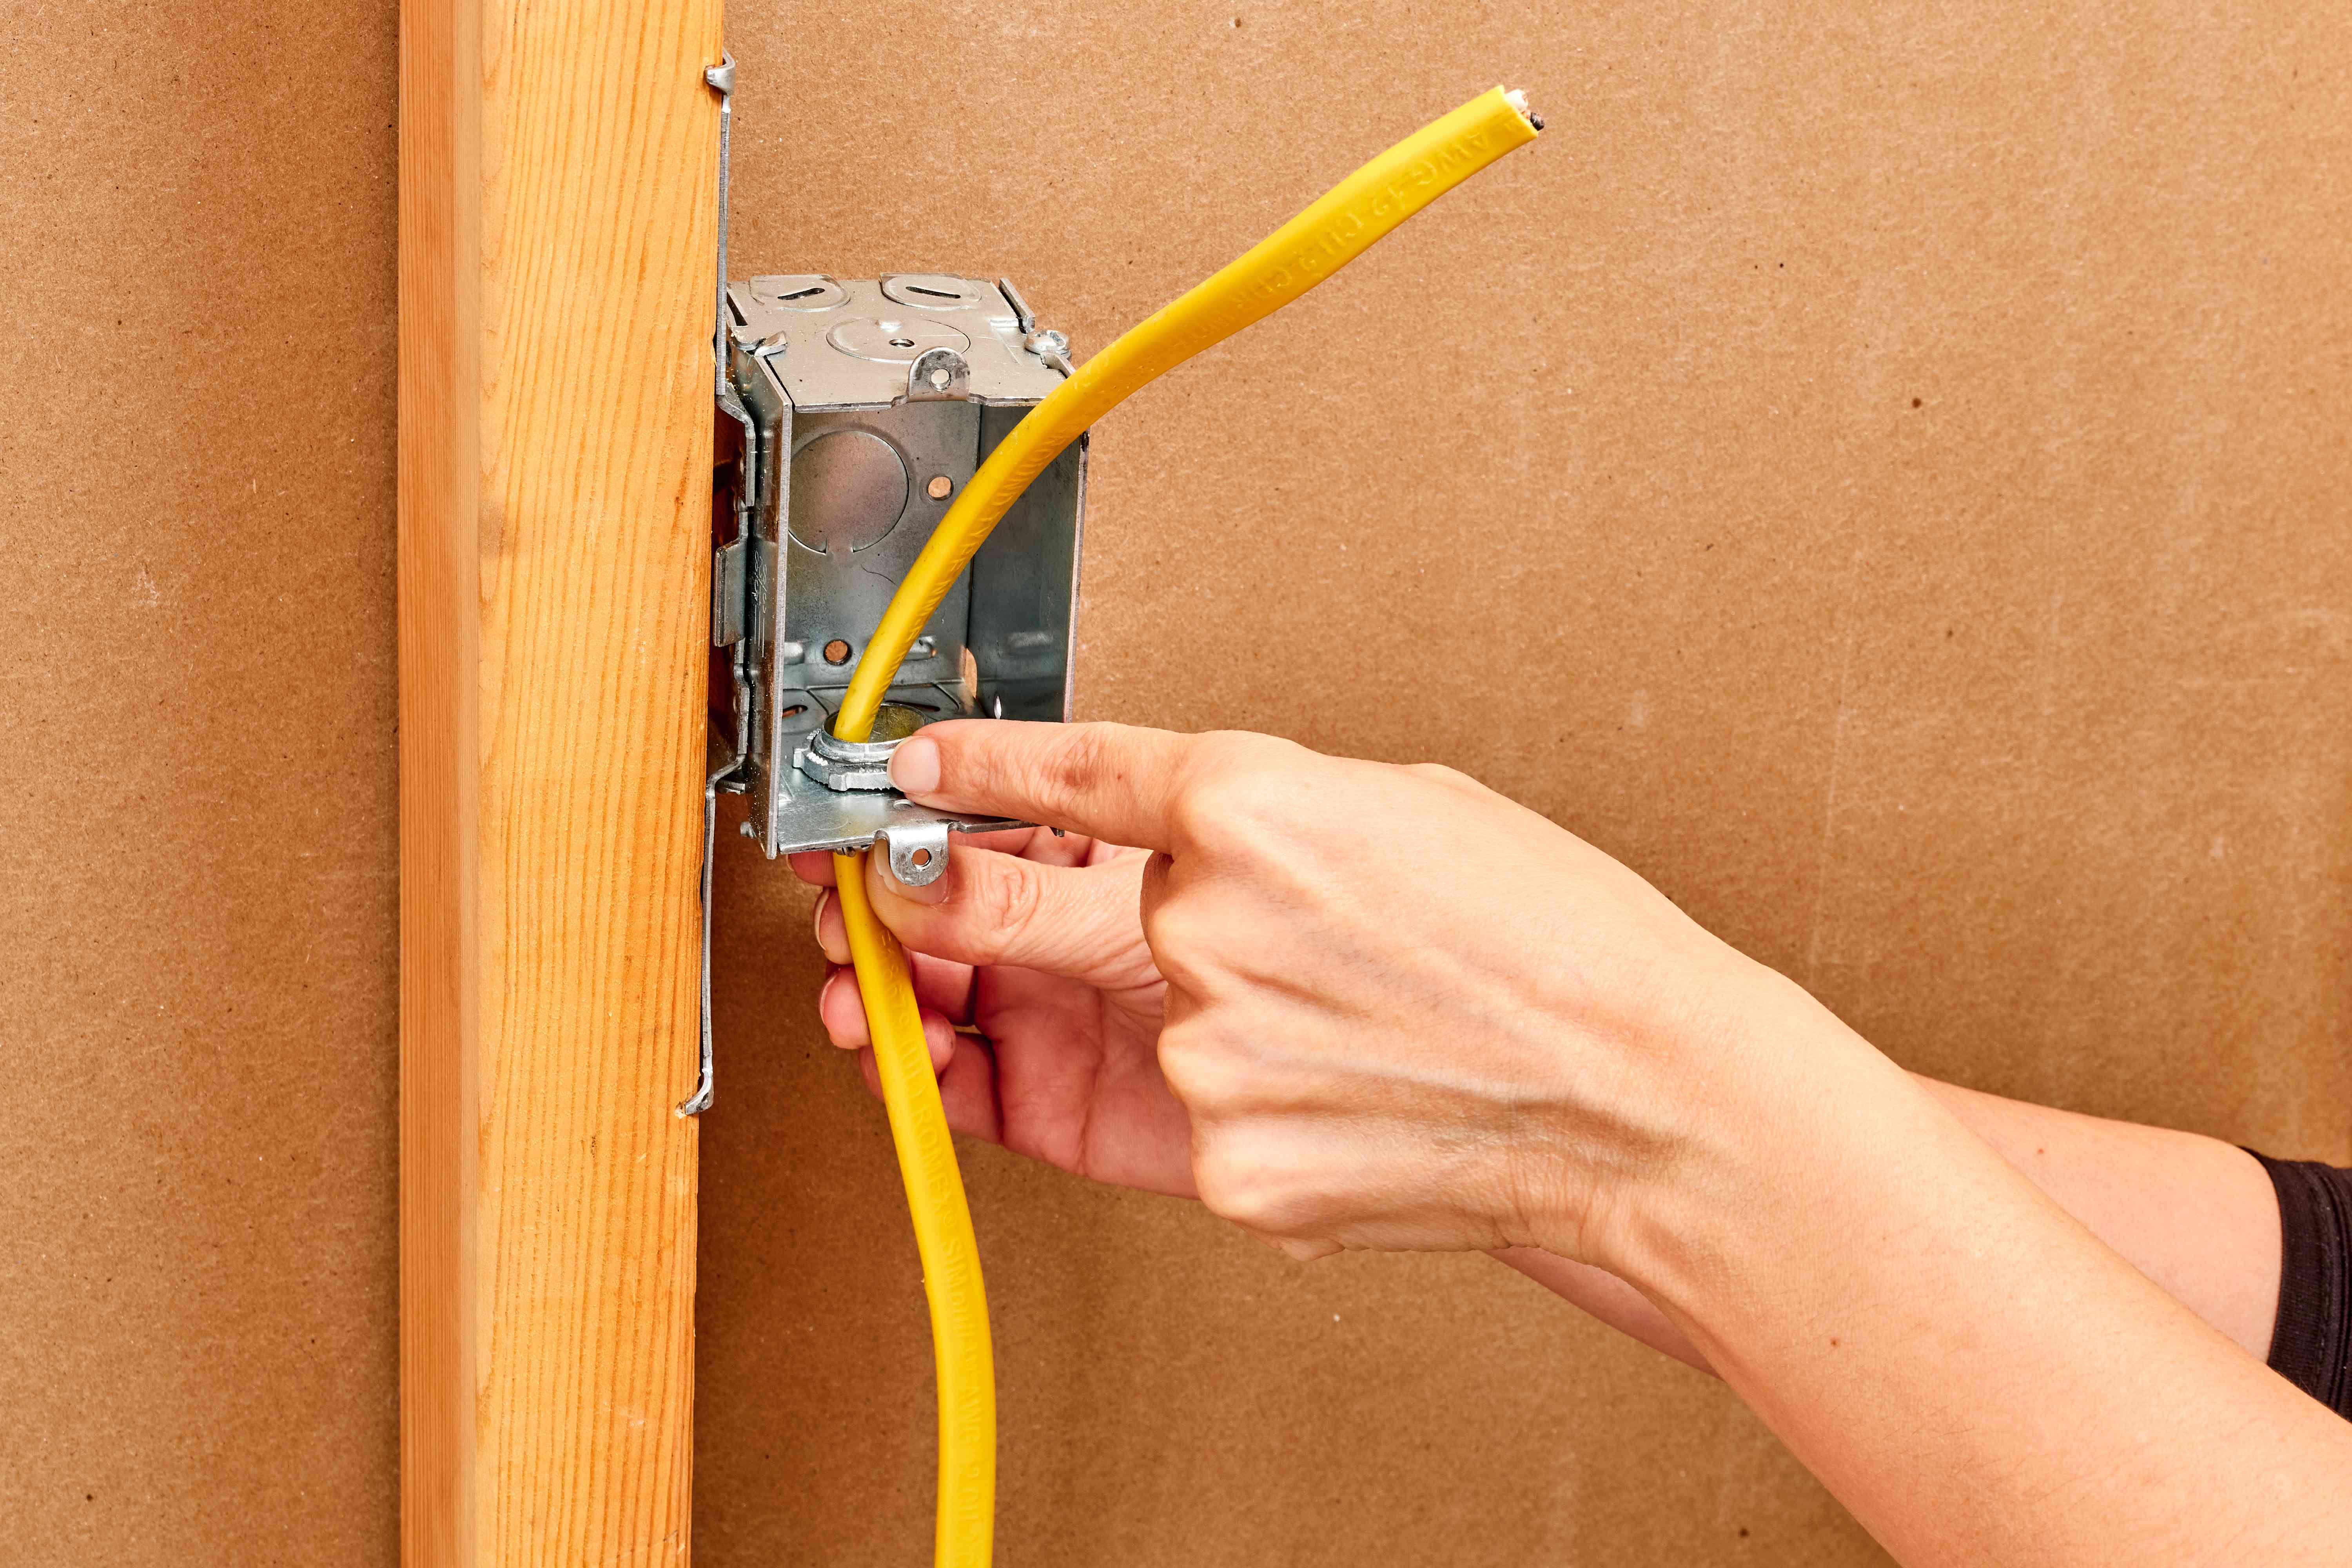
Step 3: Insert the Cable into the Romex Connector
Now, insert the stripped end of the cable into the Romex connector. Make sure the conductors are aligned with the connector’s terminal screws. Push the cable until it is securely seated in the connector. Ensure that the connector provides a tight and snug fit around the cable.
Step 4: Tighten the Terminal Screws
Using a screwdriver or an appropriate tool, tighten the terminal screws on the Romex connector. This will secure the cable in place and establish a reliable connection. Be careful not to overtighten the screws, as it may cause damage to the connector or the cable insulation.
Step 5: Secure the Romex Connector
Once the cable is firmly connected, secure the Romex connector to the desired surface, such as a junction box or conduit. Depending on the specific application, you may need to use screws or other appropriate mounting hardware. Ensure that the connector is adequately supported and in compliance with local electrical codes.
Step 6: Test the Connection
Before restoring power to the electrical circuit, it is essential to test the connection for proper functionality. Use an electrical tester or multimeter to check for continuity and ensure that the connection is secure and free from any faults or loose connections. If any issues are detected, consult a professional electrician for further assistance.
Step 7: Restore Power and Verify
After completing the installation and confirming the connection’s integrity, restore power to the electrical circuit. Double-check to ensure that the circuit is functioning correctly, and all outlets or appliances connected to it are working properly. If any anomalies are observed, immediately turn off the power and seek professional help to resolve the issue.
By following these steps, you can successfully install a Romex connector to secure and protect your electrical cables. However, it’s important to note that electrical work should be approached with caution, especially if you are not confident in your abilities. If in doubt, always consult a qualified electrician for assistance to ensure the installation is carried out safely and in compliance with local electrical codes.
Safety Considerations for Using a Romex Connector
When working with electrical installations, safety should always be a top priority. This holds true when using a Romex connector as well. Here are some important safety considerations to keep in mind while using a Romex connector:
1. Turn off the power: Before working with any electrical connections, it is crucial to turn off the power supply to the circuit. This ensures that you do not expose yourself to the risk of electric shock or other potential hazards.
2. Use proper tools: When installing a Romex connector, it is important to use the right tools for the job. This includes using wire strippers, pliers, and screwdrivers specifically designed for electrical work. Using the wrong tools may result in damage to the Romex connector or pose a safety risk.
3. Follow the manufacturer’s guidelines: Each Romex connector comes with specific guidelines for installation. It is important to carefully read and follow these instructions to ensure proper and safe installation. Deviating from the recommended installation procedures may compromise the integrity of the connection.
4. Inspect the Romex cable: Before using a Romex connector, inspect the cable for any signs of damage. This includes frayed wires, cracks in the insulation, or exposed copper. If you notice any damage, it is important to replace the cable before proceeding with the installation.
5. Adequate support: Romex connectors should be properly supported to prevent excessive strain on the cable. This helps minimize the risk of the cable coming loose or being damaged. Ensure that the Romex connector is securely fastened and supported using appropriate clamps or straps.
6. Avoid overloading the circuit: It is essential to know the electrical load capacity of the circuit you are working on. Overloading a circuit can lead to overheating and potential fire hazards. Make sure the Romex connector is used to connect wires that are within the rated capacity of the circuit.
7. Regular inspections: Periodically inspect the Romex connector installation for any signs of wear or damage. If you notice any issues, such as loose connections or exposed wires, take immediate action to rectify the problem. Regular inspections help maintain the safety and integrity of the electrical system.
Remember, if you are unsure about any aspect of using a Romex connector or performing any electrical work, it is always best to consult a qualified electrician. Safety should never be compromised when it comes to electrical installations.
Conclusion
In conclusion, a Romex connector is an essential component used in electrical wiring installations. Its primary function is to secure and protect the electrical cables, providing a durable and reliable connection. Whether you are a professional electrician or a DIY enthusiast, understanding the importance of Romex connectors is crucial to ensuring the safety and efficiency of your electrical system.
With various types of Romex connectors available in the market, it is important to choose the right one for your specific application. Consider factors such as the cable size, insulation type, and environmental conditions to select the most suitable Romex connector for your project.
By using Romex connectors correctly, you can confidently and safely connect electrical cables, minimizing the risk of electrical hazards. Always follow the manufacturer’s instructions and local electrical codes when installing Romex connectors.
Investing in high-quality Romex connectors and properly installing them will contribute to the longevity and performance of your electrical system. So, the next time you are working on an electrical installation, don’t forget the importance of a reliable Romex connector!
FAQs
- What is a Romex connector?
- Why do I need a Romex connector?
- How do Romex connectors work?
- What are the different types of Romex connectors?
- Can I install Romex connectors myself?
A Romex connector, also known as a cable connector, is a device used to secure and protect electrical cables. It is usually made of metal or plastic and is designed to provide a secure connection between the cable and an electrical box or panel.
A Romex connector is essential for a safe and reliable electrical installation. It ensures that the electrical cables are properly secured, preventing them from coming loose or being damaged. Additionally, it helps protect the cables from external forces, such as moisture, dust, and accidental impacts, which can compromise their performance or lead to electrical hazards.
Romex connectors typically consist of two main parts: a compression nut and a plastic or metal bushing. The compression nut is placed over the cable and tightened, creating a secure connection. The bushing is then inserted into a knockout hole in the electrical box or panel and secured in place. This setup provides strain relief, preventing the cable from being pulled out and reducing the risk of damage to the wires inside.
There are various types of Romex connectors available, including straight connectors, 90-degree connectors, and snap-in connectors. Straight connectors are the most common and are used to connect cables to electrical boxes or panels. 90-degree connectors are designed for use in tight spaces where a sharp bend is required. Snap-in connectors, as the name suggests, allow for easy installation by snapping into place without the need for tools.
While it is possible to install Romex connectors yourself, it is recommended to have a qualified electrician handle the installation. Electrical work can be complex and should be done following local electrical codes and safety guidelines. A professional electrician will have the expertise and knowledge to ensure a proper and safe installation, reducing the risk of electrical hazards and ensuring compliance with regulations.