
Introduction:
Ever wished you could capture stunning close-up shots with your iPhone? Well, look no further! With a little DIY creativity, you can transform your smartphone’s camera into a powerful macro lens. Macro photography allows you to capture intricate details and explore a whole new world up close. Whether you’re interested in taking mesmerizing shots of flowers, insects, or tiny objects, this DIY macro lens will take your mobile photography to the next level.
In this article, we’ll guide you through the steps of creating your own macro lens using simple and affordable materials. No need to invest in expensive camera gear or accessories – just a few household items and some creativity are all you need. So, grab your iPhone, get ready to unleash your inner photographer, and let’s dive into the world of macro photography!
Inside This Article
- Overview of DIY Macro Lens for Your iPhone
- Materials Needed
- Step-by-Step Guide
- Tips and Tricks for Better Results
- Conclusion
- FAQs
Overview of DIY Macro Lens for Your iPhone
Have you ever wanted to capture stunning close-up photos with your iPhone? Well, you’re in luck! With a simple DIY macro lens, you can transform your iPhone into a powerful tool for capturing intricate details and mesmerizing textures. A macro lens allows you to focus on subjects as close as a few centimeters away, revealing a whole new world of beauty that is often unseen by the naked eye.
The great news is that creating your own DIY macro lens for your iPhone is easier than you might think. All you need are a few inexpensive materials and a bit of creativity. You don’t have to be a photography expert or have access to costly equipment to achieve professional-looking macro shots. In just a few simple steps, you can unlock the potential of your iPhone’s camera and expand your photographic capabilities.
By following this comprehensive guide, we will show you how to create your own DIY macro lens for your iPhone. From the materials needed to the step-by-step instructions, we’ve got you covered. So, grab your iPhone, gather the supplies, and get ready to take your photography to the next level!
Materials Needed
To create a DIY macro lens for your iPhone, you will need the following materials:
- Rubber Band or Elastic Strap: This will be used to secure the macro lens to your iPhone’s camera.
- Small Magnifying Glass: Look for a magnifying glass with a small diameter, preferably one that can be easily detached from its handle.
- Super Glue or Adhesive Putty: You will need this to affix the magnifying glass to the lens of your iPhone’s camera.
- Tape: This will be used to hold the magnifying glass in place while the glue or putty dries.
These materials are easy to find and are typically available at your local craft store or hardware store. Ensure you have all of them on hand before you begin creating your DIY macro lens.
Step-by-Step Guide
Creating your own macro lens for your iPhone is easier than you might think. Follow these simple steps to turn your phone into a powerful tool for close-up photography:
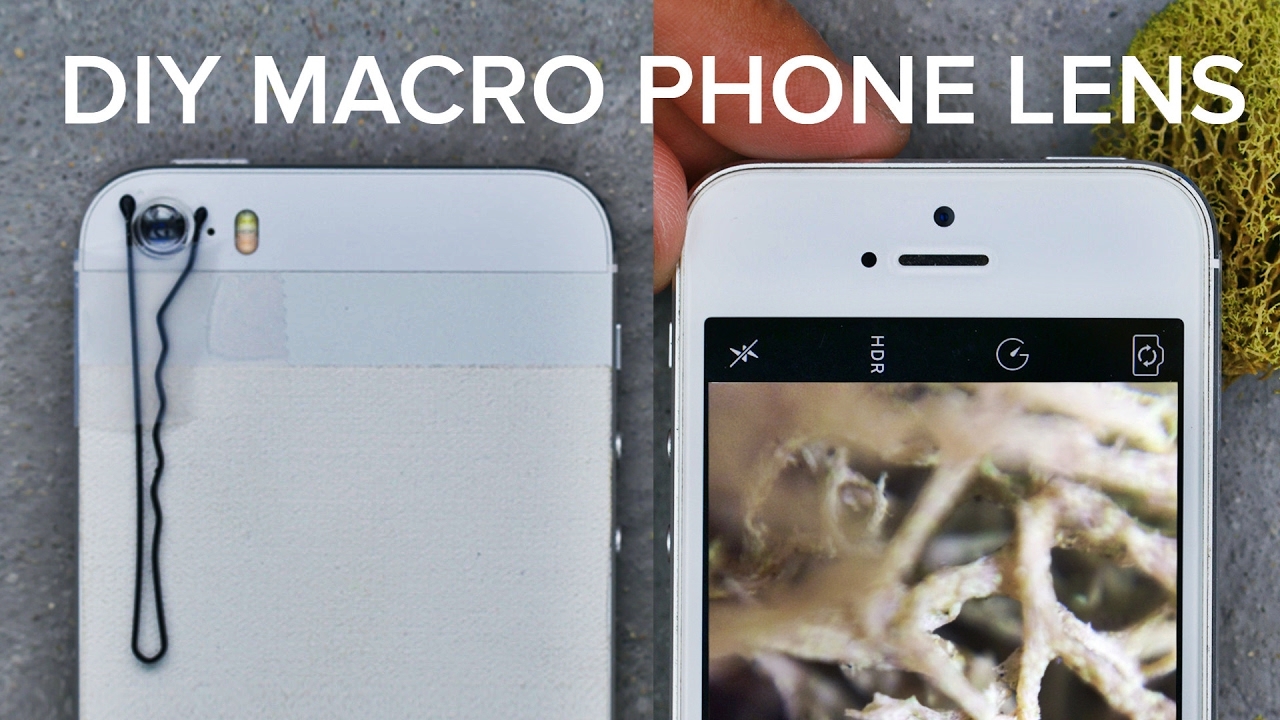
1. Gather your materials: First, you’ll need a small piece of plastic, such as a clear plastic bottle cap or a small magnifying glass. You’ll also need a small piece of double-sided tape, a pair of scissors, and your iPhone.
2. Prepare the lens: Take the plastic piece and cut it into a small circular shape, about the size of a quarter. This will be the lens for your macro attachment. Make sure the edges are smooth and free from any rough edges.
3. Attach the lens: Take the double-sided tape and cut a small strip. Place the strip of tape on the back of the plastic lens. Peel off the protective backing from the tape, and carefully position the lens over the camera lens on your iPhone.
4. Test the lens: Open the camera app on your iPhone and switch to the macro mode, if available. Start taking photos of close-up subjects to test the effectiveness of your DIY macro lens. Experiment with different distances and angles to get the best results.
5. Fine-tune the lens: If you’re not satisfied with the results, you can try adjusting the position of the lens or experimenting with different materials. You can also try adding additional layers of tape to increase the magnification power of the lens.
6. Protect the lens: Once you’re happy with the performance of your DIY macro lens, consider adding a small protective case or cover to keep the lens safe when not in use. This will help prevent scratches or damage that could affect the quality of your close-up shots.
That’s it! With just a few simple materials and steps, you can transform your iPhone into a macro photography powerhouse. Get ready to capture stunning details and explore a whole new world of close-up photography with your DIY macro lens.
Tips and Tricks for Better Results
When using a DIY macro lens for your iPhone, there are a few tips and tricks that can help you capture stunning close-up photos. Here are some techniques to elevate your macro photography game:
1. Find the Perfect Lighting: Lighting plays a crucial role in macro photography. Look for diffused, natural lighting whenever possible to avoid harsh shadows and make your subject shine. A cloudy day or shooting near a window can provide soft and even lighting.
2. Steady Your Hand: Macro photography requires a steady hand to capture sharp and detailed images. Use a tripod or stabilize your iPhone against a solid surface to minimize camera shake. This will help you achieve crisp and focused shots.
3. Experiment with Angles: Don’t be afraid to get creative with your angles when shooting macro. Get down low or look for unique perspectives to highlight the intricate details of your subject. Changing the angle can bring a fresh and captivating element to your photos.
4. Focus on a Single Point: In macro photography, the depth of field is often shallow, meaning that only a small portion of the image will be in focus. Select a single point or area of interest and focus on it for maximum impact. This will draw attention to the specific details you want to highlight.
5. Utilize Backgrounds: Pay attention to the background of your macro shots as it can either enhance or distract from your subject. Look for clean, uncluttered backgrounds that complement your subject and add depth to the composition. Consider using natural elements like flowers or leaves for a visually appealing backdrop.
6. Experiment with Editing: Once you’ve captured your macro photos, don’t be afraid to experiment with editing tools and apps. Adjusting the contrast, saturation, and sharpness can bring out the details and make your images pop. However, remember to keep the editing subtle to maintain the natural look of your macro shots.
7. Patience is Key: Macro photography requires patience and persistence. Don’t be discouraged if you don’t get the perfect shot right away. Take your time, experiment with different settings and compositions, and enjoy the process. With practice, you will improve and capture breathtaking macro photos.
Remember, while a DIY macro lens can enhance your iPhone photography, the most important element is your creativity and passion for capturing the world up close. So get out there, explore the tiny wonders around you, and have fun experimenting with your newfound macro photography skills!
In conclusion, creating a DIY macro lens for your iPhone is a fun and budget-friendly way to explore the world of close-up photography. By using simple and readily available materials, you can enhance your mobile photography skills and capture stunning details that you might have otherwise overlooked. Whether you’re an amateur photographer looking to experiment or a professional seeking a unique perspective, this DIY project is worth a try. Remember to follow the step-by-step instructions and be patient as you perfect your technique. So, grab your iPhone, gather the materials, and embark on a macro photography journey that will unlock a whole new world of creative possibilities.
FAQs
1. Can I use a macro lens on my iPhone?
Yes, you can use a macro lens on your iPhone. There are various external lenses available in the market that can be attached to your iPhone’s camera to enable macro photography.
2. Why would I want to use a macro lens on my iPhone?
Using a macro lens on your iPhone allows you to capture incredibly detailed close-up shots of small objects, revealing intricate textures and patterns that are not visible to the naked eye. It is perfect for capturing the beauty of flowers, insects, and other small subjects.
3. How do I attach a macro lens to my iPhone?
Attaching a macro lens to your iPhone is simple. Most external lenses come with a clip that can be easily attached to the top of your iPhone’s camera. Just align the lens with the camera lens and secure it in place.
4. Can I use a macro lens with any iPhone model?
Yes, macro lenses are compatible with various iPhone models, including the latest ones. However, it is important to check the lens specifications and compatibility before purchasing one to ensure it fits your specific iPhone model.
5. Are there any apps that can enhance macro photography on my iPhone?
Yes, there are several apps available in the App Store that can enhance macro photography on your iPhone. These apps offer advanced editing tools, focus stacking capabilities, and additional features to help you capture stunning macro shots.