
Connecting a wireless microphone to your iPhone opens up a world of possibilities for audio recording and capturing high-quality sound. Whether you’re a content creator, a musician, or a journalist, having the ability to wirelessly capture audio on-the-go can greatly enhance your productivity and creativity.
By eliminating the need for physical cables, a wireless microphone provides greater freedom of movement and flexibility during recordings. With advancements in technology, it has become easier than ever to pair and connect a wireless microphone to your iPhone, allowing you to capture crystal-clear audio without any hassle.
In this article, we will guide you through the process of connecting a wireless microphone to your iPhone effectively. We will provide step-by-step instructions and tips to ensure a seamless connection and optimal performance. So, if you’re ready to take your audio recording game to the next level, let’s get started!
Inside This Article
- Wireless Microphone Connectivity Options
- Connecting Wireless Microphone to iPhone using Bluetooth
- Connecting Wireless Microphone to iPhone using Wi-Fi
- Connecting Wireless Microphone to iPhone using Adapter and Cable
- Connecting Wireless Microphone to iPhone using USB
- Conclusion
- FAQs
Wireless Microphone Connectivity Options
When it comes to connecting a wireless microphone to your iPhone, you have several options to choose from. Each option offers its own benefits and considerations based on your specific needs and preferences. Whether you prefer a Bluetooth connection for convenience or a USB connection for high-quality audio, there is a solution that will suit your requirements.
Bluetooth Connection
One of the simplest ways to connect a wireless microphone to your iPhone is through Bluetooth. Bluetooth technology allows for a wireless connection between devices over short distances. By turning on Bluetooth on both the wireless microphone and your iPhone, you can easily pair the two devices. Simply select the microphone from the list of available Bluetooth devices on your iPhone, and you’re ready to go.
With a Bluetooth connection, you can enjoy the freedom of movement without being constrained by cables. It’s an excellent option for presentations, interviews, and other situations where you need flexibility and mobility.
Wi-Fi Connection
Another option for connecting a wireless microphone to your iPhone is through Wi-Fi. This method requires both the microphone and the iPhone to be connected to the same Wi-Fi network. Once they are connected, you can open the microphone’s app on your iPhone and select the microphone from the available devices. From there, you can configure settings and preferences to ensure a seamless connection.
A Wi-Fi connection offers robust and stable connectivity, making it ideal for live performances, broadcasting, and other professional settings where a reliable connection is crucial. Additionally, Wi-Fi connections often provide extended range and enhanced audio quality compared to Bluetooth.
Adapter and Cable Connection
If your wireless microphone does not have built-in wireless connectivity options like Bluetooth or Wi-Fi, you can still connect it to your iPhone using an adapter and cable. There are various adapters available that are specifically designed for iPhone connectivity.
Simply connect the wireless microphone to the adapter and then plug the adapter into the audio input port on your iPhone. This method allows you to take advantage of the microphone’s audio capabilities while capitalizing on the iPhone’s functionality and compatibility.
Using an adapter and cable connection is an excellent option for those who have a preferred wireless microphone or need specialized features that may not be available in other wireless microphones.
USB Connection
If you want to achieve the highest audio quality possible when connecting a wireless microphone to your iPhone, a USB connection may be the best choice. Many wireless microphones now come with USB connectivity options, allowing you to directly plug them into your iPhone using a USB cable.
With a USB connection, you can take advantage of the iPhone’s internal audio processing capabilities, resulting in pristine audio quality. This connection method is perfect for professional recordings, podcasting, and any other situation where the highest audio fidelity is required.
When connecting a wireless microphone to your iPhone using USB, make sure that the microphone and iPhone settings are properly configured to enable USB audio input.
As you can see, there are several wireless microphone connectivity options available for your iPhone. Whether you choose Bluetooth, Wi-Fi, an adapter and cable, or a USB connection, each option offers its own advantages and considerations. Consider your specific needs and preferences when deciding which method is right for you, and get ready to enjoy the freedom and convenience of a wireless microphone on your iPhone!
Connecting Wireless Microphone to iPhone using Bluetooth
Connecting a wireless microphone to your iPhone via Bluetooth is a convenient and hassle-free way to enhance your audio recording capabilities. By following a few simple steps, you can easily connect your microphone and start capturing high-quality sound.
The first step is to ensure that Bluetooth is turned on both on your wireless microphone and your iPhone. To do this, go to the settings menu on your iPhone and toggle the Bluetooth option to enable it. Similarly, check your microphone’s user manual or settings to enable Bluetooth connectivity.
Once Bluetooth is enabled on both devices, you can proceed to pair them. On your iPhone, navigate to the Bluetooth settings and scan for available devices. Select the wireless microphone from the list of detected devices to establish the connection. Some microphones may require you to enter a pairing code, so refer to the microphone’s manual if prompted.
After successfully pairing the microphone and iPhone, you may need to adjust settings and preferences to optimize performance. These settings can vary depending on the microphone model and the app you are using to record audio. Some common adjustments may include selecting the microphone as the input device within the recording app, adjusting volume levels, or enabling features like noise reduction or audio enhancement.
It is important to note that the Bluetooth range can vary, so ensure that you are within the desired range while using the microphone. Additionally, if you experience any connectivity issues or audio quality problems, try restarting both the microphone and iPhone, as well as resetting the Bluetooth connection.
By following these steps and ensuring proper settings and adjustments, you can seamlessly connect and use a wireless microphone with your iPhone via Bluetooth. Whether you’re recording interviews, podcasts, or capturing live performances, this wireless connection expands your audio recording possibilities.
Connecting Wireless Microphone to iPhone using Wi-Fi
When it comes to connecting a wireless microphone to an iPhone, Wi-Fi connectivity offers a convenient and reliable option. By following a few simple steps, you can seamlessly connect your wireless microphone to your iPhone and start enjoying high-quality audio recordings or performances. Here’s how to do it:
1. Ensure both the wireless microphone and iPhone are connected to the same Wi-Fi network. This is crucial for establishing a proper connection between the two devices.
2. Open the microphone’s app on your iPhone. Most wireless microphones have their dedicated apps that allow you to control and adjust various settings.
3. Within the app, select the microphone from the available devices. The app should detect your wireless microphone automatically if it is connected to the same Wi-Fi network as your iPhone.
4. Once you have selected the microphone, you may need to configure the settings and preferences within the app. This may include adjusting volume levels, choosing microphone modes, or enabling any additional features.
5. After making the necessary adjustments, you are now ready to use your wireless microphone with your iPhone via Wi-Fi. Whether you’re recording interviews, podcasts, or capturing live performances, you can enjoy the freedom of movement without the hassle of tangled cables.
Remember to consult the user manual or documentation provided with your wireless microphone to ensure compatibility with your iPhone and to familiarize yourself with any specific app features or requirements.
Connecting your wireless microphone to your iPhone using Wi-Fi opens up a world of possibilities for capturing professional-grade audio on the go. With a stable Wi-Fi connection, you can experience reliable and high-quality sound for various applications. So, grab your wireless microphone, connect it to your iPhone via Wi-Fi, and let your creativity flow!
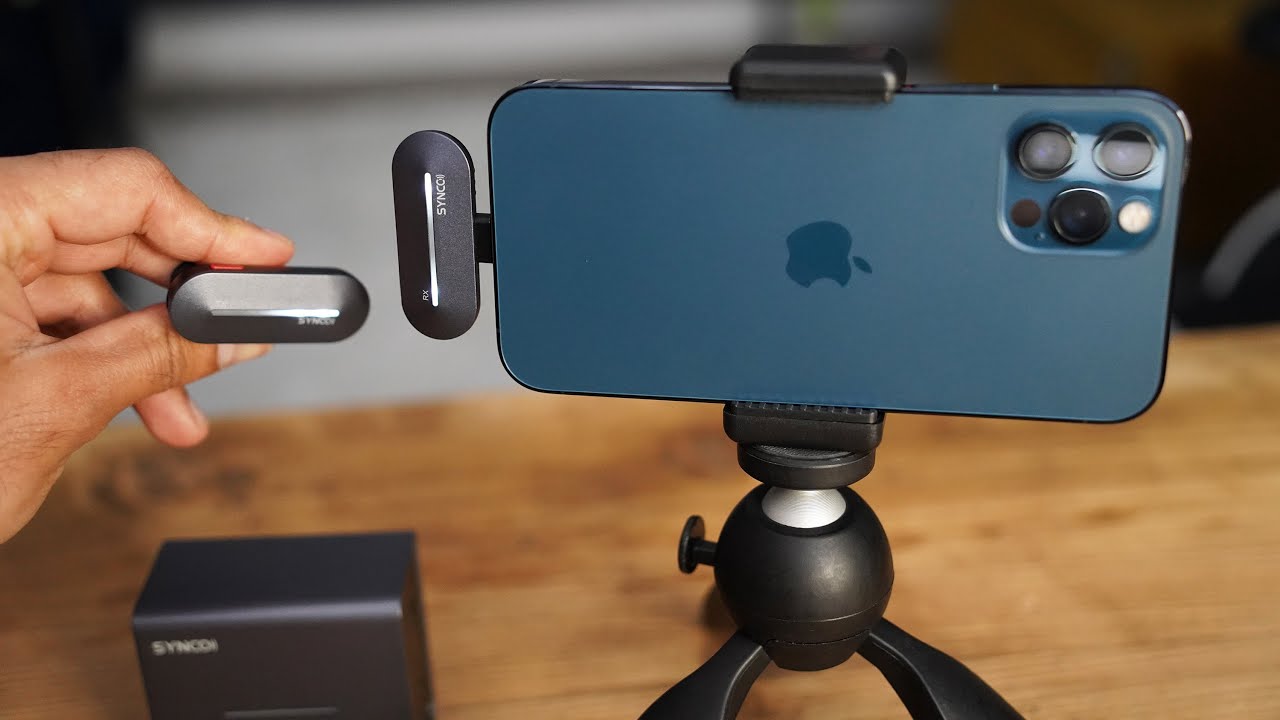
Connecting Wireless Microphone to iPhone using Adapter and Cable
When it comes to connecting a wireless microphone to an iPhone, one reliable method is to use an adapter and cable. This option provides a secure and stable connection between the microphone and the iPhone, ensuring optimal performance for any audio recording or live event.
To begin, you’ll need an adapter that is specifically designed for iPhone connectivity. These adapters typically come with different input options, such as XLR or 3.5mm audio jack, to accommodate various types of wireless microphones. Choose the adapter that is compatible with your wireless microphone model.
Once you have the appropriate adapter, you can connect the wireless microphone to it. Ensure that all the necessary cables are securely attached to both the microphone and the adapter.
Next, locate the audio input port on your iPhone. This is typically the same port used for headphones or earphones. Plug the adapter into the iPhone’s audio input port, making sure it is firmly connected.
After connecting the adapter, it’s important to adjust the settings on both the wireless microphone and the iPhone to ensure proper functionality. Check the microphone’s user manual for specific instructions on setting up the microphone with an iPhone.
On your iPhone, go to the settings and navigate to the sound or audio input settings. Ensure that the iPhone recognizes the connected microphone and adjust any necessary settings, such as input levels or microphone sensitivity.
Once the setup is complete, you’re ready to use your wireless microphone with your iPhone. The adapter and cable connection provide a reliable and hassle-free way to capture high-quality audio on your iPhone, whether you’re recording a podcast, conducting an interview, or performing live music.
Remember to always use high-quality cables and adapters for the best audio experience. It’s also a good idea to test the connection and settings before any important recording or event to ensure everything is working properly.
With the adapter and cable method, connecting a wireless microphone to your iPhone becomes a simple and effective process. Enjoy the flexibility of wireless audio capture combined with the power of your iPhone’s recording capabilities.
Connecting Wireless Microphone to iPhone using USB
One of the most straightforward ways to connect a wireless microphone to your iPhone is by using a USB connection. This method allows for a direct and reliable audio input, ensuring optimal sound quality for your recordings and performances.
The first step is to plug the wireless microphone into the iPhone using a USB cable. Make sure to use a cable that is specifically designed for connecting a microphone to an iPhone. This ensures proper compatibility and avoids any potential issues.
Once the microphone is physically connected to the iPhone, the next step is to configure the microphone and iPhone settings to enable USB audio input. This can typically be done through the audio settings on your iPhone. Look for the option to select the input device and choose the connected wireless microphone.
It is important to ensure that the microphone and iPhone are properly compatible with each other. Some wireless microphones may require additional drivers or software to be installed on the iPhone. Check the manufacturer’s instructions or website for any specific requirements or recommendations.
After configuring the settings and ensuring compatibility, you should now be able to use the wireless microphone with your iPhone through the USB connection. Test the microphone by recording audio or using it during live performances to ensure that the sound quality is optimal and that it functions as expected.
Keep in mind that the USB connection method may not be available on all wireless microphones. Some models may only support specific types of connectivity, such as Bluetooth or Wi-Fi. Always consult the microphone’s manual or contact the manufacturer for guidance on the best method of connecting to your iPhone.
Connecting a wireless microphone to your iPhone can greatly enhance your audio recording and communication capabilities. With the right equipment and a few simple steps, you can enjoy the freedom and convenience of going wireless.
In this article, we’ve explored various methods of connecting a wireless microphone to your iPhone. From using Bluetooth-enabled microphones to utilizing adapters and audio interfaces, there are multiple options available to suit your needs.
Remember to consider factors such as microphone compatibility, range, and battery life when choosing the right wireless microphone for your iPhone. Additionally, ensure that you follow the manufacturer’s instructions for proper setup and configuration.
By connecting a wireless microphone to your iPhone, you can capture high-quality audio, whether you’re recording a podcast, conducting interviews, or simply making clear and crisp phone calls. So go ahead and equip yourself with a wireless microphone to unlock a new level of convenience and audio excellence.
FAQs
1. Can I connect a wireless microphone to my iPhone?
Yes, you can connect a wireless microphone to your iPhone. With the right equipment and settings, you can wirelessly connect a microphone to your iPhone and use it for various purposes such as recording audio or facilitating live performances.
2. What equipment do I need to connect a wireless microphone to my iPhone?
To connect a wireless microphone to your iPhone, you will need a wireless microphone system that is compatible with iOS devices. This typically includes a wireless transmitter that connects to the microphone, and a receiver that connects to your iPhone via a Lightning or 3.5mm headphone jack adapter.
3. How do I connect a wireless microphone to my iPhone?
First, ensure that your wireless microphone system is charged and turned on. Connect the wireless transmitter to the microphone, and the wireless receiver to your iPhone using the appropriate adapter. Launch the audio recording or streaming app on your iPhone, select the microphone as the input source, and you’re ready to go.
4. Are there any recommended wireless microphone systems for iPhone users?
Yes, there are several recommended wireless microphone systems for iPhone users. Some popular options include the Rode Wireless Go, Shure MV88+, and Sennheiser XS Wireless Digital. These systems offer high-quality audio transmission and are designed specifically for iPhone compatibility.
5. Can I use a wireless microphone with my iPhone for video recording?
Absolutely! Using a wireless microphone with your iPhone for video recording can greatly enhance the audio quality of your videos. Simply connect the wireless microphone to your iPhone as mentioned earlier, open the video recording app, and ensure that the microphone is selected as the audio input device. This will result in clear and professional-sounding audio for your videos.