
Are you ready to unlock the incredible potential of your iPhone 13? Now, you can take your phone beyond just taking stunning photos and videos – you can use it to capture and create 3D scans! With the advanced technology of the iPhone 13, you have the power to bring real-world objects into the digital realm with ease. Whether you’re an artist, a designer, or simply someone fascinated by the world of 3D scanning, this article is your ultimate guide to exploring this exciting feature. In this article, we will walk you through the process of 3D scanning with your iPhone 13, providing valuable tips, techniques, and resources to help you get the most out of your device. So, get ready to unleash your creativity and embark on a journey into the captivating world of 3D scanning with your iPhone 13!
Inside This Article
- Overview of 3D Scanning with iPhone 13
- Required Equipment and Software
- Steps to 3D Scan with iPhone 13
- Tips for Successful 3D Scanning with iPhone 13
- Conclusion
- FAQs
Overview of 3D Scanning with iPhone 13
The iPhone 13 is not just a powerful smartphone, but it also has the capability to perform 3D scanning. This feature allows you to capture real-world objects and create digital 3D models. With the advancements in technology, the iPhone 13 uses its powerful processing capabilities, along with the high-quality cameras and sensors, to capture and analyze depth information.
Using the iPhone 13 for 3D scanning opens up a world of possibilities for various industries. Architects and designers can use this feature to capture accurate measurements of spaces and objects, allowing for precise planning and visualization. Artists and creators can bring their imagination to life by scanning real objects and incorporating them into their digital creations. Additionally, this functionality can also be used in areas such as gaming, augmented reality, and virtual reality.
The process of 3D scanning with the iPhone 13 is incredibly user-friendly. The intuitive interface and built-in software make it accessible to anyone, regardless of their technical expertise. By simply pointing your iPhone 13 at the object you want to scan, the device will capture multiple images and depth data. The device then utilizes advanced algorithms to stitch these images together, creating a detailed and accurate 3D model.
One of the key advantages of using the iPhone 13 for 3D scanning is the convenience it offers. The iPhone is a portable device, which means you can easily carry it with you wherever you go. This allows you to capture objects and spaces on the go, without the need for bulky equipment. Whether you’re at a construction site, an art gallery, or even outdoors, you can easily capture and create 3D models using the iPhone 13.
Furthermore, the iPhone 13’s advanced camera system ensures that the 3D scans are of high quality. The device’s sensors and lenses work together to capture accurate color information and depth details, resulting in realistic and vibrant 3D models. This level of precision is essential when it comes to applications such as 3D printing, where the accuracy of the model is crucial.
Overall, the iPhone 13’s 3D scanning capabilities offer a new dimension of possibilities for users. Whether you’re a professional in a specific industry or an enthusiast looking to explore the world of 3D scanning, the iPhone 13 provides a user-friendly and powerful tool to bring your ideas to life.
Required Equipment and Software
Before you delve into the exciting world of 3D scanning with your iPhone 13, it’s important to gather the necessary equipment and software. Here’s a list of what you’ll need:
- iPhone 13: The latest iPhone model boasts impressive camera capabilities, making it ideal for 3D scanning. Make sure you have the iPhone 13 or a compatible model.
- 3D scanning app: To capture and process scans, you’ll need a reliable 3D scanning app. There are several options available on the App Store, such as Scaniverse, Qlone, and ScanMentor. Research and choose the one that best suits your needs and preferences.
- Object to scan: Whether you want to scan an intricate piece of jewelry or a small figurine, you’ll need the actual object to scan. Ensure that it’s clean and well-lit to achieve the best results.
- Stable surface or tripod: To minimize camera shake and capture accurate scans, it’s essential to place your iPhone on a stable surface or use a tripod. This will ensure that the scans are sharp and detailed.
- Optional accessories: While not mandatory, certain accessories can enhance your 3D scanning experience. A turntable or rotating platform can facilitate the scanning process by allowing you to capture multiple angles easily. Additionally, a lighting setup, such as a ring light or diffused light source, can help eliminate shadows and improve the overall quality of your scans.
By gathering these required equipment and software, you’ll be fully prepared to embark on your 3D scanning journey with your iPhone 13.
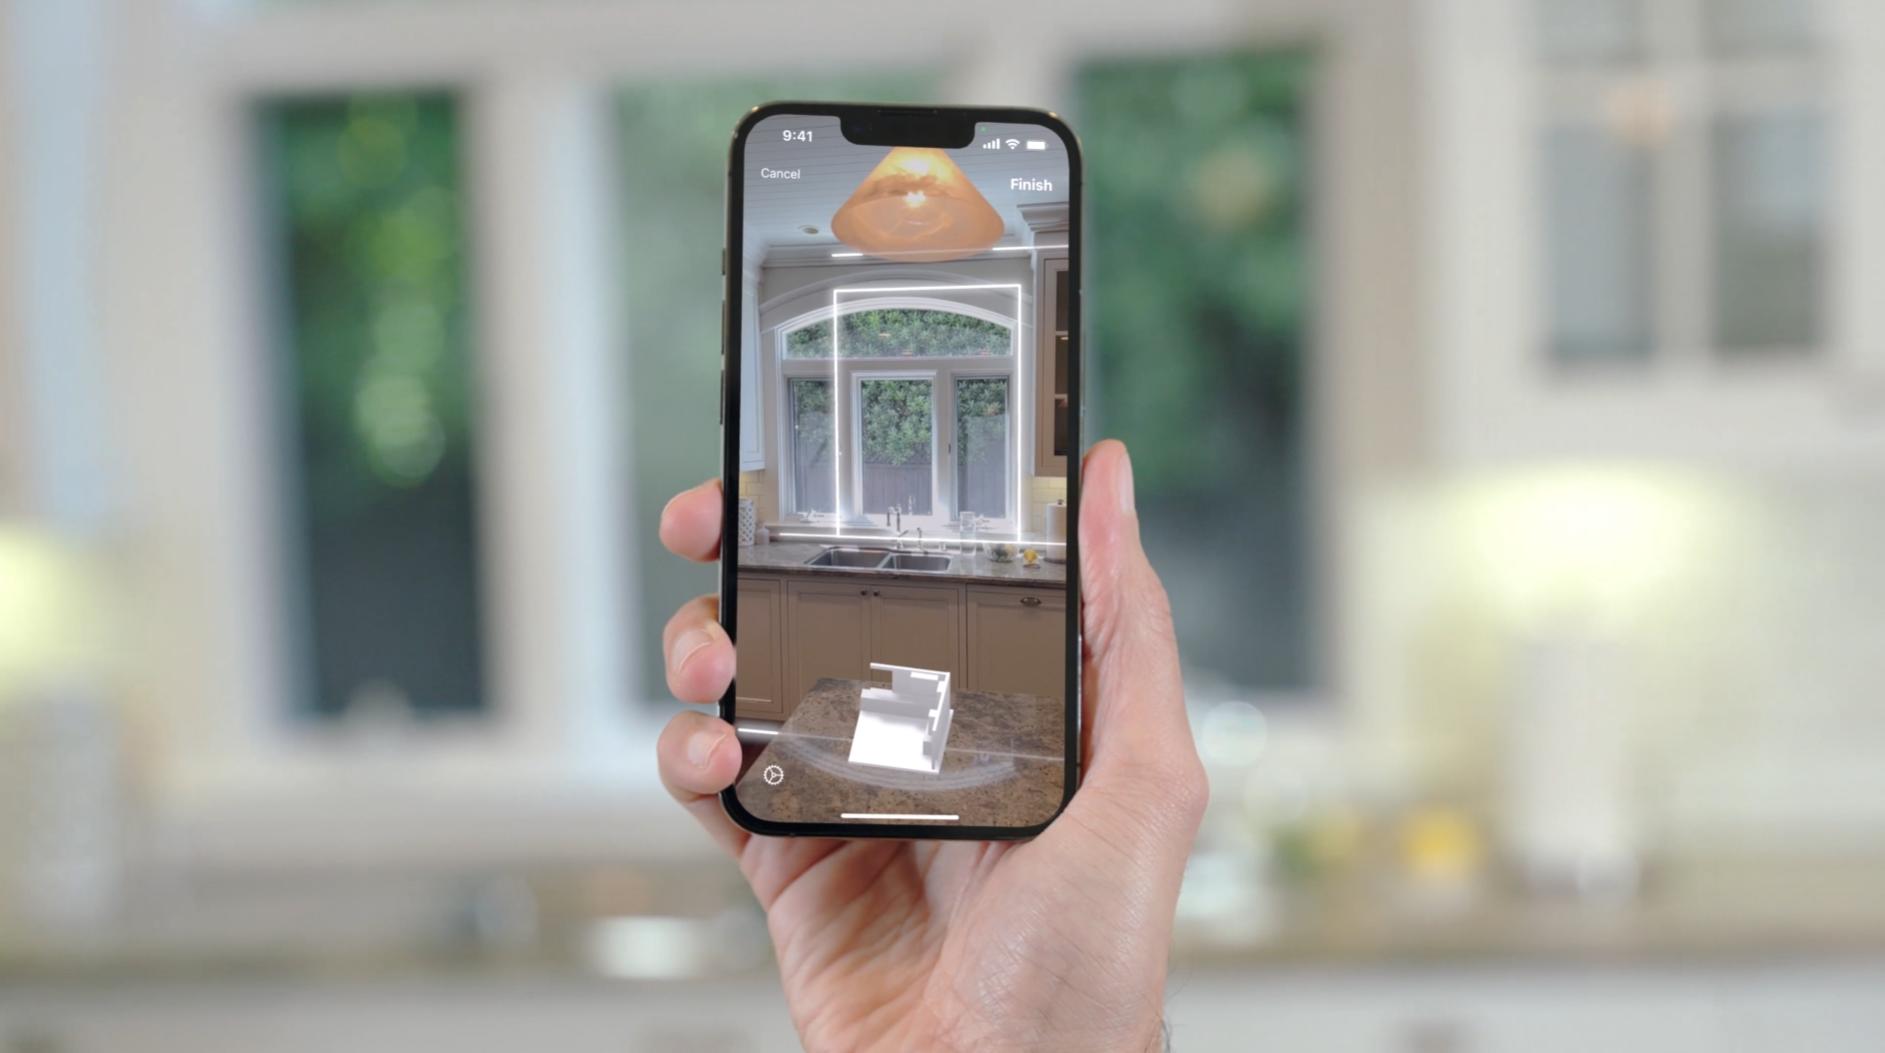
Steps to 3D Scan with iPhone 13
3D scanning with the latest iPhone 13 is an exciting feature that allows you to capture objects and turn them into digital models. If you’re eager to try this innovative capability, here are the step-by-step instructions to help you get started:
- Prepare your iPhone 13: Make sure your iPhone 13 is updated to the latest software version and has sufficient battery life. Also, clear up some storage space to accommodate the 3D scans you’ll be capturing.
- Select the 3D scanning app: There are several 3D scanning apps available on the App Store, so choose one that best suits your needs and preferences. Some popular options include Scaniverse, Polycam, and Capture 3D Scan. Install the app on your iPhone 13.
- Open the 3D scanning app: Launch the app on your iPhone 13 and familiarize yourself with its interface and features. Most apps have intuitive controls and provide guidance on how to capture accurate 3D scans.
- Set up the scanning area: Find a well-lit environment with even lighting to ensure clear and consistent scans. Avoid clutter or reflective surfaces that could interfere with the scanning process. Place your object on a stable surface, preferably against a contrasting background.
- Position your iPhone: Hold your iPhone 13 steady and position it at a comfortable distance from the object you want to scan. Follow the prompts in the app to ensure optimal distance and alignment for capturing the best possible scan.
- Start the scanning process: Once you’re ready, initiate the scanning process in the app. Move your iPhone 13 around the object, capturing different angles and perspectives. The app will guide you through the scanning motion and provide real-time feedback on the scan quality.
- Refine and finalize the scan: After capturing the initial scan, you may need to refine and optimize it for a more accurate and detailed result. Most apps offer tools for editing and enhancing the scan, such as cropping, aligning, and filling in missing areas. Take your time to achieve the desired level of precision.
- Save and export the 3D scan: Once you’re satisfied with the final result, save the 3D scan to your iPhone 13’s storage or to a cloud-based storage service. Depending on the app, you can export the scan in different file formats, such as OBJ, STL, or PLY, for further manipulation or sharing.
By following these step-by-step instructions, you can leverage the power of the iPhone 13’s 3D scanning capabilities to capture detailed digital models of objects. Whether you’re a hobbyist, designer, or professional, 3D scanning with the iPhone 13 opens up a world of creative possibilities.
Tips for Successful 3D Scanning with iPhone 13
When it comes to 3D scanning with the iPhone 13, there are a few tips and tricks that can help you achieve the best results. Whether you’re scanning objects for personal use or professional purposes, follow these tips to make your 3D scans more accurate and detailed.
1. Find a well-lit environment: Lighting plays a crucial role in capturing detailed 3D scans. Make sure you scan in a well-lit area to minimize shadows and ensure better visibility of the object you’re scanning. Natural light or a well-positioned artificial light source can significantly improve the quality of your scans.
2. Keep the object steady: Stability is key when it comes to 3D scanning. To achieve the best results, place the object on a stable surface or use a stand to hold it in place. Any movement or vibrations during the scanning process can result in blurry scans or inaccurate dimensions.
3. Maintain proper distance: It’s essential to maintain an optimal distance between the iPhone 13 and the object you’re scanning. Too close, and you may lose details, while being too far can result in a loss of resolution. Experiment with different distances to find the sweet spot that captures the object’s details accurately.
4. Use the grid feature: The iPhone 13 has a built-in grid feature that helps align the scan accurately. Enable the grid overlay in the camera settings and use it as a guide to ensure proper framing and alignment of the object within the scanning area. This can greatly improve the accuracy and symmetry of the 3D scan.
5. Slow and steady scanning: Take your time when scanning an object with the iPhone 13. Move the device slowly and smoothly around the object, capturing all angles and surfaces. Rushing through the scanning process can result in subpar scans with missing details. Patience and attention to detail are key.
6. Clean the lens: Before each scanning session, make sure to clean the lens of your iPhone 13. Dust or smudges on the lens can affect the clarity and quality of the scans. Use a microfiber cloth or a lens cleaning solution to wipe away any dirt, fingerprints, or debris that may hinder the scanning process.
7. Experiment with scanning apps: While the built-in scanning capabilities of the iPhone 13 are impressive, exploring third-party scanning apps can enhance your options and functionality. There are various apps available that offer advanced features and editing tools to further refine your 3D scans. Research and experiment with different apps to find the ones that best suit your needs.
8. Check the scan quality: After completing the scanning process, take a moment to review the scan quality before saving or exporting it. Zoom in to inspect details, check for any inconsistencies or deformities, and make adjustments if necessary. It’s better to double-check and rescan if needed rather than settling for a subpar result.
9. Practice and iterate: Like any skill, 3D scanning with the iPhone 13 requires practice and experimentation. Take the time to familiarize yourself with the process, learn from your scans, and make adjustments accordingly. The more you practice, the better your scans will become, and the more comfortable you’ll feel using the iPhone 13 for 3D scanning.
By following these tips, you can unlock the full potential of the iPhone 13 for 3D scanning. Remember, patience, attention to detail, and a willingness to experiment are the keys to successful and accurate 3D scans.
In conclusion, the iPhone 13 is not only a state-of-the-art smartphone but also a powerful tool for 3D scanning. With its advanced camera capabilities and Lidar technology, users can easily create high-quality 3D scans of objects, environments, and even people. The combination of the iPhone’s computational photography and augmented reality features opens up a world of possibilities for professionals, hobbyists, and creatives alike.
Whether you’re a designer looking to digitize your physical prototypes, an architect wanting to capture accurate measurements of a room, or simply someone who wants to delve into the fascinating world of 3D scanning, the iPhone 13 offers a convenient and accessible solution. Its user-friendly interface and seamless integration with various 3D scanning apps make it a go-to choice for those seeking both convenience and quality in their scanning endeavors.
So, unleash your creativity, explore the potential of 3D scanning, and let your iPhone 13 be your personal scanner that fits right in your pocket.
FAQs
Q: Can I use my iPhone 13 to 3D scan objects?
Yes, you can! The iPhone 13 is equipped with advanced camera technology that allows you to capture detailed 3D scans of objects.
Q: Do I need any additional hardware or accessories to 3D scan with my iPhone 13?
No, you don’t need any additional hardware or accessories. The iPhone 13’s built-in cameras and sensors are sufficient to capture accurate 3D scans.
Q: What apps can I use to 3D scan with my iPhone 13?
There are several apps available on the App Store that are specifically designed for 3D scanning. Some popular options include Scanner Pro, 3D Scanner App, and Capture 3D Scan. These apps utilize the iPhone 13’s camera and processing power to create high-quality 3D scans.
Q: How accurate are the 3D scans captured with an iPhone 13?
The accuracy of the 3D scans captured with an iPhone 13 can vary depending on various factors like lighting conditions, object complexity, and the app used. However, the iPhone 13’s advanced camera technology and powerful processors enable it to capture scans with impressive accuracy, usually within a few millimeters.
Q: Can I share and export the 3D scans captured with my iPhone 13?
Yes, you can easily share and export the 3D scans captured with your iPhone 13. Most 3D scanning apps allow you to save the scans in various formats, such as OBJ or STL, which can be easily shared via email, messaging apps, or even uploaded to cloud storage platforms.