
Welcome to the comprehensive guide on how to replace the battery in a Samsung Galaxy A tablet. Whether you’re experiencing a shortened battery life or your tablet isn’t holding a charge as it used to, replacing the battery can breathe new life into your device. The Samsung Galaxy A tablet series is known for its sleek design and impressive performance, and a simple battery replacement can prolong its usability for years to come. In this article, we’ll walk you through the step-by-step process of replacing the battery in your Samsung Galaxy A tablet, ensuring that you can continue to enjoy its features without being tethered to a power outlet. Let’s dive in and rejuvenate your tablet’s battery life!
Inside This Article
- Safety Precautions
- Tools and Materials Needed
- Removing the Back Cover
- Removing the Old Battery
- Installing the New Battery
- Replacing the Back Cover
- Powering On and Testing the Tablet
- Conclusion
- FAQs
Safety Precautions
Before attempting to replace the battery in your Samsung Galaxy A tablet, it’s crucial to prioritize safety. The following precautions should be observed to prevent accidents and ensure a smooth battery replacement process.
1. Power Off the Tablet: Always power off your tablet and disconnect it from any power source before initiating the battery replacement. This minimizes the risk of electric shock and prevents potential damage to the device.
2. Work in a Clean and Dry Area: Choose a well-lit, clean, and dry workspace to perform the battery replacement. This environment reduces the chances of dust or moisture interfering with the delicate internal components of the tablet.
3. Use the Right Tools: Ensure that you have the appropriate tools for the job, such as a set of precision screwdrivers and a plastic spudger. Using the correct tools minimizes the risk of damaging the tablet during the battery replacement process.
4. Handle the Battery with Care: Lithium-ion batteries, like the one in your Samsung Galaxy A tablet, can be volatile if mishandled. Avoid bending, puncturing, or exposing the battery to extreme temperatures to prevent the risk of fire or explosion.
5. Avoid Short Circuits: Take care to prevent any metal objects, such as jewelry or tools, from coming into contact with the battery terminals or other electronic components inside the tablet. Short circuits can cause damage to the tablet or result in personal injury.
By adhering to these safety precautions, you can ensure a secure and successful battery replacement process for your Samsung Galaxy A tablet.
Tools and Materials Needed
Before you embark on replacing the battery in your Samsung Galaxy A tablet, it’s essential to gather the necessary tools and materials. Ensuring you have the right equipment will make the process smoother and more efficient.
Here's a list of tools and materials you'll need:
- Replacement Battery: Ensure you have a compatible replacement battery for your specific Samsung Galaxy A tablet model. It's crucial to use a genuine or high-quality replacement to maintain optimal performance.
- Small Phillips Screwdriver: This will be required to remove the screws securing the back cover of the tablet. A precision screwdriver set is ideal for this purpose.
- Plastic Opening Tool: To safely pry open the back cover without causing damage, a plastic opening tool or spudger is recommended. This will help prevent scratches or dents on the tablet's casing.
- Tweezers: Having a pair of fine-point tweezers can aid in handling small components and connectors during the battery replacement process.
- Adhesive Strips: In some cases, adhesive strips may be required to secure the new battery in place within the tablet's housing. These strips ensure the battery remains properly positioned.
- Clean, Flat Workspace: Working on a clean, flat surface with ample lighting will facilitate a more organized and efficient battery replacement process. It's important to have enough space to lay out the components and screws systematically.
- Anti-Static Wrist Strap (Optional): To prevent damaging sensitive electronic components with static electricity, an anti-static wrist strap can be used during the battery replacement process.
Removing the Back Cover
Before you begin, ensure that your tablet is powered off to avoid any electrical mishaps. Once you’ve confirmed this, you can proceed to the first step of replacing the battery: removing the back cover. This process is relatively simple but requires a delicate touch to avoid damaging the tablet.
Start by locating the small notch or groove along the edge of the tablet. This is usually found at the bottom or top of the device. Gently insert your fingernail or a plastic opening tool into this groove, being cautious not to use excessive force. Slowly and carefully pry the back cover away from the tablet’s body.
Continue working your way around the edges, gradually releasing the clips that secure the back cover in place. Take your time and be gentle, as excessive force can lead to the breakage of the clips or damage to the cover itself. Once all the clips are released, carefully lift the back cover away from the tablet and set it aside.
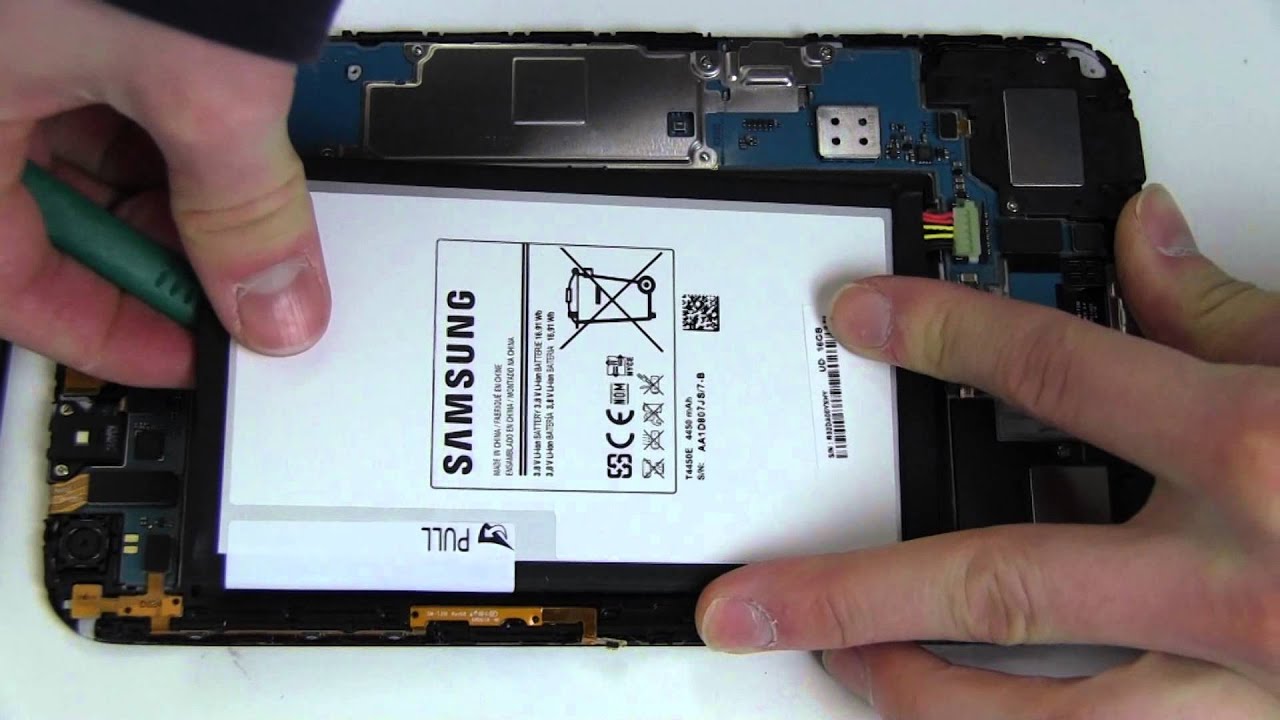
Removing the Old Battery
After successfully removing the back cover, the next step is to locate the battery. In most Samsung Galaxy A tablets, the battery is easily identifiable, positioned near the center of the device. It’s usually rectangular and has a connector attached to it.
Before proceeding, it’s crucial to ensure that the tablet is turned off to prevent any electrical mishaps. Once confirmed, carefully disconnect the battery connector from the tablet’s motherboard. This connector is usually a small, white, or black plastic piece that can be gently unclipped from the socket on the motherboard.
After disconnecting the battery, use a suitable tool, such as a spudger or plastic opening tool, to gently pry the battery from its housing. Take your time and exercise caution to avoid damaging any other internal components. The battery is typically secured with adhesive, so gentle and consistent pressure may be required to release it.
Once the battery is detached from the tablet, handle it with care. Lithium-ion batteries can be sensitive, so avoid bending or puncturing it. Additionally, ensure that the old battery is disposed of properly, following local regulations for electronic waste recycling.
Installing the New Battery
Once you have safely removed the old battery, it’s time to install the new one. Carefully take the new battery and position it in the designated area within the tablet. Ensure that the connectors on the battery align with the corresponding connectors inside the device.
Gently press the battery into place, making sure it sits securely. Avoid using excessive force, as this could potentially damage the new battery or other components within the tablet. Once the battery is properly seated, you can proceed to the next step.
After the new battery is in position, reattach any adhesive strips or covers that secure it in place. This will help prevent the battery from moving around or becoming dislodged during regular use of the tablet.
Take a moment to double-check that the battery is securely fastened and that all the connections are properly aligned. Ensuring a snug fit will help maintain the stability and performance of the battery within the tablet.
Replacing the Back Cover
Once you have successfully installed the new battery, it’s time to put the back cover back on the Samsung Galaxy A tablet. Carefully align the cover with the edges of the device, ensuring that it fits snugly into place. Start by pressing down along the edges to secure the cover back onto the tablet.
Take a moment to inspect the cover and ensure that it is sitting flush with the device. Gently run your fingers along the edges to confirm that there are no gaps or misalignments. This step is crucial to prevent any dust or debris from entering the tablet’s interior.
With the back cover securely in place, apply gentle pressure along the edges to ensure that it is properly seated. You should hear a series of soft clicks as the cover locks into position. This confirms that the cover is correctly installed and provides a reassuring indication that the tablet is protected.
Finally, give the back cover a gentle pat to ensure that it is firmly in place. Take a moment to admire your handiwork and appreciate the successful replacement of the battery and back cover on your Samsung Galaxy A tablet.
Powering On and Testing the Tablet
After successfully replacing the battery and securing the back cover, it’s time to power on and test your Samsung Galaxy A Tablet. To do this, press and hold the power button until the Samsung logo appears on the screen. This may take a few seconds, so be patient as the tablet boots up.
Once the tablet has powered on, check for any error messages or unusual behavior. It’s essential to ensure that the tablet functions normally after the battery replacement. Test the touchscreen, buttons, and camera to verify that all components are working as expected.
Next, connect the tablet to a power source and let it charge for a while. This will allow the new battery to reach an optimal charge level. Keep an eye on the battery indicator to confirm that it’s charging properly and holding the charge.
If everything appears to be functioning correctly, you can proceed to use the tablet as you normally would. However, if you encounter any issues or abnormalities during the testing phase, it’s advisable to revisit the battery replacement process to ensure that everything was done correctly.
Conclusion
Replacing the battery in your Samsung Galaxy A tablet is a manageable task that can significantly extend the lifespan of your device. By following the steps outlined in this guide, you can ensure that your tablet continues to function optimally without the hindrance of a deteriorating battery. Whether you’re an experienced tech enthusiast or a novice, the process is feasible with the right tools and attention to detail. Remember to source a high-quality replacement battery and prioritize safety throughout the procedure. With a rejuvenated battery, your Samsung Galaxy A tablet will be ready to accompany you through countless more adventures, work tasks, and entertainment experiences.
FAQs
**Q: How do I know if my Samsung Galaxy A tablet battery needs to be replaced?**
A: If your Samsung Galaxy A tablet is experiencing significantly shorter battery life, unexpected shutdowns, or difficulty holding a charge, it may be time to replace the battery.
Q: Can I replace the battery in my Samsung Galaxy A tablet myself?
A: Yes, you can replace the battery in your Samsung Galaxy A tablet yourself, but it's important to follow the manufacturer's guidelines and use the appropriate tools to ensure a safe and successful replacement.
Q: Where can I purchase a replacement battery for my Samsung Galaxy A tablet?
A: You can purchase a replacement battery for your Samsung Galaxy A tablet from authorized Samsung dealers, reputable online retailers, or directly from Samsung's official website.
Q: What tools do I need to replace the battery in my Samsung Galaxy A tablet?
A: To replace the battery in your Samsung Galaxy A tablet, you may need tools such as a small Phillips screwdriver, a plastic opening tool, and adhesive strips to secure the new battery in place.
Q: Are there any precautions I should take before replacing the battery in my Samsung Galaxy A tablet?
A: Before replacing the battery in your Samsung Galaxy A tablet, it's crucial to power off the device, discharge the old battery completely, and handle the replacement battery with care to avoid any potential hazards.