
When it comes to photography and videography, having a stable and reliable tripod is essential. Regardless of whether you’re a professional or an amateur, the height of your tripod can significantly impact the quality of your shots. But how tall should a tripod be? This is a common question that many photographers and videographers need to consider. The height of a tripod depends on various factors such as your shooting style, the type of camera you’re using, and your own height and shooting preferences. In this article, we will delve into the considerations for determining proper tripod height and provide some helpful tips to help you find the perfect tripod for your needs.
Inside This Article
- Determining the Ideal Height of a Tripod
- Considering the Factors for Choosing Tripod Height
- Finding the Right Tripod Height for Different Shooting Scenarios
- Adjusting the Tripod Height for Maximum Stability and Comfort
- Conclusion
- FAQs
Determining the Ideal Height of a Tripod
When it comes to getting the perfect shot, having a tripod can be a game-changer. A tripod not only provides stability for your camera, but it also allows you to position your camera at the ideal height for capturing stunning photos or videos. But how do you determine the ideal height for your tripod? Let’s explore some key factors to consider.
1. Purpose of Use: The first step in determining the ideal height of a tripod is identifying the purpose it will serve. Are you primarily shooting landscapes, portraits, or engaging in macro photography? Each type of photography may require a different height to achieve the desired results. For instance, shooting landscapes may require a taller tripod to capture wide-angle views, while portrait photography may benefit from a tripod that allows for eye-level shots.
2. Photographer’s Height: Another crucial factor to consider is the height of the photographer. You want to ensure that the tripod is adjustable enough to accommodate your height comfortably. There’s nothing worse than having to stoop or stretch to use your camera because the tripod isn’t the right height for you. Look for tripods with adjustable height options to find the perfect fit.
3. Shooting Style: Different photographers have varying shooting styles, and this can impact the ideal height of the tripod. Some photographers prefer to shoot from a lower perspective, while others opt for a higher angle. Consider your shooting style and the types of shots you want to capture to determine the ideal tripod height for your needs.
4. Ease of Use: It’s essential to choose a tripod that is easy to adjust and operate. Look for tripods with quick-release levers and intuitive height adjustment mechanisms. The easier it is to adjust the height of the tripod, the more flexibility you will have in finding the ideal height for each shooting scenario.
5. Weight considerations: Tripods come in different sizes and weight capacities. If you often shoot on the go or travel frequently, you may prefer a lightweight tripod for convenience. However, bear in mind that lighter tripods may have limitations in terms of maximum height and stability. Consider the weight of your camera equipment and choose a tripod that can support it adequately while maintaining stability at the desired height.
Determining the ideal height for a tripod ultimately boils down to personal preference and the specific shooting scenarios you frequently encounter. Take into account the purpose of use, your height, shooting style, ease of use, and weight considerations to find a tripod that checks all the boxes. By choosing the right tripod height, you’ll be one step closer to capturing breathtaking photos and videos with precision and stability.
Considering the Factors for Choosing Tripod Height
Choosing the right height for your tripod is crucial for achieving stability and ensuring optimal shooting conditions. While it may seem like a simple decision, there are several factors to consider when determining the ideal height. Let’s explore these factors below:
1. Shooting Position: The shooting position plays a significant role in determining the tripod’s height. If you often shoot at eye-level, you will require a tripod that extends to your eye level or slightly above. However, if you frequently shoot from a lower angle or need to be closer to ground level, a shorter tripod might be more suitable.
2. Subject and Composition: The subject you are photographing and the desired composition also impact the tripod height. For example, shooting landscapes typically requires a tripod that allows the camera to be positioned higher to capture the expansive scenery. On the other hand, macros or close-ups may require the camera to be positioned lower for detailed shots.
3. Stability and Weight: The weight of your camera gear is an important consideration when choosing tripod height. If you have heavy lenses or accessories, a taller tripod will provide better stability and balance. However, if you frequently travel or hike with your gear, a lighter and more compact tripod might be preferable, even if it means sacrificing some height.
4. User Height: Your own height is another factor to consider. If you are taller, you may prefer a tripod with extended legs to avoid hunching over while shooting. Conversely, if you are shorter, a tripod with adjustable legs that can be set at a lower height will ensure your comfort and ease of use.
5. Versatility: Consider the versatility of the tripod when it comes to adjusting the height. Some tripods offer multiple leg sections that allow for more flexibility in adjusting the height to suit different shooting scenarios. This is particularly important if you work in various situations or if you need to adapt to different shooting conditions quickly.
By considering these factors, you can make an informed decision when choosing the height of your tripod. Keep in mind that there is no one-size-fits-all solution, and it’s essential to find a tripod that meets your specific needs and shooting style.
Finding the Right Tripod Height for Different Shooting Scenarios
When it comes to photography or videography, having a stable and adjustable tripod is essential. But finding the right height for your tripod can greatly impact the quality and stability of your shots. Different shooting scenarios call for different tripod heights, so let’s explore how to find the perfect height for your specific needs.
1. Low-level Shots: Sometimes, you may want to capture shots from a lower perspective, such as capturing details or shooting close to the ground. For these types of shots, you’ll need a tripod that can go as low as possible. Look for tripods with adjustable legs that can splay out wide to provide a stable base close to the ground.
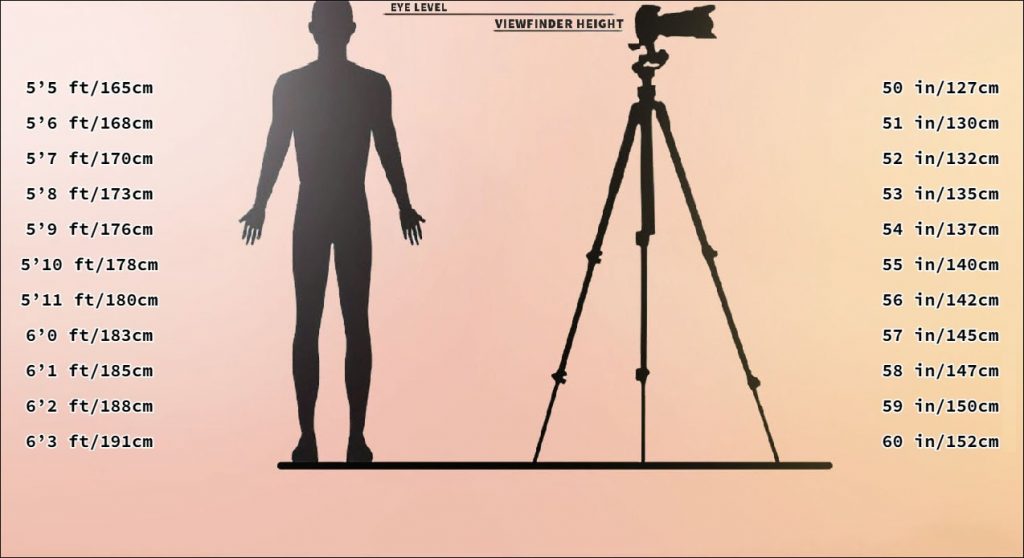
2. Eye-Level Shots: Eye-level shots are often preferred for capturing portraits or general scenes. To achieve this height, set your tripod so that the camera’s viewfinder is at your eye level. You can do this by adjusting the height of the tripod’s center column or the length of the tripod’s legs. Remember to check the stability and balance of the tripod at your desired height to ensure sharp and steady shots.
3. Overhead Shots: Whether you’re shooting a flat lay of food or capturing an aerial view, overhead shots require a tripod with extended height capabilities. Look for tripods with taller center columns or adjustable legs that can be extended to reach the desired height. This will allow you to position the camera directly above your subject and achieve a bird’s eye view perspective.
4. Panning and Tracking Shots: For dynamic shots that involve panning or tracking movements, it’s important to have a tripod that is not only stable but also easy to adjust. Look for tripods with a fluid or ball head that allows smooth movement and quick adjustments. Additionally, make sure the tripod’s height is set at a comfortable level for you to easily maneuver and follow the action.
5. Macro Photography: Macro photography involves capturing tiny subjects with intricate details. To achieve optimum focusing at such close distances, your tripod should allow for precise adjustments in height. Look for tripods with a center column that can be easily adjusted without disturbing the composition. This will help you maintain the desired focus and perspective.
Remember that the right tripod height also depends on your own height and shooting preferences. It’s important to test and experiment with different heights to find what works best for you. Having a tripod with adjustable leg lengths and a center column will give you the flexibility to adapt to various shooting scenarios and achieve optimal stability and composition.
Adjusting the Tripod Height for Maximum Stability and Comfort
When it comes to using a tripod, finding the right height is crucial for achieving maximum stability and capturing your shots with comfort. Whether you’re a professional photographer or an amateur enthusiast, understanding how to adjust the tripod height correctly can make a significant difference in the quality of your photos.
Here are a few essential tips to help you adjust the tripod height for maximum stability and comfort:
- Setting the initial height: Before you start adjusting the tripod, set the initial height by extending the legs to a level that feels comfortable when you stand next to it. This will provide a good starting point for further adjustments.
- Consider the shooting environment: Take into account the shooting environment and your desired composition. If you’re shooting on uneven ground, you may need to adjust the tripod legs individually to ensure stability. For low-angle shots, consider lowering the tripod height to get closer to the ground. On the other hand, for high-angle shots, you may need to extend the tripod height to reach the desired viewpoint.
- Use the center column: If your tripod has a center column, you can use it to fine-tune the height adjustments. Extending the center column can provide extra height in situations where you need it. However, keep in mind that raising the center column too high can compromise stability, so use it sparingly and only when necessary.
- Leveling the tripod: A level tripod is essential for stability and accurate composition. Most tripods come with a built-in bubble level, which helps you ensure that your tripod is perfectly level. Make sure to adjust the tripod’s legs, center column, or use a leveling base if needed, to achieve a balanced and stable setup.
- Be mindful of weight distribution: Another factor to consider when adjusting the tripod height is weight distribution. Ensure that the weight of your camera and lens is evenly distributed on the tripod head to maintain stability. Adjust the tripod height accordingly, so the center of gravity is well-balanced, reducing the risk of tipping over.
- Experiment and fine-tune: Adjusting the tripod height is not a one-time process. Take the time to experiment with different heights and angles to find the optimal position for your specific shooting scenario. Fine-tune the adjustments until you achieve the perfect balance between stability and comfort.
By following these tips and techniques, you can adjust the tripod height for maximum stability and comfort, allowing you to focus on capturing stunning images without any compromise. Remember that practice makes perfect, so don’t be afraid to try different setups and find what works best for you.
Conclusion
Choosing the right height for a tripod is an essential consideration for any photographer or videographer. It not only affects your comfort while shooting but also plays a crucial role in achieving stable and steady footage. Finding the perfect height requires taking into account your shooting style, the types of subjects you capture, and your own height and preferences.
Remember, a tripod that is too short may limit your shooting capabilities, while one that is too tall can be inconvenient and unstable. Take the time to experiment with different heights and tripod options to find the optimal balance for your needs. By selecting a tripod with adjustable legs and a center column, you can have the flexibility to adapt to various shooting scenarios and achieve the perfect height every time.
Investing in a high-quality tripod that meets your height requirements will greatly enhance the quality and versatility of your photography or videography work. So, take the time to research and choose a tripod that fits your needs and unleashes your creative potential. Whether you’re capturing breathtaking landscapes, shooting professional videos, or capturing precious memories, finding the right tripod height will undoubtedly elevate your photography and videography skills to new heights.
FAQs
1. Why is the height of a tripod important?
The height of a tripod is crucial because it determines the stability, functionality, and versatility of your photography or video equipment. A tripod that is too short may not provide the desired framing, and one that is too tall can become cumbersome to handle.
2. What is the ideal height for a tripod?
The ideal height for a tripod depends on your personal preferences and shooting style. In general, a tripod should be able to extend to your eye level or slightly above it when fully extended. This allows for comfortable shooting and reduces the strain on your back and neck.
3. Can tripod height be adjusted?
Yes, most tripods come with adjustable legs that allow you to change the height as per your requirement. Additionally, some tripods also have a central column that can be extended to increase the height further.
4. Can I use a tripod that is taller or shorter than my height?
Yes, you can use tripods that are taller or shorter than your height. However, it is generally recommended to use a tripod that is at least your height or slightly taller for comfortable shooting. Using a tripod that is too tall or too short can compromise stability and may result in awkward shooting positions.
5. Are there any weight considerations for tripods?
Yes, when choosing a tripod, it is important to consider its weight capacity. Ensure that the tripod can support the weight of your camera and accessories securely. Overloading a tripod can lead to stability issues and may cause it to tip over.