
Are you in need of some extra privacy on your deck? Building a lattice privacy screen can be a great solution. Not only will it add a touch of elegance to your outdoor space, but it will also provide you with the privacy you desire.
With just a few materials and some basic carpentry skills, you can easily create a lattice privacy screen that will transform your deck into a secluded retreat. Whether you want to block out nosy neighbors, shield yourself from the sun, or create a cozy ambiance, a lattice privacy screen will do the trick.
In this article, we will guide you through the step-by-step process of building a lattice privacy screen for your deck. From gathering the necessary materials to assembling the frame and attaching the lattice, you’ll find all the information you need to create your own privacy oasis.
Inside This Article
- Materials Needed
- Step 1: Planning the Privacy Screen
- Step 2: Gathering the Tools
- Step 3: Preparing the Lattice Panels
- Step 4: Building the Frame
- Step 5: Attaching the Lattice Panels
- Step 6: Adding Finishing Touches
- Conclusion
- FAQs
Materials Needed
Before you start building a lattice privacy screen for your deck, it’s important to gather all the necessary materials. Here’s a list of what you’ll need:
- Lattice panels
- Pressure-treated lumber or cedar boards
- Framing hardware (screws, nails, etc.)
- Post supports
- Concrete mix or post anchors
- Tools (power saw, drill, level, tape measure, etc.)
- Safety equipment (gloves, safety glasses, etc.)
- Finishing materials (paint or stain, if desired)
Ensure that you have all the materials on hand before starting the project. This will help you work efficiently and avoid any unnecessary delays during construction.
Additionally, make sure to check local building codes and regulations to ensure compliance with any restrictions or requirements regarding deck privacy screens. It’s always important to build within the guidelines set by your local authorities.
Step 1: Planning the Privacy Screen
Before diving into the construction process, it is crucial to start with proper planning for your lattice privacy screen. This step will lay the foundation for the rest of the project and ensure that your end result meets your needs and desires.
The first thing you need to do is decide the size and location of your privacy screen. Assess the area where you want to install it and take accurate measurements. Consider the height and width that will provide the desired level of privacy while still allowing airflow and light to pass through. This will help you determine the amount of materials you will need.
Next, consider the design and style of your lattice privacy screen. Think about how it will complement your existing deck or outdoor space. Lattice panels come in various patterns and designs, so choose one that matches your aesthetic preferences. Additionally, think about whether you want a complete solid screen or a screen with gaps between the panels. The spacing will depend on your desired level of privacy.
It is also important to check with local building codes or homeowner’s association regulations to ensure that you comply with any height restrictions or other guidelines. Some areas may have specific rules regarding the installation of privacy screens, so make sure you are aware of any restrictions before proceeding.
Lastly, consider the placement of the privacy screen in relation to your deck and how it will affect the overall functionality of the space. Ensure that you are not blocking any important views or access points. Take into account the direction of prevailing winds to avoid creating wind tunnels or blocking natural ventilation.
By taking the time to carefully plan your lattice privacy screen, you will save yourself time, money, and potential headaches down the road. Proper planning will give you a clear roadmap to follow during the construction process and ensure that the end result meets your expectations.
Step 2: Gathering the Tools
Before you begin building your lattice privacy screen for your deck, it’s important to gather all the necessary tools. Having the right tools on hand will make the process smoother and more efficient. Here’s a list of tools you’ll need:
1. Tape Measure: This will help you accurately measure the dimensions of your deck and determine the size of the lattice panels you’ll need.
2. Circular Saw: A circular saw is essential for cutting the lattice panels to the desired size. Make sure you have a sharp blade to ensure clean and precise cuts.
3. Drill: You’ll need a drill to create pilot holes for the screws. It’s helpful to have a variety of drill bits in different sizes to accommodate different screw sizes.
4. Screwdriver: A screwdriver will be necessary to attach the lattice panels to the frame. Consider using a power screwdriver for faster and easier installation.
5. Level: A level will ensure that your privacy screen is installed correctly and is straight. This is important to achieve a professional-looking result.
6. Safety Gear: Don’t forget to prioritize safety! Wear protective goggles to shield your eyes from debris, and consider wearing gloves to protect your hands during the construction process.
7. Clamps: Clamps can be handy for holding the lattice panels in place while you secure them to the frame. This helps to ensure precise alignment and a secure installation.
8. Pencil or Marker: Marking tools will come in handy for indicating where you need to make cuts or where the screws should be placed.
9. Lattice Panels: While not a tool per se, it’s important to have your lattice panels ready before you start building. Make sure you have enough panels to cover the desired area of your deck.
By having these tools readily available, you’ll be well-prepared to tackle the next steps in building your lattice privacy screen for your deck.
Step 3: Preparing the Lattice Panels
Now that you have measured and planned your lattice privacy screen for your deck, it’s time to move on to the next step: preparing the lattice panels. This step involves cutting the panels to the right size and ensuring they are ready for installation.
Here are the key steps to follow when preparing the lattice panels:
- Measure and mark the panels: Use a measuring tape to determine the required size for each panel. Mark the measurements using a pencil or marker to ensure accurate cuts. It’s important to measure twice to avoid any mistakes.
- Cut the panels: Once the measurements are marked, it’s time to cut the lattice panels. Use a saw or a lattice cutter to carefully cut along the marked lines. Take it slow and steady to ensure clean and precise cuts.
- Sand the edges: After cutting the panels, you may notice rough edges or splinters. Use sandpaper or a sanding block to smooth out the edges and remove any imperfections. This will ensure a safer and more finished look for your lattice panels.
- Apply a finish (optional): If you want to add an extra layer of protection or enhance the appearance of your lattice panels, you can consider applying a finish. Choose a waterproof and UV-resistant product that is suitable for outdoor use. Follow the manufacturer’s instructions for proper application.
- Inspect and clean the panels: Before proceeding with the installation, take a close look at the lattice panels to make sure they are in good condition. Remove any debris or dust from the surface using a soft brush or a damp cloth. This will ensure a clean and smooth installation.
By following these steps, you will ensure that your lattice panels are properly prepared for installation. Taking the time to measure, cut, and finish the panels will result in a professional-looking lattice privacy screen that adds both functionality and style to your deck.
Step 4: Building the Frame
Now that you have your post supports in place, it’s time to move on to building the frame for your lattice privacy screen. The frame serves as a sturdy structure that will hold the lattice panels securely in place.
Here are the steps to follow for this crucial stage of the project:
- 1. Measure and cut the frame pieces: Start by measuring the length and height of the desired privacy screen. Using a circular saw or a miter saw, cut the 2×4 wood boards to the appropriate sizes. Make sure to account for any overlaps or extensions you want for a seamless look.
- 2. Assemble the frame: Lay out the cut pieces on a flat surface and begin assembling the frame. Use galvanized screws or nails to secure the corners and joints. It is recommended to pre-drill pilot holes to prevent the wood from splitting.
- 3. Check for squareness: To ensure that the frame is square and level, use a carpenter’s square or a measuring tape. Adjust the frame as necessary by applying gentle pressure or using shims. A square and level frame will ensure a professional-looking finished product.
- 4. Attach additional supports: For added stability, you can attach diagonal braces to the inside corners of the frame. This will help reinforce the structure and prevent any wobbling or shifting over time.
- 5. Apply wood sealant: Before installing the lattice panels, it’s a good idea to apply a coat of wood sealant to the frame. This will protect the wood from moisture, UV rays, and general wear and tear. Allow the sealant to dry completely before moving on to the next step.
By following these steps, you’ll have a strong and durable frame for your lattice privacy screen. Now it’s time to move on to the next stage of the project: attaching the frame to the deck.
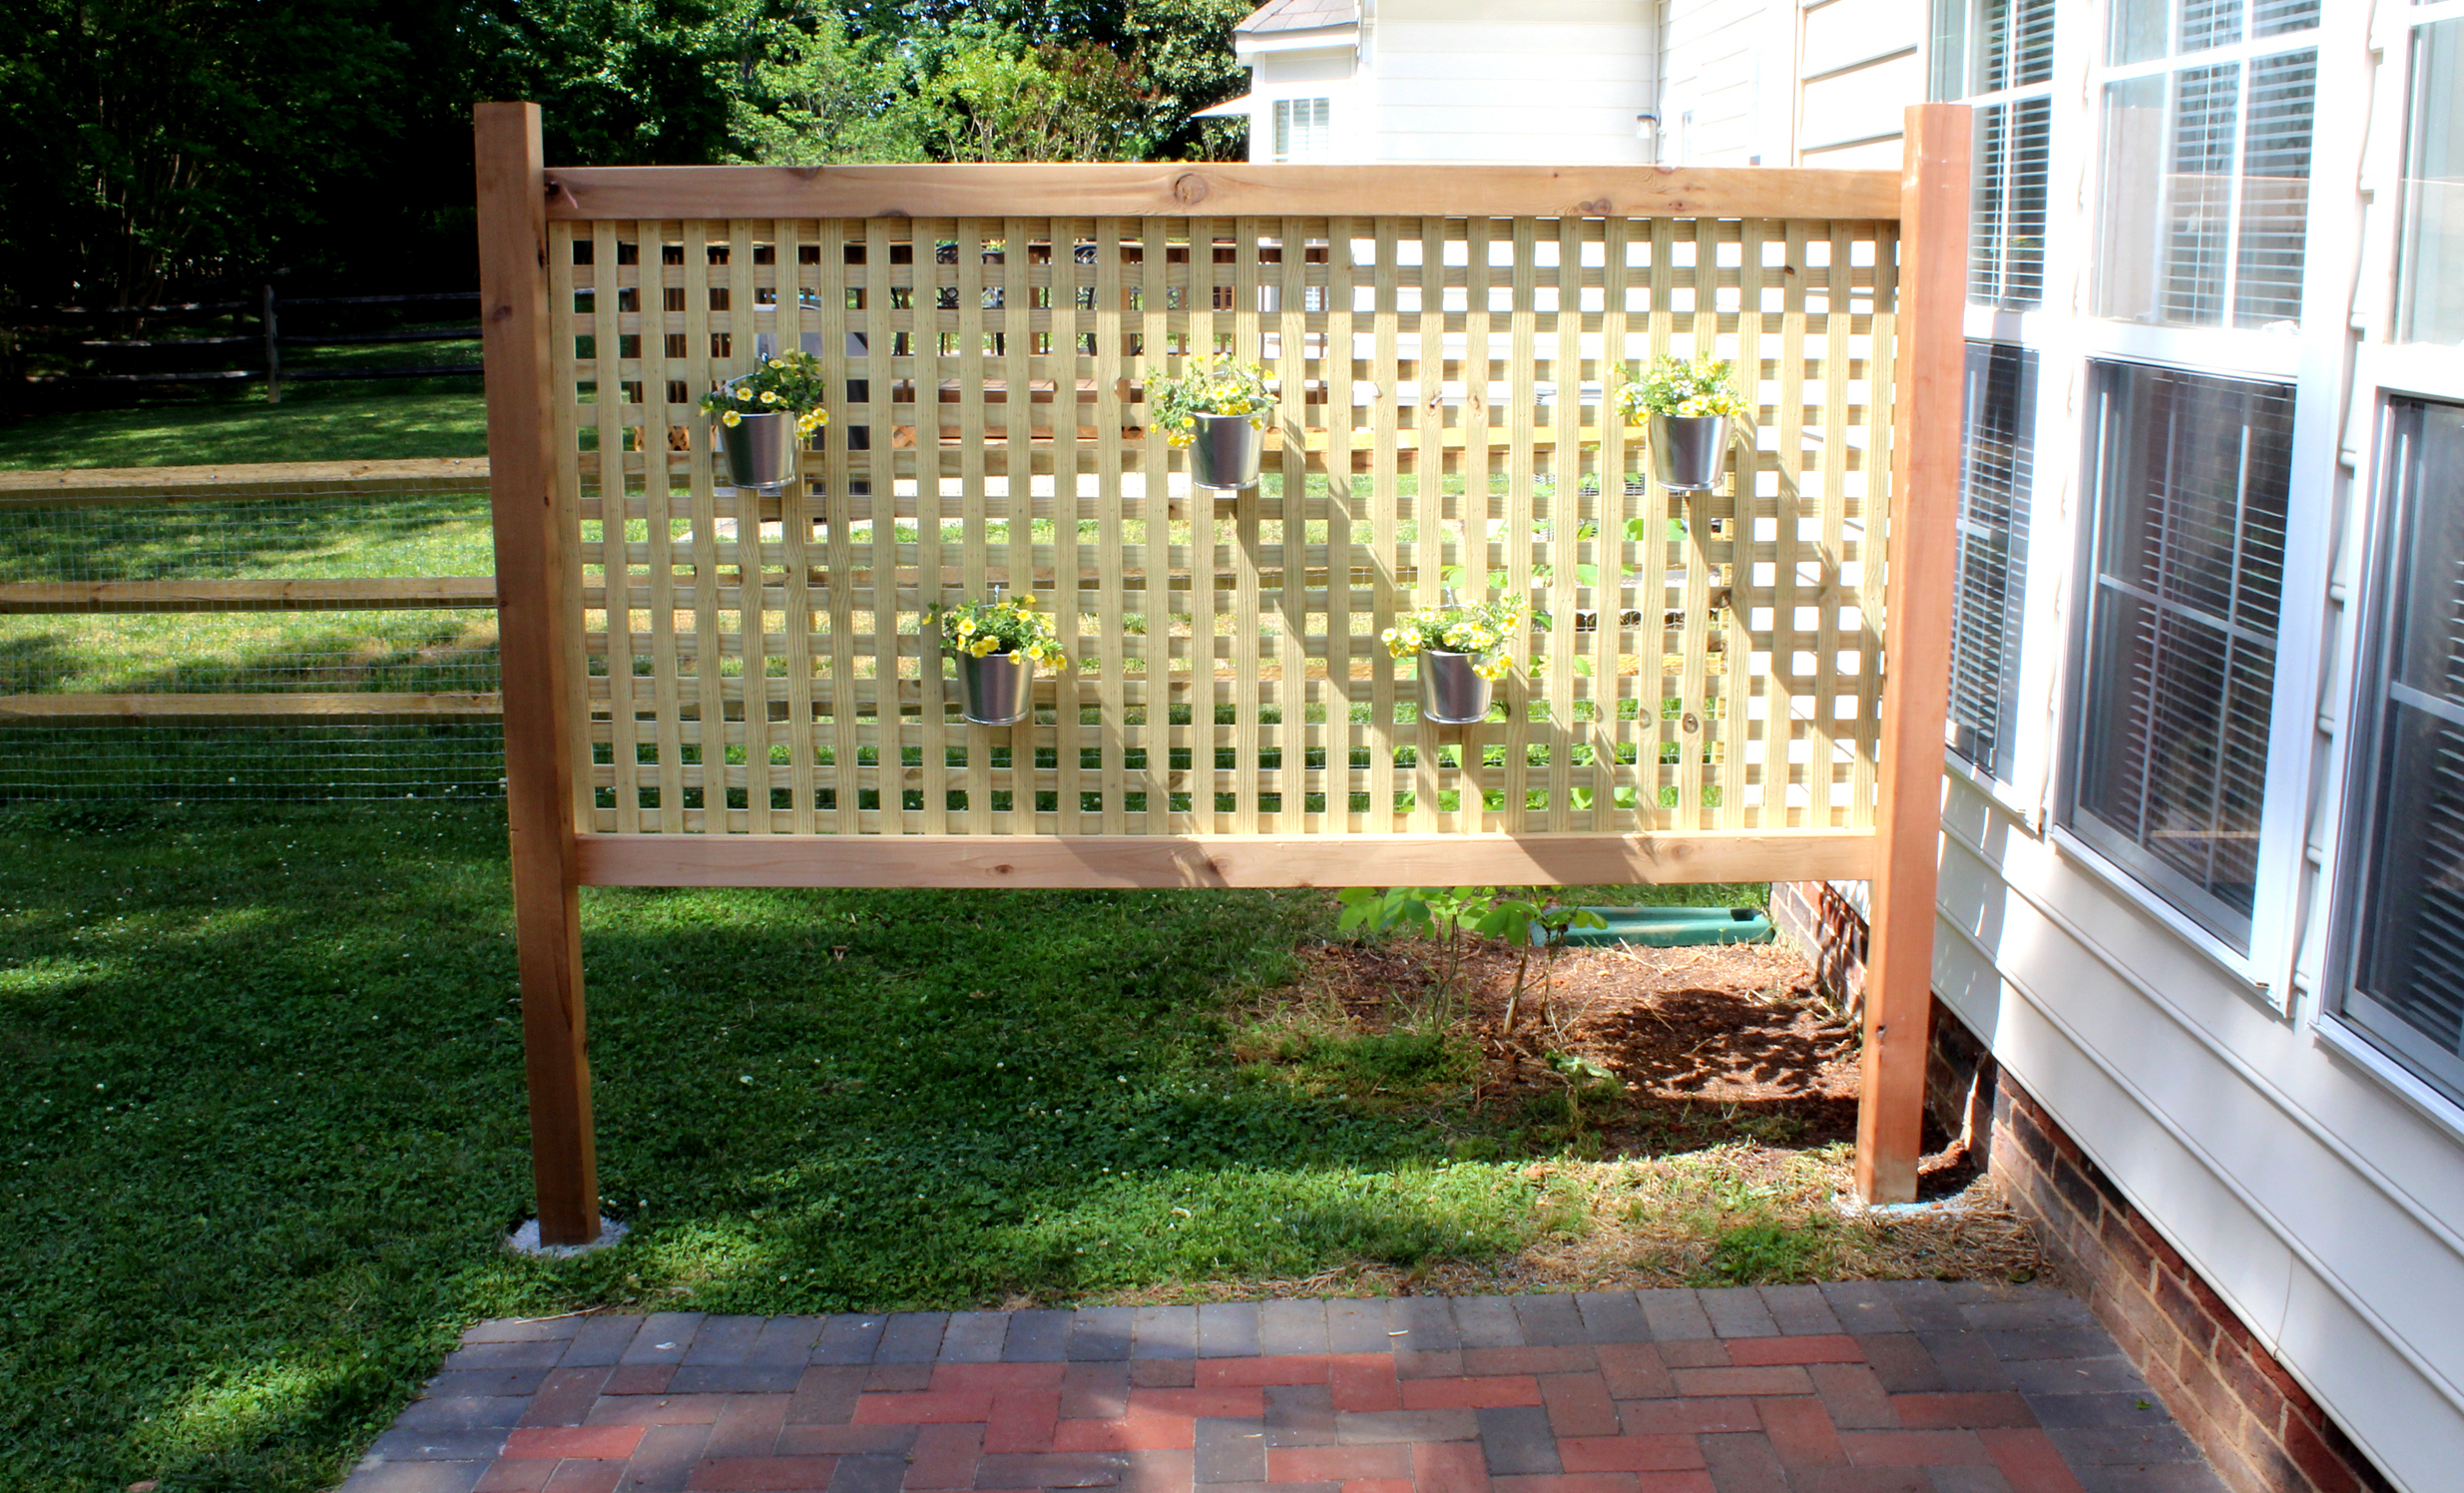
Step 5: Attaching the Lattice Panels
After you have prepared the frame and installed the post supports, it’s time to attach the lattice panels. This step is crucial as it will provide the privacy you desire while adding a decorative touch to your deck.
Here is a step-by-step guide on how to attach the lattice panels:
- Measure the Panels: Before you start, carefully measure the dimensions of your lattice panels to ensure they fit properly within the frame. Take into account any allowances for gaps or overlap if desired.
- Pre-drill Holes: To avoid any splitting or cracking, it’s recommended to pre-drill holes on the lattice panels. Use a drill bit slightly smaller than the diameter of the screws you will be using for attachment.
- Position the Panels: Start by positioning the first lattice panel against the frame. Align it properly and make sure it sits flush with the top and bottom edges of the frame.
- Secure the Panels: Using stainless steel or corrosion-resistant screws, begin securing the lattice panel to the frame. Start at one corner and work your way across, spacing the screws evenly along the edges. Be careful not to over-tighten the screws, as it may cause the lattice panel to warp or crack.
- Repeat the Process: Continue attaching the remaining lattice panels in the same manner, ensuring they are aligned properly and securely fastened to the frame.
- Trim Excess Lattice: Once all the lattice panels are attached, you may have some excess material extending beyond the edges of the frame. Use a saw or a lattice-cutting tool to trim off any overhang, giving your privacy screen a neat and finished appearance.
- Finishing Touches: Finally, step back and inspect your lattice privacy screen. Make any necessary adjustments to ensure the panels are securely attached and evenly spaced. You can also consider adding decorative elements or staining the lattice panels to match your deck’s aesthetics.
Remember, maintaining the privacy screen and ensuring its longevity requires regular inspections and occasional maintenance. Check for any loose screws or cracks in the lattice panels, and make the necessary repairs as soon as possible to prevent further damage.
With the lattice panels securely attached, your deck will not only provide the privacy you desire but also become an inviting and visually appealing outdoor space.
Step 6: Adding Finishing Touches
Once you have successfully installed the lattice panels on your deck, it’s time to add those final touches that will elevate the look and functionality of your lattice privacy screen. Here are a few key steps to consider:
1. Paint or stain the lattice: Depending on the material of your lattice panels, you may want to paint or stain them to match the color scheme of your deck. This not only adds a touch of personalization but also helps protect the lattice from the elements.
2. Decorative accents: Consider adding some decorative accents to the lattice privacy screen for extra visual appeal. You can incorporate elements like hanging plants, string lights, or outdoor artwork to create a cozy and inviting atmosphere.
3. Add a gate: If you want easy access to your deck or need to accommodate larger items, adding a gate to your lattice privacy screen is a great option. This allows you to maintain privacy when you desire it while still enabling convenient entry and exit.
4. Install a trellis: If you want to showcase climbing plants or create a greenery wall, installing a trellis on top of the lattice panels is an excellent idea. This not only adds a natural touch but also provides additional privacy and shade.
5. Incorporate seating: To make your deck even more enjoyable, consider adding seating options near the lattice privacy screen. This could include a small bench, chairs, or even a cozy swing. It provides a comfortable space to relax and enjoy the outdoors with added privacy.
6. Maintenance and upkeep: Lastly, don’t forget about the maintenance and upkeep of your lattice privacy screen. Regularly inspect the panels for any damage and perform routine cleaning to keep them looking their best. This will ensure longevity and maximize the functionality of your screen.
By following these steps and adding those invaluable finishing touches, you can transform your lattice privacy screen into a beautiful and functional addition to your deck. Not only will it provide privacy, but it will also enhance the overall aesthetic appeal of your outdoor space, making it a welcoming and cozy retreat.
Conclusion
Building a lattice privacy screen for your deck is a fantastic way to enhance your outdoor space. It provides an aesthetically pleasing and functional solution to create privacy and add a touch of style to your deck. By following the step-by-step process outlined in this article, you can create a custom lattice privacy screen that suits your needs and complements your deck’s design.
With the right materials, tools, and preparation, building a lattice privacy screen can be a satisfying DIY project that improves the privacy and enjoyment of your outdoor living area. Remember to carefully measure and plan your design, choose high-quality materials for durability, and use the appropriate techniques for assembly and installation.
So go ahead and get creative with your lattice privacy screen, whether it’s incorporating a unique pattern, adding climbing plants for a natural touch, or painting it to match your deck’s color scheme. Enjoy the privacy and seclusion that your lattice screen provides and make the most out of your deck all year round.
FAQs
Q: What materials do I need to build a lattice privacy screen for my deck?
A: To build a lattice privacy screen for your deck, you will need the following materials:
– Lattice panels
– Pressure-treated lumber or cedar posts
– Deck screws
– Circular saw
– Drill
– Level
– Measuring tape
– Pencil
– Safety goggles
– Work gloves
– Optional: Paint or stain for finishing the screen
Q: How do I choose the right size of lattice panels?
A: Measure the area where you want to install the privacy screen on your deck. Take accurate measurements of both the height and width. Choose lattice panels that are slightly smaller than the measured dimensions to allow for expansion and contraction due to weather changes.
Q: Can I install a lattice privacy screen on my existing deck?
A: Yes, you can install a lattice privacy screen on your existing deck. However, it is important to ensure that your deck is structurally sound and can support the additional weight and wind pressure of the lattice panels. If you have any doubts, consult a professional or a structural engineer.
Q: How do I secure the lattice panels to the posts?
A: To secure the lattice panels to the posts, use deck screws. Pre-drill holes in the panels to prevent splitting. Position the lattice panels onto the posts, aligning them properly, and then screw them in place. Make sure to check the level and plumbness of the panels as you go to ensure a straight and even installation.
Q: Can I customize the design of my lattice privacy screen?
A: Absolutely! You can customize the design of your lattice privacy screen to suit your personal taste and style. Experiment with different lattice patterns, add decorative trim, or even incorporate climbing plants to enhance the visual appeal of the screen. Just make sure to plan and sketch your design before starting the construction process.