
Are you tired of feeling exposed in your own outdoor space? Do you crave some privacy while enjoying the fresh air? Look no further than building an outdoor privacy screen to create a secluded oasis in your backyard. An outdoor privacy screen is a versatile and stylish solution that not only blocks out prying eyes but also adds an element of design to your outdoor area. From screening off neighbors to creating a cozy nook for relaxation, an outdoor privacy screen can transform your outdoor space into a private sanctuary. In this article, we will explore the benefits of building an outdoor privacy screen, different materials you can use, and step-by-step instructions on how to construct one. Get ready to enhance your outdoor living experience with a touch of seclusion and style.
Inside This Article
- Materials needed
- Step 1: Planning and measuring
- Step 2: Choosing the right materials
- Step 3: Building the frame
- Step 4: Attaching the screen panels
- Step 5: Adding finishing touches
- Conclusion
- FAQs
Materials needed
When embarking on the project of building an outdoor privacy screen, it’s important to gather all the necessary materials beforehand. Here is a list of the essential items you’ll need to get started:
- Wooden posts: Choose sturdy, pressure-treated wooden posts that are at least 4×4 inches in size. The number of posts required will depend on the size and height of your privacy screen.
- Wooden boards: Select weather-resistant boards, such as cedar or composite, for added durability. These will serve as the frame and supports for your privacy screen.
- Screws or nails: Opt for exterior-grade screws or nails to ensure they can withstand outdoor conditions. Make sure to choose the appropriate size and type for the materials you’re working with.
- Hinges: If you plan to make your privacy screen movable, consider getting hinges to attach the panels together.
- Screen panels: There are various options to choose from, including lattice, bamboo, metal, or even fabric. Select a material that suits your aesthetic preferences and provides the desired level of privacy.
- Paint or stain: If you wish to add a touch of color to your privacy screen, consider using outdoor paint or stain to protect the wood and enhance its appearance.
- Tools: Make sure you have the necessary tools at hand, such as a drill, saw, measuring tape, level, and a hammer or screwdriver.
- Protective gear: Always prioritize safety by wearing gloves, safety goggles, and a dust mask when working with wood and other materials.
Having these materials ready will ensure a smooth and efficient construction process for your outdoor privacy screen. Before you begin, double-check if any additional materials or tools are needed based on your specific design and requirements.
Step 1: Planning and measuring
Before you begin building your outdoor privacy screen, it’s important to have a solid plan in place. This step is crucial to ensure that your screen fits and functions properly. Planning and measuring involve assessing the area where you want to install the screen and taking accurate measurements.
First, decide the purpose of your privacy screen. Are you looking to block the view from neighboring properties, create a secluded area for relaxation, or hide unsightly objects? Clarifying the purpose will help determine the size, height, and design of your outdoor privacy screen.
Next, take precise measurements of the area where you intend to place the privacy screen. Measure the height and width of the space, ensuring that you account for any obstacles such as windows, doors, or air conditioning units. Consider the angle of the sun and the direction of prevailing winds when determining the placement of the screen.
Once you have the measurements, determine the number of panels or sections you’ll need for your privacy screen. This will depend on the desired height and width, as well as the design you have in mind. Consider using multiple panels that can be joined together or hinged, allowing for flexibility and easy installation.
After you’ve planned and measured, it’s time to sketch out a rough design of your outdoor privacy screen. This can help you visualize the overall look and make any necessary adjustments before starting the construction process. Use graph paper or a digital design tool to create a scaled drawing, ensuring that it accurately represents the dimensions of your screen.
Remember, careful planning and accurate measurements are the foundation of a successful outdoor privacy screen. Taking the time to plan and measure properly will help ensure that the end result is functional, aesthetically pleasing, and provides the level of privacy you desire.
Step 2: Choosing the right materials
When it comes to building an outdoor privacy screen, choosing the right materials is crucial. You want your screen to not only provide the desired level of privacy but also withstand the elements and complement the aesthetic of your outdoor space. Here are some factors to consider when selecting the materials for your privacy screen:
- Durability: Since your privacy screen will be exposed to the outdoor elements, it’s important to choose materials that are durable and can withstand wind, rain, and sun exposure. Look for materials such as pressure-treated wood, vinyl, or metal that have a proven track record of weather resistance.
- Privacy: The main purpose of an outdoor privacy screen is to provide privacy. Opt for materials that are solid or have dense designs to prevent prying eyes from seeing through. Wood panels, lattice, or bamboo are popular choices for creating a visually appealing privacy screen.
- Style: Consider the overall style and theme of your outdoor space when choosing materials. If you have a rustic or natural setting, wood panels or bamboo screens can complement the environment beautifully. For a more modern and sleek look, metal or vinyl materials might be a better fit.
- Maintenance: Depending on your preference and lifestyle, consider the level of maintenance required for the materials you choose. Some materials, like vinyl, are low-maintenance and only require occasional cleaning, while wood might need regular staining, sealing, or painting to preserve its appearance.
- Budget: Set a budget for your privacy screen project and select materials that fit within your financial limitations. There are various options available at different price points, so you can find materials that suit your budget without compromising on quality.
By taking these factors into account, you can ensure that you choose the right materials for your outdoor privacy screen. This will result in a screen that not only provides the privacy you desire but also enhances the beauty and functionality of your outdoor space.
Step 3: Building the frame
Building the frame is a crucial step in constructing an outdoor privacy screen. The frame provides stability and support for the screen panels, ensuring they are securely held in place. Here’s a step-by-step guide on how to build the frame:
1. Determine the size and shape: Measure the area where you want to install the privacy screen and decide on the desired height and width. This will help you determine the dimensions for your frame.
2. Choose the materials: Select the appropriate materials for your frame. This typically includes wood, such as cedar or pressure-treated lumber, which is durable and weather-resistant. Make sure the wood is properly treated to withstand outdoor conditions.
3. Cut the frame pieces: Use a saw to cut the wood into the necessary lengths for the frame. You’ll need four pieces for the vertical sides and four pieces for the horizontal top and bottom.
4. Prepare the frame pieces: Smooth any rough edges or splinters on the cut wood using sandpaper. This will ensure a clean and professional finish.
5. Assemble the frame: Lay out the frame pieces on a flat surface and begin assembling them. Start by attaching the top and bottom horizontal pieces to the vertical sides. Use screws or nails to secure the joints, ensuring they are tightly fastened. Repeat this step for the other side of the frame.
6. Reinforce the corners: To add extra strength to the frame, reinforce the corners with brackets or metal angle braces. This will help prevent any wobbling or instability.
7. Check for squareness: Use a measuring tape or carpenter’s square to ensure that the frame is square and all corners form right angles. Adjust the frame if necessary to achieve perfect squareness, as this will ensure the screen panels fit properly.
8. Paint or stain the frame: Once the frame is built and assembled, you may want to paint or stain it to match your outdoor decor. Choose a paint or stain that is suitable for outdoor use and provides protection against the elements.
By following these steps, you’ll be able to build a sturdy and durable frame for your outdoor privacy screen. With the frame in place, you’re now ready to move on to the next step of attaching the screen panels.
Step 4: Attaching the screen panels
Now that you have built the frame for your outdoor privacy screen, it’s time to attach the screen panels. This step will give your screen the functionality it needs while adding an aesthetically pleasing touch to your outdoor space.
Before you start attaching the screen panels, make sure you have measured and cut them to fit perfectly within the frame. This will ensure that your privacy screen looks professional and seamless.
Begin by positioning the first screen panel against the frame. Use a level to ensure that it is perfectly straight and plumb. Once you have it in the right position, use clamps to hold it securely in place.
Next, use a drill and screws to attach the screen panel to the frame. Make sure you choose screws that are suitable for outdoor use, as they need to withstand various weather conditions. It’s best to opt for stainless steel or galvanized screws, as they are rust-resistant and durable.
Start by drilling pilot holes through the screen panel and into the frame. This will prevent the wood from splitting when you insert the screws. Once the pilot holes are drilled, use the screws to attach the panel securely to the frame.
Repeat this process for all the remaining screen panels, ensuring that they are evenly spaced and secured to the frame. Take your time and double-check the level of each panel before moving on to the next one.
If you are using lattice or other decorative screen panels, you may need to use trim or molding to cover the edges of the panels. This will give your privacy screen a more polished look and hide any rough edges or gaps.
Once all the screen panels are attached and any necessary trims or moldings are in place, step back and admire your handiwork. Your outdoor privacy screen is now complete, providing you with a secluded and stylish space to enjoy outdoor activities.
Remember to maintain and clean your screen panels regularly to ensure their longevity. Remove any dirt, debris, or plant growth that may accumulate over time, and inspect for any signs of damage or wear.
By following these steps and attaching the screen panels correctly, you will create a beautiful and functional outdoor privacy screen that adds value to your outdoor living space.
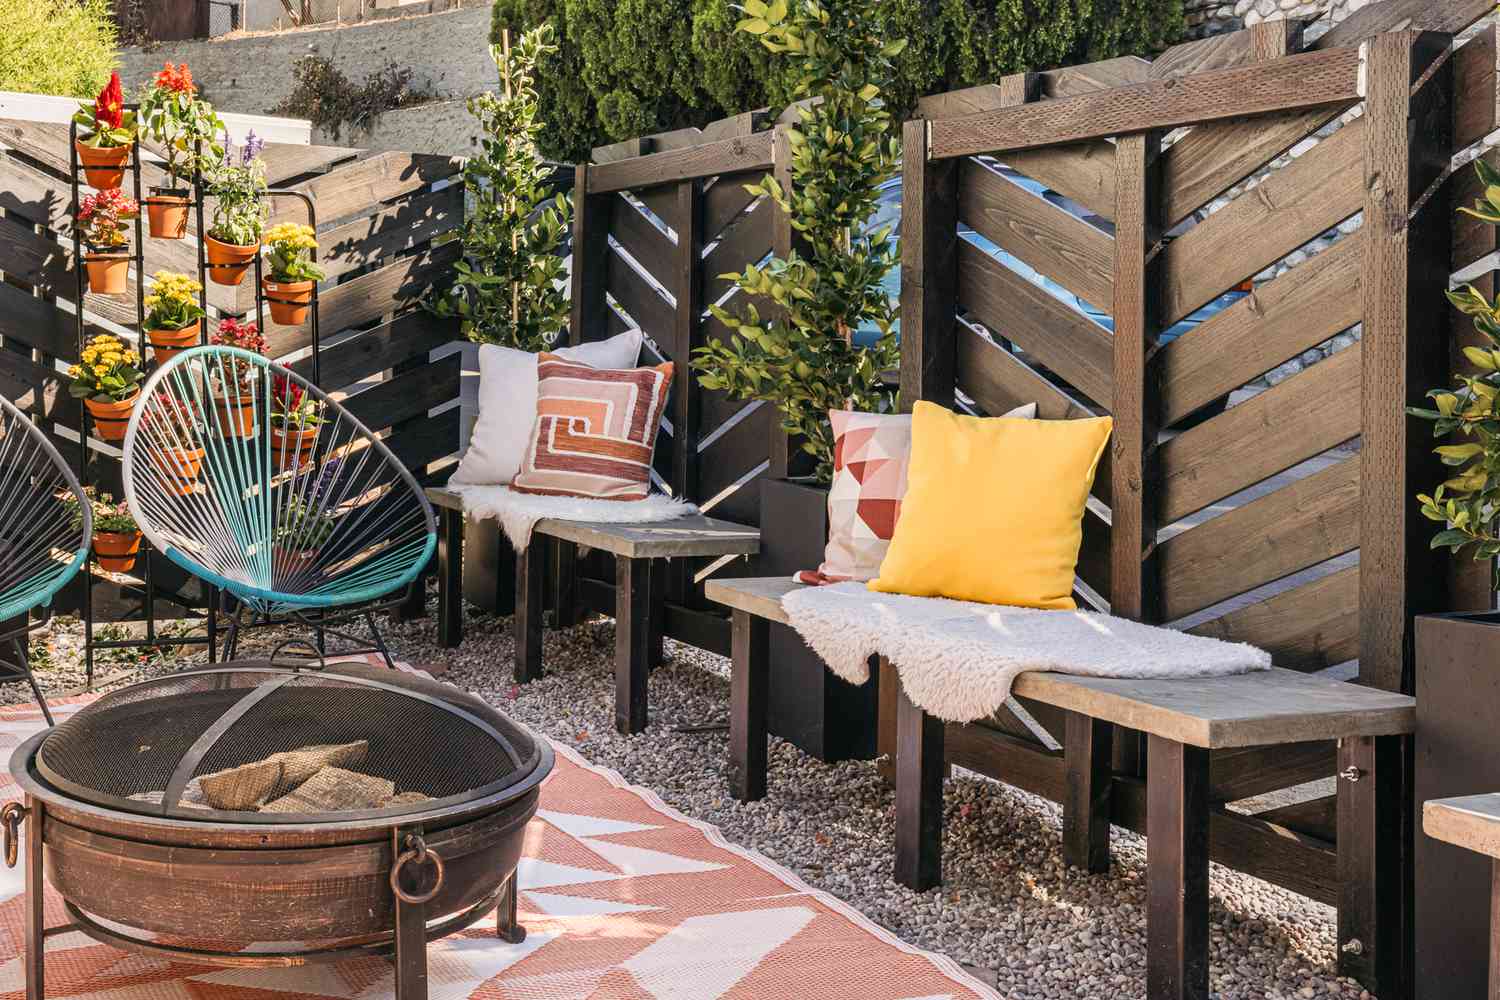
Step 5: Adding finishing touches
Once you have completed the frame and attached the screen panels to your outdoor privacy screen, it’s time to put the finishing touches to make it visually appealing and functional. These final details will elevate the overall look and feel of your privacy screen, while also ensuring its durability and longevity.
Here are some important finishing touches you can consider for your outdoor privacy screen:
- Stain or paint: Give your privacy screen a fresh and polished look by staining or painting it. Choose a color that complements your outdoor space and blends well with the surroundings. Apply a weather-resistant stain or paint to protect the wood from the elements.
- Sealant: Apply a sealant to the wooden frame and screen panels to protect them from moisture, UV rays, and other environmental factors. This will help prevent warping, cracking, and fading, ensuring that your privacy screen remains in top condition for years to come.
- Decorative elements: Add some decorative elements to make your privacy screen visually appealing. Consider attaching decorative trim or molding to the edges of the frame, or incorporating lattice panels for a more intricate design. You can also hang outdoor curtains or drapes for a touch of elegance and added privacy.
- Planters and greenery: Incorporating planters and greenery around your privacy screen can bring life and beauty to your outdoor space. Install planter boxes along the bottom of the screen or hang potted plants from the top. Choose plants that thrive in your climate and provide additional privacy and greenery.
- String lights or lanterns: Create a cozy and inviting atmosphere around your privacy screen with the addition of string lights or lanterns. Hang them along the top or wrap them around the frame to illuminate the area and add a warm ambiance during evenings or nighttime.
- Outdoor artwork or mirrors: Add a personal touch to your privacy screen by hanging outdoor artwork or mirrors. This not only adds visual interest but can also create the illusion of a larger space. Ensure that the artwork or mirrors are weather-resistant and securely attached to the screen.
By incorporating these finishing touches, your outdoor privacy screen will not only serve its purpose but become a stylish and functional addition to your outdoor living space. Take the time to choose the right materials and pay attention to the details to create a privacy screen that you can enjoy for years to come.
Conclusion
In conclusion, building an outdoor privacy screen is a fantastic way to enhance both the functionality and aesthetics of your outdoor space. Whether you want to create a secluded area for relaxation, block unsightly views, or add an element of style to your backyard, a privacy screen provides a versatile solution.
By following the step-by-step guide outlined in this article, you can successfully construct your own privacy screen using a variety of materials such as wood, lattice, or fabric. Remember to consider factors such as size, design, and placement to ensure the screen meets your specific needs.
Not only will an outdoor privacy screen provide the desired level of privacy, but it will also add a touch of uniqueness to your outdoor area. Whether you prefer a rustic, modern, or eclectic style, there are endless design possibilities to explore.
So, get creative and start building your outdoor privacy screen today. Enjoy the added seclusion, beauty, and functionality it will bring to your outdoor space!
FAQs
1. Why is an outdoor privacy screen important?
An outdoor privacy screen is essential to create a secluded and intimate space in your outdoor living area. It allows you to enjoy your backyard without worrying about prying eyes, creating a sense of privacy and tranquility.
2. What materials can be used to build an outdoor privacy screen?
There are various materials you can use to build an outdoor privacy screen, including wood, bamboo, metal, fabric, and vinyl. Each material has its own unique benefits and aesthetic appeal, allowing you to choose the one that best suits your style and needs.
3. How high should an outdoor privacy screen be?
The height of your outdoor privacy screen will depend on factors such as the desired level of privacy and the surrounding environment. In general, a 6 to 8-foot-tall screen provides a good balance between privacy and airflow, but you can adjust the height according to your specific preferences.
4. What are the different types of outdoor privacy screens?
There are several types of outdoor privacy screens available. These include freestanding screens, which can be moved around your outdoor space as needed, and fixed screens, which are permanently installed. Other options include lattice screens, trellises, and living screens made from plants.
5. Can I build an outdoor privacy screen myself?
Yes, building an outdoor privacy screen can be a fun and rewarding DIY project. Depending on your skill level and the complexity of the design, you can find numerous tutorials and guides online to help you through the process. Alternatively, you can also hire a professional to build a custom privacy screen for you.