
Welcome to the world of photography and beauty enhancement! If you’re looking to level up your selfie game or take professional-looking photos, then you’ve probably heard about the magical tool called a ring light. A ring light is a circular lighting device that helps create soft, diffused lighting, eliminating harsh shadows and reducing skin imperfections. So, how do you get that perfect ring light effect? In this article, we’ll guide you on how to diffuse a ring light to achieve the soft, flattering glow that will make your photos pop. Whether you’re a content creator, makeup artist, or simply someone who loves taking selfies, get ready to transform your lighting setup and bring your photos to life!
Inside This Article
- What is a Ring Light?
- Benefits of Using Ring Lights
- Steps to Diffuse a Ring Light
- Tips and Tricks for Diffusing Ring Light
- Conclusion
- FAQs
What is a Ring Light?
A ring light is a lighting device that is popularly used in photography and videography. It consists of a circular light source that is evenly distributed around a central opening. The design of the ring light allows for the elimination of shadows and creates a soft and flattering light for subjects.
Originally, ring lights were primarily used in the field of macro photography, where capturing intricate details was crucial. However, over time, they have gained immense popularity among various professions and industries due to their unique lighting capabilities.
The ring light is typically made up of multiple LEDs or fluorescent bulbs, which emit a bright and uniform output of light. Some ring lights come with adjustable brightness levels and color temperature controls, allowing users to customize the lighting to suit their specific needs.
One of the distinct features of a ring light is its circular shape, with a hole in the middle where the camera or the subject can be placed. This design ensures that the light is evenly distributed around the subject, resulting in soft, shadow-free lighting that complements the individual’s features.
Nowadays, ring lights are not only used in professional photography and videography studios, but they have also become popular among content creators, makeup artists, influencers, and even for video conferences and online streaming.
With the rise of social media platforms and the need for high-quality visual content, ring lights have become an essential tool for anyone looking to achieve well-lit and professional-looking photos or videos.
Benefits of Using Ring Lights
Ring lights have become a popular tool for photographers and videographers alike, and for good reason. These circular-shaped lighting devices offer a range of benefits that can drastically improve the quality of your photos and videos. Here are some of the key advantages of using ring lights:
1. Soft and Even Lighting: One of the primary benefits of ring lights is their ability to produce soft and even lighting. The circular design of the light ensures that the entire subject is evenly illuminated, eliminating any harsh shadows or uneven lighting that can detract from the final image or video.
2. Flattering Portraits: Ring lights are particularly popular in portrait photography due to their ability to create stunning catchlights in the subject’s eyes. The circular shape produces a unique ring-shaped reflection in the eyes, adding depth and radiance to the portrait.
3. Versatility: Ring lights come in various sizes and can be easily adjusted to suit different shooting scenarios. Whether you’re shooting close-ups, product photos, or videos, a ring light can provide the necessary illumination to enhance the subject and create visually appealing content.
4. Compact and Portable: Another advantage of ring lights is their compact size and portability. Whether you’re shooting in a studio or on location, ring lights are lightweight and easy to carry, making them an ideal lighting solution for photographers and videographers on the go.
5. Adjustable Light Intensity: Many ring lights come with adjustable brightness settings, allowing you to control the intensity of the light. This feature can be particularly useful when shooting in different lighting conditions or when you want to achieve a specific mood or atmosphere in your images or videos.
6. Easy to Use: Ring lights are designed to be user-friendly, even for beginners. They often come with simple controls and can be easily mounted on a tripod or attached to a camera or smartphone. This ease of use makes ring lights accessible to photographers and videographers of all skill levels.
7. Affordable Lighting Solution: Compared to other professional lighting equipment, ring lights are relatively affordable. With their versatility and range of benefits, they offer great value for money for those looking to enhance their photography or videography without breaking the bank.
Overall, the benefits of using ring lights are plenty. Whether you’re a professional photographer or a content creator, a ring light can be a valuable tool in your arsenal, enabling you to capture stunning images and videos with ease.
Steps to Diffuse a Ring Light
Diffusing a ring light can help soften the harsh and direct light it produces, resulting in a more flattering and even lighting for your photos or videos. Here are three simple steps to diffuse a ring light:
Step 1: Choose the Right Diffusion Material
The first step in diffusing your ring light is to select the appropriate diffusion material. There are several options available, including diffuser panels, softboxes, and nylon screens. Each option has its own advantages and can produce different lighting effects. Consider the size of your ring light and the type of diffusion effect you want to achieve when choosing your material.
Step 2: Attach the Diffusion Material
Once you have chosen your diffusion material, it’s time to attach it to your ring light. The method of attachment may vary depending on the type of diffusion material you are using. If you have a diffuser panel, it may come with clips or straps that make it easy to secure to the ring light. For softboxes, you may need to assemble the frame and attach it to the ring light using the provided adapter. Nylon screens can be attached using clamps or adhesive tape.
Step 3: Adjust the Position and Intensity
After attaching the diffusion material, it’s important to adjust the position and intensity of the ring light to achieve the desired effect. Experiment with moving the diffuser closer or farther away from the ring light to control the amount of diffusion. You can also adjust the angle and direction of the light to create different lighting patterns. Don’t forget to test the intensity of the light and make any necessary adjustments to ensure a balanced and well-diffused lighting.
By following these three steps, you can effectively diffuse your ring light and achieve a softer and more flattering lighting for your photos or videos. Experiment with different diffusion materials and techniques to find the ones that work best for your specific needs and style.
Tips and Tricks for Diffusing Ring Light
Diffusing a ring light can significantly enhance the quality of your photography or videography. Here are some valuable tips and tricks to help you achieve the best results:
1. Use a diffuser: A diffuser is an essential accessory for softening the harsh light emitted by the ring light. It helps create a more flattering and even illumination on your subject. There are various types of diffusers available, including fabric diffusers, plastic diffusers, and diffuser filters. Experiment with different options to find the one that suits your needs.
2. Distance from the subject: Adjusting the distance between the ring light and the subject can significantly impact the quality of the lighting. Experiment with different distances to find the sweet spot that provides the desired level of diffusion and prevents excessive shadows.
3. Angle of the light: The angle at which the ring light is positioned can greatly affect the overall look of your photos or videos. Tilting the ring light slightly downwards or upwards can help create more interesting and dynamic lighting effects. Play around with different angles to achieve the desired look.
4. Combine with other light sources: While ring lights are great for providing even illumination, they can sometimes create flat lighting. To add depth and dimension to your shots, consider incorporating other light sources, such as a softbox or a reflector, to create more interesting shadows and highlights.
5. Use colored gels: If you want to add a creative touch to your photos or videos, consider using colored gels with your ring light. Colored gels can dramatically change the mood and atmosphere of your shots, allowing you to experiment with different color effects. Whether you want a warm and cozy look or a vibrant and energetic feel, colored gels can help you achieve your desired outcome.
6. Adjust the brightness: Most ring lights come with adjustable brightness settings. Experiment with different brightness levels to find the right balance that complements your subject and the environment. Increasing the brightness can help create a more vibrant and well-lit scene, while reducing the brightness can provide a more intimate and subdued ambiance.
7. Take advantage of the dimmable feature: Some ring lights offer a dimmable feature that allows you to fine-tune the intensity of the light. Use this feature to control the amount of diffusion and prevent overexposure or harsh lighting. It gives you more control over the final outcome and helps tailor the lighting to suit your specific needs.
8. Consider the background: Pay attention to the background when diffusing your ring light. A cluttered or distracting background can take away from the main subject. Choose a clean, uncluttered background or use a backdrop to create a more professional and aesthetically pleasing composition.
9. Practice and experiment: Like any other photography or videography technique, diffusing a ring light requires practice and experimentation. Don’t be afraid to try different setups, angles, and settings. With time and experience, you will develop your own unique style and achieve the desired results.
By following these tips and tricks, you can elevate your photography or videography game and create stunning visuals using a diffused ring light. Remember, it’s not just about the equipment you use, but also how you utilize it to bring your creative vision to life.
Conclusion
In conclusion, learning how to diffuse a ring light is a valuable skill that can greatly improve the quality of your photography and videography. Whether you are a professional photographer or simply a hobbyist, understanding the different methods and techniques for diffusing the light emitted by a ring light can make a significant difference in the final results.
By softening the harsh and direct light produced by a ring light, you can achieve more flattering and natural-looking illumination on your subjects. Whether you choose to use diffusion fabric, a softbox, or other creative techniques, the goal is to create soft, even lighting that enhances your images and videos.
Experiment with different methods of diffusion to find what works best for your specific needs and creative vision. Don’t be afraid to try out new ideas and techniques to achieve the desired effect. With practice and a bit of experimentation, you’ll soon master the art of diffusing a ring light and elevate your photography and videography to a new level.
FAQs
Q: What is a ring light?
A: A ring light is a circular lighting device that is typically mounted around the lens of a camera or smartphone. It provides even and diffused lighting, eliminating harsh shadows and producing a soft and flattering glow on the subject.
Q: Why would I need to diffuse a ring light?
A: While a ring light provides great lighting for capturing sharp and well-lit photos or videos, it can sometimes create unflattering, harsh shadows. Diffusing the ring light helps to soften the light and distribute it evenly, resulting in a more natural and professional look.
Q: How can I diffuse my ring light?
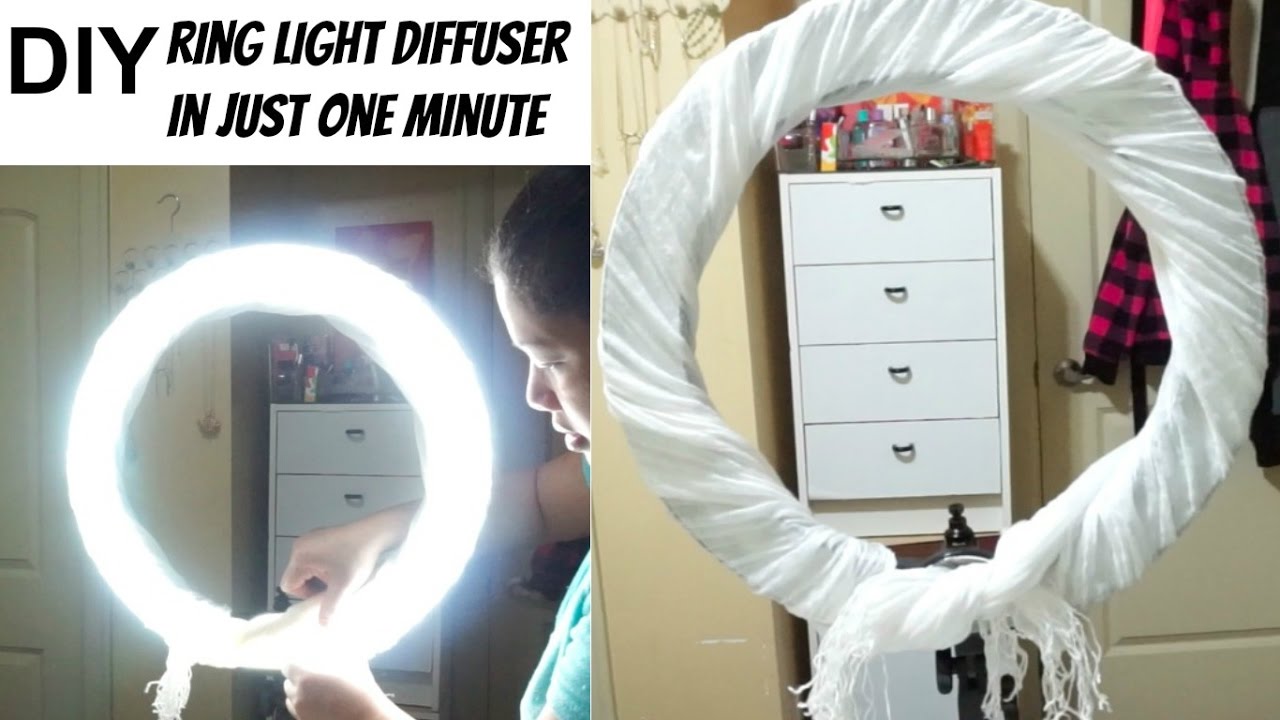
A: There are several ways to diffuse a ring light. One common method is to use a diffuser attachment, which can be purchased separately and is specifically designed for this purpose. Another option is to use a sheer white fabric, such as a white translucent cloth or even a white shower curtain, which can be positioned between the ring light and the subject to soften the light.
Q: Can I use DIY methods to diffuse my ring light?
A: Absolutely! If you’re on a budget or prefer a more creative approach, there are DIY options for diffusing your ring light. For example, you can use tissue paper or parchment paper to create a makeshift diffuser. Simply cut the paper to fit the size of your ring light and attach it securely with tape or rubber bands.
Q: What are the benefits of diffusing a ring light?
A: Diffusing a ring light offers several benefits. Firstly, it helps to reduce glare and harsh shadows, creating a more flattering and softer light. It also helps to eliminate any hotspots or bright spots that may appear on the subject’s face. Additionally, diffusing the light can create a more natural and professional-looking result in portraits, makeup tutorials, vlogging, and product photography.