
Are you tired of constantly running out of battery on your cell phone? Do you find yourself in situations where you desperately need a charger but don’t have one handy? Look no further! In this article, we will show you how to make your own cell phone charger using common household items. Whether you’re at home, on a camping trip, or stuck in a power outage, having the knowledge to create your own charger can be a lifesaver. Not only will this DIY charger save you from the frustration of a dead battery, but it will also give you a sense of self-sufficiency and resourcefulness. So, get ready to become a tech MacGyver as we guide you step-by-step through the process of making your very own cell phone charger!
Inside This Article
- Materials Needed
- Step 1: Gather the necessary components
- Step 2: Assemble the circuit
- Step 3: Connect the USB port
- Step 4: Test the charger
- Conclusion
- FAQs
Materials Needed
When it comes to making a cell phone charger, you’ll need a few essential materials to get started. Here’s a list of what you’ll need:
- USB Cable: You’ll need a USB cable that is compatible with your cell phone. Most modern smartphones use the standard USB Type-C cable, but there are also phones that use Micro-USB or Lightning cables. Make sure to check the charging port of your phone and get the appropriate cable.
- Power Source: You’ll need a power source to provide the necessary voltage and current for charging your phone. This can be a power bank, a computer USB port, or a wall adapter.
- USB Wall Adapter: If you’re planning to use a wall socket as your power source, you’ll need a USB wall adapter. These are readily available in electronic stores and come in various voltages and amperages. Make sure to choose one that matches the specifications of your phone.
- Circuit Components: To create a DIY cell phone charger, you’ll need some basic circuit components. This includes a voltage regulator, diode, capacitors, and resistors. These components can be easily found online or at your local electronics store.
- Soldering Iron and Solder: Soldering is required to connect the circuit components and create a stable connection. You’ll need a soldering iron and solder to do this. Make sure to use proper safety precautions while soldering.
- Wire Strippers and Cutters: To work with the circuit components and connect the necessary wires, you’ll need wire strippers and cutters. These tools will help you strip the insulation from the wires and cut them to the desired lengths.
By gathering these materials, you’ll have everything you need to start making your own cell phone charger. Keep in mind that the specific materials may vary based on your phone model and personal preferences. Now that you have all the necessary materials, it’s time to move on to the next step of assembling the circuit.
Step 1: Gather the necessary components
Before you begin assembling your own cell phone charger, you’ll need to gather a few key components. Here’s a list of the items you’ll need:
- A USB cable
- A 5V voltage regulator
- A diode
- A capacitor
- An LED (optional)
- A soldering iron
- Solder
- Wire cutters
- Wire strippers
- A breadboard or PCB
The USB cable is essential for connecting your charger to a power source or computer. Make sure you choose a cable that is compatible with your device.
The 5V voltage regulator is the main component responsible for converting the input voltage to a stable 5V output. Look for a regulator suited to your needs, such as the LM7805.
The diode is important for protecting your circuit from reverse polarity, which can damage your phone. A common diode used for this purpose is the 1N4001.
The capacitor helps smooth out any voltage fluctuations and ensures a steady output. A 100uf electrolytic capacitor is often used in cell phone chargers.
If you want to add a visual indicator that the charger is working, you can include an LED. This is optional but can be a nice addition to your charger.
Lastly, you’ll need standard soldering tools like a soldering iron, solder, wire cutters, and wire strippers. These tools are necessary for connecting the components and ensuring a reliable circuit.
Whether you choose to use a breadboard or a Printed Circuit Board (PCB), make sure you have the appropriate platform to build your circuit on.
Once you have gathered all the necessary components, you are ready to move on to the next step of assembling your cell phone charger.
Step 2: Assemble the circuit
Now that you have gathered all the necessary components, it’s time to assemble the circuit. This step is crucial as it involves connecting the various parts to create a functioning cell phone charger. Follow these steps carefully:
-
Start by placing the voltage regulator on your breadboard. Position it near one edge, leaving enough space for the other components.
-
Next, insert the capacitor into the breadboard near the voltage regulator. Ensure that the positive lead is connected to the input side of the regulator.
-
Take the diode and connect it to the output of the voltage regulator. Pay attention to the diode’s orientation – the stripe should be towards the output terminal of the regulator.
-
Once the diode is in place, connect the positive lead of the diode to the positive terminal of the USB connector. Use a small wire or jumper to make this connection.
-
Next, attach the negative lead of the diode to the negative terminal of the USB connector. Again, make sure the connection is secure using a jumper wire.
-
Now it’s time to connect the battery holder. Place it nearby and connect its positive lead to the input terminal of the voltage regulator. Use a jumper wire for this connection.
-
Finally, connect the negative lead of the battery holder to the negative terminal of the voltage regulator. This will complete the circuit.
Make sure all the connections are secure and double-check the orientation of each component. A loose connection or incorrect placement can lead to a malfunctioning charger.
Once you have assembled the circuit, move on to the next step for connecting the USB port and completing the charger.
Step 3: Connect the USB port
Now that you have assembled the circuit for your DIY cell phone charger, it’s time to connect the USB port. This step is crucial, as it allows you to plug in your phone and charge it conveniently.
Before you begin, make sure you have a USB port available. You can salvage one from an old device or purchase a new one from an electronics store. Once you have the USB port, follow these steps:
- Prepare the USB cable: Start by cutting off the end of a USB cable that doesn’t have the connector you need. Strip the outer sheath of the cable to expose the inner wires.
- Identify the wires: USB cables typically have four wires – red, black, white, and green. The red and black wires are used for power, while the white and green wires are for data transfer, which is not required for charging.
- Connect the power wires: Take the red wire from the USB cable and the positive (+) terminal from the circuit. Connect them together using a soldering iron, making sure the connection is secure. Repeat the same process with the black wire and the negative (-) terminal of the circuit.
- Insulate the connections: Once the wires are connected, it’s important to insulate them to prevent any short circuits. You can use electrical tape or heat shrink tubing to cover the exposed connections.
- Secure the USB port: Now it’s time to secure the USB port. Place the USB port in a secure location, such as inside a plastic enclosure, and fix it in place using hot glue or small screws.
- Connect the wires to the USB port: Take the other end of the USB cable and strip the outer sheath to expose the wires. Connect the red wire to the VCC terminal of the USB port, and the black wire to the GND terminal. Ensure a solid connection by soldering them together.
Once you have completed these steps, you will have successfully connected the USB port to your DIY cell phone charger. It is important to double-check all the connections before moving on to the next step.
Now that you have connected the USB port, you are one step closer to creating your own functional cell phone charger. Keep reading to learn how to test the charger in the next step.
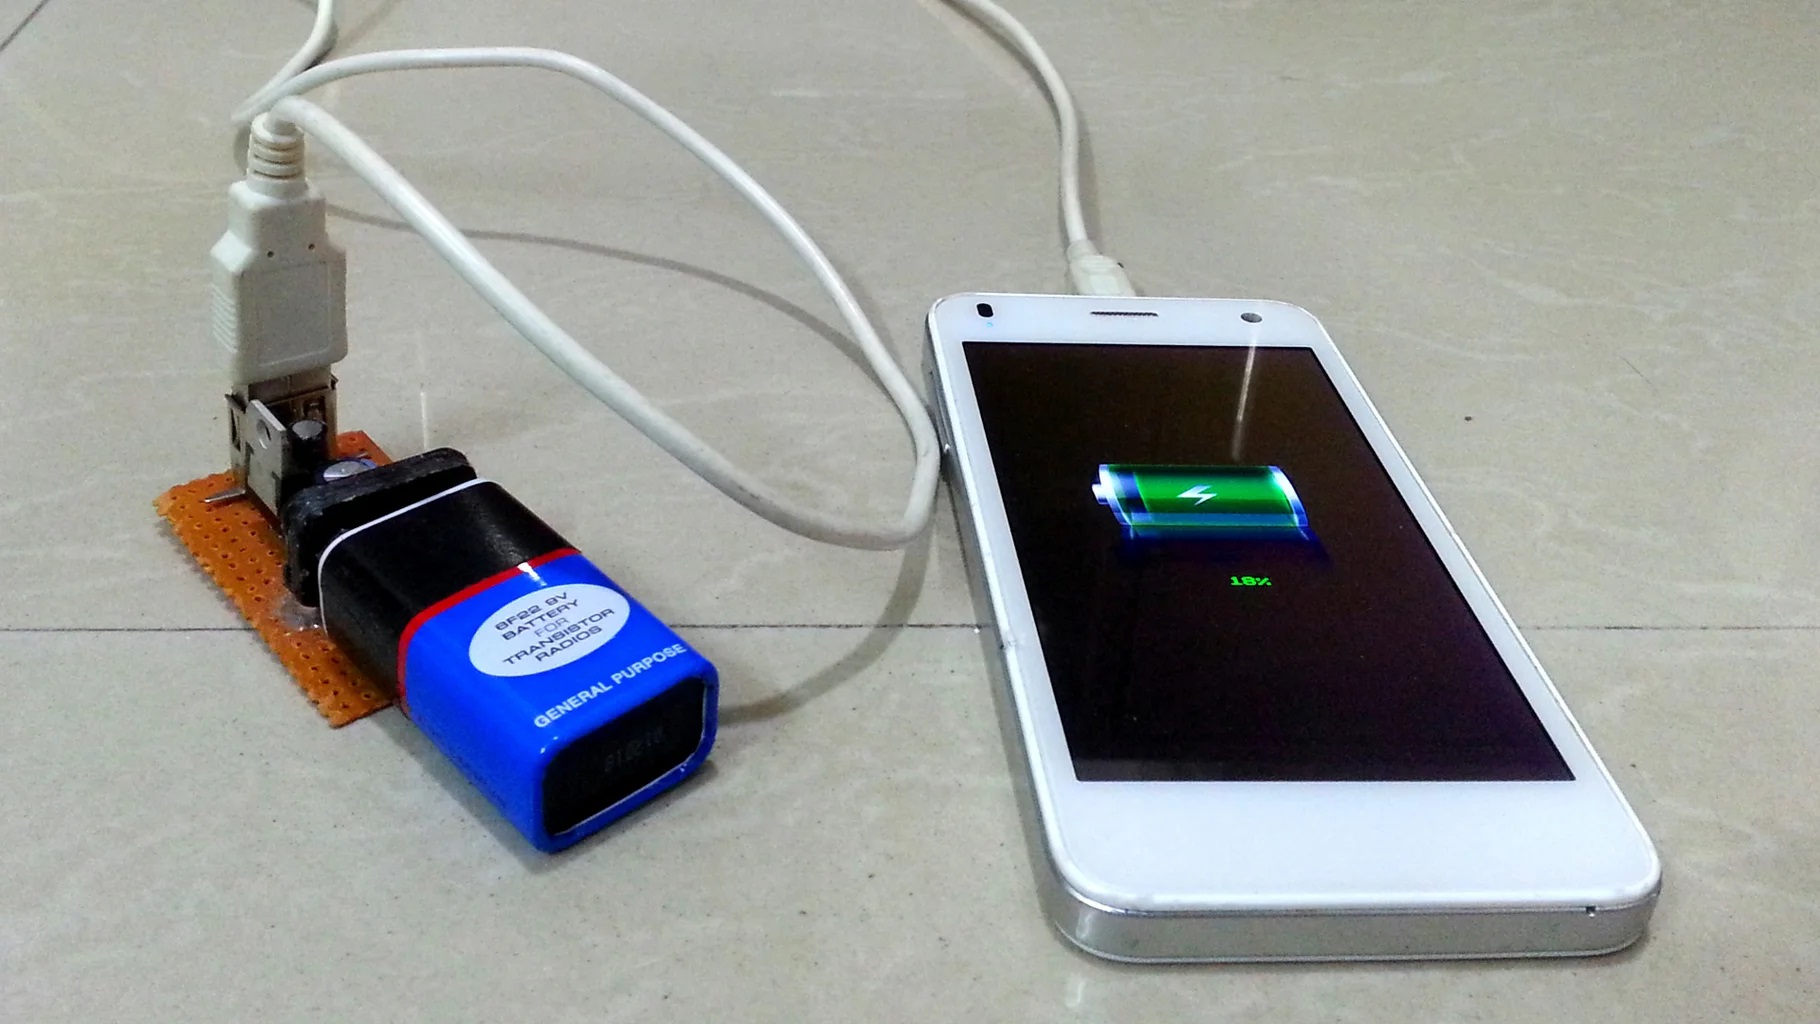
Step 4: Test the charger
Once you have successfully assembled your cell phone charger, it’s time to put it to the test and see if it works. Follow these steps to ensure your charger is functioning properly:
1. Connect your charger to a power source: Plug the USB end of your charger into a power source such as a wall adapter or a USB port on your computer.
2. Plug in your cell phone: Take the charging cable that corresponds to your cell phone and plug it into the USB port of your charger. Make sure it is securely connected.
3. Check for a charging indicator: Most cell phones have a charging indicator that will let you know if the device is receiving power. Look for a battery icon or a charging symbol on your phone’s screen or LED indicator.
4. Monitor the charging progress: Once your phone is connected to the charger, keep an eye on the battery level. It should start to increase slowly over time. If your phone is already depleted of battery, it may take a few minutes before the charging symbol appears.
5. Ensure proper charging: While your phone is charging, check if it is getting warm. A slight rise in temperature is normal, but if it becomes too hot to touch or if you notice any unusual behavior, disconnect the charger immediately.
6. Test the charging speed: If possible, keep track of how long it takes for your phone to reach a certain percentage of charge. Compare it to the estimated charging time for your phone model to see if the charger you made is delivering the desired charging speed.
7. Disconnect and examine the charger: Once you are satisfied with the charging process and your phone has reached the desired battery level, unplug the charger from the power source. Take a moment to inspect the connections and make sure everything is intact and functioning correctly.
By following these steps, you can test the effectiveness of your homemade cell phone charger. If everything goes smoothly and your phone charges without any issues, then congratulations – you have successfully created a functional charger!
Conclusion
In conclusion, making your own cell phone charger can be a fun and rewarding project. Not only does it give you the opportunity to customize your charger to suit your needs, but it can also save you money in the long run. By following the steps outlined in this article, you can create a charger that is safe, efficient, and compatible with your cell phone.
Remember, it’s important to have a good understanding of electronics and to follow safety precautions when working with electricity. If you’re unsure about any aspect of the process, it’s best to consult a professional or seek guidance from someone with experience in electronics.
Once you have successfully made your own cell phone charger, you’ll have the satisfaction of knowing that you can power up your device anytime, anywhere. So why not give it a try and take your charging game to the next level!
FAQs
1. How do I choose the right cell phone charger for my device?
When choosing a cell phone charger, it’s important to consider the compatibility with your specific device. Look for chargers that are designed for your phone model or have universal compatibility. Pay attention to the charger’s output current and voltage to ensure it matches the requirements of your phone. Additionally, consider the charging speed, durability, and safety features of the charger.
2. Can I use any charger with my cell phone?
While most cell phones have standard charging ports, it is recommended to use chargers that are specifically designed for your device. Using an incompatible charger may result in slow charging, compatibility issues, or even damage to your phone’s battery. To ensure optimal charging performance and device safety, it’s best to stick to chargers recommended by the manufacturer or certified third-party chargers.
3. Are there any safety precautions I should take when using a cell phone charger?
Yes, there are a few safety precautions to keep in mind when using a cell phone charger. Avoid using damaged or frayed charging cables, as they can pose a fire hazard. Always plug the charger into a grounded outlet and avoid using extension cords or multi-plug adapters, as they may not provide adequate power or protection. Finally, never leave your phone charging unattended for long periods, especially overnight, to prevent overheating and reduce the risk of accidents.
4. How can I extend the lifespan of my cell phone charger?
To extend the lifespan of your cell phone charger, handle it with care and avoid pulling the cable from the charger or device forcefully. Store the charger properly, keeping it in a cool and dry place. Avoid exposing it to extreme temperatures or bending the cable excessively. It’s also recommended to unplug the charger when not in use to prevent unnecessary wear and tear. Regularly inspect the charger for any signs of damage and replace it if necessary.
5. Are there any portable or wireless chargers available for cell phones?
Yes, there are portable and wireless chargers available for cell phones. Portable chargers, also known as power banks, are battery packs that provide a convenient way to charge your phone on the go. These chargers come in various capacities and connect to your phone using a USB cable. Wireless chargers, on the other hand, use inductive charging technology to power up your device without the need for cables. Simply place your compatible phone on the wireless charging pad to start charging.