
Popsockets have become popular mobile accessories, offering a convenient way to grip and handle our phones. However, there may come a time when you need to remove a Popsocket from your phone case. Whether you want to replace it with a new design or need to detach it for any other reason, knowing the proper technique is essential to avoid damaging your phone or case.
In this article, we will guide you on how to safely remove a Popsocket off a phone case without causing any harm. We’ll provide step-by-step instructions, highlight important considerations, and offer alternative methods to ensure successful removal. So, if you’re ready to take off that Popsocket and give your phone case a fresh look, let’s dive right in!
Inside This Article
- Introduction
- Tools Needed: Adhesive remover, Credit card or plastic tool
- Step 1: Preparation
- Step 2: Loosening the Popsocket
- Step 3: Applying Adhesive Remover
- Step 4: Removing the Popsocket
- Step 5: Cleaning the Phone Case
- Conclusion
- Conclusion
- FAQs
Introduction
Popsockets have become a popular accessory for smartphones, providing a convenient grip and stand functionality. However, there may come a time when you need to remove a Popsocket from your phone case, whether it’s because you want to replace it with a new design or simply prefer to use your phone case without one. While removing a Popsocket might seem like a daunting task, it can actually be done with a few simple steps and the right tools. In this article, we will guide you through the process of removing a Popsocket from a phone case.
Before we get started, it’s important to note that removing a Popsocket may cause damage to your phone case or the adhesive on the back of the Popsocket. So, it’s always a good idea to proceed with caution and take your time to minimize any potential risks.
Now, let’s gather the tools you will need for this process:
Tools Needed
- Adhesive remover: This can help to dissolve the adhesive and make it easier to remove the Popsocket.
- Credit card or plastic tool: This will be used to gently pry the Popsocket away from the phone case.
With these tools in hand, let’s move on to the step-by-step process of removing a Popsocket:
Tools Needed: Adhesive remover, Credit card or plastic tool
When it comes to removing a Popsocket from a phone case, having the right tools can make the process much easier and more efficient. Here are the tools you’ll need:
1. Adhesive remover: This is a crucial tool for removing any adhesive residue left behind after taking off the Popsocket. There are various adhesive removers available, such as Goo Gone or isopropyl alcohol, which work effectively in breaking down the adhesive and making it easier to remove.
2. Credit card or plastic tool: A credit card or a plastic tool, like a guitar pick or a plastic opening tool, can be used to gently pry off the Popsocket from the phone case. The advantage of using a card or plastic tool is that it reduces the risk of scratching or damaging the phone case.
Having these tools ready will ensure a smooth and hassle-free removal process.
Step 1: Preparation
Before you begin removing the Popsocket from your phone case, it’s important to make sure you have everything you need and prepare the area for the process. Follow these steps to ensure a smooth and successful removal:
- Gather the necessary tools: To effectively remove the Popsocket, you will need an adhesive remover and a credit card or plastic tool. The adhesive remover can be purchased at most hardware or electronics stores, and the credit card or plastic tool can be any sturdy, flat object that won’t damage your phone case.
- Find a well-lit and clean workspace: Look for a well-lit area where you can comfortably work on removing the Popsocket. Make sure the workspace is clean and free of any debris that could get in the way.
- Remove the phone case from your phone: Carefully take off the phone case from your device. This will give you better access and visibility when removing the Popsocket.
- Inspect the Popsocket: Take a close look at the Popsocket and examine how it is attached to the phone case. This will help you understand the best approach to remove it without causing any damage to the case or your phone.
By adequately preparing yourself and the workspace, you are setting the stage for a successful Popsocket removal process. Taking the time to gather the right tools and assess the situation will ensure that you can proceed with confidence and minimize any potential challenges that may arise during the removal process.
Step 2: Loosening the Popsocket
Once you have prepared your phone case and gathered the necessary tools, the next step is to loosen the popsocket from its adhesive. Follow these steps:
- Start by holding the phone case firmly in one hand.
- Using your other hand, gently wiggle the popsocket base back and forth. This motion helps to loosen the adhesive bond.
- If the popsocket feels resistant, you can apply a little bit of heat. Use a hairdryer or a heat gun on a low setting and aim it at the back of the phone case. The heat will soften the adhesive, making it easier to remove.
- Continue wiggling the popsocket until it starts to rotate or move slightly.
- Once the popsocket is loosened, you are ready to move on to the next step.
It’s important to be gentle while loosening the popsocket to avoid damaging the phone case or the popsocket itself. Take your time and apply steady but controlled pressure to gradually release the adhesive bond.
Step 3: Applying Adhesive Remover
Now that you have loosened the Popsocket, it’s time to tackle the adhesive that is still stuck to your phone case. To do this, you will need to use an adhesive remover. This product is specifically designed to dissolve adhesives without damaging the surface of your case.
Here is how you can apply the adhesive remover:
- Start by applying a small amount of the adhesive remover onto a clean cloth or cotton swab. Be sure to follow the instructions provided with the product for the best results.
- Gently rub the adhesive remover onto the remaining adhesive residue. Allow the product to sit for a few minutes to loosen the adhesive.
- Once the adhesive has been loosened, use a clean cloth or paper towel to wipe away the residue. Repeat this process as needed until all the adhesive is removed.
- After you have removed all the adhesive residue, take a moment to inspect your phone case. If there are any stubborn spots or remnants of adhesive, repeat the process until the case is clean and free from any residue.
It is important to note that not all adhesive removers are suitable for all types of phone cases. Make sure to choose a product that is safe to use on the specific material of your phone case. Always follow the instructions and safety guidelines provided by the manufacturer of the adhesive remover.
Once you have successfully removed the adhesive, you can move on to the next step – removing the Popsocket from your phone case.
Step 4: Removing the Popsocket
Now that the adhesive remover has loosened the bond between the Popsocket and the phone case, it’s time to remove the Popsocket. Here’s how to do it:
- Hold the phone case firmly with one hand to provide stability.
- Use your other hand to grip the base of the Popsocket. If the Popsocket has a collapsible mechanism, make sure it is in the extended position.
- Gently twist and pull the Popsocket away from the phone case. Apply steady pressure until it starts to come off.
- If you encounter any resistance, try twisting the Popsocket a little more or applying a bit more adhesive remover to further weaken the bond.
- Continue twisting and pulling until the Popsocket is fully removed from the phone case.
Be careful not to use excessive force or yank the Popsocket too abruptly, as this could damage the phone case or the Popsocket itself. Take your time and exercise patience throughout the process to ensure a successful removal.
Once the Popsocket is off, inspect the phone case for any residue or traces of adhesive. If you notice any leftover adhesive, use a clean cloth or cotton swab dipped in adhesive remover to gently wipe it away. Take extra care not to apply too much pressure to avoid scratching the phone case.
After removing the Popsocket and cleaning the phone case, you can now enjoy the freedom to switch to a different Popsocket or leave the phone case as it is. Just make sure to follow the proper installation instructions for any new Popsocket you choose to attach.
Congratulations! You have successfully removed the Popsocket from your phone case and prepared it for any further modifications or accessories you may want to add.
Step 5: Cleaning the Phone Case
Once you have successfully removed the Popsocket from your phone case, it’s time to clean the case to ensure it’s free from any residue or sticky substances. Follow these simple steps to clean your phone case:
- Prepare a mild cleaning solution by mixing a few drops of dish soap or hand soap with warm water.
- Dip a soft cloth or sponge into the cleaning solution and gently scrub the surface of the phone case. Be careful not to use excessive force or scrub too vigorously, as it may damage the case.
- Pay special attention to any leftover adhesive residue from the Popsocket. Use your fingers or a soft toothbrush to carefully remove any remaining residue.
- Rinse the phone case thoroughly with clean water to remove any soap residue.
- Pat the case dry with a clean, lint-free cloth and let it air dry completely before reattaching the Popsocket or putting the case back on your phone.
It is important to note that if your phone case is made of fabric or has intricate designs, it is advisable to check the manufacturer’s instructions for cleaning recommendations specific to your case.
Cleaning your phone case regularly not only ensures a clean and appealing appearance but also helps in maintaining the integrity and longevity of the case. It helps avoid the buildup of grime or dirt and keeps your phone protected and looking its best.
Once the phone case is clean and dry, you can reattach your Popsocket or use the case as desired.
By following these steps, you’ll be able to remove a Popsocket from a phone case, clean the case, and have it ready for further use. Remember to be patient and gentle while handling the case to avoid any damage, and always ensure proper cleaning and drying before reattaching or reusing.
Conclusion
In conclusion, removing a popsocket from a phone case can be a straightforward process if you follow the right steps and use the necessary tools. By preparing the area, loosening the popsocket, applying adhesive remover, and carefully removing it, you can successfully detach the popsocket without damaging your phone case.
Remember to take your time and be gentle during the removal process to ensure the longevity of your phone case. Once the popsocket is removed, make sure to clean the case thoroughly to remove any residue or adhesive left behind.
Having the ability to remove a popsocket from a phone case gives you the flexibility to switch designs whenever you want or replace a worn-out popsocket with a new one. Keep in mind that the process may vary slightly depending on the type of phone case and adhesive used.
By following the steps outlined in this guide and being patient and careful, you can remove a popsocket from your phone case in no time. So go ahead and personalize your phone case with a trendy new popsocket or switch between different designs to match your mood and style.
With these tips and tricks, you will be able to remove a popsocket from a phone case with ease. Enjoy the process and have fun customizing your mobile accessories!
Conclusion
In conclusion, removing a Popsocket from a phone case is a simple task that can be done with just a few steps. By following the proper technique, you can safely detach the Popsocket without causing any damage to your phone or case. Remember to start by gently lifting the edges of the Popsocket with your fingernails or a thin object, such as a credit card. Once you have enough space, use a twisting or rotating motion to loosen the adhesive. Gradually apply even pressure until the Popsocket detaches completely.
It’s important to note that the adhesive on the Popsocket is strong and durable, ensuring that it stays securely attached to your phone case. However, if you ever need to remove it for any reason, whether it’s to replace the Popsocket or switch to a different phone case, knowing the proper technique will make the process quick and easy.
By following the guidelines outlined in this article, you can confidently remove a Popsocket from your phone case without any hassle. So go ahead and experiment with different Popsocket designs and styles, knowing that you can easily switch them out whenever you like without causing any damage. Enjoy the freedom of customizing your phone case with the perfect Popsocket for every occasion.
FAQs
Q: Can I remove a Popsocket from my phone case?
A: Yes, you can remove a Popsocket from your phone case. Popsockets are designed to be removable and reusable, allowing you to change their position or remove them altogether if needed.
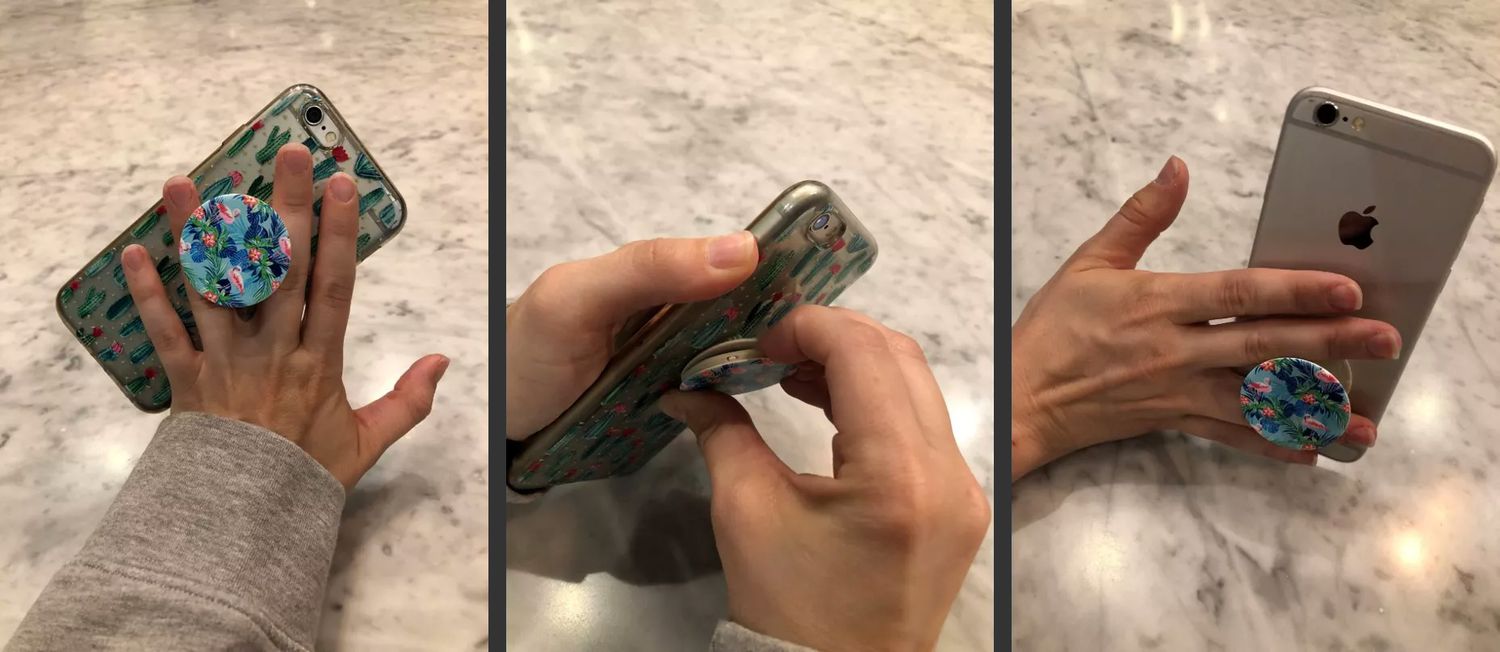
Q: How do I remove a Popsocket from my phone case?
A: To remove a Popsocket from your phone case, start by applying gentle pressure to the base of the Popsocket from the backside of your phone case. Slowly push upwards, away from the case, until it pops off. Be careful not to exert too much force to avoid damaging your phone case.
Q: Will removing a Popsocket leave residue on my phone case?
A: In most cases, removing a Popsocket should not leave any residue on your phone case. However, if you notice any adhesive residue or sticky residue, you can use a mild cleaning solution or rubbing alcohol on a soft cloth to gently wipe away the residue.
Q: Can I reuse a Popsocket once it has been removed?
A: Yes, you can reuse a Popsocket once it has been removed from a phone case. The adhesive on the back of the Popsocket is designed to be reusable. If the adhesive loses its stickiness over time, you can clean it with water and let it dry to restore its adhesive properties.
Q: Are there any precautions I should take when removing a Popsocket?
A: When removing a Popsocket from your phone case, it is important to take some precautions to avoid any damage. Avoid using excessive force when removing the Popsocket to prevent any damage to your phone case. Additionally, be cautious not to put too much pressure on your phone screen while removing the Popsocket to prevent any cracks or damage.