
Are you wondering how to remove the HP laptop battery? Whether you’re looking to replace the battery, clean the laptop, or perform some maintenance, removing the battery from your HP laptop is a straightforward process that doesn’t require any special tools.
In this article, we will guide you step-by-step on how to remove the battery from your HP laptop. We will cover different HP laptop models and provide you with easy-to-follow instructions. By following these steps, you’ll be able to remove the battery safely and efficiently, ensuring that your laptop is ready for any necessary repairs or upgrades.
So, if you’re ready to take care of your HP laptop, let’s get started with the battery removal process!
Inside This Article
- Step 1: Shutdown the HP Laptop
- Step 2: Locate the Battery Release Latch
- Step 3: Slide or push the Battery Release Latch
- Step 4: Remove the Battery from the HP Laptop
- Conclusion
- FAQs
Step 1: Shutdown the HP Laptop
To safely and effectively remove the battery from your HP laptop, it’s important to start by shutting down the device. This ensures that all running processes are properly closed and that the laptop is in a “powered off” state.
First, save any open files and close any running programs or applications. This will prevent data loss or corruption when you shut down the laptop. You can do this by clicking on the “X” button on each program or using the keyboard shortcut for closing applications.
Next, click on the “Start” button in the bottom left corner of the screen and select the “Power” option from the menu. A new submenu will appear with various power options such as “Sleep,” “Restart,” and “Shutdown.” Click on the “Shutdown” option to begin the shutdown process.
Wait for a few moments as the laptop goes through the shutdown process. You may see a “Shutting down” message on the screen, indicating that the system is closing all processes and preparing for shutdown. Once the laptop is fully shut down, you can proceed to the next step of removing the battery.
Step 2: Locate the Battery Release Latch
Once you have successfully shut down your HP laptop, it is time to locate the battery release latch. The battery release latch is a mechanism designed to secure the battery in place and prevent it from accidentally falling out. Locating this latch is essential in order to safely remove the battery without causing any damage.
The battery release latch is typically located on the bottom of your HP laptop. It may vary in appearance depending on the model and design of your laptop. Look for a switch or a button-like mechanism that is specifically marked with a battery icon or the word “release”. This will indicate that it is the designated latch for unlocking the battery.
If you are having trouble finding the battery release latch, refer to your HP laptop’s user manual or visit the official HP website for detailed instructions. They may provide specific diagrams or illustrations to help you locate the latch more easily.
Once you have identified the battery release latch, make sure your laptop is laid flat on a stable surface. This will ensure that you have better control and stability when performing the next step. Position the laptop in such a way that the battery release latch is easily accessible and within reach.
It is important to handle the battery release latch with care and gentleness to avoid any unnecessary force or damage. Press or slide the latch in the designated direction indicated by the arrow or symbol on the latch. The latch should move smoothly and release the battery from its locked position.
Some laptops may have a latch release mechanism that requires sliding or pushing, while others may have a simple button that needs to be pressed to release the battery. Follow the instructions according to your specific HP laptop model.
After successfully releasing the battery, you should feel a slight click or hear a soft “pop” sound. This is an indication that the latch has disengaged and the battery is now free to be removed. Carefully lift the battery out of its compartment by using your fingers and gripping it firmly but gently.
It is important to note that some HP laptops may have multiple battery release latches if they are equipped with extended battery options or power pack attachments. In such cases, repeat the same process for each latch to safely remove the additional batteries.
By locating and properly operating the battery release latch, you have successfully completed the second step in removing the HP laptop battery. Proceed to the next step to learn how to safely remove the battery from the laptop.
Step 3: Slide or push the Battery Release Latch
Now that you have successfully shut down your HP laptop and located the battery release latch, it’s time to proceed with the next step: sliding or pushing the latch to release the battery.
On most HP laptops, the battery release latch is located on the bottom of the device. Look for a small indent or a switch-like mechanism near the battery compartment. It may be marked with a battery icon or a label indicating the direction to slide or push.
Using your finger or a small tool, such as a pen cap or a flathead screwdriver, gently slide or push the latch in the designated direction. This action will unlock the battery and allow you to remove it from the laptop.
Be careful not to use excessive force while sliding or pushing the latch, as it may cause damage to the latch mechanism or the laptop itself. Use a steady, but gentle, pressure to ensure a smooth release.
Once the latch is moved, you should feel a slight resistance and hear a click or a release sound. This indicates that the latch has disengaged from the battery, and it is now ready to be removed.
After sliding or pushing the latch, locate the battery compartment or the designated area where the battery is held. Depending on the HP laptop model, the battery may be easily accessible from the bottom of the device.
Using your fingertips or a small tool, gently lift the battery from the compartment. Be cautious not to apply too much pressure, as this may damage the battery or the connectors. If you encounter any resistance, double-check to ensure that the latch has been fully released.
Once the battery is detached from the laptop, set it aside in a safe and dry location. You can inspect the battery for any signs of damage or wear, such as bulging or leaking. If you notice any abnormalities, it may be a sign that the battery needs to be replaced.
Removing the battery from your HP laptop can be a straightforward process if you follow the necessary steps and exercise caution. By correctly sliding or pushing the battery release latch, you can safely detach the battery and address any battery-related issues or perform maintenance on your device.
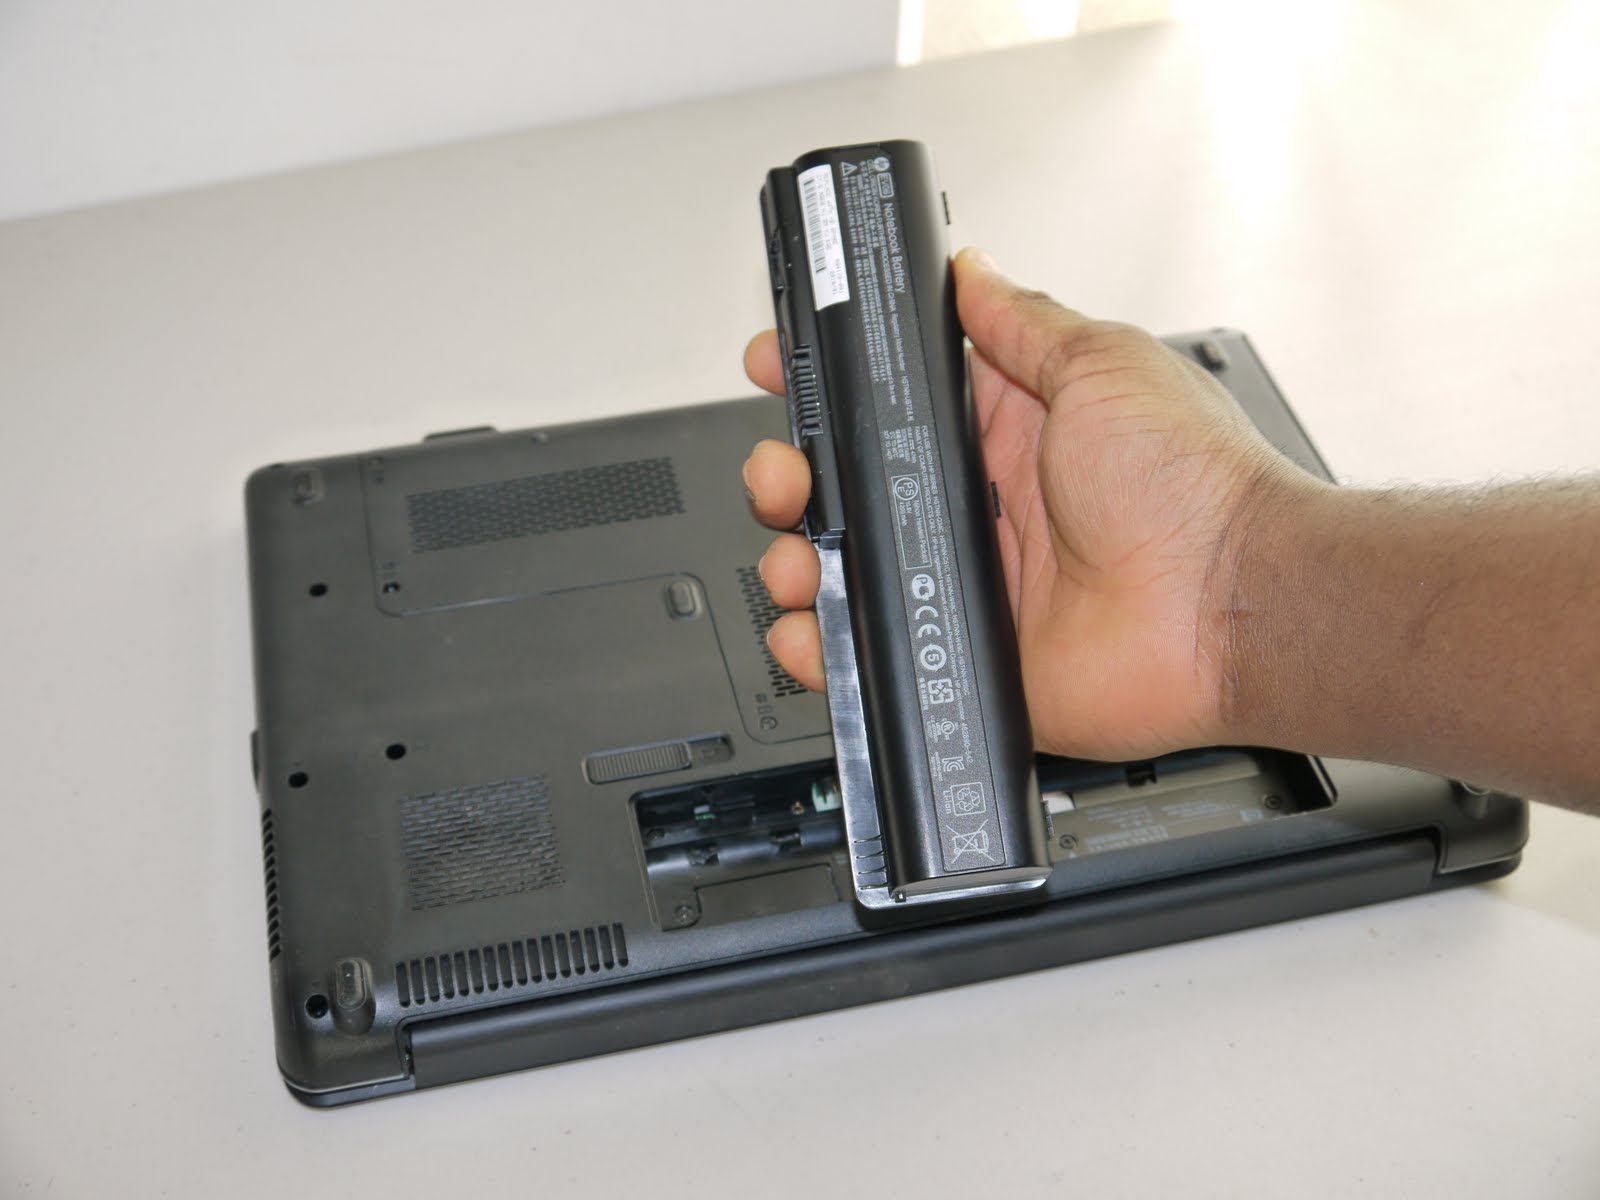
Step 4: Remove the Battery from the HP Laptop
Now that you have successfully located and released the battery latch, it’s time to safely remove the battery from your HP laptop. Follow these steps:
Step 1: With the battery latch released, gently hold the edge of the battery that is farthest away from the laptop’s hinge.
Step 2: Slowly and carefully lift the battery away from the laptop’s base. Make sure to maintain a firm grip on the battery to prevent it from slipping out of your hands.
Step 3: As you lift the battery, be mindful of any cables or connectors that may be attached to it. If you encounter any cables, gently detach them from the battery by carefully unplugging them.
Step 4: Once all cables or connectors are detached, continue lifting the battery until it is completely separated from the laptop. You can now set the battery aside in a safe location.
Note: It’s important to handle the battery with care, avoiding any excessive force or bending. This will help prevent damage to both the battery and the laptop.
Removing the battery is a straightforward process, but it is essential to follow these steps diligently to avoid any mishaps or damage. Now that the battery has been successfully removed, you can proceed with any necessary maintenance or replacement.
Conclusion
In conclusion, removing the battery from an HP laptop is a simple and straightforward process that can be done by following a few steps. By carefully shutting down the laptop, unplugging it from the power source, and locating the battery release latch or switch, users can easily detach the battery. Removing the battery can be beneficial for several reasons, such as troubleshooting power-related issues, extending the laptop’s overall lifespan, and ensuring the safety of the device during long periods of non-use. However, it is essential to note that different laptop models may have slight variations in the battery removal process, so always refer to the specific user manual or manufacturer’s instructions if uncertain.
FAQs
Q: Why would I need to remove the battery from my HP laptop?
A: There could be several reasons why you might need to remove the battery from your HP laptop. It could be to replace a faulty battery, troubleshoot power-related issues, or when performing a BIOS reset. Removing the battery can also be a safety measure when working with the laptop’s internal components.
Q: How do I know when it’s time to remove the battery from my HP laptop?
A: If your HP laptop is experiencing problems with the battery, such as not holding a charge, draining quickly, or overheating, it may indicate that it’s time to remove the battery. Additionally, if you’re going to perform any hardware upgrades or repairs, it’s recommended to remove the battery as a safety precaution.
Q: Is it safe to remove the battery from my HP laptop while it’s still running?
A: It’s generally not recommended to remove the battery from your HP laptop while it’s still running. Removing the battery abruptly can cause your laptop to shut down abruptly, leading to potential data loss or system crashes. It’s best to shut down your laptop properly before removing the battery to avoid any issues.
Q: How can I remove the battery from my HP laptop?
A: The process of removing the battery from an HP laptop may vary depending on the model. However, in most cases, you can follow these steps:
- Make sure your laptop is shut down and disconnected from any power sources.
- Locate the battery release latch or slider on the bottom of your laptop.
- Slide or press the latch to release the battery.
- Gently lift the battery out of its compartment.
If you’re unsure about the exact procedure for your specific model, it’s recommended to consult the user manual or HP support website for detailed instructions.
Q: Should I remove the battery from my HP laptop if I’m using it plugged into a power source?
A: If you’re using your HP laptop plugged into a power source most of the time, it’s generally not necessary to remove the battery. However, if you plan on using your laptop for an extended period without the need for battery power or if you’re storing it for a prolonged period, it’s advisable to remove the battery to avoid any potential battery degradation or safety concerns.