
Are you tired of tangled wires and limited mobility when using your laptop? If so, then you should consider connecting a wireless mouse to your HP laptop. Not only will it eliminate the hassle of dealing with cords, but it will also provide you with freedom of movement and improved convenience. In this article, we will guide you through the simple steps of connecting an HP wireless mouse to your laptop. Whether you are a tech-savvy individual looking to enhance your computing experience or a novice in need of assistance, we have got you covered. So, let’s dive in and discover how to connect your HP wireless mouse to your laptop and unlock a whole new level of productivity and comfort.
Inside This Article
- Troubleshooting Steps
- Step 1: Check Compatibility
- Step 2: Prepare the Mouse
- Step 3: Enable Bluetooth Connection on the Laptop
- Step 4: Pair the Mouse with the Laptop
- Conclusion
- FAQs
Troubleshooting Steps
If you’re having trouble connecting your HP wireless mouse to your laptop, don’t worry – we’ve got you covered. Follow these troubleshooting steps to get your mouse up and running in no time:
Step 1: Check Compatibility
The first thing you need to do is make sure that your HP wireless mouse is compatible with your laptop. Check the manufacturer’s website for compatibility information or refer to the user manual that came with your mouse.
Step 2: Prepare the Mouse
Next, make sure that your HP wireless mouse is properly prepared for pairing. This usually involves inserting batteries into the mouse and switching it on. Refer to the user manual for specific instructions on how to prepare your mouse for pairing.
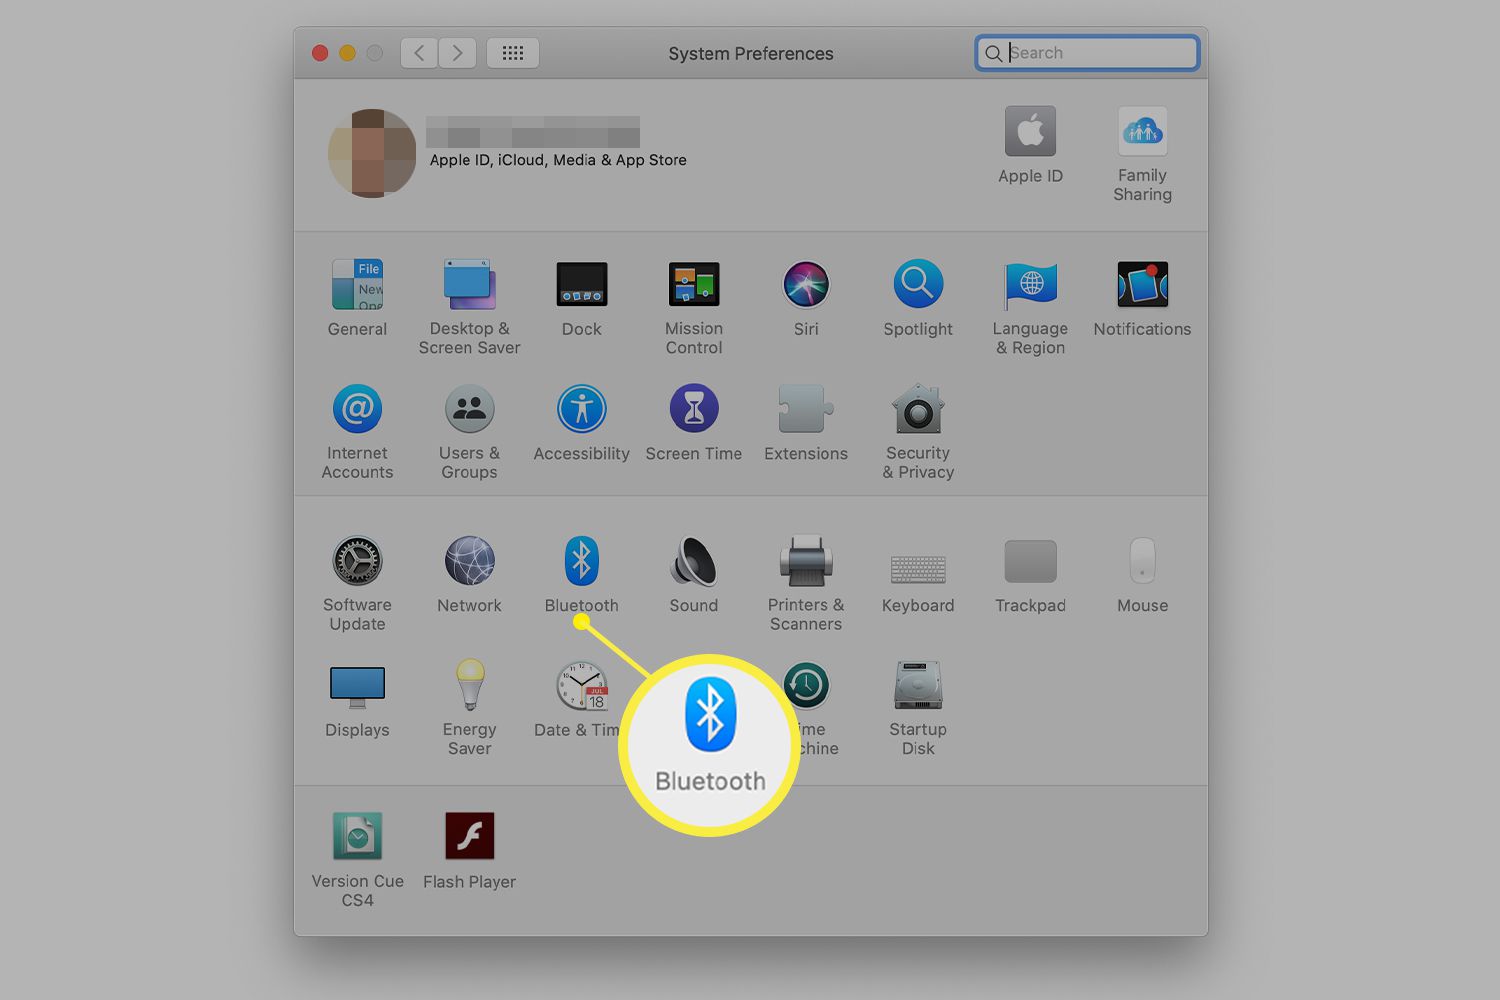
Step 3: Enable Bluetooth Connection on the Laptop
Now, it’s time to enable the Bluetooth connection on your laptop. Navigate to the settings or control panel of your laptop and look for the Bluetooth settings. Make sure that it is turned on and set to discoverable mode.
Step 4: Pair the Mouse with the Laptop
Once your laptop is in discoverable mode, you can now pair your HP wireless mouse with it. Press the pairing button on the mouse (usually located on the bottom) and wait for your laptop to detect the mouse. Follow the on-screen instructions to complete the pairing process.
If you’re still having trouble connecting your HP wireless mouse to your laptop after following these troubleshooting steps, it’s recommended to contact the HP customer support for further assistance. They will be able to provide you with additional guidance and troubleshooting tips specific to your model of mouse and laptop.
Remember, connecting a wireless mouse to a laptop can be a simple and straightforward process when you follow the right steps. So, don’t let technical difficulties hold you back from enjoying the convenience of a wireless mouse. Get your HP wireless mouse connected today!
Step 1: Check Compatibility
Before you begin connecting your HP wireless mouse to your laptop, it’s crucial to ensure that the mouse is compatible with your device. Here are a few steps to check the compatibility:
1. Check the System Requirements: Start by reviewing the system requirements mentioned in the user manual or on the product packaging. Make sure that your laptop meets the minimum requirements specified by the manufacturer.
2. Wireless Technology: Confirm whether your laptop supports the same wireless technology as your HP wireless mouse. Most wireless mice use either Bluetooth or a USB receiver. Check if your laptop has built-in Bluetooth connectivity or if it requires a USB port for the receiver.
3. Operating System Compatibility: Verify that your laptop’s operating system is compatible with the HP wireless mouse. Whether you have Windows, macOS, or Linux, ensure that the mouse’s drivers and software are compatible with your laptop’s operating system.
4. Battery Requirements: Determine the type of batteries required for the HP wireless mouse. Some use disposable batteries, while others have rechargeable batteries. Make sure you have the appropriate batteries on hand to power the mouse.
5. DPI Settings: If you have specific preferences for the mouse’s sensitivity or DPI (Dots Per Inch), ensure that the HP wireless mouse offers that level of customization. Some models allow you to adjust the DPI settings for a smoother and more precise cursor movement experience.
By following these compatibility checks, you can ensure that your HP wireless mouse is a perfect match for your laptop, minimizing any compatibility issues and ensuring a seamless connection process.
Step 2: Prepare the Mouse
Once you’ve ensured compatibility, the next step is to prepare your HP wireless mouse for connection to your laptop. Follow these simple steps:
1. Open the battery compartment of your wireless mouse. Most HP wireless mice have a small latch or sliding cover that allows access to the batteries. Remove any protective plastic or paper tabs from the batteries if necessary.
2. Insert the batteries into the mouse in the correct orientation. It’s typically indicated by the plus (+) and minus (-) symbols on both the mouse and the batteries. Make sure the batteries are secure and the compartment is properly closed.
3. Turn on the power switch located on the underside of the mouse. Some models have a switch while others have a button that needs to be pressed to activate the mouse.
4. Check if your HP wireless mouse has a pairing button on it. This button is usually located either on the bottom or the side of the mouse. If it does have a pairing button, press and hold it until the LED indicator light starts flashing.
5. If your HP wireless mouse doesn’t have a pairing button, simply turn on the mouse and wait for the LED indicator light to start flashing. This indicates that the mouse is now in pairing mode.
By following these steps, you have successfully prepared your HP wireless mouse for connection to your laptop. Now, let’s move on to the next step to enable Bluetooth connection on your laptop.
Step 3: Enable Bluetooth Connection on the Laptop
Once you have prepared your HP wireless mouse and made sure it is compatible with your laptop, the next step is to enable the Bluetooth connection on your laptop. Follow the steps below to do so:
1. Go to the settings menu on your laptop. This can usually be accessed by clicking on the Start menu and then selecting “Settings” or by pressing the Windows key + I.
2. In the Settings menu, look for the “Devices” option and click on it. This will open the Devices settings window.
3. Within the Devices settings window, locate and click on the “Bluetooth & other devices” tab. This is where you can manage your Bluetooth connections.
4. Make sure the Bluetooth toggle switch is turned on. If it is already on, you can proceed to the next step. If it is off, simply click on the toggle switch to turn it on.
5. Once Bluetooth is enabled, your laptop will start searching for available devices in the vicinity. Make sure your HP wireless mouse is turned on and in pairing mode, as mentioned in the previous steps.
6. Look for your HP wireless mouse in the list of available devices on your laptop. It might appear as “HP Mouse” or a similar name. Click on it to select it.
7. After selecting your HP wireless mouse, click on the “Pair” or “Connect” button to establish the connection between the laptop and the mouse.
8. Your laptop will now attempt to connect to the HP wireless mouse. Once the connection is successful, you will see a confirmation message on your laptop screen.
9. Test the connection by moving your HP wireless mouse and ensuring that the cursor moves on your laptop screen accordingly. If everything is working properly, you have successfully enabled the Bluetooth connection between your laptop and the HP wireless mouse.
Following these steps should allow you to enable the Bluetooth connection on your laptop and connect your HP wireless mouse successfully. If you encounter any issues during this process, double-check the compatibility, make sure both the laptop and mouse are charged, and try again.
Step 4: Pair the Mouse with the Laptop
Once you have enabled the Bluetooth connection on your laptop and prepared the wireless mouse, it’s time to pair them together. Follow these simple steps to successfully pair your HP wireless mouse with your laptop:
1. Turn on the mouse by pressing the power button located on the underside or top of the mouse. Make sure the mouse has enough battery power to establish a connection.
2. On your laptop, go to the “Settings” menu and locate the “Bluetooth” option. Click on it to open the Bluetooth settings.
3. Toggle the Bluetooth button to turn it on. Your laptop will start searching for nearby devices that are available for pairing.
4. Press and hold the “Connect” or “Pairing” button on the wireless mouse. This button is typically located on the bottom of the mouse or on the side near the power button. Hold the button until you see a light indicator on the mouse flashing or changing color.
5. On your laptop, you should now see a list of available devices. Look for the name or model number of your HP wireless mouse and click on it to start the pairing process.
6. Your laptop will display a pairing code or passkey. This code may appear as a series of numbers or alphanumeric characters. Take note of the code as you will need to enter it on the mouse.
7. On the wireless mouse, you may need to input the pairing code using the buttons or a small keypad, if available. Follow the instructions provided with your specific model to enter the code correctly.
8. Once you have entered the pairing code, press the “Enter” or “OK” button on the mouse. The mouse and laptop will now establish a connection. You may see a notification on your laptop confirming the successful pairing.
9. Test the connection by moving the mouse cursor on your laptop’s screen. If the cursor responds to the movement of the mouse, congratulations! You have successfully paired your HP wireless mouse with your laptop.
10. If the connection is not established, try repeating the pairing process from the beginning. Make sure both the laptop and the mouse are in close proximity and that there are no obstructions interfering with the Bluetooth signal.
Once your HP wireless mouse is paired with your laptop, you can enjoy the freedom of using a wireless mouse for increased convenience and mobility. Remember to keep the mouse charged to ensure seamless performance.
Conclusion
Connecting your HP wireless mouse to your laptop is a simple process that can greatly enhance your productivity and convenience. By following the steps outlined in this article, you can easily establish a wireless connection between your mouse and laptop, freeing yourself from the constraints of a traditional wired mouse.
With a wireless mouse, you can enjoy the freedom of movement and eliminate the clutter of cables on your desk. The convenience of wireless technology allows you to use your mouse from a comfortable distance, whether you’re working in your office, attending a meeting, or simply sitting on your couch.
By investing in an HP wireless mouse and successfully connecting it to your laptop, you can experience a smoother and more efficient workflow. Take advantage of this wireless solution to streamline your computing experience and enjoy the benefits of increased flexibility and freedom.
So, don’t let yourself be restricted by a wired mouse any longer. Upgrade to an HP wireless mouse, follow the easy steps mentioned in this article, and enjoy the enhanced functionality and convenience it brings to your laptop usage.
FAQs
Q: How do I connect an HP wireless mouse to my laptop?
A: Connecting an HP wireless mouse to your laptop is a simple process. First, make sure the mouse is turned on and has batteries inserted. Next, locate the USB receiver that came with the mouse and insert it into an available USB port on your laptop. Your laptop should automatically recognize the mouse and establish a connection. If it doesn’t, you can try pressing the connect button on the mouse and the USB receiver simultaneously to establish the connection manually.
Q: Is it necessary to install any software to connect an HP wireless mouse to a laptop?
A: In most cases, you won’t need to install any additional software to connect an HP wireless mouse to your laptop. The mouse should work with the built-in drivers of your operating system. However, if you encounter any issues or want to customize the mouse settings, you may need to download and install the HP Mouse Control Center software or any specific software provided by HP for your particular model.
Q: How do I know if my HP wireless mouse is connected to my laptop?
A: Once you have successfully connected your HP wireless mouse to your laptop, you can check the connection status by looking at the LED indicator on the mouse. If the LED is solid or blinking, it means the mouse is connected and working properly. Additionally, you can move the cursor on your laptop screen to ensure that the mouse is functioning correctly.
Q: Can I connect multiple HP wireless mice to my laptop?
A: Generally, you can only connect one wireless mouse to your laptop at a time. This limitation is because each wireless mouse comes with its own USB receiver, and most laptops have only a limited number of USB ports. However, some advanced models of HP wireless mice and laptops may support multiple simultaneous connections. Refer to the user manual of your specific mouse and laptop model for more information on this feature.
Q: Do I need to replace the batteries in my HP wireless mouse?
A: Yes, wireless mice, including HP wireless mice, require batteries for operation. The battery type and life can vary depending on the mouse model, but most HP wireless mice use either AA or AAA batteries. When the batteries start to run low, you may experience issues with the mouse’s performance. It is recommended to keep spare batteries on hand and replace them as needed to ensure uninterrupted usage of your HP wireless mouse.