
If you’re an avid mountain biker, you know the importance of having a smoothly functioning headset on your bike. The headset bearings play a vital role in allowing your handlebars to turn smoothly and efficiently, ensuring optimal control and handling on the trail. However, over time, these bearings can wear out or become damaged, leading to increased friction and reduced performance.
In this comprehensive guide, we will walk you through the process of replacing headset bearings on your mountain bike. We’ll cover everything from the tools you’ll need, step-by-step instructions on removing the old bearings, choosing the right replacement bearings, and finally installing and adjusting the new ones. By the end of this article, you’ll have the knowledge and confidence to tackle this essential maintenance task, prolonging the lifespan of your bike and improving your riding experience.
Inside This Article
- Components of Headset Bearings
- Tools and Materials Needed
- Step-by-Step Process for Replacing Headset Bearings
- Conclusion
- FAQs
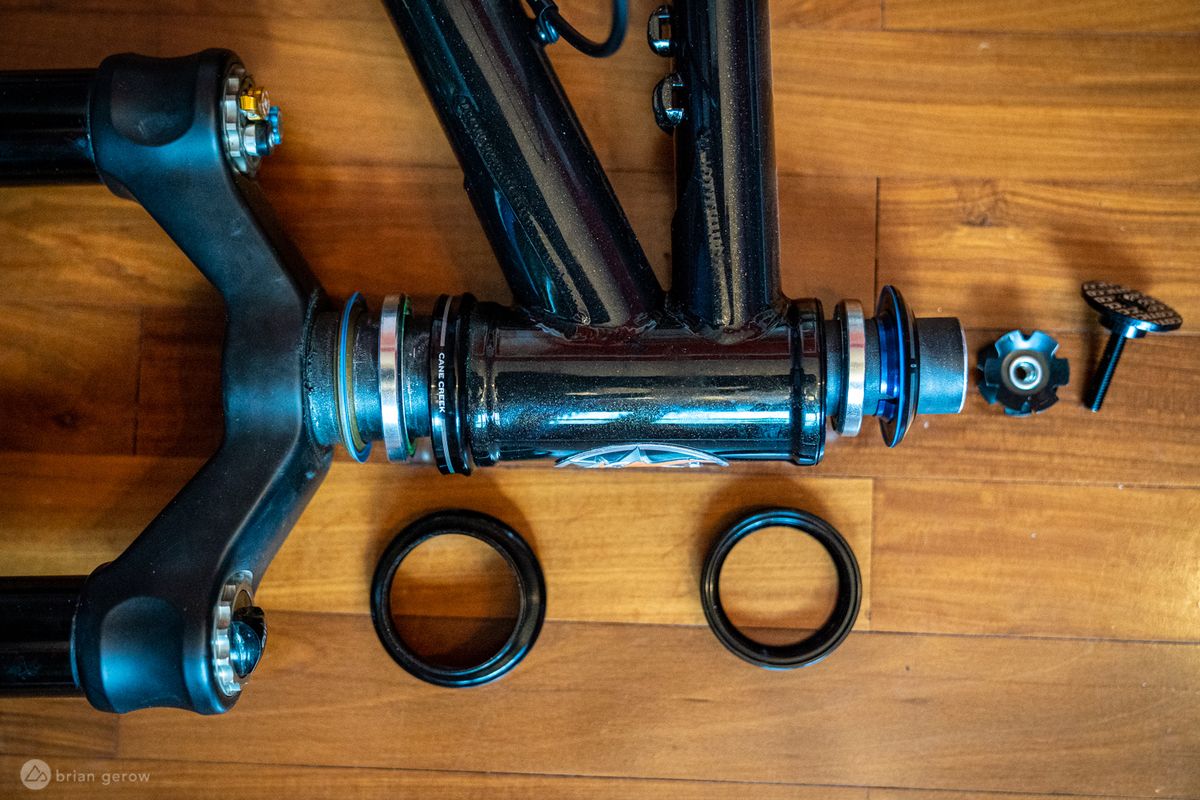
Components of Headset Bearings
Headset bearings are crucial components of a mountain bike as they allow the smooth rotation of the handlebars and fork. Understanding the different parts of headset bearings is essential when it comes to replacing them. Here are the main components:
1. Upper Bearing: This bearing is positioned at the top of the headset and provides support for the fork steerer tube. It allows for smooth steering motion and helps to distribute forces evenly.
2. Lower Bearing: Positioned at the bottom of the headset, the lower bearing provides stability and support to the steerer tube. It enables smooth rotation of the fork and handlebars.
3. Bearing Cups: These cups are press-fitted into the frame and serve as the housing for the upper and lower bearings. They ensure proper alignment and stability of the bearings within the frame.
4. Crown Race: The crown race sits on the fork’s steerer tube and forms a contact point with the lower bearing. It allows for smooth rotation of the fork while maintaining stability.
5. Headset Spacers: These are small cylindrical rings positioned on top of the upper bearing. They are used to adjust the height of the handlebars and provide proper clearance between the stem and headset.
6. Compression Ring: The compression ring is placed on top of the upper bearing and is used in threadless headset systems. It helps to create a secure fit between the stem and the steerer tube.
7. Top Cap: The top cap is located on top of the stem and is used to preload the headset bearings. It provides compression force to keep everything securely in place.
Understanding these components will not only help you identify the parts of headset bearings but also ensure a smoother replacement process. Now, let’s move on to the tools and materials you’ll need for this task.
Tools and Materials Needed
Before you start replacing the headset bearings on your mountain bike, make sure you have the following tools and materials ready:
- Headset press tool: This tool is essential for properly installing the new headset bearings. It allows you to apply even pressure and ensures a smooth installation process.
- Bearing puller or extractor: If your old bearings are stuck and need to be removed, a bearing puller or extractor will come in handy. It helps you safely and effectively remove the worn-out bearings without damaging the headset or frame.
- Bearing press: This tool is used to press the new bearings into place. It ensures a secure and proper fit, preventing any issues during your rides.
- Allen wrenches: You’ll need a set of Allen wrenches to loosen and tighten the bolts on the headset and other components of your mountain bike during the replacement process.
- Clean cloth: Keeping a clean cloth nearby will help you wipe off any dirt, grease, or debris that you might encounter while removing the old bearings or installing the new ones.
- Grease: Applying grease to the bearings and other parts during the installation process is crucial for smooth operation and longevity. Ensure you have grease specifically designed for bike applications.
- Replacement bearings: Of course, you’ll need new headset bearings suitable for your mountain bike. Make sure to choose the correct size and type based on your bike’s specifications.
Having these tools and materials ready before you start the process will ensure a smooth and efficient replacement of the headset bearings on your mountain bike. It’s always better to be prepared and have everything you need at hand to avoid any unnecessary delays or difficulties along the way.
Step-by-Step Process for Replacing Headset Bearings
Replacing headset bearings on a mountain bike is a relatively straightforward process that can significantly improve your riding experience. Follow these step-by-step instructions to replace the headset bearings on your mountain bike:
-
Gather the necessary tools and materials: Before you begin, make sure you have the following items on hand:
- Headset bearing press or headset press tool: This tool is essential for safely removing and installing headset bearings. Make sure to choose a tool that is compatible with your bike’s headset.
- Replacement headset bearings: It’s important to choose bearings that are the correct size and type for your bike’s headset. Consult the manufacturer’s specifications or consult a bike shop for assistance.
- Grease: Apply a liberal amount of waterproof grease to the new bearings for smooth operation.
- Hex wrenches or Allen keys: These tools will be used to remove and install various components.
- Rubber mallet or soft-faced hammer: This will be used to gently tap the bearings into place.
-
Remove the fork: Start by removing the front wheel of your mountain bike. Then use the appropriate size hex wrench or Allen key to loosen the stem bolts. Once loose, slide the stem and handlebars off the fork and set them aside. Next, use a hex wrench or Allen key to loosen the top cap bolt on the headset. This will release the tension on the fork. Remove the top cap and set it aside.
-
Remove the old bearings: With the fork removed, you can now access the old headset bearings. Use the headset press or press tool to carefully push the old bearings out of the frame. You may need to use a rubber mallet or soft-faced hammer to gently tap on the press tool to apply pressure and remove the bearings.
-
Clean and inspect the headset: Once the old bearings are removed, take the opportunity to clean any accumulated dirt or grime from the headset cups and frame. Inspect the bearings cups and frame for any signs of damage or wear. If necessary, replace any damaged components before proceeding.
-
Install the new bearings: Apply a generous amount of grease to the new headset bearings. Carefully place the bearings into the headset cups. If needed, use a rubber mallet or soft-faced hammer to gently tap on the press tool to secure the bearings in place. Ensure that the bearings are fully seated and aligned properly.
-
Reassemble the headset: Once the new bearings are installed, it’s time to reassemble the headset. Place the top cap back on the steerer tube and tighten the top cap bolt. This will preload the headset bearings. Take care not to overtighten. Replace the stem and handlebars onto the steerer tube and tighten the stem bolts securely.
-
Test and adjust: With the headset reassembled, double-check all the bolts and components for proper tightness. Ensure that the fork can turn smoothly and without any binding. If necessary, make any adjustments to the headset tension or bearing preload to achieve optimal performance.
By following these simple steps, you can easily replace the headset bearings on your mountain bike. Remember to take your time and be careful during the process. If you are unsure or uncomfortable performing this task, it is always wise to consult a professional bike mechanic.
Conclusion
In conclusion, knowing how to replace headset bearings on a mountain bike is an invaluable skill for any rider. By ensuring your headset is properly maintained and functioning smoothly, you can enhance your riding experience and extend the lifespan of your bike. Whether it’s a creaky headset, a loose feel, or excessive play, the steps outlined in this article will guide you through the process of replacing your headset bearings.
Remember, safety is key when working on your bike. Take your time, follow the steps carefully, and if you’re unsure about any aspect of the process, it’s always best to seek professional help.
So, don’t let worn-out headset bearings slow you down. With a bit of patience and the right tools, you can have your mountain bike back in peak performance in no time. Get ready to hit the trails with confidence and enjoy a smoother and more enjoyable ride!
FAQs
- Why is it important to replace headset bearings on a mountain bike?
- How often should I replace the headset bearings on my mountain bike?
- What are the signs that indicate the headset bearings need replacement?
- Excessive play or looseness in the handlebars
- Difficulty in steering or inconsistent turning
- Unusual clicking, grinding, or creaking noises while turning the handlebars
- Feeling of roughness or grittiness while steering
- Can I replace the headset bearings on my mountain bike myself?
- What tools do I need to replace headset bearings on a mountain bike?
- Headset press or headset cup remover
- Headset cup press or bearing press
- Allen wrenches or hex keys
- Bearing puller or bearing press tool
- Grease for lubrication
Headset bearings play a crucial role in maintaining the smooth and stable operation of your mountain bike’s steering. Over time, these bearings can wear out due to regular use, dirt, dust, and moisture. Replacing them is essential to ensure proper functionality and prevent potential accidents while riding.
The frequency of replacing headset bearings can vary depending on several factors, including the type of riding you do, riding conditions, and maintenance practices. As a general guideline, it is recommended to inspect the bearings regularly and replace them if you notice any signs of wear, roughness, or play. It is also a good idea to replace them during regular bike maintenance sessions, typically once a year or every few thousand miles.
There are a few telltale signs that indicate it’s time to replace the headset bearings. These include:
Yes, it is possible to replace the headset bearings on your mountain bike yourself if you have the necessary tools, knowledge, and confidence in your mechanical skills. However, it can be a delicate and intricate procedure that requires proper attention to detail. If you are unsure or inexperienced, it is advisable to seek assistance from a professional bike mechanic.
To replace the headset bearings on your mountain bike, you will typically need the following tools: