
Are you tired of dealing with loose or unreliable electrical connections on your mobile accessories? If so, learning how to solder an XT60 connector might be just the solution you need. Soldering is the process of using heat to join two pieces of metal, and it provides a strong and reliable connection. XT60 connectors are commonly used in mobile accessories, such as chargers, power banks, and wireless headphones, to ensure a secure and efficient electrical connection. In this article, we will guide you through the steps of soldering an XT60 connector, providing you with the knowledge and confidence to tackle this project on your own. So, grab your soldering iron and let’s get started!
Inside This Article
- Materials Needed
- Steps to Solder XT60 Connector
- Frequently Asked Questions
- Troubleshooting and Tips
- Conclusion
- FAQs
Materials Needed
In order to solder an XT60 connector, you will need the following materials:
- XT60 Connector: Ensure you have a genuine XT60 connector, as counterfeit ones may not provide a secure and reliable connection.
- Soldering Iron: A 30-40 watt soldering iron with a fine tip is recommended for this task.
- Solder: Choose a quality lead-based solder with a diameter of 0.8mm to 1.2mm for optimal results.
- Flux: Flux helps in improving the flow of solder and reduces oxidation during the soldering process. You can use a flux pen or flux paste.
- Wire Cutters: These will come in handy for cutting and preparing the wires for soldering.
- Wire Strippers: A good pair of wire strippers will make it easier to remove the insulation from the wires.
- Heat Shrink Tubing: Heat shrink tubing is used to insulate and protect the soldered connections.
- Heat Gun or Lighter: You will need a heat gun or a lighter to shrink the heat shrink tubing.
- Clean Cloth or Sponge: This is used to clean the soldering iron tip during the soldering process.
- Safety Equipment: It is important to use safety equipment such as safety glasses and heat-resistant gloves to protect yourself during soldering.
Make sure you have these materials ready before you start soldering the XT60 connector. Having them on hand will ensure a smooth and successful soldering process.
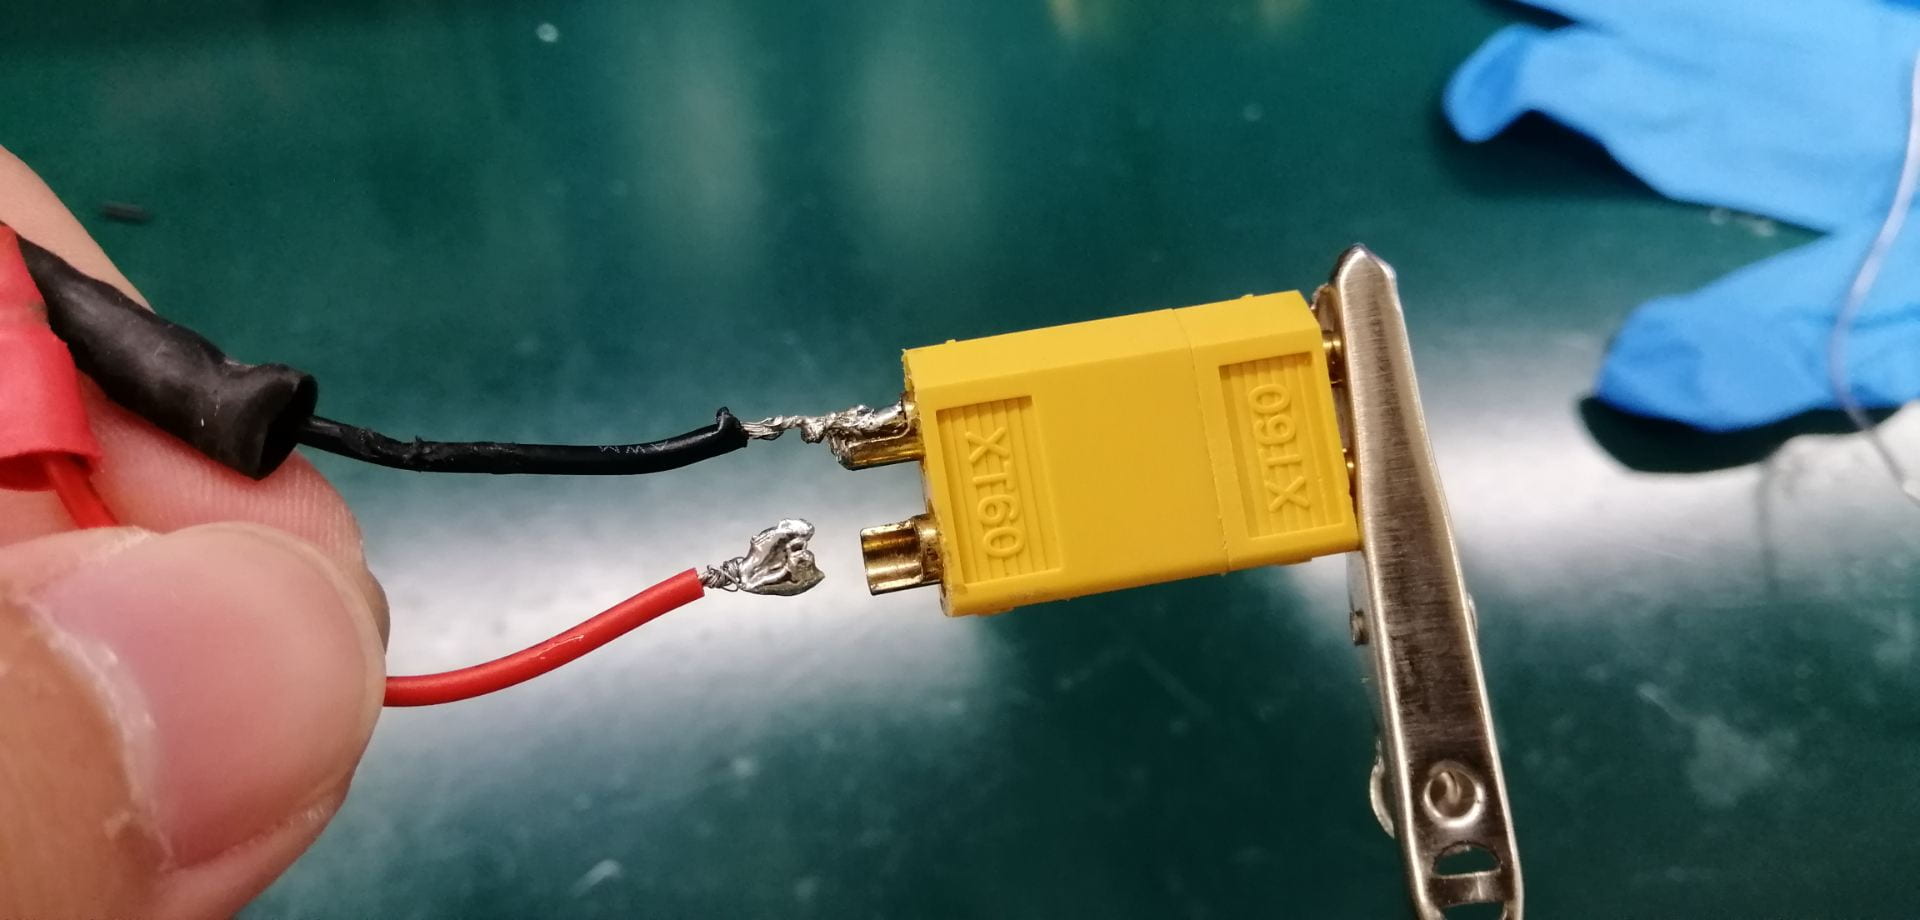
Steps to Solder XT60 Connector
Soldering an XT60 connector is a fundamental skill for anyone involved in the world of RC vehicles, quadcopters, or other electronic projects. This reliable connector is commonly used to connect batteries to electronic devices, providing a secure and efficient power transfer. If you’re new to soldering or need a refresher, no worries! In this article, we’ll take you through the step-by-step process of soldering an XT60 connector.
Step 1: Preparing the XT60 Connector
The first step is to ensure that the XT60 connector is ready for soldering. Start by tinning the connector’s pads. Apply a small amount of solder to the pads, making sure they are fully covered. This will help facilitate the soldering process and create a strong bond between the wire and the connector.
Step 2: Preparing the Wires for Soldering
Next, prepare the wires that will be soldered to the XT60 connector. Strip off a small section of insulation from the end of each wire, exposing the bare copper strands. It’s crucial to have enough exposed copper for a good solder joint, but not too much that it extends beyond the solder pad.
Step 3: Soldering the Wires to the XT60 Connector
Now it’s time to solder the wires to the XT60 connector. Take one wire and heat the tinned pad with the soldering iron to melt the solder. Once the solder is molten, insert the bare end of the wire into the solder pool and hold it in place until the solder solidifies. Repeat this process for the second wire, ensuring that both wires are securely soldered to their respective pads.
Step 4: Insulating the Soldered Connections
After the soldering is complete, it’s essential to insulate the soldered connections to prevent any short circuits or accidental contact. A heat shrink tube is commonly used for this purpose. Slide the heat shrink tube over the soldered joint and use a heat gun to apply heat evenly, causing the tube to shrink and form a protective seal around the connection.
Step 5: Testing and Verifying the Soldered XT60 Connector
With the soldering and insulation complete, it’s time to test the XT60 connector to ensure a successful solder joint. Connect the battery to the XT60 connector and verify that the power is flowing correctly to the electronic device. Wiggle the wires slightly to ensure they are securely connected. If everything works as expected, congratulations – you have successfully soldered an XT60 connector!
Soldering an XT60 connector requires patience and precision, but with practice, it becomes a straightforward process. By following these steps and taking your time, you can confidently solder XT60 connectors for your projects without any issues. Enjoy the satisfaction of creating reliable and secure power connections!
If you have any questions or need further assistance, feel free to check our FAQs section below.
Frequently Asked Questions
-
Can I use a different connector instead of XT60?
While the XT60 connector is popular and widely used, there are other connectors available in the market. It’s essential to ensure compatibility with your specific application and adhere to the correct wiring and safety standards.
-
What temperature should I set my soldering iron to?
The ideal temperature for soldering XT60 connectors is typically between 350-400 degrees Celsius (660-750 degrees Fahrenheit). However, it’s best to refer to the manufacturer’s guidelines for your specific soldering iron model.
-
Can I reuse a previously soldered XT60 connector?
While it is possible to reuse XT60 connectors, it’s generally recommended to replace them with a new one if you notice any signs of damage, such as melted plastic or loose connections. This will ensure optimal performance and safety.
-
What precautions should I take while soldering XT60 connectors?
When soldering XT60 connectors, it’s crucial to work in a well-ventilated area and use proper safety equipment, including goggles and heat-resistant gloves. Ensure that the soldering iron is clean, and avoid touching the hot tip or the soldered area to prevent burns.
We hope this guide has been helpful in understanding the steps to solder an XT60 connector. With practice and attention to detail, you’ll be able to master this essential skill and tackle more advanced electronic projects with confidence!
Note: Remember to always follow the manufacturer’s instructions and guidelines for the specific XT60 connector and soldering equipment you are using.
Troubleshooting and Tips
While soldering an XT60 connector can be a straightforward process, there may still be instances where you encounter issues or need some guidance. Here are some troubleshooting tips to help you overcome common challenges and make the soldering process smoother:
- Check for Proper Heat: Make sure your soldering iron is at the correct temperature. If it’s too hot, it can damage the connector or wires. If it’s too cold, the solder may not flow properly. Aim for a temperature range of 300-350°C (572-662°F).
- Use Flux: Applying flux to the wires and the connector can help improve the soldering process. Flux promotes better heat transfer and helps the solder to flow and adhere evenly.
- Ensure Clean Surfaces: Before soldering, ensure that both the wires and the XT60 connector are clean and free from any dirt, grease, or oxidation. Use a wire brush or sandpaper to remove any contaminants.
- Properly Strip Wires: Be careful when stripping the insulation off the wires. Avoid cutting through the wire strands, as this can weaken the connection. Use a wire stripper or a sharp blade to remove the right amount of insulation.
- Apply the Right Amount of Solder: Applying an appropriate amount of solder is crucial. Too little may result in a weak connection, while too much can cause the solder to flow onto neighboring pins and create a short circuit.
- Inspect for Cold Joints: After soldering, inspect the joints to ensure the solder has formed a shiny and smooth connection. Dull or rough joints may indicate a cold joint, which can be weak and prone to breaking. If necessary, reapply heat and solder to improve the connection.
- Use Heat Shrink Tubing: To provide extra protection and insulation, consider using heat shrink tubing. Slide the tubing over the soldered connections and apply heat to shrink it, creating a secure and insulated joint.
- Test the Connection: After completing the soldering process, it’s essential to test the connection before using it. Use a multimeter to check for continuity and ensure a proper electrical connection.
By following these troubleshooting tips and practicing proper soldering techniques, you can successfully solder an XT60 connector and create a reliable electrical connection for your mobile accessories.
Conclusion
In conclusion, the process of soldering an XT60 connector is a valuable skill that allows you to enhance the performance and reliability of your electronic devices. By following the steps outlined in this article, you can successfully solder an XT60 connector and ensure a secure and efficient connection. Remember to always prioritize safety by using the appropriate safety equipment and following good soldering practices. With practice and patience, you’ll become proficient in this essential technique and be able to customize and optimize your mobile accessories to suit your needs. So, go ahead and give it a try – you’ll be amazed at the difference it makes in the performance of your devices!
FAQs
1. What is an Xt60 connector?
The Xt60 connector is a widely used electrical connector commonly employed in the RC (radio-controlled) hobby and other electronic devices. It is known for its durability, high current rating, and easy installation, making it ideal for connecting batteries and other high-powered components.
2. Why would I need to solder Xt60 connectors?
Soldering Xt60 connectors allows you to create custom-length battery leads or repair damaged connectors. It also ensures a secure and reliable connection between your battery and the device it powers. By soldering Xt60 connectors, you have greater control over your electrical connections and can tailor them to suit your specific needs.
3. What tools and materials do I need to solder Xt60 connectors?
To solder Xt60 connectors, you will need the following tools and materials:
- Soldering iron with a fine tip
- Soldering stand or holder
- Lead-free solder
- Wire stripper or cutter
- Heat shrink tubing (optional, but recommended for added protection)
- Heat gun or lighter (for shrink tubing)
4. What is the recommended technique for soldering Xt60 connectors?
The recommended technique for soldering Xt60 connectors is as follows:
- Strip a small portion (around 1/4 inch) of the insulation from the wire ends.
- Tin the exposed wires by applying a small amount of solder to them.
- Insert the tinned wires into the corresponding holes of the Xt60 connector, ensuring that the positive and negative wires are correctly aligned.
- Heat the solder pad of the Xt60 connector using the soldering iron, and gently apply solder to the pad until it melts and forms a secure connection with the wire.
- Allow the connection to cool, and if desired, slide heat shrink tubing over the soldered portion and apply heat to shrink it into place.
- Repeat the process for the remaining wire and connector.
5. What precautions should I take when soldering Xt60 connectors?
When soldering Xt60 connectors, it is advisable to follow these precautions:
- Make sure to work in a well-ventilated area to prevent inhaling solder fumes.
- Ensure that the soldering iron is properly heated before making any connections.
- Avoid excessive heat that can damage the connector or surrounding components.
- Use only lead-free solder to minimize environmental impact and health hazards.
- Take care not to apply too much pressure when inserting the wires into the connector to avoid damaging the internal contacts.
- Always double-check the polarity before soldering to avoid reversed connections.