
When it comes to testing a 9V battery with a multimeter, it’s important to know the steps involved to ensure accurate readings. A multimeter is a versatile tool that measures voltage, current, and resistance, making it the perfect instrument for testing batteries. Whether you want to confirm if your 9V battery is still functional or need to troubleshoot an electrical device, a multimeter can provide valuable insights.
In this article, we’ll walk you through the process of testing a 9V battery using a multimeter. We’ll cover everything from setting up the multimeter to interpreting the readings and determining the battery’s health. So, if you’ve ever wondered how to check the status of your 9V battery, you’ve come to the right place. Let’s dive in and learn how to put your multimeter to good use!
Inside This Article
- Why Testing a 9V Battery is Important
- Different Types of Multimeters
- Steps to Test a 9V Battery with a Multimeter
- Conclusion
- FAQs
Why Testing a 9V Battery is Important
Testing a 9V battery is important for several reasons. Firstly, it allows you to determine the remaining charge in the battery, ensuring it is still suitable for use. This is especially crucial in devices such as smoke alarms, emergency lights, and portable radios, where a low battery can compromise their effectiveness when needed the most.
Secondly, testing a 9V battery helps you avoid unnecessary replacements. Many times, batteries are discarded and replaced prematurely, simply because their voltage is not accurately known. By testing the battery with a multimeter, you can make an informed decision whether to invest in a new battery or not, saving you both money and the environment.
Furthermore, testing a 9V battery can prevent you from experiencing sudden battery failure. Batteries can lose their charge over time, or even experience a sudden drop in voltage due to factors such as temperature fluctuations. By regularly testing the battery, you can proactively replace it before it fails and causes inconvenience.
In addition, testing a 9V battery can give you peace of mind. Knowing that the battery in your essential electronic device is functioning properly can provide reassurance, especially in situations where you rely on it during emergencies or crucial moments. It can also ensure that your devices perform optimally, avoiding any frustrating glitches or malfunctions.
Lastly, testing a 9V battery is a good practice for overall battery maintenance. Regularly testing your batteries with a multimeter helps you stay proactive in identifying any potential issues with them. This allows you to troubleshoot and address any battery-related problems early on, ultimately prolonging the lifespan of your batteries and maximizing their usage.
Different Types of Multimeters
When it comes to testing a 9V battery with a multimeter, it’s important to understand that there are different types of multimeters available in the market. These multimeters vary in their features, functionality, and price range. Let’s take a closer look at the different types:
1. Analog Multimeters: Analog multimeters are the traditional type of multimeters that use a needle and a scale to display readings. They are simple to use and are often less expensive than their digital counterparts. However, they may be less accurate and harder to read compared to digital multimeters.
2. Digital Multimeters (DMMs): Digital multimeters, also known as DMMs, have become increasingly popular due to their accuracy and ease of use. These multimeters display readings in numeric form on a digital screen, making them more precise and readable. They often come with additional features such as auto-ranging, data hold, and backlit displays.
3. Clamp Meters: Clamp meters are a specialized type of multimeter that allows you to measure current without breaking the circuit. They have a unique clamp mechanism that can be placed around a wire to measure the current flowing through it. Clamp meters are commonly used by electricians and HVAC technicians.
4. True RMS Multimeters: True RMS multimeters are designed to accurately measure AC voltage and current, including distorted or non-sinusoidal waveforms. They are often used in industrial and electronic applications where non-linear loads are present, such as inverter-controlled motors and power electronics.
5. Autoranging Multimeters: Autoranging multimeters are a convenient option for those who want the multimeter to automatically select the appropriate range for a given measurement. They eliminate the need for manual range selection and make the testing process faster and easier.
Each type of multimeter has its advantages and is suited for different purposes. When choosing a multimeter to test a 9V battery, consider your specific needs, budget, and the level of accuracy required for the task at hand. Now that you have an understanding of the different types of multimeters, let’s proceed with the steps to test a 9V battery using a multimeter.
Steps to Test a 9V Battery with a Multimeter
Testing a 9V battery with a multimeter is a simple and effective way to determine its remaining power. By following a few easy steps, you can quickly assess whether your battery is still good or if it needs to be replaced. Here’s how:
- Set your multimeter: Begin by setting your multimeter to the DC voltage setting. Look for the V with a straight line next to it to indicate the DC voltage mode. Set the range to a suitable level, such as 20V or higher.
- Attach the multimeter probes: Take the black probe and connect it to the COM port on your multimeter. This port is usually indicated by a negative (-) sign. Then, take the red probe and attach it to the V?mA port, usually indicated by a positive (+) sign.
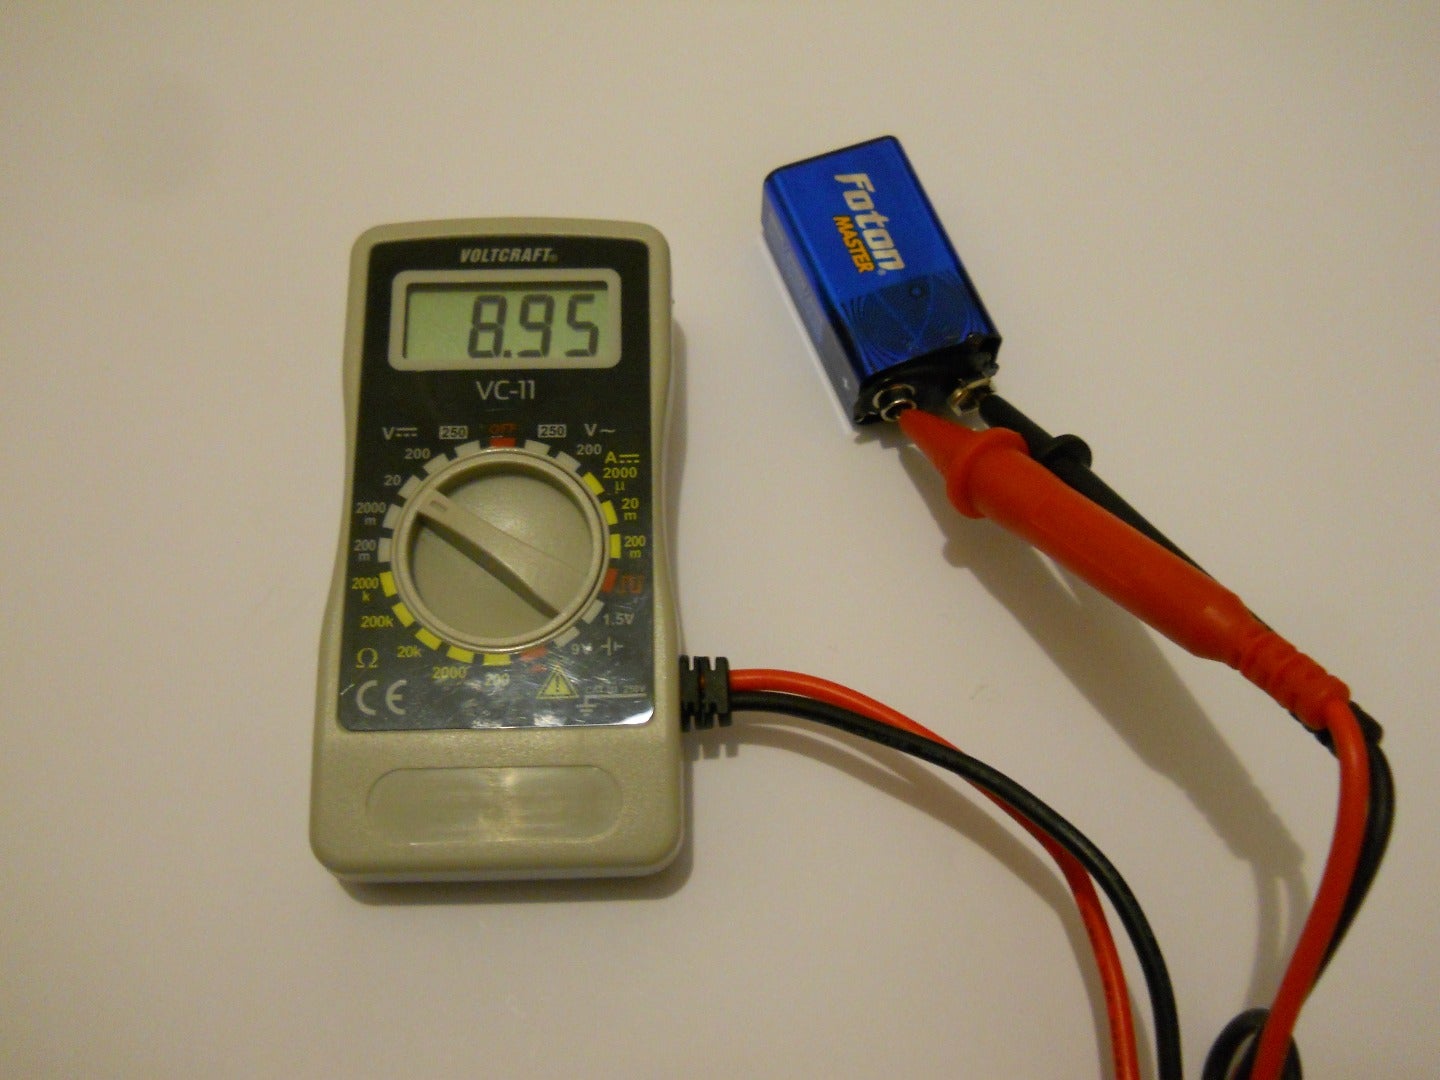
- Check the battery voltage: With the multimeter probes attached, touch the black probe to the negative terminal of the 9V battery. Similarly, touch the red probe to the positive terminal. Ensure a good connection is made with both probes and the battery terminals.
- Read the multimeter display: Once the probes are in place, the multimeter display will show the voltage reading of the battery. A fully charged 9V battery should display a voltage reading between 8.4V and 9.6V. If the reading falls significantly below this range, it’s an indication that the battery is nearing depletion and requires replacement.
- Take multiple measurements: To ensure accuracy, it’s advisable to take multiple voltage measurements of the 9V battery. This can help to confirm the consistency of the readings and provide more reliable results.
- Disconnect the probes: After completing the measurements, remove the probes from the battery terminals. Start by disconnecting the red probe from the positive terminal, followed by the black probe from the negative terminal. Ensure proper safety measures are taken during this step to avoid any accidental shocks.
By following these simple steps, you can effectively test a 9V battery using a multimeter. Remember to always exercise precaution when using electrical equipment and handling batteries. Regularly checking the battery’s voltage can help you stay prepared and ensure that your devices are powered by reliable and efficient batteries.
Conclusion
In conclusion, testing a 9V battery with a multimeter is a simple and effective way to determine its level of charge and overall health. By following the step-by-step process of connecting the multimeter and selecting the appropriate mode, you can easily obtain accurate readings and make informed decisions about the battery’s usability.
Remember to always prioritize safety when working with batteries and multimeters. Use protective gloves and eyewear, and avoid touching the exposed ends of the battery during the testing process. If a battery shows signs of low charge or damage, it’s best to dispose of it properly and replace it with a new one.
By regularly testing your 9V batteries, you can ensure that you have a reliable power source for your devices and avoid any unexpected interruptions. So, go ahead and grab a multimeter, test out your 9V batteries, and make sure you’re never caught without battery power again!
FAQs
1. Can I test a 9V battery without a multimeter?
Yes, there are alternative methods to test a 9V battery without a multimeter. For example, you can use a battery tester or voltmeter, which are designed specifically for testing batteries. Another method is to use a battery load tester, which simulates the electrical load of a device to see how the battery performs under normal usage conditions.
2. Why is it important to test a 9V battery with a multimeter?
Testing a 9V battery with a multimeter allows you to determine its voltage level and whether it is still in working condition. This is important because a low voltage or dead battery can affect the performance of electronic devices that rely on it for power.
3. How do I test a 9V battery with a multimeter?
To test a 9V battery with a multimeter, follow these steps:
a. Set your multimeter to the DC voltage mode.
b. Connect the red probe to the positive (+) terminal of the battery and the black probe to the negative (-) terminal.
c. Read the voltage displayed on the multimeter screen. A fully charged 9V battery should read around 9 volts or slightly higher.
4. What does it mean if my 9V battery reads below 9 volts?
If your 9V battery reads below 9 volts, it indicates that the battery may be discharged or nearing the end of its life. It may no longer provide sufficient power to operate electronic devices reliably. It’s recommended to replace the battery with a new one to ensure proper performance.
5. How often should I test my 9V battery?
It’s a good practice to test your 9V battery periodically, especially if you depend on it to power important devices or equipment. As a general guideline, you can perform a battery test every few months or whenever you notice a decrease in device performance. Regularly testing your battery can help you identify any issues early on and prevent unexpected power failures.