
In today’s fast-paced world, staying connected is essential. Mobile phones have become our lifelines, enabling us to communicate, work, and entertain ourselves on the go. However, the one common challenge we face is running out of battery power when we need it the most. That’s where portable phone chargers come to the rescue. These handy devices allow us to charge our smartphones anytime, anywhere, ensuring that we never miss an important call, text, or email.
While there are many portable chargers available in the market, you can also make your own using batteries. In this article, we will guide you through the process of creating your own portable phone charger with batteries. Not only will this save you money, but it will also give you the freedom to charge your phone even in the absence of electricity. So let’s dive in and discover how to create a portable phone charger that will keep you connected no matter where you are.
Inside This Article
- Materials Needed
- Step 1: Gather the necessary equipment
- Step 2: Prepare the batteries
- Step 3: Connect the batteries to the power bank
- Step 4: Test the portable phone charger
- Conclusion
- FAQs
Materials Needed
Before you begin making your own portable phone charger with batteries, you’ll need to gather a few essential materials. Here’s a list of what you’ll need:
- Power bank: Choose a power bank with a sufficient capacity to charge your phone. Look for one that can accommodate multiple batteries.
- AA batteries: You will need a set of AA batteries to power your portable charger. Make sure they are fully charged.
- Battery holder: Select a battery holder that can hold the number of batteries you plan to use. It should also be compatible with your power bank.
- USB cable: You’ll need a USB cable with a micro-USB or USB-C connector, depending on the type of phone you have. Ensure it is in good condition.
- Electrical tape: Electrical tape will be used to secure the connections and protect the wires from damage.
- Wire cutter/stripper: You may need a wire cutter/stripper to trim and strip the wires for proper connections.
- Soldering iron (optional): If you have experience with soldering, a soldering iron can help create more secure connections between the wires.
Make sure you have all these materials ready before you proceed with creating your portable phone charger. With everything in hand, you’ll be well-equipped to begin the process.
Step 1: Gather the necessary equipment
In order to make a portable phone charger with batteries, you’ll need a few key pieces of equipment. Here’s a list of what you’ll need:
- A power bank or portable charger
- Batteries (preferably rechargeable)
- Battery holder or battery case
- USB cable
- Electrical tape or soldering equipment
- A small screwdriver
These items are essential for the DIY portable phone charger project. The power bank or portable charger will serve as the main component that stores and distributes the power to charge your phone. The batteries, battery holder or case, and USB cable will allow you to connect the power bank to your phone.
It’s important to choose batteries that are compatible with your power bank and have sufficient capacity to charge your phone. Rechargeable batteries are ideal since they can be used multiple times and are more sustainable in the long run.
The battery holder or case will securely hold the batteries in place, ensuring a stable power supply. The USB cable will act as the connection between the power bank and your phone.
Additionally, you may need electrical tape or soldering equipment to properly connect the battery holder or case to the power bank, depending on the specific design of your DIY portable charger.
A small screwdriver may also be required to open the battery compartment of the power bank or to secure the connections when assembling the charger.
Once you have gathered all the necessary equipment, you can move on to the next step of making your portable phone charger with batteries.
Step 2: Prepare the batteries
Preparing the batteries is a crucial step in making a portable phone charger. It ensures that the batteries are safe to use and can provide sufficient power to charge your phone. Follow these steps to prepare the batteries:
1. Choose the right batteries: Select batteries that are suitable for your portable phone charger. It is recommended to use rechargeable lithium-ion batteries with a high capacity. These types of batteries provide longer-lasting power and can be recharged multiple times.
2. Check the battery condition: Before using the batteries, inspect them for any signs of damage or leakage. Avoid using batteries that are dented, bulging, or showing any other visible defects. Using damaged batteries can pose a safety risk and may damage your phone or the charger.
3. Charge the batteries (if necessary): If your batteries are not fully charged, you will need to charge them before using them for the portable phone charger. Follow the manufacturer’s instructions for charging the batteries. It is recommended to use a dedicated battery charger rather than charging them inside the portable phone charger.
4. Determine the battery configuration: Depending on the design of your portable phone charger, you may need to arrange the batteries in a specific configuration. This could be series or parallel connection. Check the instruction manual or the specifications of your charger to determine the correct configuration.
5. Ensure proper polarity: When placing the batteries in the charger, make sure to pay attention to the polarity. Most batteries have clearly labeled positive (+) and negative (-) terminals. Align the batteries according to the indicated polarity to avoid damaging the charger or the batteries.
6. Secure the batteries: Once you have placed the batteries in the correct configuration and ensured proper polarity, secure them in the designated battery slots or compartments of your portable phone charger. This will prevent the batteries from moving or disconnecting during use.
7. Insulate the battery connections: Using electrical tape or insulation material, cover the exposed battery connections to prevent short circuits or accidental contact with other metal objects. This step adds an extra layer of safety to your homemade portable phone charger.
By properly preparing the batteries, you can ensure the efficiency and safety of your portable phone charger. Once you have completed this step, you are ready to move on to the next phase of connecting the batteries to the power bank.
Step 3: Connect the batteries to the power bank
Now that you have prepared the batteries, it’s time to connect them to the power bank. Follow these simple steps to create your own portable phone charger:
- Identify the positive and negative terminals: The first step is to identify the positive (+) and negative (-) terminals on both the batteries and the power bank. Typically, the positive terminal is marked with a “+,” while the negative terminal is marked with a “-.”
- Connect the batteries in series: Take the positive terminal of one battery and connect it to the negative terminal of the other battery. This creates a series connection, effectively doubling the voltage of the overall battery pack.
- Attach the batteries to the power bank: Once the batteries are connected in series, you can proceed to connect them to the power bank. Locate the charging input port on your power bank, which is usually a USB port labeled “input” or “charge.” Insert the USB cable into this port.
- Connect the batteries to the power bank: Take the other end of the USB cable and cut it, exposing the internal wires. Strip the insulation from the wires to reveal the positive (red) and negative (black) wires.
- Solder the wires to the battery terminals: Carefully solder the positive (red) wire to the positive terminal of the battery pack and the negative (black) wire to the negative terminal. Make sure the connections are secure and insulated properly to avoid any short circuits.
- Secure the connections: To ensure the connections are sturdy and won’t come loose, you can use electrical tape or heat shrink tubing to cover and protect the soldered joints.
Once you have completed these steps, you have successfully connected the batteries to the power bank, creating your very own portable phone charger. It’s important to note that handling batteries and soldering requires caution and expertise. If you are unfamiliar with these processes, it is recommended to seek assistance from someone with experience or consider purchasing a pre-made portable phone charger.
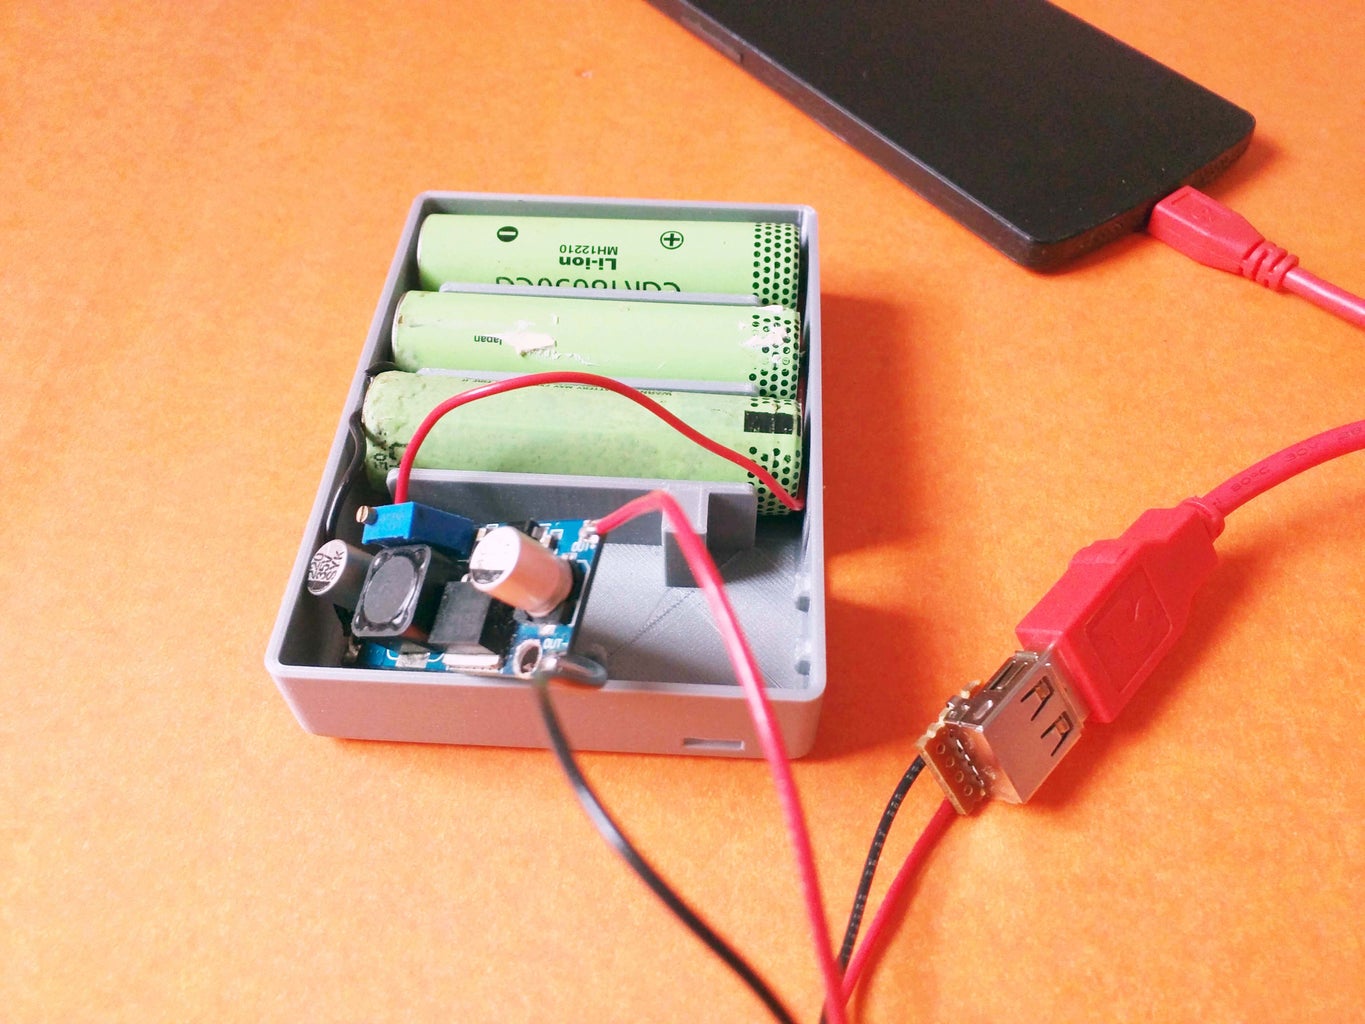
Step 4: Test the portable phone charger
Once you have successfully connected the batteries to the power bank, it’s time to test your homemade portable phone charger. Testing the charger will ensure that it is functioning correctly and can provide a reliable power source for your mobile devices.
Here is a step-by-step guide on how to test your portable phone charger:
- Connect your device: Begin by connecting your smartphone or any other mobile device to the USB port of the power bank. Use the appropriate charging cable for your device.
- Check for device recognition: Upon connecting your device, check if it is recognized by the power bank. A notification or indication light on the power bank might confirm the connection.
- Monitor the battery level: Keep an eye on your device’s battery level as you charge it with the portable phone charger. Ideally, the battery level should start increasing gradually over time.
- Observe the charging speed: Take note of the charging speed of your device. If it is charging at a similar rate as a wall charger would, it indicates that your portable charger is functioning properly.
- Ensure stable charging: While your device is charging, make sure there are no interruptions or fluctuations in the charging process. The power bank should consistently provide a stable power output.
- Verify device functionality: After a sufficient charging time, disconnect your device from the portable phone charger and check if it is functioning normally. Ensure that all the features and functions are working as expected.
Testing your portable phone charger is an essential step to ensure its reliability and safety. It gives you the confidence to rely on it as a backup power source in various situations such as emergencies or when you’re on the go.
If you encounter any issues during the testing phase, double-check all your connections and make sure the batteries are properly connected. It’s also a good idea to consult the user manual or seek assistance from an experienced individual if needed.
Once you are satisfied with the performance of your portable phone charger, you can confidently rely on it to keep your mobile devices powered up whenever you need them.
Conclusion
Creating a portable phone charger with batteries is a simple and cost-effective solution for keeping your devices powered on the go. By following the steps outlined in this article, you can transform ordinary batteries into a reliable power source for your mobile phone. Whether you’re traveling, camping, or experiencing a power outage, having a portable charger can provide peace of mind and keep you connected.
Remember to always prioritize safety when working with batteries and follow the instructions carefully. Using rechargeable batteries can be more sustainable and cost-efficient in the long run. Additionally, consider investing in a dedicated portable phone charger for even more convenience and efficiency.
Now that you have the knowledge and skills, go ahead and create your own portable phone charger with batteries. Stay powered up and connected wherever you go!
FAQs
Q: Can I make a portable phone charger with regular batteries?
A: Yes, it is possible to make a portable phone charger using regular batteries. However, it is important to note that the charging process may be slower and less efficient compared to using specialized power banks or portable chargers.
Q: What type of batteries should I use?
A: It is recommended to use rechargeable lithium-ion or nickel-metal hydride (NiMH) batteries for making a portable phone charger. These batteries have a higher capacity and can provide more power for charging your mobile devices.
Q: How many batteries do I need to make a portable phone charger?
A: The number of batteries you need depends on the capacity and voltage required to charge your phone. Generally, you would need multiple batteries connected in series or parallel to achieve the desired output. It is advisable to research the power requirements of your specific phone model before proceeding.
Q: How do I connect the batteries to create a portable phone charger?
A: To create a portable phone charger, you would need to connect the batteries in a way that provides the required voltage and current output. This can be done using a battery holder or by soldering wires to the terminals of each battery. It is important to follow proper safety precautions and consult a guide or tutorial for detailed instructions.
Q: Can I charge my phone directly from the batteries?
A: No, it is not recommended to charge your phone directly from the batteries. To ensure safe and efficient charging, you would need to incorporate a voltage regulator and other circuitry to control the power output. It is best to use a charging module or USB power bank circuit to regulate the voltage and current before connecting your phone.