
Are you looking to protect your precious mobile phone screen from scratches and cracks? Look no further! In this article, we will guide you on how to put tempered glass on your phone for maximum protection. Tempered glass is a thin but strong layer of glass that acts as a barrier between your phone’s screen and potential damage. By following our step-by-step instructions, you can easily apply tempered glass to your phone without any hassle. Say goodbye to unsightly scratches and hello to a crystal-clear screen that is shielded from everyday wear and tear. So, let’s dive in and learn how to keep your phone display safe and sound.
Inside This Article
- Necessary Supplies
- Preparing the phone
- Applying the tempered glass
- Additional tips for best results
- Conclusion
- FAQs
Necessary Supplies
When it comes to applying tempered glass on your phone, having the right supplies on hand is crucial to ensure a smooth and successful installation. Here are the necessary supplies you will need:
- Tempered Glass: Make sure to choose a high-quality tempered glass screen protector specifically designed for your phone model. It should offer excellent clarity and protection.
- Microfiber Cloth: A microfiber cloth is essential for cleaning your phone’s screen before applying the tempered glass. It effectively removes dust, fingerprints, and smudges without scratching the surface.
- Dust Removal Sticker: This sticky adhesive strip helps in removing any lingering dust particles from the screen before placing the tempered glass. It ensures a clean and bubble-free installation.
- Alcohol Wipes: Alcohol wipes are useful for disinfecting the phone’s screen before installing the tempered glass. They help remove any oils or residue that may affect the adhesion of the protector.
- Tape: Transparent tape can be helpful in two ways. Firstly, it can be used to lift any remaining dust particles from the screen. Secondly, it can be used as a guide to align the tempered glass properly.
- Dry Cloth: Having a dry cloth on hand will allow you to remove any excess adhesive or fingerprints that may appear during the application process.
- Clear Plastic Card: A clear plastic card, such as a credit card or an ID card, will come in handy for smoothing out any air bubbles and ensuring proper adhesion of the tempered glass.
By gathering these necessary supplies before you begin, you can make sure that you have everything you need to complete the tempered glass installation without any interruptions or compromises on quality.
Preparing the phone
Before applying tempered glass on your phone, it is important to properly prepare the device. This will ensure that the tempered glass sticks securely and provides maximum protection for your screen. Follow these steps to prepare your phone:
1. Clean the screen: Start by cleaning the screen of your phone thoroughly. Use a microfiber cloth or a soft, lint-free cloth to wipe away any fingerprints, dust, or smudges. Make sure to remove any particles or residue that may interfere with the adhesion of the tempered glass.
2. Use a cleaning solution: If there are stubborn stains or marks on the screen, you can use a small amount of a mild cleaning solution. Mix equal parts of distilled water and isopropyl alcohol in a spray bottle. Spray a little of the solution onto the cloth and gently clean the screen. Avoid spraying directly onto the phone to prevent any liquid damage.
3. Remove any existing screen protectors: If you have a previous screen protector on your phone, remove it carefully. Peel it off slowly to avoid any damage to the screen. Clean any residue left behind using the cleaning solution and cloth.
4. Check for any damages: Inspect your phone screen for any cracks, scratches, or damages. It is crucial to have a smooth and intact surface before applying the tempered glass. If you notice any significant damage, consider getting the screen repaired before proceeding.
5. Power off the device: Before applying the tempered glass, it is recommended to power off the phone. This will prevent any accidental touches or movements while applying the glass, ensuring a perfect placement.
By carefully following these steps, you will ensure that your phone is well-prepared for the application of the tempered glass. This will result in a seamless and effective installation, providing optimal protection for your phone’s screen.
Applying the tempered glass
Now that you have gathered all the necessary supplies and prepared your phone, it’s time to apply the tempered glass. Follow these simple steps to ensure a smooth and successful installation:
Step 1: Start by cleaning the screen thoroughly. Use the microfiber cloth provided in the tempered glass kit or a lint-free cloth. Make sure to remove any smudges, dust, or fingerprints from the screen. A clean surface will help the tempered glass adhere properly.
Step 2: Once the screen is clean and dry, carefully peel off the protective film from the back of the tempered glass. Be gentle to avoid any damage or fingerprints on the adhesive side.
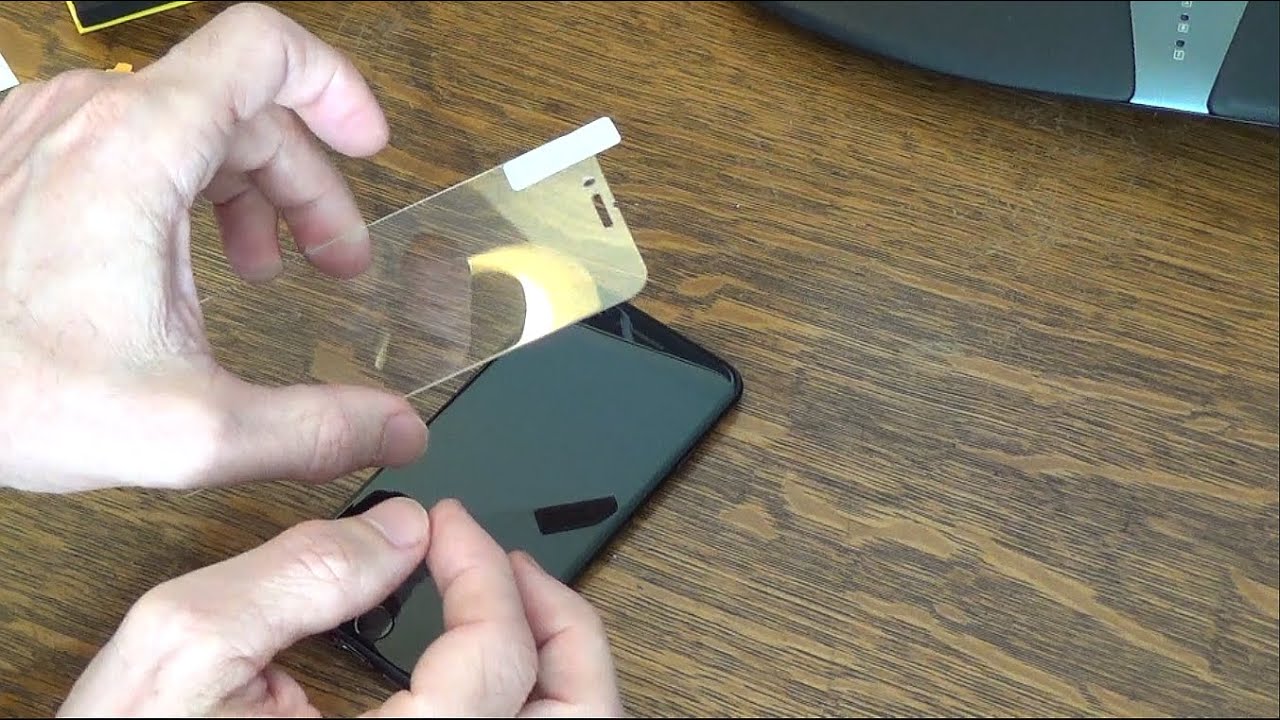
Step 3: Align the tempered glass with the screen. Pay close attention to the edges, buttons, and front-facing camera cutouts. Most tempered glasses come with alignment guides or notches to help you position it correctly. Take your time to ensure perfect alignment.
Step 4: Once aligned, gently place the tempered glass onto the screen. Start from one end and slowly press it down, working your way to the other end. Use your fingers or a soft cloth to apply even pressure and remove any air bubbles trapped underneath.
Step 5: Take a moment to inspect the screen for any misalignment or bubbles. If you notice any issues, carefully lift the tempered glass from the screen and realign it. Alternatively, you can gently push the bubbles towards the edges using a smooth, flat object like a credit card or your fingertips.
Step 6: Once you are satisfied with the placement and removal of air bubbles, press firmly on the tempered glass to ensure a secure bond with the screen. Pay extra attention to the edges and corners, as they are more susceptible to lifting over time.
Step 7: Finally, use the microfiber cloth to wipe away any fingerprints or smudges on the tempered glass. This will ensure crystal-clear visibility and a polished look.
Remember, applying a tempered glass is a delicate process that requires patience and precision. Take your time, follow these steps carefully, and you’ll have a well-protected phone screen in no time.
Additional tips for best results
When it comes to applying tempered glass on your phone, following a few additional tips can help you achieve the best results. Here are some key considerations to keep in mind:
1. Clean the screen thoroughly: Before applying the tempered glass, make sure that your phone screen is free from dust, fingerprints, and any other debris. Use a microfiber cloth or screen cleaning solution to clean the surface effectively.
2. Align the glass accurately: Take your time to align the tempered glass properly with the screen. Start by matching the cutouts for the camera, speaker, and buttons. Once aligned, smooth it down from the center toward the edges using gentle pressure to avoid any air bubbles.
3. Use a dust removal sticker: Many tempered glass kits include a dust removal sticker or tape. Take advantage of this by using it to pick up any lingering dust particles or lint before applying the glass. This will help ensure a clean and smooth installation.
4. Apply gentle but firm pressure: To ensure proper adhesion, use your fingers or a clean cloth to press firmly on the tempered glass once it’s in place. Apply pressure evenly across the surface to minimize any gaps or bubbles that may occur during application.
5. Give it time to settle: Once the tempered glass is applied, give it some time to settle and adhere to the screen. Avoid using excessive force or touching the glass for at least 24 hours to allow for a secure bond.
6. Be cautious with phone cases: Depending on the thickness of the tempered glass, you may need to check if your phone case is compatible. Some cases may not fit properly or may put pressure on the edges of the glass, causing it to lift. Consider using a case specifically designed for use with tempered glass.
7. Regularly clean the tempered glass: To maintain optimum clarity and performance, regularly clean the tempered glass with a microfiber cloth. Avoid using abrasive cleaners or harsh chemicals as they can damage the glass.
By following these additional tips, you can ensure that your tempered glass is properly applied and provides the best protection for your phone’s screen. Remember, a well-applied tempered glass can help prevent scratches, cracks, and damage, extending the life of your device.
After reading this article, you now have a clear understanding of how to put tempered glass on your phone. Tempered glass is a great way to protect your phone’s screen from scratches, cracks, and other damage. By following the steps outlined in this guide, you can easily apply tempered glass to your phone without any hassle.
Remember to select the right size and type of tempered glass for your phone model, clean the screen thoroughly before installation, and carefully align and apply the tempered glass to avoid any air bubbles or misalignment. Taking these precautions will ensure that your phone’s screen remains durable and protected.
Now that you know how to put tempered glass on your phone, you can enjoy peace of mind, knowing that your screen is guarded against everyday wear and tear. So go ahead and give your phone the protection it deserves!
FAQs
1. What is tempered glass and why is it important for my phone?
2. How do I apply tempered glass to my phone?
3. Can tempered glass protect my phone from scratches and cracks?
4. Is it possible to remove tempered glass without damaging my phone?
5. How often do I need to replace tempered glass on my phone?