
Setting up Apple Pay on your iPhone is a convenient and secure way to make payments without the need for physical credit cards or cash. With Apple Pay, you can easily pay for purchases in stores, online, and within apps using just your iPhone and your fingerprint or Face ID for authentication.
Whether you’re new to Apple Pay or want to refresh your knowledge on the setup process, this comprehensive guide will walk you through the steps to set up Apple Pay on your iPhone in 2023. From adding your credit or debit cards to managing your payment preferences, we’ll cover everything you need to know to start using Apple Pay effortlessly. So, let’s dive in and explore the world of seamless mobile payments with Apple Pay.
Inside This Article
- Prerequisites for Setting Up Apple Pay
- Adding Credit or Debit Cards to Apple Pay
- Setting a Default Payment Card
- Using Apple Pay for In-Store and Online Payments
- Conclusion
- FAQs
Prerequisites for Setting Up Apple Pay
Before you can start using Apple Pay on your iPhone, there are a few prerequisites that you need to fulfill. These prerequisites ensure that you have a seamless and secure experience while making contactless payments using your device. Let’s take a look at the necessary requirements:
1. Compatible iPhone model: Apple Pay is supported on various iPhone models, including the iPhone 6s or later. Ensure that your device is compatible with Apple Pay by checking the specifications of your iPhone.
2. iOS version: Make sure that your iPhone is running on the latest version of iOS. Apple Pay functionality may vary depending on the iOS version, so it’s essential to keep your device updated to enjoy the latest features and enhancements.
3. iCloud account: To set up Apple Pay, you must have a valid iCloud account linked to your iPhone. If you haven’t already set up an iCloud account, you can easily create one from your device’s settings.
4. Supported bank or financial institution: Check whether your bank or financial institution supports Apple Pay. Many major banks and financial institutions worldwide have partnered with Apple to offer their customers the convenience of using Apple Pay. Visit your bank’s website or contact their customer support to verify if Apple Pay is available.
5. Valid credit or debit card: Before adding your cards to Apple Pay, ensure that they are eligible for contactless payments. Most major credit and debit cards can be added to Apple Pay, but it’s crucial to check with your card issuer to confirm its compatibility.
Once you have met these prerequisites, you are ready to proceed with setting up Apple Pay on your iPhone. This seamless payment method allows you to make purchases securely and conveniently, without the need for physical cards or cash.
Adding Credit or Debit Cards to Apple Pay
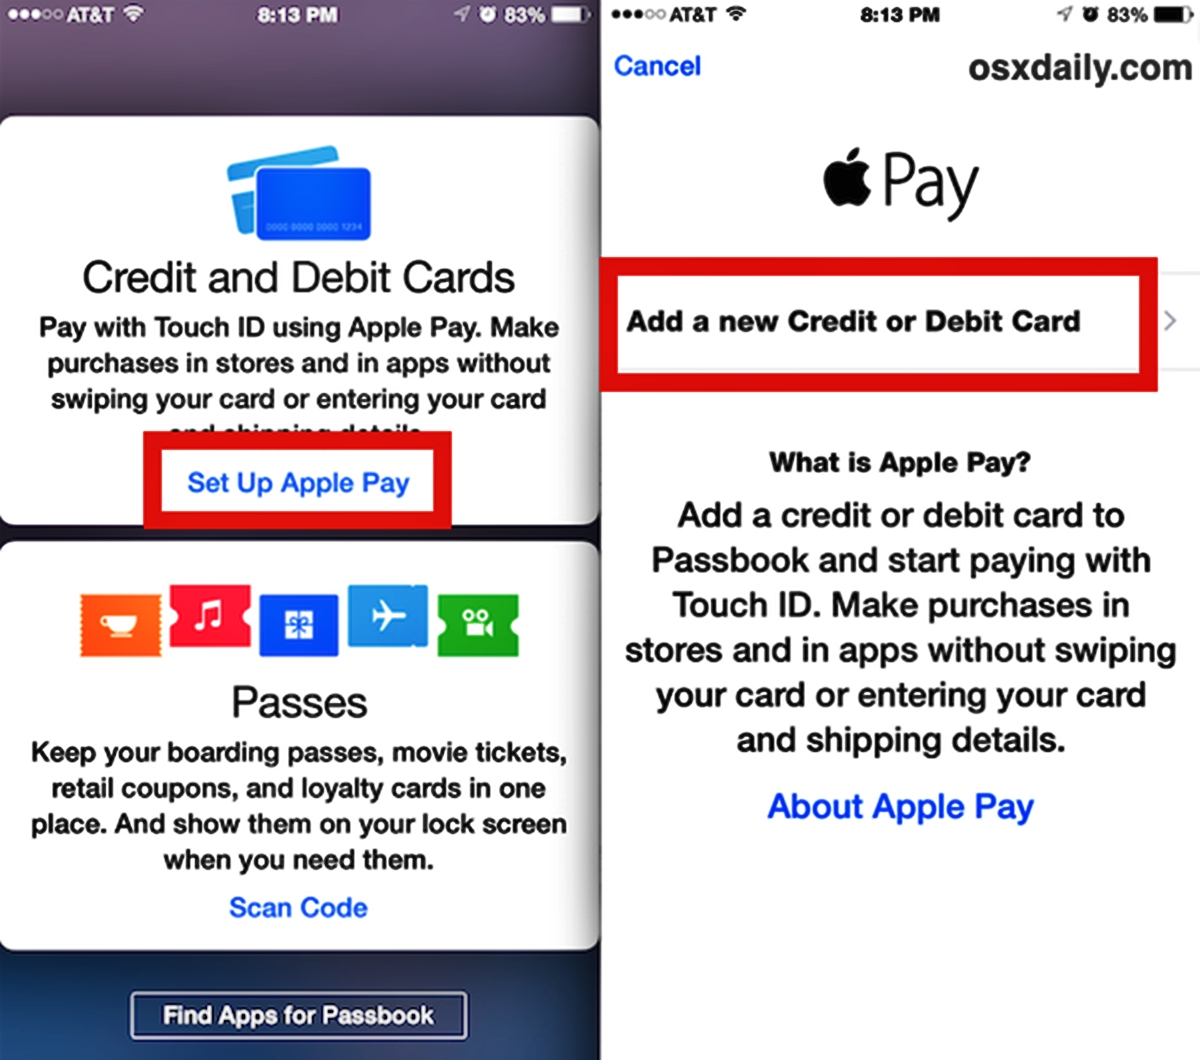
Once you have set up Apple Pay on your iPhone, the next step is to add your credit or debit cards to the Apple Wallet. Adding cards to Apple Pay is a straightforward process that can be done in just a few simple steps.
To begin, open the Wallet app on your iPhone. If you can’t find it, swipe down on your home screen and use the Spotlight search feature to locate it. Once you’re in the Wallet app, tap the “Add Card” button to get started.
At this point, you have two options for adding cards to Apple Pay: manual entry or scanning your card using your iPhone’s camera. Let’s explore both methods:
Manual Entry: If you choose manual entry, you’ll need to input your card details manually. Start by selecting the type of card you want to add, such as credit or debit. Next, enter the card number, expiration date, and security code found on the back of your card. Lastly, provide your card’s billing information, including your name, billing address, and phone number.
Camera Scanning: To use the camera scanning feature, simply tap the “Scan Card” button in the Wallet app. Align your card within the frame provided on the screen, and your iPhone will automatically detect and capture the card details. This convenient feature saves you from the hassle of manually typing in your card information.
After you’ve entered or scanned your card details, Apple Pay will ask you to verify your card. Depending on your card issuer, the verification process may vary. Some card issuers will require you to authenticate using a one-time password sent to your registered mobile number, while others may ask you to authorize the card within your banking app.
Once your card has been verified, it will be added to your Apple Wallet, and you’ll be able to use it for contactless payments, in-app purchases, and online transactions wherever Apple Pay is accepted. You can add multiple credit or debit cards to your Apple Wallet, making it even more convenient to manage your payment options.
Remember, the security of your cards is of utmost importance. Apple Pay utilizes multiple layers of security, including tokenization and device-specific unique numbers, to safeguard your card information. Rest assured that when you use Apple Pay, your card details are never shared with merchants or stored on Apple’s servers.
Adding credit or debit cards to Apple Pay is a seamless process that enhances the convenience and security of your transactions. With just a few taps, you can have your favorite cards ready to use on your iPhone. Say goodbye to carrying bulky wallets and hello to the ease of Apple Pay!
Setting a Default Payment Card
Once you have successfully added your credit or debit cards to Apple Pay, you can choose a default payment card for convenience. The default payment card is the card that will be automatically used for transactions unless you select a different card during checkout.
Setting a default payment card is straightforward. Follow the steps below:
- Open the Settings app on your iPhone.
- Scroll down and tap on “Wallet & Apple Pay”.
- Under the “Transaction Defaults” section, tap on “Default Card”.
- A list of your added cards will appear. Select the card that you want to set as the default.
Once you have chosen the default card, it will be indicated with a checkmark. You can always change the default card by repeating the above steps and selecting a different card.
Setting a default payment card is particularly useful for streamlining your payment process. Whether you’re making online purchases or using Apple Pay at physical stores, having a default card ensures a seamless and efficient transaction experience.
It’s important to note that the default card is specific to your iPhone. If you have multiple devices connected to your Apple Pay account, you may need to set a default card on each individual device.
By setting a default payment card, you can enjoy the convenience of contactless payments with a simple tap of your iPhone. Say goodbye to fumbling through wallets or purses to find the right card when you’re in a hurry!
Using Apple Pay for In-Store and Online Payments
Once you have set up Apple Pay on your iPhone, you can start using it for both in-store and online payments. Apple Pay offers a convenient and secure way to make transactions using your iPhone.
In-Store Payments:
To use Apple Pay for in-store payments, follow these steps:
- Look for the contactless payment symbol on the payment terminal.
- Hold your iPhone near the payment terminal.
- Use Face ID or Touch ID to authenticate the payment.
- The transaction will be completed, and a confirmation will appear on your iPhone’s screen.
It’s important to note that not all stores accept Apple Pay, so make sure to look for the contactless payment symbol before attempting to use it.
Online Payments:
Apple Pay can also be used for online payments, making the checkout process quicker and more secure. To use Apple Pay for online payments, follow these steps:
- When checking out on a website or app, select Apple Pay as the payment method.
- Review your shipping and billing information.
- Use Face ID or Touch ID to authenticate the payment on your iPhone.
- Your payment will be processed, and the order will be confirmed.
Apple Pay for online payments eliminates the need to manually enter your payment information, reducing the risk of data breaches and making the checkout process faster and more convenient.
Keep in mind that not all websites and apps support Apple Pay. However, the popularity of Apple Pay is steadily growing, and more businesses are adopting it as a payment option.
Using Apple Pay for both in-store and online payments provides a seamless and secure experience, allowing you to leave your wallet behind and rely on your iPhone for all your payment needs.
Conclusion
Setting up Apple Pay on your iPhone is a convenient and secure way to make payments on the go. With just a few simple steps, you can link your credit or debit cards to your Apple Wallet and start using Apple Pay to make purchases at supported retailers, in apps, and online.
By utilizing the power of NFC technology, Apple Pay provides a seamless and contactless payment experience. It eliminates the need to carry physical cards and provides an added layer of security with biometric authentication.
Remember to keep your iPhone and Apple Wallet protected with a strong passcode or Face ID/Touch ID to prevent unauthorized access to your payment information. Additionally, regularly monitor your transactions and report any suspicious activity to your card issuer or Apple immediately.
With Apple Pay, you can enjoy the convenience, security, and simplicity of making payments with just a tap of your iPhone. It’s time to embrace the future of mobile payments and experience the ease and peace of mind that comes with Apple Pay.
FAQs
Q: How do I set up Apple Pay on my iPhone?
To set up Apple Pay on your iPhone, follow these steps:
- Open the Wallet app on your iPhone.
- Tap the “+” (plus) sign to add a card.
- Choose “Add a Credit or Debit Card.”
- Position your card within the frame or enter the card details manually.
- Verify your card by following the provided instructions.
- Once your card is verified, you can start using Apple Pay.
Q: Can I use Apple Pay without an iPhone?
Yes, Apple Pay can be used on other Apple devices as well. It is available on Apple Watch, Mac, and iPad. On these devices, you can set up Apple Pay using the respective settings app or the Wallet app, depending on the device.
Q: Is Apple Pay safe to use?
Yes, Apple Pay is considered to be a secure payment method. It utilizes multiple layers of security, including tokenization, encryption, and biometric authentication (such as Touch ID or Face ID) to protect your payment information. Additionally, Apple does not store your card details on its servers.
Q: Can I use Apple Pay for online purchases?
Yes, Apple Pay can be used for online purchases. Many websites and apps support Apple Pay as a payment option. When making a purchase, simply choose Apple Pay at the checkout and authenticate using Touch ID, Face ID, or your passcode to complete the transaction.
Q: Are there any transaction limits when using Apple Pay?
The transaction limits for Apple Pay may vary depending on the country, bank, and merchant. In many cases, there are no specific limits for using Apple Pay, and you can make payments up to the limits set by your card issuer. It is advisable to check with your bank or card issuer for any specific transaction limits associated with Apple Pay.