
Are you ready to take control of your diabetes management? The Dexcom G6 is a revolutionary device that allows you to monitor your glucose levels using your mobile phone. With its easy-to-use setup, you can quickly start tracking your blood sugar levels and gain valuable insights to help you make informed decisions about your health.
In this article, we will guide you through the step-by-step process of setting up the Dexcom G6 on your phone. Whether you’re a newbie to continuous glucose monitoring or a Dexcom veteran, we’ve got you covered. By the end of this article, you’ll be equipped with the knowledge and confidence to get started with the Dexcom G6 and take control of your diabetes management like never before.
Inside This Article
- Compatibility and Requirements
- Step 1: Downloading the Dexcom G6 Mobile App
- Step 2: Creating a Dexcom Account
- Step 3: Pairing the Dexcom G6 Sensor and Transmitter
- Step 4: Setting Up Alerts and Notifications
- Step 5: Calibrating the Dexcom G6 Sensor (if required)
- Troubleshooting Tips
- Frequently Asked Questions
- Resources and Support
- Conclusion
- FAQs
Compatibility and Requirements
To set up the Dexcom G6 on your phone, it’s important to ensure compatibility and meet the necessary requirements. The Dexcom G6 system is compatible with a wide range of smartphones, both iOS and Android devices. However, it’s essential to check if your specific phone model meets the requirements for a seamless setup process. Below are the compatibility and requirements for setting up Dexcom G6 on your phone:
- Operating System: Your phone should be running on iOS 12.0 or later for iPhones or Android 6.0 or later for Android devices.
- Bluetooth: Ensure that your phone has Bluetooth capability, as it is required for the Dexcom G6 transmitter to communicate with the Dexcom G6 app.
- Internet Connectivity: A stable internet connection is necessary for the Dexcom G6 app to sync and update data in real-time.
- Memory Space: Make sure your phone has sufficient available memory to download and run the Dexcom G6 app.
- Display: A clear and well-functioning display will enhance your experience when using the Dexcom G6 app on your phone.
Before proceeding with the setup process, double-check if your phone meets these compatibility and requirements. Ensuring that your phone aligns with these specifications will help you have a smooth and hassle-free experience with the Dexcom G6 system.
Step 1: Downloading the Dexcom G6 Mobile App
The first step in setting up the Dexcom G6 on your phone is to download the Dexcom G6 Mobile App. This app is available for both iOS and Android devices and can be easily found in their respective app stores.
Here’s a step-by-step guide to help you download the app:
- Open the App Store on your iPhone or the Play Store on your Android device.
- Type “Dexcom G6” in the search bar and tap the search button.
- Look for the official Dexcom G6 Mobile App by Dexcom, Inc.
- Tap the app icon to open its download page.
- Click on the “Download” or “Install” button to begin the download process.
- Once the app is downloaded, tap on it to open and start the setup.
Note: Before downloading the app, make sure you have a stable internet connection to avoid any interruptions during the download process.
After successful installation, you’re now ready to move on to the next step: creating a Dexcom account.
Step 2: Creating a Dexcom Account
Creating a Dexcom account is an essential step in setting up the Dexcom G6 on your phone. The Dexcom account allows you to sync your data, receive alerts and notifications, and access additional features of the Dexcom G6 Mobile App.
To create a Dexcom account, follow these steps:
- Open the Dexcom G6 Mobile App on your phone.
- Tap on the “New to Dexcom? Create Account” option.
- Enter your personal information, including your name, email address, and desired password.
- Read and accept the Terms of Use and Privacy Policy.
- Complete the registration process by following the on-screen instructions.
By creating a Dexcom account, you gain access to Dexcom CLARITY, a valuable tool that provides comprehensive reports and insights about your glucose levels, trends, and patterns. Dexcom CLARITY helps you make informed decisions about your diabetes management.
Remember to keep your Dexcom account credentials secure and never share them with anyone. Your Dexcom account contains sensitive personal health information, and it’s crucial to protect it.
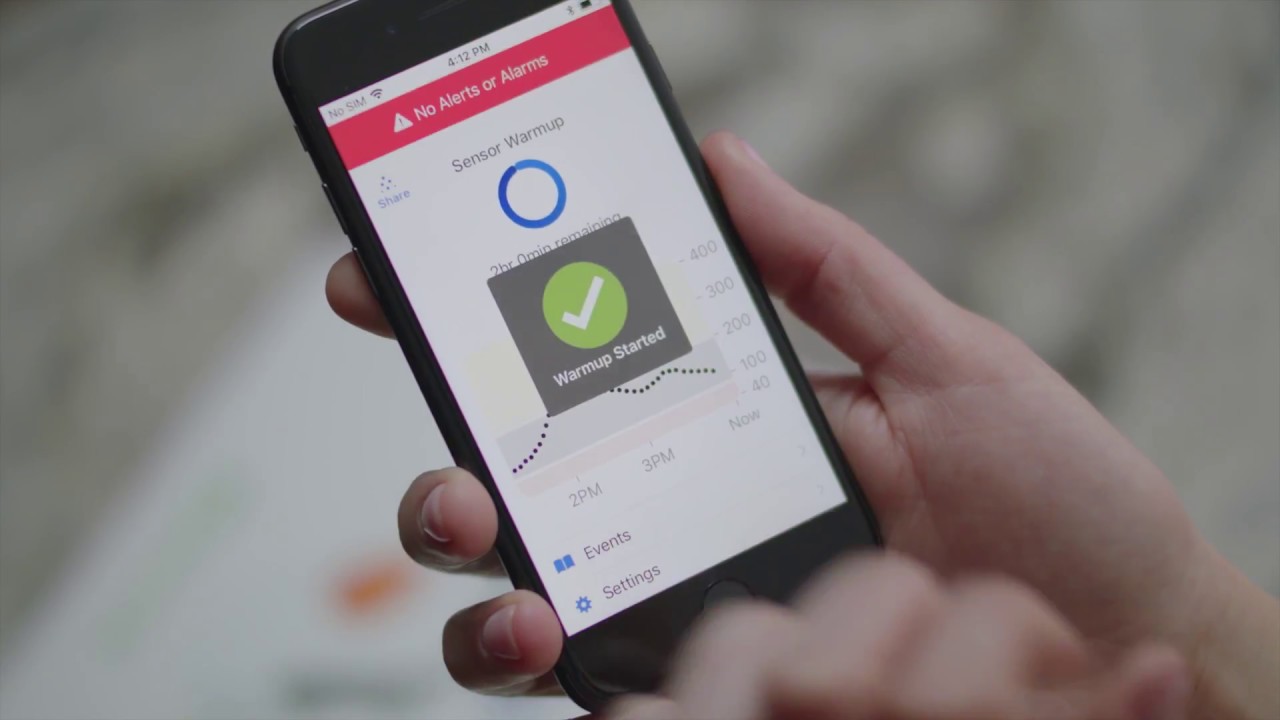
Step 3: Pairing the Dexcom G6 Sensor and Transmitter
Once you have successfully downloaded the Dexcom G6 Mobile App and created your Dexcom account, the next step is to pair the Dexcom G6 Sensor and Transmitter with your phone. This allows the app to receive real-time glucose readings from the sensor, providing you with valuable information about your glucose levels.
To begin the pairing process, ensure that your Dexcom G6 Sensor is inserted properly and the Transmitter is securely attached. Make sure both devices are within close proximity to your mobile phone.
Follow these steps to pair the Dexcom G6 Sensor and Transmitter:
- Open the Dexcom G6 Mobile App on your phone.
- Tap on the menu icon in the top left corner of the screen to open the app menu.
- Select the “Pair New Device” option from the menu.
- Choose the “Sensor” option to initiate the pairing process.
- Follow the app prompts to scan the unique barcode on the sensor packaging.
- Next, carefully remove the transmitter from the sensor and press and hold the button on the transmitter until the LED light starts flashing.
- Place the transmitter close to your phone and wait for the app to detect and pair with the transmitter.
- Once the pairing is successful, you will receive a confirmation message on the app.
It is essential to ensure that the Dexcom G6 Sensor and Transmitter are properly paired for accurate and reliable glucose readings on your phone. If you encounter any issues during the pairing process, consult the troubleshooting section or reach out to the Dexcom support team for assistance.
Step 4: Setting Up Alerts and Notifications
Once you have successfully paired the Dexcom G6 sensor and transmitter with your phone, it’s time to set up alerts and notifications. These features are extremely useful as they enable you to monitor your glucose levels and receive timely notifications if there are any abnormal changes.
To get started, open the Dexcom G6 mobile app on your phone, and navigate to the settings menu. Look for the “Alerts” or “Notifications” option and tap on it to access the settings for configuring alerts.
Within the alerts menu, you will find various options to customize how and when you receive alerts. Some of the key alerts you can set up include:
- Low Glucose Alert: This alert will notify you when your glucose levels are below a certain threshold. You can choose the specific value for the low glucose alert and customize the alarm sound.
- High Glucose Alert: Similar to the low glucose alert, this alert will notify you when your glucose levels are above a certain threshold. Again, you can set the desired high glucose value and select an alarm sound.
- Urgent Low Soon Alert: This alert is particularly useful if your glucose levels are dropping rapidly. It notifies you when your glucose levels are predicted to reach a critically low level within a specified timeframe.
- Delayed Sensor Alert: The delayed sensor alert reminds you to replace your sensor when it is nearing the end of its lifespan. It helps ensure that you always have accurate glucose readings by prompting you to change the sensor in a timely manner.
- Custom Alerts: Dexcom G6 also allows you to create custom alerts based on your specific needs. For instance, you can set up an alert to remind you to take medication or to log your food intake.
Once you have configured the alerts based on your preferences, make sure to save the settings. You can also choose to enable vibration alerts in addition to the audible alerts. This offers discreet notifications when you’re in a meeting or a public setting.
It is important to note that setting up alerts and notifications may vary slightly depending on the specific mobile operating system you are using. Dexcom G6 is compatible with both Android and iOS devices, but there might be minor differences in the menu and settings layout.
By setting up alerts and notifications on your Dexcom G6, you can stay informed about your glucose levels throughout the day, helping you make necessary adjustments to your lifestyle and manage your diabetes more effectively.
Step 5: Calibrating the Dexcom G6 Sensor (if required)
Calibrating the Dexcom G6 sensor is an essential step to ensure accurate glucose readings. Calibration is typically required when you first start using the sensor and at least every 12 hours thereafter. Follow these steps to calibrate your Dexcom G6 sensor:
1. Before calibrating, ensure that your sensor has been inserted properly and has been running for at least two hours. This allows the sensor to stabilize and provide consistent readings.
2. Wash your hands thoroughly with soap and water to remove any residue that could affect the accuracy of the calibration.
3. Check your glucose levels using a standard glucose meter. Ensure that the reading is stable and reliable.
4. Open the Dexcom G6 mobile app on your phone and navigate to the calibration menu.
5. Enter the glucose value from your standard glucose meter into the app’s calibration screen. Make sure to type the value accurately to ensure precise calibration.
6. The app will process the calibration value and update the sensor’s calibration data. Wait for a few minutes for the calibration to take effect.
7. After calibration, the Dexcom G6 sensor will use the entered glucose value to improve the accuracy of the continuous glucose readings.
8. Repeat the calibration process every 12 hours, or as recommended by your healthcare provider.
It is important to note that calibrating the Dexcom G6 sensor is not required for everyone. Some users may not need to calibrate the sensor, as it has advanced algorithms that can provide accurate readings without calibration. However, if you are uncertain, it is always best to consult with your healthcare provider for personalized guidance.
Troubleshooting Tips
Despite its advanced technology, you may encounter some issues when setting up the Dexcom G6 on your phone. Here are some troubleshooting tips to help you overcome common challenges:
1. No Sensor Detected: If your phone is unable to detect the Dexcom G6 sensor, ensure that the sensor and transmitter are properly connected and positioned. Try repositioning the sensor or replacing the transmitter battery if necessary.
2. Poor Signal Strength: If you’re experiencing weak signal strength, try moving closer to your phone or ensuring that there are no obstructions between the sensor and the phone. Signal interference can occur due to walls, metal objects, or electromagnetic interference.
3. Inaccurate Readings: If you notice inaccurate glucose readings, check that the sensor is securely applied and has not loosened. Make sure to follow the correct insertion process and avoid applying the sensor in areas prone to movement or compression.
4. Bluetooth Connectivity Issues: If you’re unable to establish a Bluetooth connection between your phone and the Dexcom G6 sensor, try turning off Bluetooth on your phone and turning it back on. Additionally, make sure that the sensor is within the Bluetooth range of your phone.
5. App Crashing: In case the Dexcom G6 app crashes or becomes unresponsive, try closing the app and reopening it. If the issue persists, consider reinstalling the app and ensuring that you have the latest version installed on your phone.
6. Excessive Sensor Error Messages: If you’re receiving frequent sensor error messages, check that the sensor and transmitter are not expired. If they have expired, replace them with new ones. If the issue persists, contact Dexcom customer support for further assistance.
Remember, troubleshooting is a part of the process, and with a little patience and persistence, you can resolve most issues encountered during the setup of your Dexcom G6 on your phone.
Frequently Asked Questions
Here are some commonly asked questions about setting up Dexcom G6 on your phone:
1. Can I use my phone to set up Dexcom G6?
Yes, Dexcom G6 can be set up on compatible smartphones. Make sure to check the compatibility and requirements discussed earlier in the article to ensure your phone is compatible.
2. Do I need to download the Dexcom G6 Mobile App?
Yes, you need to download the Dexcom G6 Mobile App from the app store on your phone. This app is vital for setting up and monitoring your Dexcom G6 system.
3. How do I create a Dexcom account?
To create a Dexcom account, open the Dexcom G6 Mobile App and follow the guided setup process. You will be prompted to provide information and create a username and password for your account.
4. How do I pair the Dexcom G6 sensor and transmitter?
Once you have setup your Dexcom account, you can pair the Dexcom G6 sensor and transmitter by following the on-screen instructions provided in the app. The process involves scanning the QR code on the sensor packaging.
5. How can I customize alerts and notifications?
The Dexcom G6 Mobile App allows you to customize alerts and notifications according to your preferences. You can choose the types of alerts you want to receive, such as high or low glucose values, and set the threshold levels that trigger these notifications.
6. Do I need to calibrate the Dexcom G6 sensor?
Most of the time, the Dexcom G6 sensor does not require calibration. However, there may be occasions where the app prompts you to calibrate if it detects inaccurate readings. Follow the instructions provided in the app when calibration is needed.
7. What are some troubleshooting tips for the Dexcom G6 system?
If you encounter any issues with the Dexcom G6 system setup, try the following troubleshooting tips:
- Ensure your phone’s Bluetooth is turned on and is in close proximity to the transmitter.
- Make sure the sensor and transmitter are properly attached.
- Restart the app and try reconnecting the system.
- If the problem persists, refer to the Dexcom G6 user manual or contact Dexcom customer support for assistance.
8. Where can I find additional resources and support for Dexcom G6?
If you need further assistance or information about Dexcom G6, you can visit the official Dexcom website, access their user manuals and instructional videos, join online communities, or contact Dexcom’s customer support directly.
Remember, the Dexcom G6 system can significantly improve your diabetes management by providing real-time glucose data on your smartphone. If you have any concerns or questions, don’t hesitate to seek support and guidance from Dexcom and healthcare professionals.
Resources and Support
When it comes to setting up the Dexcom G6 on your phone, it’s natural to have questions or encounter issues along the way. Luckily, Dexcom provides a range of resources and support options to help you navigate through any challenges you may face. Here are some valuable resources to aid you in the process:
1. Dexcom Support Center: The Dexcom Support Center is an online hub where you can access a wealth of information about the Dexcom G6 system. You’ll find user guides, instructional videos, troubleshooting tips, and frequently asked questions. This resource is a valuable first stop if you have any questions about the setup process.
2. Dexcom Community: The Dexcom Community is an online forum where you can connect with other Dexcom users to share experiences, ask questions, and find support. It’s a great platform to interact with a community of individuals who have firsthand knowledge of using the Dexcom G6 on their phones. You may find answers to your questions or even gain valuable insights from others in the community.
3. Dexcom Customer Support: If you’re still facing issues and can’t find the answers you need in the Support Center or Community, you can reach out to Dexcom’s customer support team. They are available to assist you in resolving any technical problems or providing guidance through the setup process. You can contact them via phone or email, and their dedicated support staff will ensure you receive the assistance you need.
4. Healthcare Provider: Your healthcare provider can also be a valuable resource when setting up the Dexcom G6 on your phone. They have the knowledge and expertise to guide you through the setup process and address any concerns or questions you may have. Don’t hesitate to reach out to your healthcare provider for their support and advice.
By taking advantage of these resources and support options, you can ensure a smooth and successful setup of the Dexcom G6 on your phone. Remember, you’re not alone in this process, and support is available every step of the way.
Conclusion
Setting up the Dexcom G6 on your phone is a convenient and user-friendly process that allows you to easily monitor your glucose levels on the go. With just a few simple steps, you can connect your Dexcom G6 sensor to your smartphone, enabling real-time tracking and personalized alerts.
By utilizing the Dexcom G6 app, you gain access to a wealth of information about your glucose patterns, trends, and insights, empowering you to make informed decisions regarding your diabetes management. The seamless integration of the Dexcom G6 system with your phone creates a powerful tool that enhances your overall health and well-being.
With the ability to share your glucose data with loved ones or healthcare professionals, the Dexcom G6 promotes collaboration in your diabetes care and ensures that you are well-supported in your journey towards better health.
So, why wait? Take control of your diabetes management by setting up the Dexcom G6 on your phone today and experience the benefits of real-time glucose monitoring right at your fingertips.
FAQs
1. How do I set up Dexcom G6 on my phone?
Setting up Dexcom G6 on your phone is a straightforward process. First, ensure that you have the compatible smartphone, such as an iPhone or Android device. Next, download the Dexcom G6 app from the App Store or Google Play Store. Once installed, open the app and follow the on-screen instructions to create an account and pair the app with your Dexcom G6 sensor. It may require entering the serial number of the sensor or scanning a QR code. Once the pairing is complete, you will be able to view your glucose levels on your phone.
2. Is the Dexcom G6 app available for both iPhone and Android?
Yes, the Dexcom G6 app is available for both iPhone and Android devices. You can download it from the App Store for iPhones or the Google Play Store for Android devices. Ensure that you have a compatible smartphone model and operating system version before downloading the app.
3. Can I receive alerts and notifications on my phone with Dexcom G6?
Absolutely! With Dexcom G6, you can receive customizable alerts and notifications directly on your phone. These alerts can include high or low glucose levels, sensor expiration, and even reminders to calibrate or change the sensor. You can configure the app’s settings to fit your specific needs and be alerted when necessary.
4. How accurate is Dexcom G6 on a smartphone?
Dexcom G6 is highly accurate when used with a compatible smartphone. The glucose readings displayed on your phone are similar to those shown on the Dexcom receiver or display device. However, it’s important to note that individual experiences may vary, and external factors like the placement of the sensor or signal interference may impact accuracy to some extent. Always consult with your healthcare professional for accurate interpretation of your glucose data.
5. Can I share my Dexcom G6 data with others via my phone?
Yes, Dexcom G6 allows for data sharing with others through your phone. The Dexcom Share feature enables you to share your glucose data with designated family members or friends who have the Dexcom Follow app installed on their smartphones. This can provide peace of mind for loved ones, as they can stay informed about your glucose levels and receive alerts when necessary.