
In the ever-evolving world of technology, Oppo has firmly established itself as a trusted and innovative brand in the realm of mobile phones. With its sleek designs, cutting-edge features, and exceptional performance, Oppo devices have gained a loyal following worldwide. But what happens when you upgrade to a new Oppo phone and need to transfer your important data from your old device? Fear not, as we are here to guide you through the process of seamlessly transferring your data from your old Oppo phone to the latest model, ensuring that you don’t lose a single precious file or contact. In this article, we will delve into the various methods and tools you can utilize to effortlessly transfer your data from Oppo to Oppo, making the transition to your new phone a hassle-free experience.
Inside This Article
- Setting up the Devices
- Using the Clone Phone App – Installing the Clone Phone app on both devices – Connecting the devices via Wi-Fi or QR code – Selecting data to transfer – Initiating the data transfer
- Using Google Account
- Using Bluetooth or Wi-Fi Direct
- Transferring Data through a Computer
- Using Cloud Storage Services
- Transferring SIM Card Contacts
- Importing and Exporting Contacts using VCF
- Conclusion
- FAQs
Setting up the Devices
When transferring data from one Oppo device to another, the first step is to set up the devices properly. This involves turning on the Oppo devices and configuring the basic settings.
To begin, make sure both Oppo devices are powered off. Then, press and hold the power button on each device to turn them on. Wait for the devices to boot up and reach the home screen.
Once the devices are turned on, it’s time to configure the basic settings. On the home screen, swipe down from the top to access the notification panel or, depending on the Oppo device model, swipe up from the bottom to access the app drawer.
In the notification panel, you’ll find various quick settings options. Tap on the gear icon or the “Settings” option to open the device settings.
Within the settings menu, you’ll find a plethora of options to customize your Oppo device. This includes options for Wi-Fi, mobile data, sound, display, privacy, and more. Take a moment to navigate through the settings and configure them according to your preferences.
Some key settings to pay attention to during the setup process include:
- Wi-Fi: Connect to a Wi-Fi network to enable faster data transfer during the data migration process.
- Accounts: Add and sync your Google account to ensure a smooth transfer of data, including contacts, calendar events, and emails.
- Security: Set up screen lock options, such as PIN, pattern, or fingerprint, to protect your data during the transfer.
- Backup & Restore: Enable automatic backup of data to ensure you have a recent backup before initiating the transfer.
Once you’ve configured the basic settings, you’re ready to proceed with the data transfer process. There are several methods you can use to transfer data from one Oppo device to another, and we’ll explore them in the following sections.
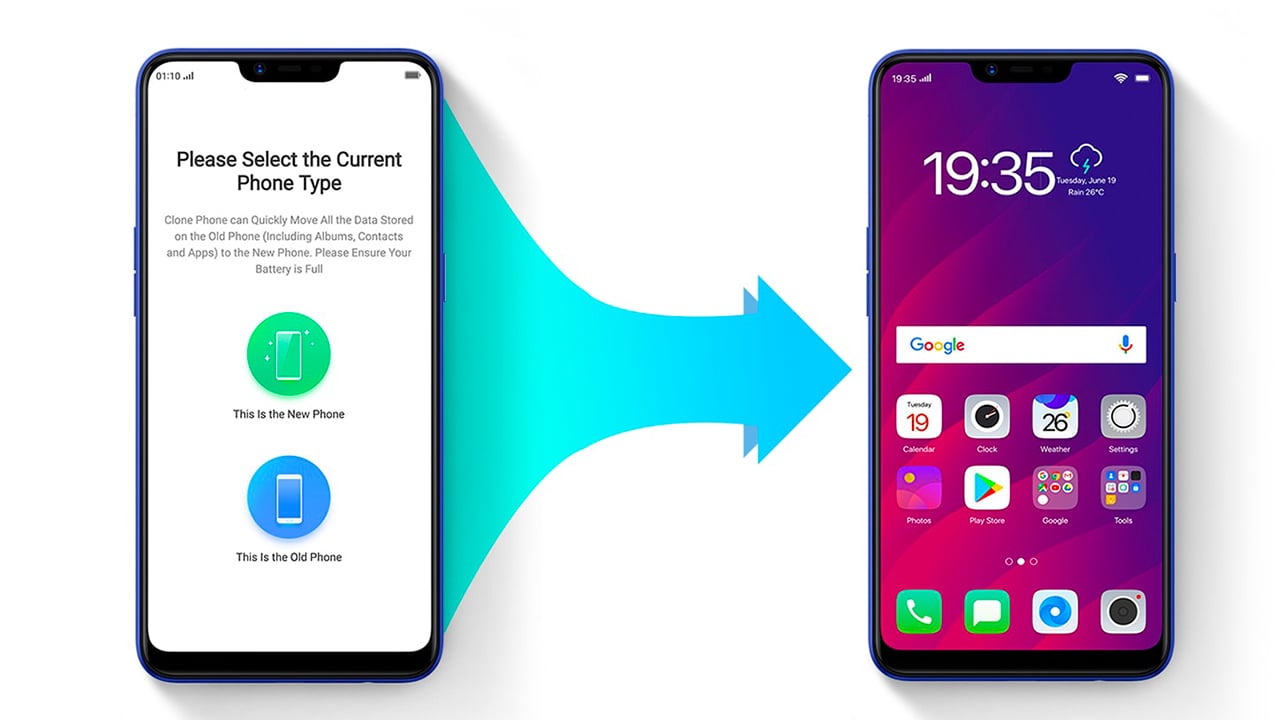
Using the Clone Phone App – Installing the Clone Phone app on both devices – Connecting the devices via Wi-Fi or QR code – Selecting data to transfer – Initiating the data transfer
Transferring data from one Oppo device to another can be a hassle, but thankfully, Oppo has provided a convenient solution with their Clone Phone app. This app allows you to effortlessly migrate your data from your old Oppo device to a new one. Here’s a step-by-step guide on how to use the Clone Phone app for data transfer:
- Installing the Clone Phone app on both devices: Begin by downloading and installing the Clone Phone app from the Google Play Store on both your source (old) and target (new) Oppo devices. Make sure you have a stable internet connection for a smooth installation process.
- Connecting the devices via Wi-Fi or QR code: Once the Clone Phone app is installed on both devices, open it on both devices. The app will guide you through the process of connecting the devices. You can choose to connect via Wi-Fi or by scanning a QR code. Follow the on-screen instructions to establish a secure connection between the devices.
- Selecting data to transfer: After the devices are successfully connected, you will be presented with a list of data types that can be transferred. This includes contacts, messages, photos, videos, apps, and more. Choose the data types you want to transfer by ticking the checkboxes next to them.
- Initiating the data transfer: Once you have selected the data types, click on the “Start Transfer” button to initiate the data transfer process. The app will begin transferring the selected data from the source device to the target device. Ensure that both devices remain connected throughout the transfer process.
The Clone Phone app will handle the transferring process and notify you when it’s complete. The time taken for the transfer may vary depending on the amount of data being transferred. Once the transfer is done, you can safely disconnect the devices and enjoy your data on your new Oppo device.
The Clone Phone app is a versatile and efficient tool for transferring data between Oppo devices. It simplifies the process and eliminates the need for manual backup and restore. Whether you’re upgrading to a new Oppo device or simply need to transfer data, the Clone Phone app is a reliable choice for a seamless transition.
Using Google Account
One convenient way to transfer data from one Oppo device to another is by using your Google Account. Google offers seamless integration across devices, allowing you to sync and restore data effortlessly. Here’s how you can transfer data using your Google Account:
Syncing data from the source Oppo device to the Google Account:
1. On your source Oppo device, go to “Settings.”
2. Scroll down and find the “Accounts” or “Google” option.
3. Tap on “Google” and sign in with your Google Account credentials.
4. Once signed in, you can choose which data you want to sync with your Google Account, such as contacts, calendar events, app data, and more.
5. Enable the toggle button next to each data category you want to sync.
6. Wait for the sync process to complete. Your data will now be securely stored in your Google Account.
Signing in to the target Oppo device with the same Google Account:
1. On your new Oppo device, go to “Settings.”
2. Scroll down and find the “Accounts” or “Google” option.
3. Tap on “Google” and select “Add Account” or “Sign in.”
4. Enter the same Google Account credentials used on the source device and sign in.
5. Once signed in, your Google Account will be linked to the new Oppo device.
Restoring data from the Google Account:
1. After signing in to the target Oppo device, go to “Settings.”
2. Scroll down and find the “Backup and Restore” or “Google Backup” option.
3. Tap on it and select “Restore from Google Account.”
4. Choose the Google Account associated with your data.
5. Select the data you want to restore, such as contacts, apps, settings, and more.
6. Follow the prompts to complete the restoration process.
By syncing data from the source Oppo device to your Google Account and signing in to the target Oppo device with the same Google Account, you can effortlessly transfer and restore your data. Remember to ensure a stable internet connection during the syncing and restoration process for a smooth transfer experience.
Using Bluetooth or Wi-Fi Direct
When transferring data between two Oppo devices, you can utilize the Bluetooth or Wi-Fi Direct functionality to establish a direct connection and transfer data wirelessly. Here’s a step-by-step guide on how to do it:
1. Enabling Bluetooth or Wi-Fi Direct on both devices:
On the source Oppo device, go to the settings menu and navigate to the Bluetooth or Wi-Fi Direct settings. Toggle the switch to turn it on. Repeat the same process on the target Oppo device.
2. Pairing the devices:
Once Bluetooth or Wi-Fi Direct is enabled on both devices, they need to be paired to establish a connection. On the source Oppo device, go to the Bluetooth or Wi-Fi Direct settings and search for available devices. Select the target Oppo device from the list and follow the on-screen prompts to complete the pairing process.
3. Selecting and transferring specific files or folders:
Once the devices are paired, you can start selecting the specific files or folders you want to transfer. On the source Oppo device, navigate to the files or folders you wish to transfer, and using the sharing or sending option, choose Bluetooth or Wi-Fi Direct as the transfer method. Select the paired target Oppo device as the destination, and confirm the transfer on the target device when prompted.
It is important to note that the speed of data transfer using Bluetooth or Wi-Fi Direct may vary depending on the file size and the strength of the wireless connection. Larger files may take longer to transfer, so it’s recommended to have a stable and strong connection for faster transfer speeds.
Once the transfer is complete, you can verify the transferred files on the target Oppo device to ensure a successful transfer. Don’t forget to disable Bluetooth or Wi-Fi Direct when you’re done to conserve battery life and maintain security.
Using Bluetooth or Wi-Fi Direct to transfer data between Oppo devices offers a convenient way to share files wirelessly without the need for cables or an internet connection. Give it a try and experience the seamless transfer of data between your Oppo devices.
Transferring Data through a Computer
Transferring data between Oppo devices can be done efficiently using a computer as a intermediary. Follow these steps to easily transfer your files:
- Connecting the source Oppo device to the computer using a USB cable: Start by connecting your source Oppo device to the computer using a USB cable. Make sure to use a compatible cable and connect the USB end to an available USB port on your computer.
- Copying and pasting or dragging and dropping files to the computer: Once the connection is established, your computer should recognize the Oppo device as a storage device. Open the file explorer on your computer and navigate to the Oppo device. Here, you can access the internal storage or SD card of your device. Simply select the files or folders you want to transfer and copy them to a location on your computer by either right-clicking and selecting “Copy,” then pasting them into the desired folder, or by dragging and dropping the files to the desired location on your computer.
- Disconnecting the source device and connecting the target Oppo device: After successfully transferring the files from the source Oppo device to your computer, safely disconnect the USB cable from the source device by ejecting it from the computer. Then, connect the USB cable to the target Oppo device.
- Copying the files from the computer to the target device: Open the file explorer on your computer and navigate to the location where you copied the files from the source Oppo device. Select the files or folders you want to transfer to the target Oppo device and copy them. Then, go to the USB storage of the target Oppo device and paste the files or drag and drop them into the desired location on the target device.
This method allows you to have full control over the files you transfer and ensures a secure and efficient transfer process. Make sure to safely disconnect both Oppo devices from the computer after completing the transfer.
Using Cloud Storage Services
If you’re looking for a convenient and efficient way to transfer data from one Oppo device to another, using cloud storage services can be a great option. Cloud storage services like Google Drive and Dropbox provide a secure and reliable platform to store and access your files from anywhere.
To begin transferring data using cloud storage services, you’ll first need to upload the data from the source Oppo device to the cloud storage service of your choice. Most cloud storage services have mobile apps that can be downloaded from the app store. Once you have installed the app on your Oppo device, follow these steps:
- Launch the cloud storage app on your source Oppo device.
- Create an account if you don’t have one or sign in if you already have an account.
- Navigate to the folder where you want to upload the data.
- Select the files or folders you want to transfer and tap on the upload button.
- Wait for the upload process to complete.
Once the data is uploaded to the cloud storage service, you can easily access it from any device with internet access. Now, to download the data onto the target Oppo device, follow these steps:
- Install the same cloud storage app on your target Oppo device, if it isn’t already installed.
- Launch the app and sign in with the same account used to upload the data.
- Navigate to the folder where the data is stored.
- Select the files or folders you want to download.
- Tap on the download button and wait for the process to complete.
Using cloud storage services makes transferring data between Oppo devices a breeze. It eliminates the need for physical connections or transferring files individually. With just a few taps, you can upload your data to the cloud and easily access it on your target Oppo device.
Remember to have a stable internet connection while uploading and downloading the data, as it can affect the transfer speed and overall process. Additionally, make sure you have enough storage space available on your cloud storage account to accommodate the files you want to transfer.
With cloud storage services, you can conveniently transfer various types of data, including documents, photos, videos, and more, without the hassle of cables or external storage devices. Take advantage of the cloud to seamlessly transfer your data from one Oppo device to another!
Transferring SIM Card Contacts
One of the simplest ways to transfer contacts from one Oppo device to another is by utilizing the SIM card. Follow these steps to successfully transfer SIM card contacts:
- Exporting contacts from the source Oppo device to the SIM card: Start by accessing the contacts app on your source Oppo device and navigate to the contact list. Look for the option to export contacts or manage contacts. From there, select the desired contacts that you want to transfer to the SIM card. Choose the export option and select the SIM card as the destination. Confirm and wait for the contacts to be exported.
- Inserting the SIM card into the target Oppo device: Once you have exported the contacts to the SIM card, power off the source Oppo device and locate the SIM card tray. Use the SIM card ejector tool or a small pin to gently remove the SIM card tray. Insert the SIM card into the SIM card tray of the target Oppo device, positioning it correctly according to the instructions provided by the device manufacturer.
- Importing contacts from the SIM card to the target device: Power on the target Oppo device and go to the contacts app. Access the contact list or import contacts menu. Look for the option to import contacts from the SIM card and select it. The device will scan the SIM card for contacts and display a list of available contacts. Choose the contacts you wish to import and confirm the import process. Wait for the contacts to be imported to the target Oppo device. Once finished, you will have successfully transferred contacts from the source Oppo device to the target device using the SIM card.
Transferring contacts via SIM card is a convenient method when dealing with a limited number of contacts. However, please note that some newer Oppo devices may not support SIM card contact transfer. In such cases, alternative methods like using cloud storage services or syncing contacts with a Google Account can be utilized.
Importing and Exporting Contacts using VCF
One convenient way to transfer contacts from one Oppo device to another is by using a VCF (Virtual Contact File) file. This method allows you to export your contacts from the source Oppo device into a VCF file and then import those contacts into the target Oppo device. Here’s how you can do it:
- Exporting contacts from the source Oppo device to a VCF file:
- Transferring the VCF file to the target Oppo device:
- Bluetooth: Enable Bluetooth on both devices and pair them. Once paired, simply select the VCF file and choose the option to share it via Bluetooth. On the target Oppo device, accept the incoming file transfer and save the VCF file.
- Email: Attach the VCF file to an email and send it to an account accessible on the target Oppo device. Open the email on the target device and download the attached VCF file.
- Messaging apps: If both devices have a messaging app installed, you can share the VCF file through the app. Simply select the VCF file and choose the share option. On the target device, open the received file and save it.
- Importing contacts from the VCF file to the target device:
To begin the process, open the Contacts app on your source Oppo device. From there, locate the “Export” or “Share” option, which can usually be found in the settings or more options menu. Select the export option and choose the VCF file format. Confirm the export and select the destination to save the VCF file.
Now that you have successfully exported the contacts as a VCF file, you can transfer it to the target Oppo device. There are several ways you can do this:
Now that the VCF file is on the target Oppo device, it’s time to import the contacts. Locate the Contacts app on the target device and open it. Look for the import option, which is typically found in the settings or more options menu. Select the import option and choose the VCF file from the location where you saved it. Confirm the import and let the device process and import the contacts.
By following these steps, you can easily export your contacts from one Oppo device as a VCF file and import them into another Oppo device with ease. This method ensures a quick and hassle-free transfer of your valuable contact information.
Conclusion
Transferring data from one Oppo phone to another has become easier than ever with the advancements in technology. Whether you’re upgrading to a new Oppo model or simply need to transfer data between devices, you can now do so seamlessly and effortlessly.
By following the methods outlined in this article, you can successfully transfer all your important data, including contacts, messages, photos, videos, and more, to your new Oppo phone. Whether you prefer using the Clone Phone app, the Bluetooth method, or the Google Account sync, these options exist to cater to your individual needs and preferences.
Remember to backup your data regularly and keep your devices updated to ensure a smooth and seamless transfer process. With Oppo’s user-friendly interface and intuitive features, transferring data has never been easier.
So, go ahead and enjoy your new Oppo phone, knowing that your precious memories and important data are safely transferred and easily accessible.
FAQs
1. How do I transfer data from my old Oppo phone to a new Oppo phone?
To transfer data from your old Oppo phone to a new Oppo phone, you can follow these steps:
– Connect both phones to a stable Wi-Fi network.
– On your old Oppo phone, go to “Settings” and select “Additional Settings.”
– Tap on “Backup & Reset” and then choose “Clone Phone.”
– Select “This is the old phone” and follow the on-screen instructions to generate a QR code.
– On your new Oppo phone, go to “Settings” and select “Additional Settings.”
– Tap on “Backup & Reset” and choose “Clone Phone.”
– Select “This is the new phone” and scan the QR code displayed on your old Oppo phone.
– Follow the prompts to complete the data transfer process.
2. Can I transfer all types of data from my old Oppo phone to a new Oppo phone?
Yes, you can transfer various types of data including contacts, messages, call logs, photos, videos, music, apps, and more from your old Oppo phone to a new Oppo phone using the data transfer methods provided by Oppo. However, it’s always a good idea to double-check if all the data has been successfully transferred.
3. What if I don’t have a stable Wi-Fi connection?
If you do not have a stable Wi-Fi connection, you can use alternative methods to transfer data from your old Oppo phone to a new Oppo phone. You can use a computer to back up the data from your old phone and then transfer it to your new phone using a USB cable. Additionally, you can use cloud storage services like Google Drive or Dropbox to back up your data and restore it on your new phone.
4. Is it necessary to factory reset my old Oppo phone after transferring data?
It is not necessary to factory reset your old Oppo phone after transferring data to a new Oppo phone. However, if you are planning to sell or give away your old phone, it is recommended to perform a factory reset to ensure that all your personal data is erased from the device.
5. Can I transfer data from an iPhone to a new Oppo phone?
Yes, it is possible to transfer data from an iPhone to a new Oppo phone. Oppo provides a built-in iOS to Android data transfer tool called “Clone Phone” that allows you to transfer data from an iPhone to an Oppo phone. The process involves installing the “Clone Phone” app on both devices and following the on-screen instructions to transfer your data.