
Are you tired of scrolling and clicking with a dirty wireless mouse? Don’t worry, we’ve got you covered! In this article, we will guide you on how to clean your wireless mouse effectively. A clean mouse not only ensures smooth and precise movements but also promotes overall hygiene. Whether you use your wireless mouse for work, gaming, or casual browsing, keeping it clean is essential for optimal performance. From removing dirt and grime to sanitizing the surface, we will provide you with step-by-step instructions on how to maintain a pristine wireless mouse. So, let’s dive in and learn how to keep your wireless mouse squeaky clean!
Inside This Article
- Gathering the necessary supplies
- Powering off the wireless mouse
- Removing dust and debris from the mouse surface
- Cleaning the mouse buttons and scroll wheel
- Cleaning the sensor on the bottom of the mouse
- Reassembling and Testing the Wireless Mouse
- Conclusion
- FAQs
Gathering the necessary supplies
Before you begin cleaning your wireless mouse, it’s important to gather all the necessary supplies. Having the right tools on hand will make the process easier and more effective. Here are the supplies you’ll need:
- Cotton swabs or Q-tips
- Isopropyl alcohol or a mild cleaning solution
- Clean, lint-free cloth
- Canned air or a soft brush for dusting
- Small screwdriver (if needed for disassembly)
Cotton swabs or Q-tips are essential for reaching into small crevices and cleaning hard-to-reach areas. Isopropyl alcohol or a mild cleaning solution will help disinfect and remove any dirt or grime from the mouse surface. Make sure to use a clean, lint-free cloth for wiping down the mouse.
Canned air or a soft brush will come in handy for removing dust and debris from the mouse. If your wireless mouse requires disassembly for thorough cleaning, you may need a small screwdriver to remove any screws or fastenings.
Having all these supplies within reach will ensure a smooth and efficient cleaning process for your wireless mouse.
Powering off the wireless mouse
Before you start cleaning your wireless mouse, it’s crucial to power it off to avoid any accidental clicks or movements during the cleaning process. Here’s how you can do it:
1. Locate the power switch or button on your wireless mouse. This is usually located on the bottom or side of the mouse.
2. Slide or press the power switch to the “off” position. This will ensure that the mouse is completely turned off and there is no power running through it.
3. Some wireless mice may require you to remove the batteries to completely power it off. In this case, gently remove the battery cover, and take out the batteries from the compartment. Make sure to keep the batteries in a safe place to avoid misplacing them.
4. Once the power is completely off, you can safely proceed with the cleaning process without any interference from the mouse.
Remember, it’s important to follow these steps and ensure that the wireless mouse is powered off to prevent accidental clicks or movement while cleaning. This will help you maintain the integrity and functionality of your mouse.
Removing dust and debris from the mouse surface
Over time, dust and debris can accumulate on the surface of your wireless mouse, affecting its performance. It’s important to regularly clean the mouse to ensure smooth operation. Here are the steps to remove dust and debris from the mouse surface:
1. Start by turning off your wireless mouse and unplugging any USB receiver or charging cable connected to it. This will prevent any accidental clicks or movements while cleaning.
2. Take a clean, lint-free cloth or a microfiber cloth and lightly dampen it with water. Make sure the cloth is not too wet to avoid any damage to the mouse.
3. Gently wipe the surface of the mouse, paying attention to areas where dust and debris may have accumulated, such as around the buttons and the scroll wheel.
4. If there are stubborn spots or stains, you can use a mild cleaning solution specifically designed for electronics. Apply a small amount of the solution to the cloth and carefully wipe the affected areas. Avoid getting the solution into any openings or ports.
5. For hard-to-reach areas, such as the crevices between the buttons or the scroll wheel, you can use a soft-bristled brush or a cotton swab dipped in cleaning solution to gently remove any debris.
6. Once you have thoroughly cleaned the surface of the mouse, use a dry cloth to remove any excess moisture. Make sure the mouse is completely dry before using it again.
7. Finally, reconnect the USB receiver or charging cable to the mouse and power it on. Test the mouse to ensure that it is functioning properly after the cleaning process.
By regularly removing dust and debris from the mouse surface, you can maintain optimal performance and prolong the lifespan of your wireless mouse.
Cleaning the mouse buttons and scroll wheel
One of the most important parts of cleaning a wireless mouse is ensuring that the buttons and scroll wheel are free of dust, dirt, and grime. Over time, these components can become sticky or unresponsive, affecting the overall functionality of the mouse. Follow these steps to clean the mouse buttons and scroll wheel:
1. Start by turning off the mouse and removing any batteries or power source. This will prevent accidental clicking or scrolling while cleaning.
2. Use a soft, lint-free cloth or microfiber cloth to gently wipe the surface of the mouse buttons and scroll wheel. Dampen the cloth slightly with water or isopropyl alcohol if needed, but ensure it’s not dripping wet.
3. For stubborn dirt or grime, you can use a cotton swab dipped in isopropyl alcohol. Gently rub the swab against the buttons and scroll wheel to remove any residue. Avoid using excessive force to prevent damaging the components.
4. Pay attention to the crevices and corners around the buttons and scroll wheel. Use a toothpick or a soft-bristled brush to remove any dirt or debris that may be stuck in those hard-to-reach areas.
5. After cleaning, use a dry cloth to wipe away any leftover moisture from the buttons and scroll wheel. Ensure that all the components are completely dry before reassembling the mouse.
6. Once the cleaning process is complete, assemble the mouse back together and insert the batteries or reconnect the power source. Turn on the mouse and test the buttons and scroll wheel to ensure they are working properly.
Regularly cleaning the mouse buttons and scroll wheel not only improves their functionality but also helps prevent any build-up that can affect the overall performance of the wireless mouse.
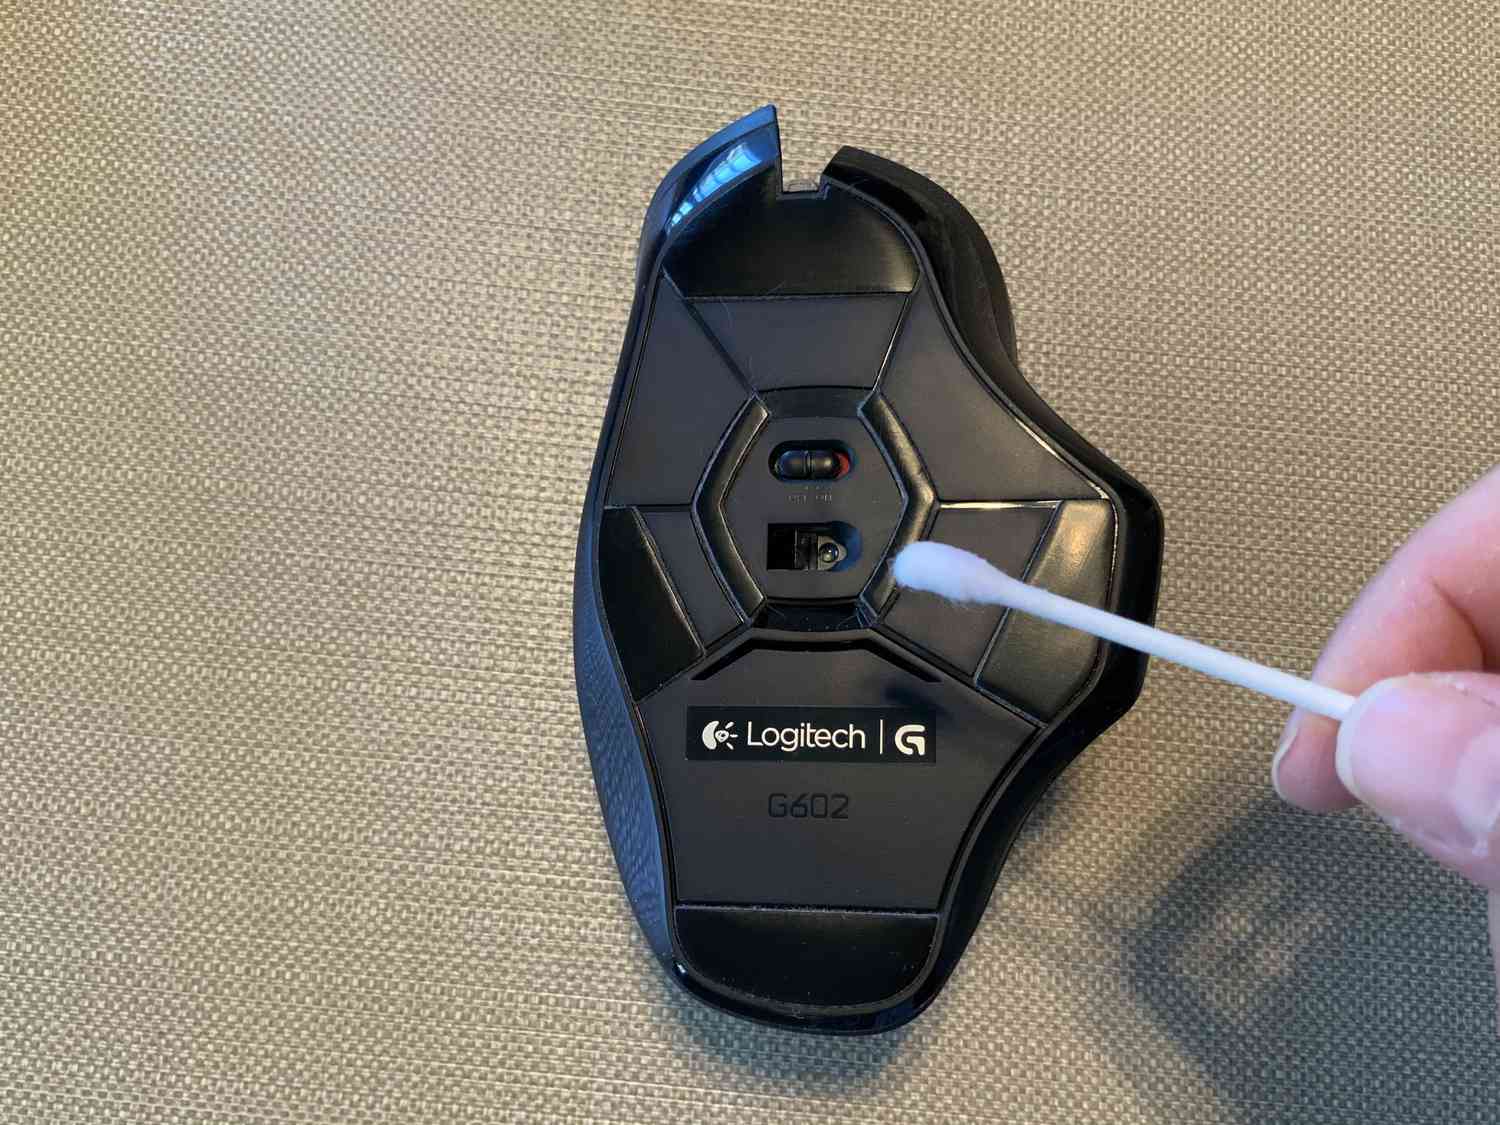
Cleaning the sensor on the bottom of the mouse
Cleaning the sensor on the bottom of the wireless mouse is essential to ensure smooth and accurate tracking. Over time, dust and debris can accumulate on the sensor, leading to erratic mouse movements and decreased performance. Here’s how you can effectively clean the sensor and restore optimal functionality:
1. Begin by powering off the wireless mouse and removing any batteries or charging cables connected to it. This ensures your safety and prevents any accidental clicks or movements while cleaning.
2. Turn the mouse upside down and locate the sensor, which is typically a small, rectangular or circular area on the bottom of the mouse. This is where the optical or laser technology tracks your movements.
3. Take a soft, lint-free cloth or a cotton swab and gently wipe the sensor area to remove any visible dust or debris. Be careful not to apply excessive force or press too hard on the sensor, as this could damage it.
4. If there are stubborn dirt particles or residue on the sensor, you can moisten the cloth or cotton swab with a small amount of isopropyl alcohol or lens cleaner. Ensure the cloth is only slightly damp and not dripping with liquid, to avoid any liquid damage to the mouse.
5. Use gentle, circular motions to clean the sensor, making sure to cover the entire surface area. Take your time and be thorough in your cleaning to ensure the removal of any contaminants that could affect the mouse’s performance.
6. Once you’ve cleaned the sensor, allow it to dry completely before reassembling and using the wireless mouse again. This will prevent any moisture from impacting the functionality of the sensor.
7. After the sensor has dried, reinsert the batteries or connect the mouse to the charging cable, depending on your mouse’s power source. Power on the mouse and test its responsiveness by moving it around on a smooth surface.
Regular maintenance of the sensor will keep your wireless mouse functioning flawlessly and help extend its lifespan. Make it a habit to clean the sensor periodically, especially if you notice any unusual cursor movement or sluggish performance. Your wireless mouse will thank you for it!
Reassembling and Testing the Wireless Mouse
After you have cleaned all the individual components of your wireless mouse, it’s time to reassemble it and test if everything is working properly. Follow these steps to ensure a successful reassembly:
- Place the mouse buttons and scroll wheel back into their original positions: Carefully align the buttons and scroll wheel with their respective slots on the mouse body. Make sure they fit snugly and securely.
- Reattach the bottom cover: If you had removed the bottom cover during the cleaning process, place it back onto the mouse body. Ensure that all the tabs and screws are properly aligned before pressing it down.
- Insert the batteries and close the battery compartment: If your wireless mouse is powered by replaceable batteries, insert them back into the battery compartment following the correct polarity. Close the battery compartment securely.
- Power on the wireless mouse: If your wireless mouse has an on/off switch, turn it on. Some mice may automatically power on when the batteries are inserted.
- Test the mouse’s functionality: Move the mouse around on a clean, flat surface and check if the cursor moves smoothly and accurately. Click each button and test the scroll wheel to ensure they are responsive. If there are any issues, double-check the assembly and battery placement.
- Reconnect the wireless receiver: Plug the USB receiver back into the computer or the appropriate port. Wait for the computer to detect the mouse properly before using it.
By carefully reassembling and testing your wireless mouse, you ensure that it functions optimally and can provide you with a seamless user experience. If you encounter any persistent issues after cleaning and reassembling, you may need to consult the manufacturer’s troubleshooting guide or seek professional assistance.
Conclusion
Keeping your wireless mouse clean is essential for optimal performance and longevity. Regularly cleaning the exterior and removing dust and debris from the sensor will ensure smooth tracking and precision. Remember to power off your mouse before cleaning to avoid accidental clicks.
By following the steps outlined in this guide, you can easily maintain a clean and hygienic wireless mouse. Whether you’re using it for work or gaming, a clean mouse will enhance your overall experience and help you avoid any performance issues.
So, take a few minutes every now and then to give your wireless mouse a thorough cleaning. It’s a simple task that can go a long way in ensuring your mouse remains in top-notch condition. Happy clicking!
FAQs
Q: How often should I clean my wireless mouse?
It is recommended to clean your wireless mouse at least once every few months. However, if you notice that your mouse is not functioning properly or if it becomes visibly dirty, it is a good idea to clean it sooner.
Q: Can I use water to clean my wireless mouse?
No, it is not recommended to use water or any liquid directly on your wireless mouse. The moisture can damage the internal components and potentially cause the mouse to stop working. Instead, use a damp cloth or a slightly moistened cotton swab for cleaning.
Q: What should I do if my wireless mouse is not working after cleaning?
If your wireless mouse is not working after cleaning, there may be a few possible reasons. First, make sure that the battery is properly inserted and charged. If that doesn’t solve the issue, try re-syncing the mouse with the USB receiver by following the manufacturer’s instructions. If the problem persists, it may be time to consider replacing the mouse.
Q: How do I clean the sensor on my wireless mouse?
To clean the sensor on your wireless mouse, start by turning off the mouse and removing the battery. Use a dry cotton swab to gently wipe away any dirt or debris from the sensor. Be careful not to apply too much pressure or touch the sensor with your fingers, as this may affect its performance.
Q: Can I use compressed air to clean my wireless mouse?
Yes, you can use compressed air to clean your wireless mouse. It is a good idea to use short bursts of air to remove any dust or debris that may be stuck in the crevices or buttons. However, do not hold the can of compressed air too close to the mouse, as the force of the air may damage the internal components.