
Are you tired of dealing with tangled cords and limited mobility when trying to print from your laptop? Well, you’re in luck! In this article, we will guide you through the steps on how to connect a printer to your laptop wirelessly. Gone are the days of wrestling with USB cables and searching for the nearest power outlet. With wireless printing, you can conveniently print documents, photos, and more, without the hassle of physical connections. Whether you’re working from home, in the office, or on the go, connecting your printer to your laptop wirelessly will provide you with the freedom and flexibility you need. So, grab your laptop and let’s get started on this wireless printing journey!
Inside This Article
- Step 1: Check the compatibility
- Step 2: Connect your printer to a power source
- Step 3: Turn on the printer and laptop
- Step 4: Connect the printer to your wireless network
- Step 5: Install printer software on your laptop
- Step 6: Test the wireless connection
- Troubleshooting Common Issues
- Conclusion
- FAQs
Step 1: Check the compatibility
Before you dive into the process of connecting your printer to your laptop wirelessly, it’s important to ensure that your devices are compatible. Compatibility plays a crucial role in successfully establishing a wireless connection between your printer and laptop.
The first thing you need to do is check the specifications of both your printer and laptop. Look for the wireless connectivity options supported by your devices. Common wireless connectivity options include Wi-Fi, Bluetooth, or AirPrint for Apple devices.
Make sure that your printer supports wireless connectivity and is compatible with the operating system of your laptop. Some printers may only work with specific operating systems such as Windows, macOS, or Linux.
Additionally, check if your laptop has the necessary hardware and software requirements to connect wirelessly to a printer. This may include having a built-in wireless network adapter or the ability to connect to a Wi-Fi network.
If you’re unsure about the compatibility of your devices, consult the user manuals or visit the manufacturer’s website for more information. They usually provide detailed specifications and compatibility guidelines to help you make an informed decision.
Ensuring compatibility between your printer and laptop is the first step in successfully connecting them wirelessly. Once you’ve confirmed that your devices are compatible, you can move on to the next steps in the process.
Step 2: Connect your printer to a power source
Before you can connect your printer to your laptop wirelessly, you need to make sure it is properly connected to a power source. Follow these steps to ensure a smooth and successful connection:
1. Locate the power cord that came with your printer. It should be a thick, typically black cord with a three-pronged plug at one end.
2. Find a nearby electrical outlet and plug the power cord into it. Make sure the outlet is easily accessible and not blocked by any furniture or other objects.
3. Connect the other end of the power cord to the back of your printer. Look for a small, round socket with matching prongs or a power port labeled “AC” or “Power.”
4. Once the power cord is securely connected, make sure the printer is turned off before proceeding to the next step.
Now that your printer is properly connected to a power source, you are ready to move on to the next step in the wireless connection process. Remember, each printer model may have slightly different power connection options, so refer to your printer’s user manual for specific instructions if needed.
Step 3: Turn on the printer and laptop
Before you can connect your printer to your laptop wirelessly, you need to make sure that both devices are turned on. Follow these steps to turn on your printer and laptop:
- 1. Locate the power button on your printer. It is usually located on the front or top of the printer.
- 2. Press the power button to turn on the printer. You may need to wait a few moments for the printer to initialize.
- 3. Once the printer is turned on, you can move on to turning on your laptop.
- 4. Locate the power button on your laptop. On most laptops, it is located on the keyboard, usually in the top-right corner.
- 5. Press and hold the power button until your laptop boots up. You will typically see the manufacturer’s logo or the Windows/Mac logo appear on the screen.
- 6. Once your laptop has powered on, wait for it to fully load and reach the desktop or login screen.
By turning on both the printer and laptop, you ensure that they are ready to establish a wireless connection. This step is crucial to successfully connect your printer to your laptop wirelessly. It is important to remember that the specific steps for turning on your printer and laptop may vary depending on the make and model of your devices. Always refer to the user manuals or documentation provided by the manufacturer for detailed instructions.
Step 4: Connect the printer to your wireless network
Once you have powered on your printer and laptop, it’s time to connect your printer to your wireless network. Follow these steps to establish a wireless connection:
1. On your printer, navigate to the settings menu. The exact steps may vary depending on the make and model of your printer, but you can usually find this option by pressing the menu button or accessing the printer’s control panel.
2. Look for the network settings or the wireless setup option. Select it and choose “Wireless Network Wizard” or a similar option.
3. Your printer will now search for available wireless networks in the vicinity. Wait for the list of networks to appear on the screen.
4. Locate your wireless network from the list and select it. If your network is password-protected, you will need to enter the password. Use the printer’s control panel or navigate using the arrow keys to input the password when prompted.
5. Once you have entered the correct password, press the “OK” or “Connect” button on your printer. Wait for the printer to establish a connection with your wireless network.
6. After successfully connecting to the wireless network, your printer will display a confirmation message. This indicates that the printer is now connected to your Wi-Fi network.
7. To verify the connection, you can print a wireless network settings report from the printer. Refer to the printer’s user manual for instructions on how to do this. The report should show the status as “Connected” or “Active” for the wireless network.
Once you have successfully connected the printer to your wireless network, you can proceed to the next step of installing the printer software on your laptop.
Step 5: Install printer software on your laptop
Once you have successfully connected your printer to your wireless network, the next step is to install the printer software on your laptop. This software is necessary for your laptop to communicate with the printer and send print commands. Installing the software is usually a straightforward process, and you can follow these steps to get it done:
1. Check for the installation CD: Most printers come with an installation CD that contains the necessary drivers and software. Look for the CD that came with your printer and insert it into your laptop’s CD/DVD drive. If your laptop doesn’t have a CD/DVD drive, don’t worry. You can usually download the software from the printer manufacturer’s website.
2. Run the installation wizard: After inserting the CD or downloading the software from the manufacturer’s website, you’ll need to run the installation wizard. This wizard will guide you through the installation process step by step. Simply follow the on-screen instructions and click on the “Next” button to proceed.
3. Choose the installation type: During the installation process, you may be prompted to choose the type of installation you prefer. The two common options are “Standard” and “Custom.” The Standard installation option usually includes all necessary software and drivers, while the Custom option allows you to select specific components to install. If you’re unsure, it’s generally safe to choose the Standard installation.
4. Accept the license agreement: Like most software installations, you’ll need to accept the license agreement before proceeding with the installation. Make sure to read through the agreement carefully, and if you agree to the terms, check the box or click on the “Accept” button to continue.
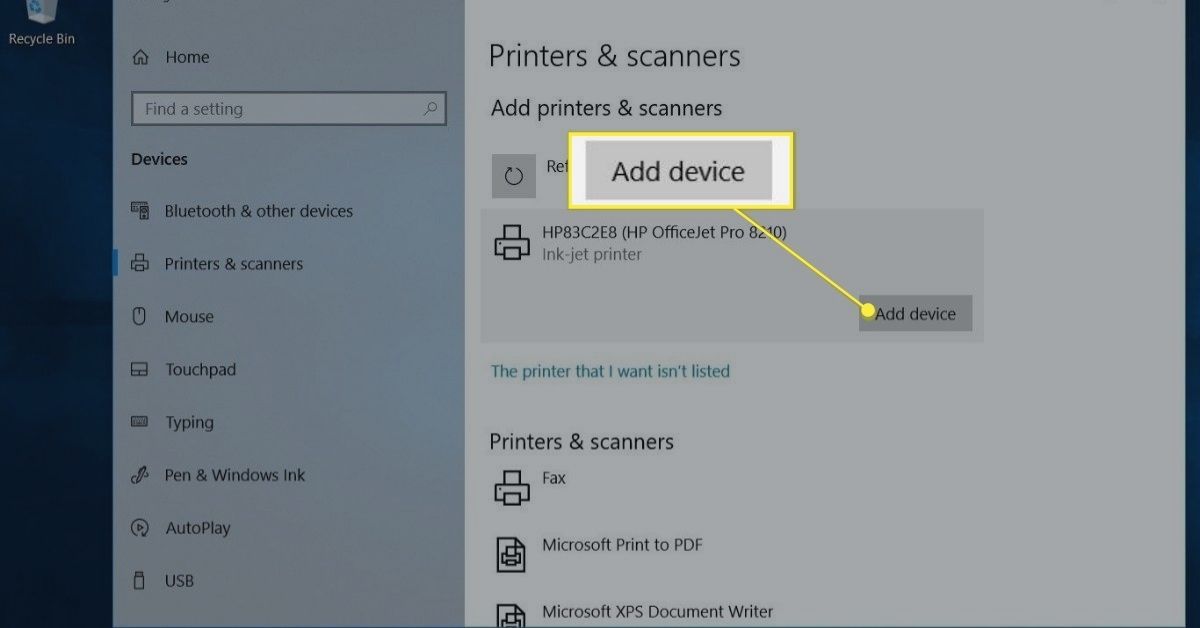
5. Connect the printer to your laptop: Once the software installation is underway, you may be prompted to connect your printer to your laptop. Follow the instructions provided by the installation wizard to connect your printer using the appropriate method. This may involve using a USB cable or selecting your printer from the list of available devices on your network.
6. Complete the installation: After connecting your printer, the installation wizard will continue to install the necessary software and drivers. This process may take a few minutes, depending on the speed of your laptop and the size of the software package. Once the installation is complete, you’ll usually see a confirmation message or a prompt to restart your laptop.
7. Test the printer: Once your laptop has restarted, it’s a good idea to test the printer to ensure it’s working correctly. Open a document or an image on your laptop and click on the “Print” option. Select your printer from the list of available printers and click on the “Print” button. If the printer successfully prints the document or image, then congratulations! You have successfully installed the printer software on your laptop.
Installing printer software is an essential step to establish a seamless connection between your laptop and printer. Following the steps above will ensure that you can start printing wirelessly and efficiently.
Step 6: Test the wireless connection
Once you have successfully connected your printer to your laptop wirelessly, it’s important to test the connection to ensure that everything is working properly. Follow these steps to test the wireless connection:
1. Open a document or a picture on your laptop that you want to print. Make sure the document is ready to be printed, and the printer is turned on.
2. Go to the “File” menu in your document or picture application and select “Print”. Alternatively, you can use the keyboard shortcut “Ctrl + P” to open the print dialog box.
3. In the print dialog box, select the wireless printer you have connected to your laptop. It should be listed as an available printer in the drop-down menu. If you cannot find the printer in the list, make sure the printer is turned on and connected to the same Wi-Fi network as your laptop.
4. Choose your desired print settings, such as the number of copies, orientation, and paper size. You can also choose whether to print in color or grayscale.
5. Click on the “Print” button to send the document to the printer. If the wireless connection is functioning properly, you should see the printer’s status change to “Printing” on your laptop screen.
6. Monitor the printer to ensure that it starts printing the document. You should hear the sound of the printer initializing and see the pages being fed into the printer. If the printer does not start printing or encounters any errors, make sure it is properly connected to the Wi-Fi network and try again.
7. Once the document has been successfully printed, check if the print quality meets your expectations. Examine the printed pages for any issues such as smudges, streaks, or faded text. If you notice any problems, check the printer’s ink or toner levels and perform any necessary maintenance tasks, such as cleaning the print heads.
By testing the wireless connection and printing a document, you can ensure that your printer is functioning correctly and that you can print wirelessly from your laptop without any issues. If you encounter any problems during the testing process, refer to the troubleshooting section or consult the printer’s user manual for further assistance.
Troubleshooting Common Issues
Even with the best of intentions, technical issues can sometimes arise when connecting a printer to a laptop wirelessly. Don’t worry; most of these issues can be easily resolved. Here are some common problems you might encounter and how to troubleshoot them:
1. No wireless connection: If your laptop can’t find your printer on the network, ensure that both devices are connected to the same wireless network. Double-check your Wi-Fi settings and make sure that the printer’s wireless settings are correctly configured.
2. Printer not responding: If you’re unable to print from your laptop after establishing a wireless connection, check if your printer is turned on and has enough paper and ink. Additionally, verify that there are no error messages displayed on the printer’s control panel that might require attention.
3. Driver compatibility: Ensure that you have installed the correct printer driver on your laptop. Visit the manufacturer’s website to download and install the latest driver compatible with your printer model. Outdated or incompatible drivers can cause connectivity issues.
4. Firewall or antivirus software blocking connection: Sometimes, the firewall or antivirus software on your laptop can prevent the printer from connecting wirelessly. Temporarily disable these software programs and try connecting again. If successful, you may need to adjust the settings to allow the printer to communicate with the laptop.
5. IP address conflict: If multiple devices have the same IP address on your network, it can cause connectivity problems. Ensure that each device, including your laptop and printer, has a unique IP address. You can check and change the IP address settings in the printer’s configuration settings or contact your network administrator for assistance.
6. Printer firmware update: The printer’s firmware may need updating to improve compatibility and performance. Visit the manufacturer’s website and check if there are any available firmware updates for your printer model. Follow the instructions provided by the manufacturer to update the firmware.
Remember, if you’re still encountering issues after troubleshooting, don’t hesitate to reach out to the printer manufacturer’s customer support for further assistance. They are typically well-equipped to help you resolve any technical difficulties you may be experiencing.
In conclusion, connecting a printer to a laptop wirelessly can greatly enhance convenience and productivity. Gone are the days of dealing with tangled cables and limited placement options. With the right equipment and software, setting up a wireless connection between your printer and laptop is a breeze.
By following the steps outlined in this article, you can quickly establish a seamless connection that allows you to print documents, photos, and more from your laptop without the hassle of connecting cables.
Whether you work from home, need to print important documents on the go, or simply want to streamline your printing process, connecting your printer to your laptop wirelessly is a game-changer. Embrace the freedom and flexibility of wireless printing and experience a more efficient and convenient printing experience.
FAQs
1. Can I connect any printer to my laptop wirelessly?
– In most cases, you can connect any printer to your laptop wirelessly, as long as the printer has wireless capabilities. However, it’s important to check the manufacturer’s specifications to ensure compatibility with your laptop and operating system.
2. How do I know if my laptop supports wireless printing?
– To determine if your laptop supports wireless printing, you can check the specifications on the manufacturer’s website or refer to the user manual. Additionally, you can look for the Wi-Fi symbol on your laptop’s keyboard or check the network settings to see if there is an option for wireless printing.
3. What are the steps to connect a wireless printer to my laptop?
– The steps to connect a wireless printer to your laptop may vary slightly depending on the printer and operating system you’re using. However, generally, you need to ensure that both the printer and laptop are on the same Wi-Fi network, install the printer software or driver on your laptop, and follow the on-screen instructions to complete the setup process. It’s recommended to refer to the printer’s user manual or the manufacturer’s website for specific instructions.
4. Can I connect multiple laptops to the same wireless printer?
– Yes, you can connect multiple laptops to the same wireless printer, as long as all laptops are connected to the same Wi-Fi network. Each laptop will need to have the necessary printer software or driver installed, and you can usually add the printer by going to your laptop’s settings and selecting the printer from the available devices.
5. What should I do if I’m unable to connect my laptop to a wireless printer?
– If you’re experiencing difficulties connecting your laptop to a wireless printer, there are several troubleshooting steps you can try. First, ensure that both the printer and laptop are within range of the Wi-Fi network and that the network connection is stable. You can also try restarting both the printer and the laptop, checking for any software updates, or reinstalling the printer software or driver. If the issue persists, it may be helpful to consult the printer’s user manual or contact the manufacturer’s customer support for further assistance.