
Are you tired of constantly tapping and swiping on your iPhone screen to control it? Well, here’s some good news for you – now you can control your iPhone with just a simple movement of your head! Thanks to the innovative feature called “Head Movements” introduced by Now You Know, navigating through your iPhone has never been easier. By using the front-facing TrueDepth camera and advanced facial recognition technology, your iPhone can detect your head movements and translate them into actions on your device. Whether you want to scroll through websites, read emails, or even play games, you can accomplish all of this without ever touching your screen. In this article, we will guide you through the steps to set up and use this incredible feature on your iPhone. So get ready to experience a whole new level of convenience and control with Head Movements on your iPhone.
Inside This Article
- How to Enable Head Movements on your iPhone
- Customizing Head Movements Settings
- Navigating Your iPhone Using Head Movements
- Using Head Movements for Accessibility Features
- Troubleshooting Head Movements on iPhone
- Conclusion
- FAQs
How to Enable Head Movements on your iPhone
If you are looking for a hands-free way to control your iPhone, you’ll be thrilled to learn about the head movement feature. By enabling head movements, you can navigate your device using just the movements of your head.
Enabling head movements on your iPhone is a simple process. Follow the steps below:
- Open the Settings app on your iPhone.
- Scroll down and tap on “Accessibility”.
- Under the “Physical and Motor” section, tap on “Head Control”.
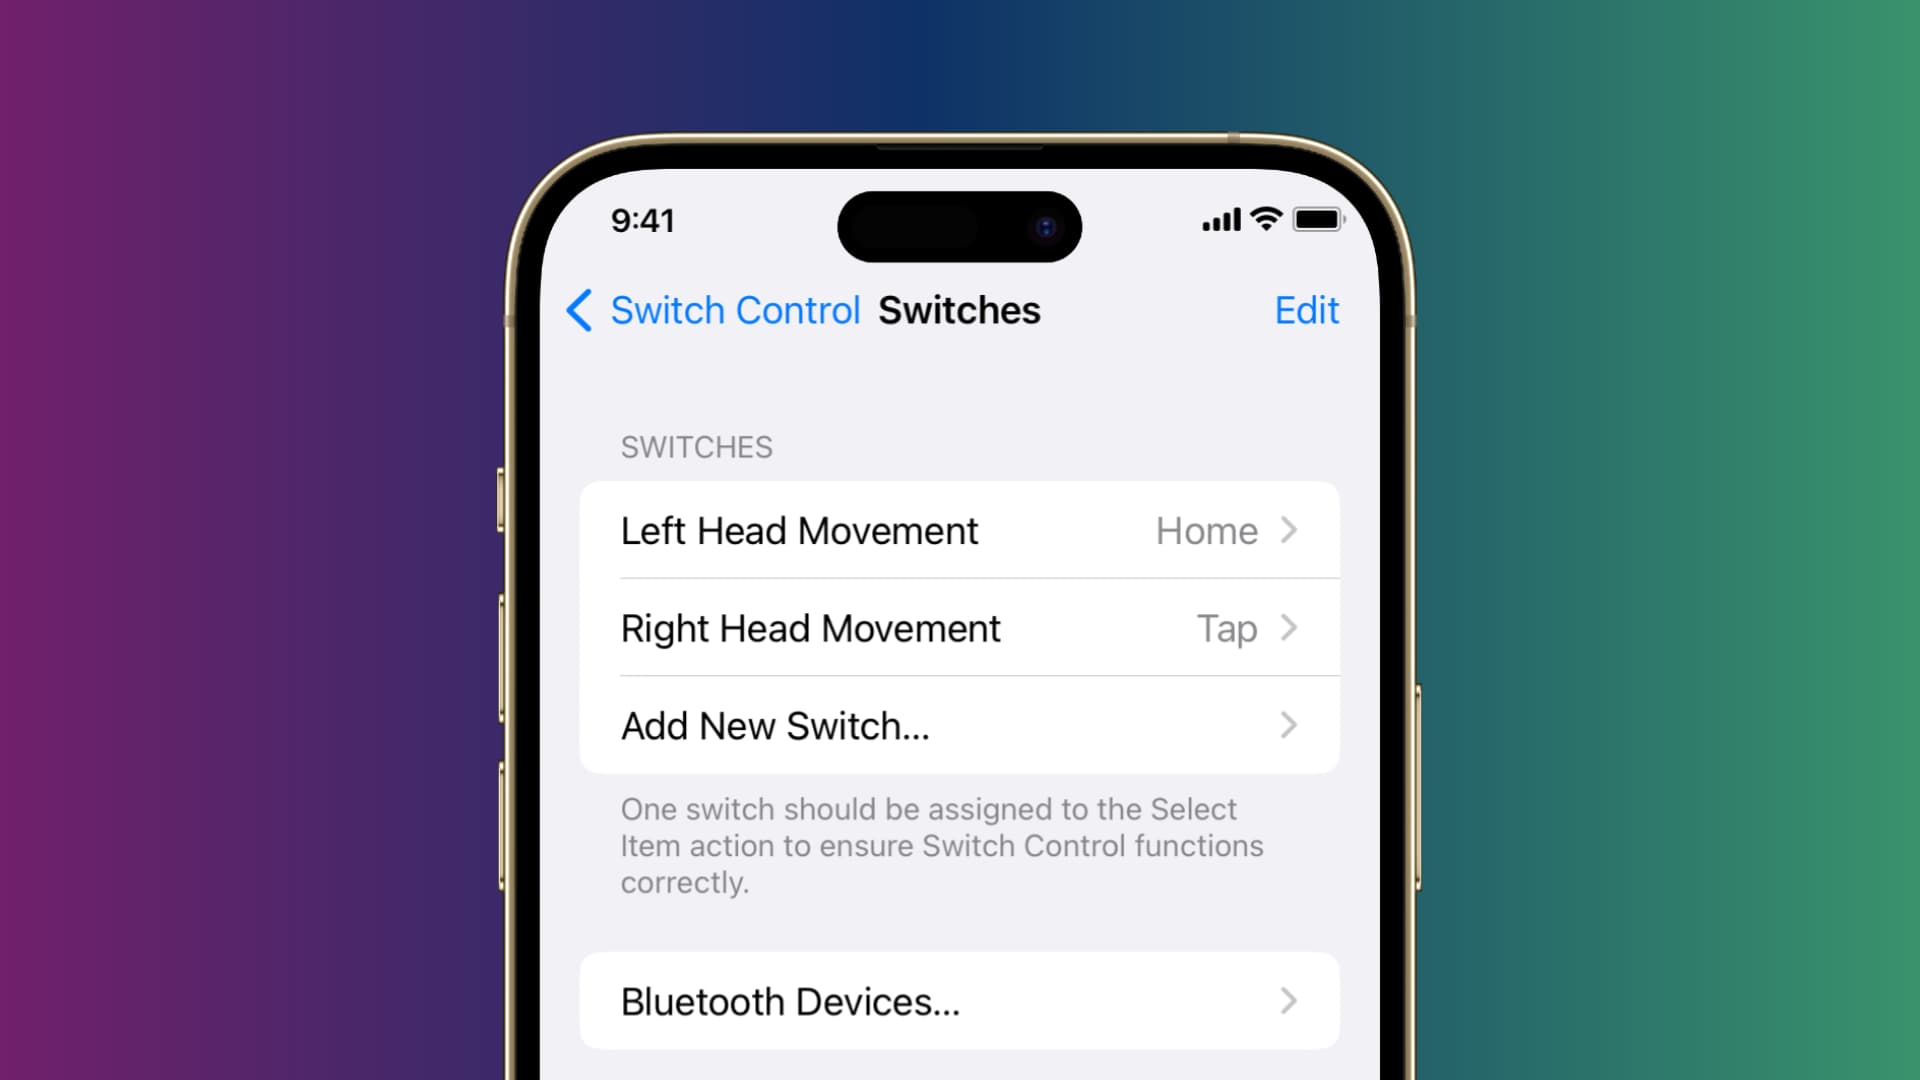
- Tap on “Switches” and then select “Head Movement”.
- Toggle the switch to the right to enable head movements. You can also customize the sensitivity and motion settings according to your preference.
- Once you have enabled head movements, you can start using this feature to control your iPhone.
With the head movement feature enabled, you can now navigate your iPhone by simply moving your head. Move your head to the left or right to scroll through apps or menus. Tilt your head forward or backward to interact with on-screen elements.
It is important to note that head movements may not be suitable for everyone. Ensure that you are in a comfortable position and have enough space to move your head freely before using this feature. It is also recommended to start with gentle movements and gradually increase the intensity as you become more comfortable with the functionality.
Enabling head movements on your iPhone opens up a new world of convenience and accessibility. You can now control your device without the need to touch the screen, making it a great option for individuals with limited mobility or those who prefer a hands-free experience.
So why wait? Give the head movement feature a try and experience a new way to interact with your iPhone!
Customizing Head Movements Settings
When it comes to controlling your iPhone with head movements, customization is the key. Apple has provided options to adjust the sensitivity and gesture settings according to your preferences. Here’s how you can customize the head movements settings on your iPhone:
1. Open the “Settings” app on your iPhone and navigate to “Accessibility.”
2. Tap on “Head Movements” under the “Physical and Motor” section.
3. In the Head Movements settings, you will find two options: “Enable Head Movements” and “Customize Gestures.”
4. To enable head movements, toggle the switch next to “Enable Head Movements.” Once enabled, your iPhone will recognize your head movements.
5. To customize the gestures, tap on “Customize Gestures.” Here, you can adjust the sensitivity and speed of the head movements.
6. The “Sensitivity” slider allows you to control how sensitive your iPhone is to head movements. Slide it to the left for less sensitivity or to the right for more sensitivity.
7. The “Speed” slider determines how fast your iPhone responds to your head movements. Adjust it to your desired speed.
8. You can also toggle the switches for individual gestures like “System Menu,” “App Switcher,” and “Lock Screen.” This allows you to choose which actions you want to perform using head movements.
9. Experiment with the settings to find the right balance that suits your needs and comfort.
10. Once you have customized the settings, you can start using head movements to control your iPhone with precision and ease.
Customizing the head movements settings gives you the flexibility to personalize your iPhone experience and adapt it to your unique preferences and physical abilities.
Navigating Your iPhone Using Head Movements
Once you have enabled head movements on your iPhone, you can begin utilizing this unique feature to navigate your device with ease. Let’s take a closer look at how you can use head movements to control your iPhone:
1. Scroll and select: To scroll through a page, simply tilt your head in the desired direction. If you want to select an item, keep your head steady for a moment until the item is highlighted, and then tilt your head slightly to activate the selection.
2. Swipe and switch: To swipe between different screens or switch between apps, tilt your head quickly in the direction you want to go. This allows you to effortlessly move between different pages, such as your home screen, app drawer, or browser tabs.
3. Zoom in and out: When viewing images or webpages, you can use head movements to zoom in or out. By tilting your head away from you, you can zoom in on the content, and by tilting your head towards you, you can zoom out and see a wider view.
4. Control media playback: Head movements also provide a convenient way to control media playback on your iPhone. To play or pause a video or music, simply tilt your head to the left. Tilt it to the right to skip to the next track or video.
5. Access Notification Center and Control Center: To access the Notification Center, tilt your head downwards. Likewise, to open the Control Center, tilt your head upwards. This allows for quick and easy access to these important features without having to swipe or touch the screen.
6. Interact with Siri: Head movements can also be used to interact with Siri. Simply tilt your head twice quickly to activate Siri, and then you can proceed with your voice commands, making it even more convenient to use your iPhone hands-free.
7. Fine-tuning sensitivity: If you find that the head movements are too sensitive or not responsive enough, you can adjust the sensitivity in the head movements settings. Experiment with different sensitivity levels to find the one that suits you best.
With these functionalities, navigating your iPhone using head movements becomes a seamless and intuitive process. Whether you have limited mobility or simply prefer a hands-free approach, this feature opens up new possibilities for interacting with your device.
Using Head Movements for Accessibility Features
Head movements on the iPhone can be a powerful tool for individuals with limited mobility. With the ability to control various accessibility features, it opens up a whole new world of possibilities. Here are some ways you can utilize head movements for accessibility on your iPhone:
1. Voice Control: Head movements can be used to activate Voice Control, allowing you to navigate and interact with your iPhone completely hands-free. Whether you want to make calls, send messages, or launch apps, you can do it all by simply moving your head in the desired direction.
2. AssistiveTouch: AssistiveTouch is a feature that provides a virtual menu with customizable options and gestures. With head movements, you can navigate through the AssistiveTouch menu and perform actions such as tapping, scrolling, zooming, and more. This is especially helpful for individuals who have difficulty using physical buttons or gestures.
3. Switch Control: Switch Control allows you to control your iPhone using external switches or through head movements. By assigning specific actions to different head movements, you can navigate through apps, control media playback, adjust settings, and perform other tasks, all without touching the screen or buttons.
4. Zoom: For individuals with visual impairments, head movements can be used to control the zoom level on their iPhone. By moving their head closer or farther away from the device’s camera, they can zoom in or out on the screen, making it easier to read content or view details.
5. Gestures: Head movements can also be used to perform custom gestures that enable specific actions on your iPhone. For example, you can set up a head movement to activate Siri, take a screenshot, switch between apps, or perform any other action you find useful.
Using head movements for accessibility features not only provides greater independence and control for individuals with limited mobility but also enhances their overall user experience. It empowers them to interact with their iPhones in ways that were previously impossible, opening up a world of opportunities and possibilities.
Troubleshooting Head Movements on iPhone
If you are experiencing issues with head movements not working properly on your iPhone, don’t worry! Here are some troubleshooting tips to help you resolve the problem.
1. Check Your iPhone’s Software Version: Ensure that you are running the latest version of iOS on your iPhone. Head movement control may require specific software updates to function correctly. Go to Settings > General > Software Update to check for any available updates.
2. Calibrate Head Movements: Sometimes, calibrating head movements can improve their accuracy. To do this, go to Settings > Accessibility > Head Movements > Calibration. Follow the on-screen instructions to complete the calibration process.
3. Check Head Movements Sensitivity: Adjusting the sensitivity of head movements can make a difference in how well they work for you. Head to Settings > Accessibility > Head Movements and try adjusting the sensitivity slider to a level that suits you best.
4. Restart Your iPhone: A simple restart can often resolve minor issues. Hold down the power button until the slide to power off option appears. Slide to power off, wait a few seconds, and then press and hold the power button again to turn your iPhone back on.
5. Disable and Re-enable Head Movements: Turning off head movements and then turning them back on can sometimes solve any temporary glitches. Go to Settings > Accessibility > Head Movements and toggle the switch off. Wait a few moments, and then toggle it back on.
6. Reset All Settings: If none of the above troubleshooting steps work, you can try resetting all settings on your iPhone. This will not delete any data but will reset all settings to their default values. Go to Settings > General > Reset > Reset All Settings. Note that you will have to reconfigure any personalized settings after the reset.
If you have tried all of the above troubleshooting steps and are still facing issues with head movements on your iPhone, it may be worth contacting Apple Support or visiting an Apple Store for further assistance. They will be able to provide more in-depth help and diagnose any hardware or software-related problems.
In conclusion, controlling your iPhone with head movements is a revolutionary feature that brings convenience and accessibility to a whole new level. Whether you have limited mobility or simply want to have a hands-free experience, this functionality allows you to navigate your device effortlessly. With the help of the Now You Know app, you can activate this feature and start enjoying the benefits it offers. From answering calls to scrolling through webpages, the ability to control your iPhone with head movements opens up a world of possibilities. So, why wait? Give it a try and experience the future of mobile interaction today!
FAQs
1. Can I really control my iPhone with head movements?
Yes, you can! The iPhone has a built-in accessibility feature called “Head Movement Control” that allows users to control their device using the motion of their head.
2. How do I enable Head Movement Control on my iPhone?
To enable Head Movement Control, go to your iPhone’s Settings, then select “Accessibility” and tap on “Head Control”. From there, you can turn on the feature and customize its settings to suit your needs.
3. What can I do with Head Movement Control?
Head Movement Control allows you to perform various actions on your iPhone, such as scrolling, selecting items, tapping, and even adjusting the volume. You can navigate through apps, control music playback, answer calls, and more, all with just the movement of your head.
4. Is Head Movement Control suitable for everyone?
While Head Movement Control can be a valuable tool for individuals with limited mobility, it may not be suitable or comfortable for everyone. It is important to try it out and see if it works well for you. If not, there are alternative accessibility features available on the iPhone that may better meet your needs.
5. Are there any limitations or challenges with Head Movement Control?
Head Movement Control relies on the front-facing camera of your iPhone to track your head movements. This means that in low-light conditions or if the camera is obstructed, the feature may not work as effectively. Additionally, it may take some time to get accustomed to the motion required for precise control. However, with practice, many users find it to be a convenient and intuitive way to interact with their device.