
In today’s world, cell phones have become an indispensable part of our lives. We rely on them for communication, accessing information, and even for entertainment. However, one major challenge we face is keeping our cell phones charged, especially when we are on the go or during power outages. This is where a solar cellphone charger comes in, offering a sustainable and eco-friendly solution.
A solar cellphone charger utilizes the power of the sun to generate electricity, which can then be used to charge your device. Not only does it provide a convenient way to keep your phone powered up, but it also reduces your dependence on traditional power sources, helping to reduce your carbon footprint. In this article, we will guide you through the steps of making your own solar cellphone charger, allowing you to harness the sun’s energy and keep your phone charged wherever you are.
Inside This Article
- Materials Needed
- Steps to Prepare the Solar Panels
- Assembling the Cellphone Charger
- Charging Your Phone with the Solar Charger
- Conclusion
- FAQs
Materials Needed
Creating a solar cellphone charger is a fantastic way to harness the power of the sun to keep your phone charged and ready to go, especially when you’re on the go. To embark on this DIY project, you will need the following materials:
- Small solar panels
- USB charging circuit
- Rechargeable battery pack
- Enclosure or case
- Wires and connectors
- Epoxy resin or adhesive
- Mounting hardware
- Tools (such as a soldering iron and wire cutter)
- Optional: Voltage regulator
Let’s take a closer look at each of these materials and their role in building your solar cellphone charger.
1. Small Solar Panels: The solar panels are the heart of your charger. Choose a pair of small solar panels that are compact, lightweight, and efficient at converting sunlight into electricity.
2. USB Charging Circuit: The USB charging circuit is responsible for regulating the flow of electricity and ensuring that your phone’s battery is charged safely. It connects the solar panels to the rechargeable battery pack.
3. Rechargeable Battery Pack: The battery pack stores the solar energy captured by the panels. Opt for a high-capacity rechargeable battery to provide ample power for your phone.
4. Enclosure or Case: You will need a suitable enclosure or case to house all the components. It should be durable, weather-resistant, and have enough space to accommodate the panels, circuit, and battery pack.
5. Wires and Connectors: Use high-quality wires and connectors to connect the solar panels, charging circuit, and battery pack together. These will ensure efficient power flow and secure connections.
6. Epoxy Resin or Adhesive: These materials are used to secure the components in place within the enclosure or case. They provide structural integrity and protect the internal components from damage.
7. Mounting Hardware: Depending on your preference, you may need mounting hardware to attach the solar panels to a surface, such as an outdoor backpack or a window.
8. Tools: Prepare the necessary tools, which may include a soldering iron, wire cutter, and other basic handheld tools to assist with the assembly process.
9. Optional: Voltage Regulator: If you want to ensure a consistent and stable voltage output, you can consider adding a voltage regulator to the circuit. This will protect your phone from potential power fluctuations.
Now that you have an understanding of the materials needed, it’s time to delve into the step-by-step process of preparing the solar panels for your cellphone charger.
Steps to Prepare the Solar Panels
Preparing the solar panels for your cellphone charger is a crucial step in ensuring its efficiency and effectiveness. Follow these steps to properly prepare the panels:
- Gather the necessary materials: To prepare the solar panels, you will need the following materials:
- Solar cells
- Tabbing wire
- Flux pen
- Bus wire
- Tabbing tape
- Soldering iron and solder
- Inspect the solar cells: Begin by examining the solar cells for any defects or damages. It is important to ensure they are in good condition before proceeding.
- Pre-tab the solar cells: Use the tabbing wire and flux pen to pre-tab the solar cells. This involves applying flux to the bus bars on the back of the solar cells and then attaching the tabbing wire to the bus bars.
- Solder the tabbing wire: Once the tabbing wire is in place, use a soldering iron to carefully solder the tabbing wire to the bus bars. Make sure the solder joints are secure and avoid applying excessive heat that may damage the solar cells.
- Connect the solar cells: Take the pre-tabbed solar cells and connect them together using the tabbing tape. Place the cells side by side, aligning the tabbing wire connections, and ensure they are firmly secured with the tabbing tape.
- Test the solar panel: After assembling the solar cells, test the panel’s voltage and current output using a multimeter. This will help you verify that the connections are properly made and that the panel is generating the expected power.
- Protect the solar panel: Lastly, encase the solar panel in a protective covering such as clear acrylic or a transparent sheet to shield it from any potential damage and outdoor elements.
By following these steps, you will be able to prepare the solar panels for your cellphone charger. Once the panels are ready, you can proceed to the next step of assembling the charger and harnessing the power of the sun to charge your phone on the go.
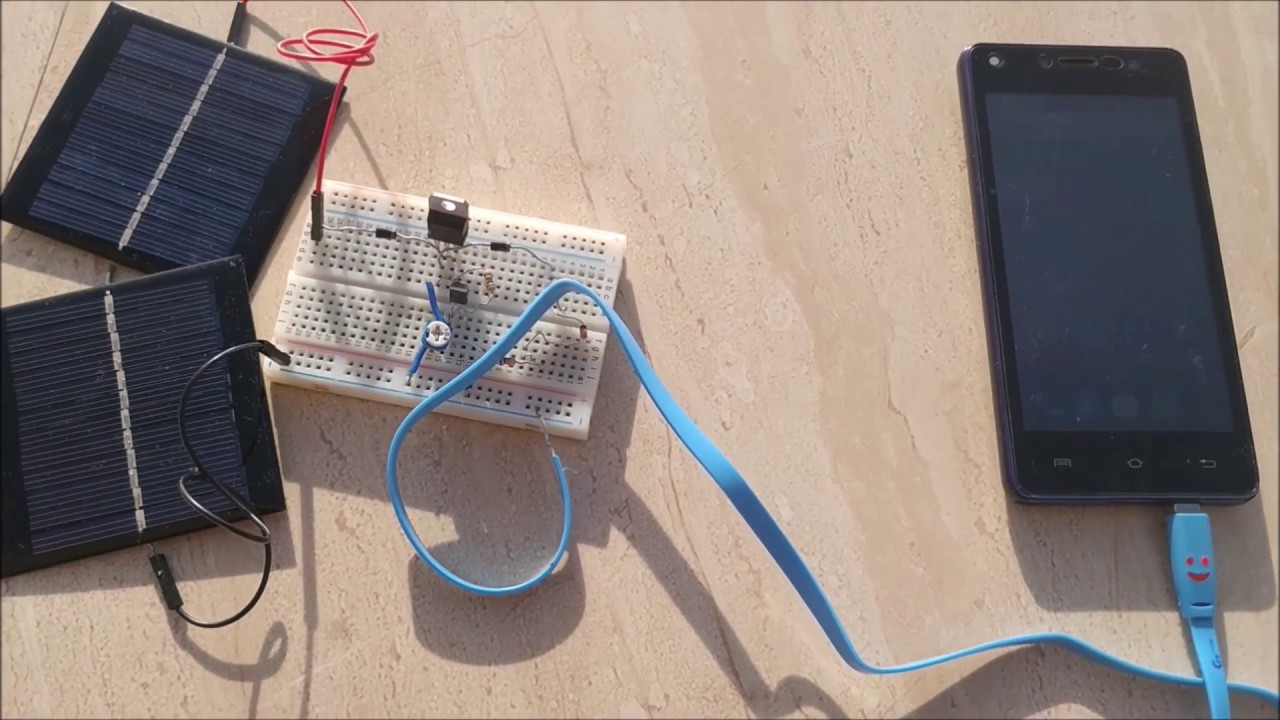
Assembling the Cellphone Charger
Now that you have prepared the solar panels, it’s time to assemble your very own cellphone charger. Follow these steps to put everything together:
- Step 1: Gather the materials: Make sure you have all the necessary components, including the solar panels, voltage regulator, rechargeable battery, USB charging port, and wires.
- Step 2: Connect the solar panels: Begin by connecting the positive (+) and negative (-) terminals of the solar panels to the corresponding terminals on the voltage regulator. This will regulate the voltage output from the solar panels.
- Step 3: Connect the voltage regulator: Use wires to connect the voltage regulator to the rechargeable battery. The voltage regulator will control the amount of power flowing into the battery, preventing it from overcharging.
- Step 4: Attach the USB charging port: Connect the positive and negative terminals of the rechargeable battery to the USB charging port using wires. This will allow you to plug your cellphone into the charger.
- Step 5: Test the charger: Before sealing everything up, make sure to test the charger. Connect your cellphone to the USB charging port and check if the battery starts charging. If everything is working properly, proceed to the final step.
- Step 6: Secure the components: Once you have confirmed that the charger is functioning correctly, it’s time to secure the components. You can use a small project box or a waterproof container to protect the circuitry from the elements. Ensure that all wires are properly insulated to avoid short circuits.
- Step 7: Add finishing touches: If desired, you can add an on/off switch to control the flow of power from the solar panels to the cellphone. This will help conserve battery life and ensure that the charger only operates when needed.
With these steps completed, you have successfully assembled your own cellphone charger using solar panels. Now, you can enjoy the convenience of charging your phone on-the-go, using the power of the sun.
Charging Your Phone with the Solar Charger
Once you have successfully assembled your cellphone charger using the solar panels, it’s time to start harnessing the power of the sun to charge your phone. Here are the steps to follow:
- Position the solar charger in direct sunlight: Find a sunny spot outdoors where you can place the solar charger. Ensure that it is exposed to direct sunlight, as this is crucial for effective charging.
- Connect your phone to the charger: Most solar chargers come with USB ports that allow you to connect your phone using a USB cable. Simply plug one end of the USB cable into the charger and the other end into your phone. Ensure that the connection is secure.
- Monitor the charging progress: Depending on the efficiency of your solar charger and the amount of sunlight available, the charging process may take a while. Keep an eye on your phone’s battery indicator to see the progress. You may also check the output power of the solar charger to ensure it is generating enough energy.
- Adjust the position of the solar charger if needed: If you notice that the charging process is slow or your phone is not charging at all, try repositioning the solar charger to maximize its exposure to sunlight. Experiment with different angles and orientations until you find the optimal position.
- Be patient: Solar charging is not as fast as traditional charging methods, especially if the sunlight is limited. It may take several hours to fully charge your phone. Therefore, it is important to be patient and give the solar charger enough time to harness the sun’s energy and convert it into power for your device.
- Enjoy the benefits of sustainable charging: By using a solar charger, you are not only saving energy and reducing your carbon footprint, but also gaining access to a convenient and sustainable charging solution. Whether you are on a camping trip, hiking, or simply want to take advantage of the natural power of the sun, a solar charger can be a great alternative to traditional charging methods.
Remember to always follow the instructions provided by the manufacturer of your specific solar charger model. It is also advisable to have a backup charging option like a power bank or a traditional wall charger in case of emergencies or when sunlight is limited.
With the increasing popularity of renewable energy sources, utilizing a solar charger for charging your phone is a step towards a greener and more sustainable future. So, go ahead and harness the power of the sun to keep your phone powered up wherever you go.
Conclusion
In today’s world, where cellphones have become an essential part of our lives, having a reliable and eco-friendly charging solution is a great advantage. Making a solar cellphone charger is not only a sustainable option but also a practical one. By harnessing the power of the sun, we can charge our phones anytime and anywhere, without relying on electricity grids or conventional chargers.
Creating a solar cellphone charger may seem like a daunting task, but with the right knowledge and materials, anyone can do it. The process involves gathering the necessary components, such as solar panels, rechargeable batteries, and a charging circuit, and assembling them into a portable and efficient charger.
By following the steps outlined in this guide, you can make a solar cellphone charger that not only reduces your dependence on traditional power sources but also helps you embrace clean and renewable energy. So go ahead, unleash your creativity, and contribute to a greener future while staying connected to the world through your cellphone.
FAQs
1. Can I use a solar cellphone charger for any type of cellphone?
Yes, most solar cellphone chargers are designed to be compatible with a wide range of cellphones, including popular brands like Apple, Samsung, and Huawei. However, it is recommended to check the specifications of the charger to ensure compatibility with your specific cellphone model.
2. How long does it take to fully charge a cellphone using a solar charger?
The time required to fully charge a cellphone using a solar charger can vary depending on factors such as sunlight intensity, battery capacity, and charging efficiency. On average, it may take anywhere from 2 to 8 hours to fully charge a cellphone using solar power. It’s worth noting that charging times may be longer on cloudy or overcast days.
3. Can I use a solar charger as the primary source of charging for my cellphone?
Solar chargers can be a convenient and eco-friendly option for charging your cellphone, especially when you’re outdoors or in areas without access to electricity. However, it’s recommended to have alternative charging options available, such as a traditional wall charger or power bank, in case of prolonged periods of low sunlight or emergencies.
4. Are solar cellphone chargers waterproof?
Not all solar cellphone chargers are waterproof, so it is important to check the product specifications before purchasing. Some manufacturers offer waterproof or water-resistant models that can withstand exposure to rain or splashes. If you plan to use the charger in outdoor or wet environments, it’s advisable to opt for a waterproof or water-resistant model.
5. Are there any safety precautions I need to consider when using a solar charger?
When using a solar cellphone charger, it is important to follow basic safety guidelines. Avoid exposing the charger to extreme temperatures, as this can affect its performance and lifespan. Additionally, ensure that the charger is properly connected to your cellphone and avoid overcharging your device. If you notice any unusual behavior or damage to the charger, discontinue use and seek professional assistance.