
Welcome to the world of renewable energy! In this article, we will explore the fascinating realm of building a solar cellphone charger. With the constant advancement of technology and the increasing reliance on mobile devices, finding a sustainable and eco-friendly way to charge our phones has become more important than ever. Solar energy offers a fantastic solution, allowing us to harness the power of the sun and convert it into electricity that can charge our cellphones on the go. Whether you’re an eco-conscious individual looking to reduce your carbon footprint or an enthusiastic DIYer seeking a fun and practical project, this guide will help you embark on your journey to build your very own solar cellphone charger. Get ready to learn about the components you’ll need, the steps to assemble your charger, and the benefits of incorporating solar energy into your daily life. Let’s dive in!
Inside This Article
- Introduction
- Materials Needed
- Step 1: Testing the Solar Panel
- Step 2: Building the Circuit
- Step 3: Assembling the Charger
- Introduction
- Materials Needed
- Step 1: Testing the Solar Panel
- Step 2: Building the Circuit
- Step 3: Assembling the Charger
- Step 4: Testing and Using the Charger
- Conclusion
- FAQs
Introduction
Welcome to the world of renewable energy and innovation! In this article, we will delve into the exciting realm of building your very own solar cellphone charger. As the demand for sustainable energy solutions continues to rise, harnessing the power of the sun to charge our devices has become increasingly popular. Not only does it provide a convenient and eco-friendly way to keep your cellphone juiced up, but it also allows you to stay connected even when you’re off the grid.
So, whether you’re an outdoor enthusiast, a tech-savvy individual, or simply someone who is passionate about reducing their carbon footprint, building a solar cellphone charger is a fantastic DIY project that combines technology and environmental consciousness.
To embark on this journey, you’ll need a few essential materials and a basic understanding of electronics. Don’t worry if you’re new to the world of circuits and soldering – we’ll guide you through each step, ensuring that you feel confident throughout the process. So let’s gather our supplies and get started on this electrifying adventure!
Materials Needed
Before starting the process of building a solar cellphone charger, it’s important to gather all the necessary materials. Here’s a list of the items you’ll need:
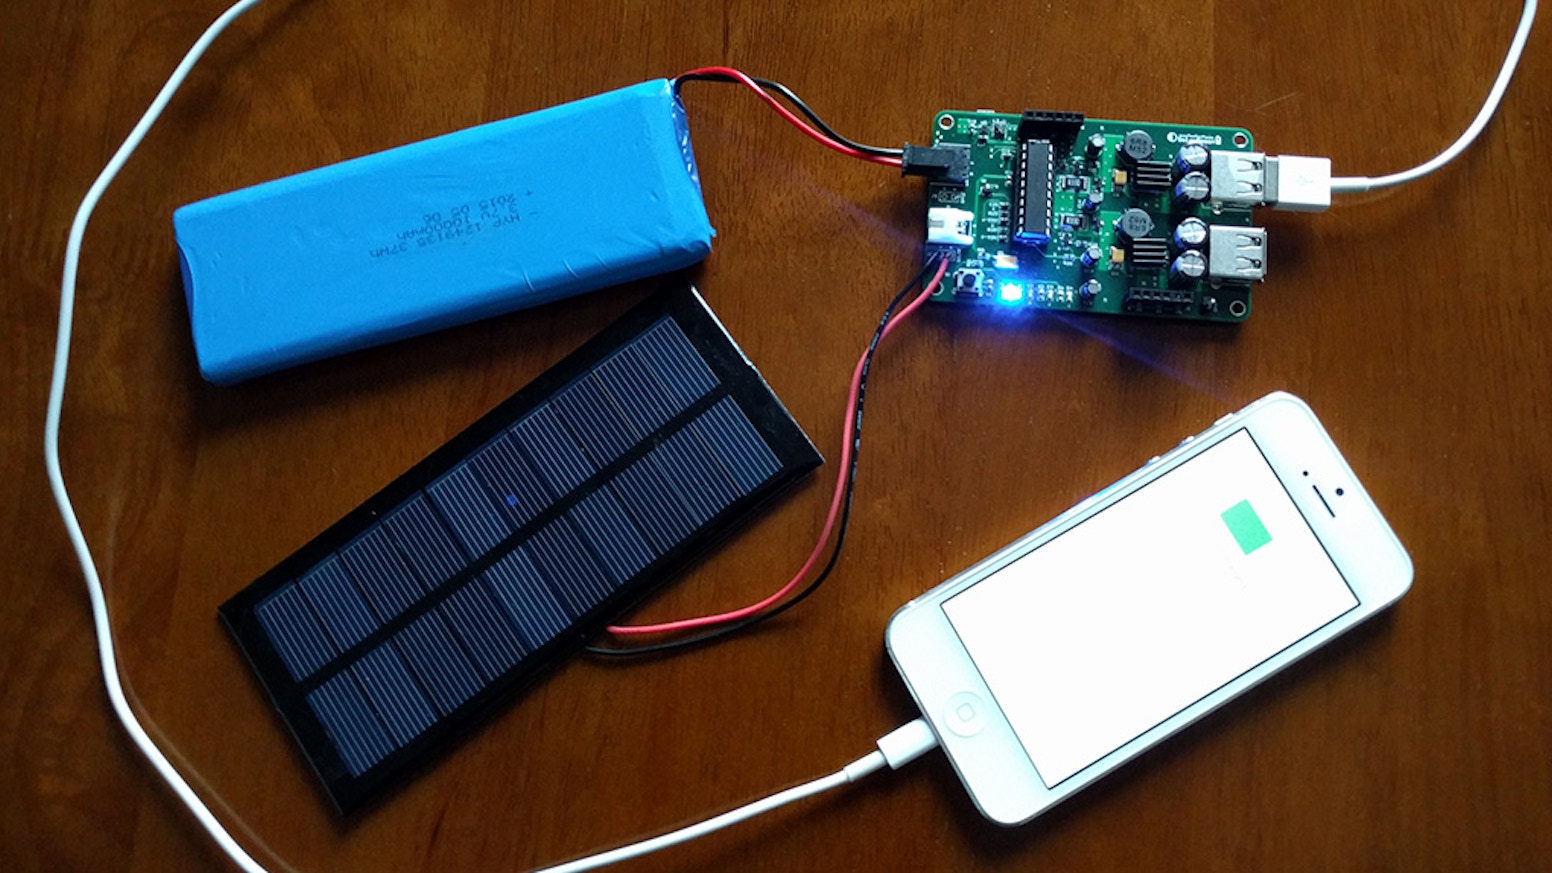
- Solar panel: A high-quality solar panel is essential for harnessing solar energy efficiently. Look for one with a suitable wattage to charge your cellphone.
- Power bank: A power bank acts as a backup battery, storing the energy generated by the solar panel. Choose a power bank with a USB output compatible with your cellphone.
- USB cable: This cable will connect the power bank to your cellphone for charging. Ensure it is a high-quality, durable cable.
- Diode: A diode is used to prevent reverse current flow, protecting your circuit and ensuring energy flows in the correct direction.
- Voltage regulator: A voltage regulator is necessary to stabilize the voltage output from the solar panel, ensuring a safe and steady charge for your cellphone.
- Connectors: You’ll need connectors to securely attach the various components, making sure they are properly connected and able to conduct electricity.
- Soldering iron: A soldering iron is necessary for soldering the components together, creating the required electrical connections in the circuit.
- Solder wire: High-quality solder wire is essential for creating reliable and durable connections between the components.
- Heat shrink tubing: Heat shrink tubing helps insulate and protect the soldered connections, providing additional stability and preventing short circuits.
- Wire cutters: Wire cutters are needed to cut and trim the wires to the appropriate length, ensuring a clean and organized circuit assembly.
- Wire strippers: Wire strippers are essential for removing the insulation from the wires, allowing for proper electrical contact.
- Electrical tape: Electrical tape is used to secure and insulate the exposed wires, providing an extra layer of protection against damage and short circuits.
Gathering all these materials beforehand will ensure a smooth and efficient building process for your solar cellphone charger. Once you have everything ready, you can proceed to the next steps.
Step 1: Testing the Solar Panel
Before starting to build your solar cellphone charger, it is important to first test the solar panel to ensure that it is in working condition and capable of providing the necessary voltage and current output.
The first step in testing the solar panel is to carefully examine it for any physical damage or defects. Look for any cracks, scratches, or loose connections. If you notice any issues, it is best to replace the panel before proceeding.
Once you have determined that the solar panel is in good condition, you can proceed to test its voltage and current output. To do this, you will need a multimeter, which is a tool used to measure electrical values.
Connect the positive (red) probe of the multimeter to the positive terminal of the solar panel and the negative (black) probe to the negative terminal. Set the multimeter to the appropriate voltage setting, typically DC voltage. The reading on the multimeter should indicate the voltage output of the solar panel.
In addition to checking the voltage, it is also important to measure the current output of the solar panel. To do this, set the multimeter to the appropriate current setting, typically DC current. Disconnect the positive wire of the solar panel from the multimeter and connect it to the positive terminal of a load, such as a resistor or small light bulb. Then, connect the negative terminal of the load to the negative terminal of the solar panel. The multimeter reading will indicate the current output of the solar panel.
It is important to ensure that the solar panel is capable of providing the required voltage and current to charge your cellphone or power bank. Refer to the specifications of your device to determine the optimal charging parameters. If the voltage and current output of the solar panel are within the desired range, you can proceed with confidence knowing that your solar charger will be effective.
Step 2: Building the Circuit
After testing the solar panel, the next step is to build the circuit that will convert the solar energy into usable power for charging a cellphone. This circuit will consist of several components, including a diode, a voltage regulator, and connectors to connect the different elements together.
The first step is to connect the diode to the circuit. The diode serves an important purpose in preventing the reverse flow of current from the power bank back to the solar panel. This is important to ensure that the solar panel only charges the power bank and not the other way around.
Next, the voltage regulator is connected to the circuit. The voltage regulator is responsible for stabilizing the voltage output from the solar panel. This ensures that the power provided to the cellphone is consistent and doesn’t exceed the device’s limits. It helps protect the cellphone from voltage spikes and fluctuations.
Once the diode and voltage regulator are in place, it’s time to connect the solar panel to the circuit. The positive and negative terminals of the solar panel are connected to the corresponding terminals on the circuit. This establishes the connection between the solar panel and the circuit, allowing the generated solar power to flow into the circuit.
It’s important to ensure that all connections are secure and properly soldered. Use a soldering iron and solder wire to solder the connections and make them sturdy. This will prevent any loose connections or accidental disconnections while using the cellphone charger.
Finally, insulate the connections using heat shrink tubing and electrical tape. This adds an extra layer of protection and prevents any short circuits or exposed wires. Insulating the connections is crucial for the safety and functionality of the charger.
Once all the components are connected and the circuit is built, you can move on to the next step of assembling the cellphone charger.
Step 3: Assembling the Charger
Now that we have completed the circuit, it’s time to assemble the charger. This step will involve soldering the components together, insulating the connections, and connecting the USB cable to the output of the circuit.
1. Soldering the components together: Take your soldering iron and solder wire, and heat up the iron. Begin by soldering the wire from the solar panel to the input of the diode. Make sure that the connection is secure and well-insulated. Next, solder the wires from the voltage regulator to the appropriate spots on the circuit, following the pin configuration specified by the manufacturer. Double-check that all connections are properly soldered and that there are no loose wires.
2. Insulating the connections: To ensure the longevity and safety of your charger, it’s important to insulate the connections. Use heat shrink tubing to cover each soldered joint individually. Slip the tubing over the joint and apply heat using a heat gun or a lighter. The tubing will shrink and form a tight seal around the connection. Alternatively, you can use electrical tape to wrap around the joints, ensuring that they are well-insulated. Repeat this process for each soldered connection in the circuit.
3. Connecting the USB cable: Take the USB cable and cut off one end. Strip the wires to expose the inner copper strands. Match the color-coded wires from the USB cable to the appropriate connections on the output side of the circuit. Typically, the red wire corresponds to the positive (+) terminal, and the black wire corresponds to the negative (-) terminal. Solder the wires to the circuit, making sure to secure them tightly and insulate the connections as done before.
Once all the soldering and insulation work is complete, you have successfully assembled your solar cellphone charger! It’s time to move on to the final step: testing and using the charger.
Introduction
Are you tired of your phone running out of battery power, especially when you’re on the go? Building your own solar cellphone charger can be a solution to this problem. With a few materials and some basic knowledge of electronics, you can harness the power of the sun to keep your phone charged and ready to go. In this article, we will guide you through the step-by-step process of building a solar cellphone charger, from testing the solar panel to assembling the charger and using it effectively. Let’s get started!
Materials Needed
To build a solar cellphone charger, you will need the following materials:
- Solar panel
- Power bank
- USB cable
- Diode
- Voltage regulator
- Connectors
- Soldering iron
- Solder wire
- Heat shrink tubing
- Wire cutters
- Wire strippers
- Electrical tape
Step 1: Testing the Solar Panel
The first step is to test the solar panel to ensure it is in working condition. Start by checking the voltage and current output of the panel. Use a multimeter to measure the voltage and current readings. This will give you an idea of how much power the solar panel can generate. Ensure that the readings match the specifications of the panel to ensure optimal performance.
Step 2: Building the Circuit
Once you have verified the solar panel is functioning properly, you can proceed to build the circuit. Start by connecting the diode to the circuit to prevent reverse current flow. The diode ensures that energy flows in one direction, from the solar panel to the power bank.
Next, connect the voltage regulator to the circuit. The voltage regulator helps stabilize the voltage output from the solar panel, ensuring a steady and safe level of power reaches your phone.
Finally, connect the solar panel to the circuit using the appropriate connectors. Make sure the connections are secure and well-insulated to prevent any potential short circuits.
Step 3: Assembling the Charger
Now, it’s time to assemble the physical components of the charger. Start by soldering the various components together. Take your time to ensure a strong and reliable connection between each element of the circuit.
After soldering, insulate the connections using heat shrink tubing or electrical tape. This step is crucial for safety purposes and to prevent any accidental short circuits.
Finally, connect the USB cable to the output of the circuit. This will be the interface through which your phone will connect to the charger and receive power. Make sure the USB cable is secure and properly connected to the circuit.
Step 4: Testing and Using the Charger
You’re almost done! The next step is to test your newly built solar cellphone charger. Connect your phone to the charger using the USB cable and check if it starts charging. Verify that the charging capability is functioning correctly by monitoring the battery percentage of your phone as it charges.
For optimal charging performance, ensure that the solar panel is properly positioned to receive maximum sunlight. Place the panel in a location with direct sunlight and adjust its angle to capture the most sunlight throughout the day.
Lastly, to maintain efficient charging and prolong the lifespan of your solar cellphone charger, here are a few tips:
- Keep the solar panel clean and free from dirt or debris.
- Regularly check the connections and ensure they are secure.
- Avoid overcharging your phone or power bank to prevent battery damage.
With these tips in mind, you can enjoy the convenience and sustainability of your homemade solar cellphone charger.
Building your own solar cellphone charger is not only an eco-friendly alternative, but it also ensures that you have a reliable source of power wherever you go. By following the step-by-step process outlined in this article and utilizing the power of the sun, you can keep your phone charged and ready for any adventure. So go ahead, give it a try, and harness the power of renewable energy.
Conclusion
Building a solar cellphone charger is a great way to harness the power of renewable energy and keep your mobile devices charged on the go. By following the steps outlined in this guide, you can create a sustainable and eco-friendly charging solution that works efficiently and reliably.
Not only does building a solar cellphone charger reduce reliance on traditional electricity sources, but it also offers the flexibility and convenience of charging your phone wherever you are, even in remote locations or during power outages. The ability to tap into the sun’s energy provides an environmentally friendly alternative that reduces carbon footprint and protects the planet.
Whether you are an outdoor enthusiast, a tech enthusiast, or simply someone looking to be more environmentally conscious, building a solar cellphone charger is a rewarding and beneficial project. It not only saves you money on electricity bills but also helps you contribute to the global effort of transitioning to clean energy sources.
So, why wait? Start gathering the materials and follow the steps to build your own solar cellphone charger today. Embrace renewable energy and enjoy the satisfaction of having a reliable, sustainable, and portable charging solution at your fingertips.
FAQs
1. Can I build a solar cellphone charger myself?
Yes, you can certainly build a solar cellphone charger yourself! There are many DIY tutorials and kits available online that provide step-by-step instructions on how to create your own charger using solar panels, a battery, and a few other components. It can be a fun and rewarding project for those with basic knowledge of electronics.
2. How does a solar cellphone charger work?
A solar cellphone charger harnesses the power of the sun to convert sunlight into electricity. It consists of solar panels that capture sunlight and convert it into direct current (DC) electricity. This DC electricity is then converted into usable AC power by a charge controller or an inverter. The charger stores the electricity in a battery, which can be used to charge your cellphone at any time.
3. What are the benefits of using a solar cellphone charger?
Using a solar cellphone charger offers several benefits. Firstly, it allows you to charge your phone using clean, renewable energy, reducing your carbon footprint. Secondly, it provides a convenient charging solution, especially when you’re outdoors or in areas without access to electricity. Additionally, it offers cost savings over time by reducing reliance on traditional electricity sources.
4. Can a solar cellphone charger fully charge a cellphone?
Yes, a properly designed and efficient solar cellphone charger can fully charge a cellphone. However, the charging time may vary depending on factors such as the size and efficiency of the solar panels, the intensity of sunlight, and the capacity of the battery. It’s important to choose a charger with suitable power output and capacity to ensure it can meet your charging needs.
5. Can I use a solar cellphone charger in any weather conditions?
Solar panels can generate electricity even on cloudy days, although the charging efficiency may be lower compared to sunny conditions. However, heavy rain or extreme weather conditions may affect the charger’s performance. It’s always a good idea to check the weather forecast and choose the right charging method accordingly. Some portable solar chargers also come with waterproof and durable designs, making them suitable for outdoor use in various weather conditions.