
Are you tired of dealing with tangled wires while using your USB devices? Well, we have the perfect solution for you – making your USB wireless! With this simple and effective method, you can ditch the hassle of wires and enjoy the convenience of a wireless connection. Whether it’s a printer, keyboard, mouse, or any other USB device, this guide will walk you through the steps to turn them into a wireless device. Say goodbye to the limitations of cords and cables and embrace the freedom of a wireless setup. Get ready to transform your USB devices into wireless wonders with our easy-to-follow instructions. Let’s dive in and discover how you can make a USB wireless!
Inside This Article
- Materials Needed
- Step 1: Preparing the USB
- Step 2: Installing the Wireless Adapter Driver
- Step 3: Connecting the Wireless Adapter
- Step 4: Configuring the Wireless Network
- Troubleshooting
- Conclusion
- FAQs
Materials Needed
Before you start turning your USB into a wireless adapter, you will need to gather a few materials. Here are the key items you will need:
- USB Stick: Select a USB stick that is compatible with your computer. Make sure it has enough storage space to accommodate the necessary drivers and software. A USB 2.0 or 3.0 will work just fine.
- Wireless Adapter: This is the most important component. Choose a wireless adapter that fits your specific needs. Research and select one that supports the wireless standards you require, such as 802.11n or 802.11ac.
- Driver Software: Visit the manufacturer’s website of your wireless adapter and download the latest driver software. Make sure to select the driver that corresponds to your operating system.
- Internet Connection: You will need a stable internet connection to download the necessary software and drivers. This can be through a wired connection on your computer or using another device with internet access.
- Administrator Access: To install the driver and configure your wireless adapter, you will need administrative access on your computer. Ensure that you have the necessary privileges to perform these tasks.
- Antivirus Software: It is always recommended to have up-to-date antivirus software running on your computer. This will help protect against any potential threats or malware that may be encountered during the process.
With these materials in hand, you’re ready to proceed with turning your USB into a wireless adapter. Make sure you have everything ready before starting the process to ensure a smooth and successful setup.
Step 1: Preparing the USB
Before you can make your USB wireless, you need to properly prepare it. Here are the steps you need to follow:
1. Ensure that your USB is compatible: Not every USB device can be made wireless. Make sure your USB has the capability to connect to a wireless network. Check the packaging or device specifications for wireless compatibility information.
2. Format the USB: If your USB is not already formatted, you will need to format it to a compatible file system, such as FAT32 or NTFS. Formatting will erase all data on the USB, so make sure to backup any important files before proceeding.
3. Check for firmware updates: Some USB devices may require firmware updates to enable wireless functionality. Visit the manufacturer’s website and check for any available firmware updates for your specific USB model. Follow the instructions provided to update the firmware if necessary.
4. Connect the USB to your computer: Use the appropriate USB cable to connect your USB device to your computer. Ensure that your computer recognizes the USB and that it is properly connected.
5. Install necessary software: Some USB devices may require additional software to enable wireless functionality. Check the packaging or manufacturer’s website for any software that needs to be installed. Follow the installation instructions provided.
By following these steps, you will be well on your way to preparing your USB for wireless connectivity. Once you have completed this step, you can proceed to the next step of installing the wireless adapter driver.
Step 2: Installing the Wireless Adapter Driver
After obtaining a wireless adapter, the next step is to install the necessary driver software. The driver acts as a mediator between the hardware and the operating system, enabling them to communicate effectively.
1. Begin by inserting the USB wireless adapter into an available USB port on your computer. Make sure it is securely plugged in.
2. Once inserted, the operating system will attempt to automatically install the driver. This process varies depending on the operating system you are using.
3. If the automatic installation does not occur, there are a couple of options available. Firstly, you can check the packaging of the wireless adapter for a driver CD. Insert the CD into your computer and follow the on-screen instructions to install the driver.
4. Alternatively, you can visit the website of the wireless adapter’s manufacturer and search for the appropriate driver software. Most manufacturers have a support or download section on their website where you can find the necessary drivers for your specific adapter model.
5. Download the driver software and save it to a location on your computer that is easily accessible, such as the desktop or a specific folder.
6. Locate the downloaded driver file and double-click on it to initiate the installation process. Follow the on-screen instructions provided by the installer to complete the driver installation.
7. Once the installation is complete, restart your computer to ensure that the driver is properly loaded and configured.
8. After restarting, the wireless adapter should be detected by your computer, and you should be able to connect to wireless networks in your area.
It is worth noting that some wireless adapters may require additional configurations or software installations beyond just the driver. It is recommended to consult the documentation or online resources provided by the manufacturer to ensure you have all the necessary components for your wireless adapter to function properly.
By following these steps, you can successfully install the wireless adapter driver and be ready to connect to wireless networks.
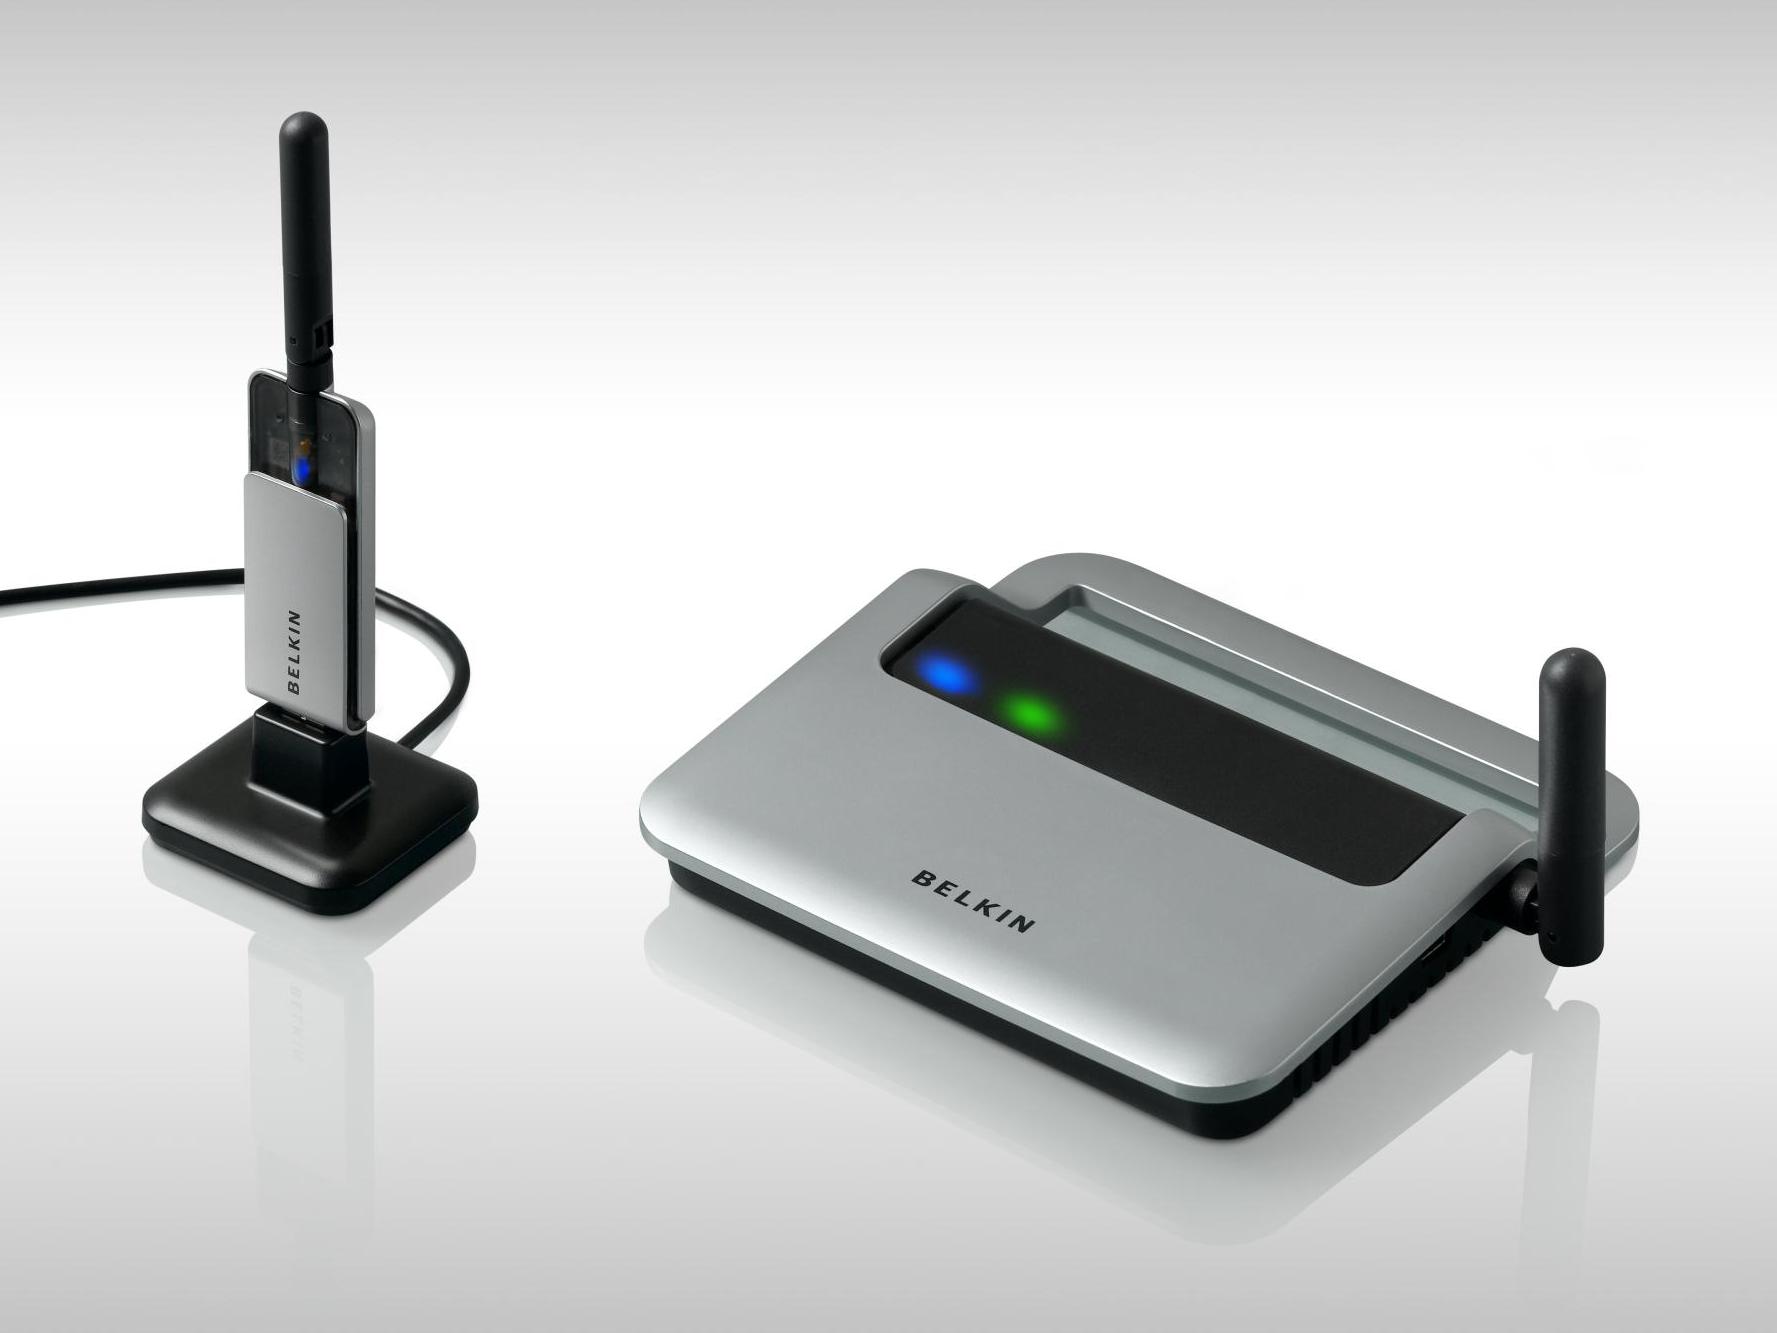
Step 3: Connecting the Wireless Adapter
Once you have successfully installed the wireless adapter driver, the next step is to connect the wireless adapter to your computer. Follow these simple steps to establish a wireless connection:
1. Locate an available USB port on your computer. It is usually found on the front or back panel of the CPU, or on the side of a laptop. Make sure the USB port is not obstructed and is easily accessible.
2. Take the USB end of the wireless adapter and insert it gently into the USB port. Apply steady pressure until the adapter is firmly inserted. Ensure that the USB connector is properly aligned with the port to prevent any damage.
3. Once you have connected the wireless adapter, your computer should automatically recognize it. You may see a notification or hear a sound indicating that a new device has been connected. If you don’t see any immediate notification, don’t worry, as some devices may require additional setup or drivers.
4. To double-check if the wireless adapter is properly connected, go to your computer’s Device Manager. To access Device Manager, right-click on the Windows Start button and select “Device Manager” from the dropdown menu. Look for the name of the wireless adapter under the “Network Adapters” section. If the adapter is listed without any warning signs, it means that the connection was successful.
5. Once the wireless adapter is connected and recognized by your computer, you can now start enjoying wireless internet connectivity. Open your web browser and browse the internet, or connect to your home Wi-Fi network by selecting your network name from the available networks list.
Remember, if you are connecting to a secured Wi-Fi network, you will be prompted to enter the network password. Make sure to enter the correct password to establish a secure connection.
It’s important to note that the exact steps for connecting a wireless adapter may vary depending on the brand and model you are using. Always refer to the manufacturer’s instructions for specific guidance.
Now that you have successfully connected your wireless adapter, you are ready to enjoy the convenience of wireless connectivity on your computer.
Step 4: Configuring the Wireless Network
Once you have successfully installed the wireless adapter and connected it to your USB port, the next step is to configure the wireless network settings. Configuring the network is crucial to ensure a stable and secure connection to the internet.
Here are the essential steps to follow:
1. Accessing the Router
In order to configure the wireless network, you need to access your router’s settings. To do this, open a web browser and enter the router’s IP address into the address bar. The IP address is usually printed on the router or can be found in the user manual.
2. Entering the Login Credentials
Once you have entered the router’s IP address, you will be prompted to enter the login credentials. Typically, the default username and password are ‘admin’ for both fields, but it is recommended to change them for security reasons. If you have already changed the credentials, enter the new ones.
3. Navigating to the Wireless Settings
Once you have logged into the router, navigate to the wireless settings section. This can usually be found under a tab labeled ‘Wireless’ or ‘Wi-Fi’. Here, you will find various options to configure the wireless network.
4. Setting the SSID
The SSID (Service Set Identifier) is the name of your wireless network. Choose a unique and easily identifiable name for your network. Avoid using personal information or any sensitive data in the SSID to maintain security.
5. Selecting the Security Settings
It is crucial to enable the appropriate security settings to protect your network from unauthorized access. Choose the security protocol that best suits your needs. WPA2-PSK (Wi-Fi Protected Access 2 with Pre-Shared Key) is the most secure option available. Create a strong and unique password for your network.
6. Save and Apply the Settings
Once you have configured the SSID and security settings, click on the ‘Save’ or ‘Apply’ button to save the changes. The router will then apply the new settings, and your wireless network will be configured.
7. Connecting to the Wireless Network
After configuring the wireless network, disconnect the ethernet cable from your computer. Open the network settings on your device (laptop, smartphone, etc.) and select your network’s SSID from the available Wi-Fi networks. Enter the password you set during the configuration process, and you should be connected to the wireless network.
Remember to make a note of the SSID and password for future reference. In case you forget the password or need to change any network settings, you can always access the router’s settings again.
Configuring the wireless network is an integral part of utilizing your USB wireless adapter efficiently. It ensures a stable and secure connection, allowing you to enjoy seamless internet access.
Troubleshooting
Despite following the steps mentioned above, you may encounter some difficulties while setting up a USB wireless adapter. Don’t worry, as we have listed some common issues and their solutions below to help you troubleshoot the problem:
1. Device not recognized: If your computer fails to recognize the USB wireless adapter, try the following:
- Ensure that the USB port is functioning properly by connecting another device.
- Try connecting the adapter to a different USB port.
- Make sure that the driver for the adapter is correctly installed.
2. Limited or no connectivity: If you are experiencing issues with connectivity after installing the adapter, consider the following solutions:
- Check if your Wi-Fi router is properly connected to the internet.
- Ensure that the wireless adapter is within range of the router.
- Try restarting your router and adapter.
- Check for any software conflicts that may be affecting the adapter’s functionality.
3. Slow internet speed: If your internet connection is slow despite using a USB wireless adapter, you can try the following:
- Check if there are any obstructions or interference between the adapter and the router.
- Ensure that you are using the latest driver for the adapter.
- Consider upgrading your internet plan or contacting your internet service provider for assistance.
4. Disconnecting frequently: If your USB wireless adapter keeps disconnecting from the network, try the following:
- Make sure that the adapter is securely plugged into the USB port.
- Check if there are any driver updates available for the adapter.
- Reset your router and try reconnecting the adapter.
If none of the above solutions resolve your issue, it is possible that there may be a problem with the USB wireless adapter itself. In such cases, contacting the manufacturer’s support team or considering a replacement might be the best course of action.
Remember, troubleshooting can sometimes be trial and error, so don’t hesitate to experiment with different solutions to find what works for you. With a bit of patience and persistence, you’ll be able to resolve any issues and enjoy a seamless wireless internet experience with your USB wireless adapter.
Conclusion
In conclusion, making a USB wireless is a convenient and cost-effective way to expand the connectivity options of your devices. Whether you want to upgrade an existing USB device or create a wireless solution from scratch, there are various methods available. From using a USB wireless adapter to designing a wireless USB hub, the possibilities are endless.
Not only does making a USB wireless enable seamless connectivity, but it also provides flexibility and mobility. You can enjoy the freedom of connecting your devices without the restrictions of wires. Whether you’re streaming media, transferring files, or using peripherals, going wireless can enhance your overall user experience.
By following the steps and tips mentioned in this guide, you can easily transform your USB devices into wireless ones. Stay connected and eliminate the clutter of wires with a USB wireless solution that suits your needs and preferences. Experience the convenience and freedom of wireless connectivity and take your devices to the next level.
FAQs
1. Can I make my USB wireless?
Yes, it is possible to make a USB device wireless by using a wireless adapter. This adapter connects to the USB port of your device and provides wireless capabilities, allowing you to connect to Wi-Fi networks or other wireless devices.
2. What are the benefits of making my USB wireless?
Converting your USB device into a wireless one offers several advantages. Firstly, it provides the freedom to connect to wireless networks, eliminating the need for physical connections through cables. This enables seamless mobility and convenience. Additionally, it allows you to connect your USB device to multiple wireless devices simultaneously, enhancing the flexibility of data transfer.
3. Is it possible to make any USB device wireless?
In most cases, any USB device can be made wireless with the use of a wireless adapter. However, it is important to note that the compatibility and functionality of the wireless adapter may vary depending on the type of USB device. It is recommended to consult the device’s manufacturer or refer to the wireless adapter’s specifications to ensure compatibility.
4. Are there any limitations to making a USB device wireless?
While converting a USB device to wireless can offer numerous benefits, there are a few limitations to consider. Firstly, the range of the wireless connection may be limited, especially compared to wired connections. This means that you may experience reduced signal strength or loss of connection if you move too far from the wireless source. Additionally, the speed of data transfer may be slower compared to a wired connection, depending on the capabilities of the wireless adapter and the wireless network.
5. What wireless adapters are available for making USB devices wireless?
There are various wireless adapters available in the market that can be used to make USB devices wireless. Some common types include USB Wi-Fi adapters, which are specifically designed to provide wireless connectivity to devices without built-in Wi-Fi capabilities. Additionally, there are wireless USB hubs that allow multiple USB devices to connect wirelessly to a computer or network. It is important to research and choose the appropriate adapter based on your specific needs and device compatibility.