
Are you the proud owner of an iPhone 14? Whether you’re a long-time Apple enthusiast or a recent convert, it’s essential to understand how to remove the SIM card from your device. The SIM card is a small, removable chip that stores important information, such as your phone number and contacts.
In this article, we will guide you step-by-step on how to remove the SIM card from your iPhone 14. We will also provide some useful tips and precautions to ensure a smooth process. So, if you’re ready to learn how to safely remove the SIM card from your iPhone 14, let’s dive in!
Inside This Article
- Overview
- Step 1: Gather necessary tools – SIM card removal tool – Paperclip or ejection tool (if SIM card removal tool is not available)
- Step 2: Locate the SIM card tray- Look for the SIM card tray slot on the side of your iPhone 14
- Step 3: Insert the SIM card removal tool or a paperclip into the small hole near the SIM card tray
- Step 4: Eject the SIM card tray – Apply gentle pressure using the tool to push the SIM card tray out of the iPhone 14
- Step 5: Remove the SIM card – Carefully remove the SIM card from the tray
- Step 6: Reinsert the SIM card tray- Align the SIM card tray properly and push it back into the iPhone 14
- Step 7: Check the SIM card connection – Make sure the SIM card is securely inserted and the tray is flush with the iPhone
- Step 8: Power on your iPhone 14 – Turn on your iPhone 14 and ensure it recognizes the SIM card properly
- Conclusion
- FAQs
Overview
Removing the SIM card from an iPhone 14 might seem like a daunting task, but it is actually quite simple once you know the proper steps. Whether you need to switch your SIM card to a new device or perform a SIM card swap, we will guide you through the process. In this article, we will explore four different methods to remove the SIM card from an iPhone 14, ensuring that you can easily perform this essential task whenever necessary.
Before diving into the specific methods, let’s briefly discuss the importance of the SIM card. The SIM card, short for Subscriber Identity Module, is a small chip that connects your iPhone to your cellular network. It contains crucial information such as your phone number, carrier details, and other identifying data. Without a functioning SIM card, your iPhone cannot make calls, send messages, or connect to the internet via cellular data.
Now that we understand the significance of the SIM card, let’s explore the different methods you can use to remove it from your iPhone 14.
Step 1: Gather necessary tools – SIM card removal tool – Paperclip or ejection tool (if SIM card removal tool is not available)
Before you begin removing the SIM card from your iPhone 14, you will need to gather a few essential tools. These tools will make the process much easier and ensure that you don’t damage the SIM card or the device itself. Here’s what you’ll need:
1. SIM card removal tool: The SIM card removal tool is a small pin-like tool that is specifically designed to eject the SIM card tray from the iPhone. If you have the SIM card removal tool that came with your iPhone, it is highly recommended to use it as it provides a safe and easy way to remove the SIM card.
2. Paperclip or ejection tool (if SIM card removal tool is not available): If you don’t have the SIM card removal tool, don’t worry. You can use a straightened paperclip or another small, pointy object as an alternative. Just make sure that it is thin enough to fit into the SIM card ejection slot without causing any damage.
Once you have these tools ready, you’re all set to proceed with the SIM card removal process for your iPhone 14.
Step 2: Locate the SIM card tray- Look for the SIM card tray slot on the side of your iPhone 14
Once you have gathered the necessary tools, it’s time to locate the SIM card tray on your iPhone 14. The SIM card tray is typically located on the side of the device. To find it, turn your phone over and look for a small slot with a pinhole. This slot is where the SIM card tray is housed.
On the iPhone 14, the SIM card tray is usually on the right side of the device. It may be slightly above or below the volume buttons, depending on the model. The exact placement may vary slightly between different iPhone 14 models, so take a moment to double-check the location on your specific device.
It’s important to note that the SIM card tray slot is quite small, so you may need to take a closer look to locate it. Additionally, the slot is typically labeled with a small SIM card icon, making it easier to identify. Once you have found the slot, you are ready to proceed to the next step.
Step 3: Insert the SIM card removal tool or a paperclip into the small hole near the SIM card tray
After locating the SIM card tray, it’s time to insert the SIM card removal tool. This tool is usually provided with your iPhone, and it looks like a small pin or paperclip. If you don’t have the official tool, you can also use a paperclip that has been straightened out.
Hold the tool firmly, and look for a small hole located near the SIM card tray. This hole is specifically designed to accommodate the tool and eject the tray. It is usually positioned on the side of the iPhone, but the exact placement may vary depending on the model.
Gently insert the tool into the hole, applying a bit of pressure until you feel it make contact with the release mechanism. Be careful not to insert the tool too forcefully or at an angle, as this could potentially damage the internal components of your iPhone.
Once the tool is inserted correctly, you will feel a slight resistance. Press firmly but gently in a straight line towards the iPhone to activate the release mechanism. The SIM card tray should start to pop out, allowing you to easily remove it from the device.
If you don’t have the SIM card removal tool or a paperclip, you can use an alternative method. Apple devices have a small hole on the SIM card tray itself, designed for easy SIM card removal. Simply insert the tip of a straightened paperclip into the hole and press firmly to eject the tray.
Once the tray is ejected, you can carefully remove it from the iPhone. Take note of the orientation of the SIM card in the tray before removing it. This will ensure that you insert the SIM card correctly when you reinsert it later.
It’s worth mentioning that the SIM card tray on iPhone 14 models is located on the side of the device. However, the specific placement and design may vary based on the iPhone model you own. Make sure to consult your device’s user manual or check the Apple Support website for detailed instructions tailored to your specific iPhone model.
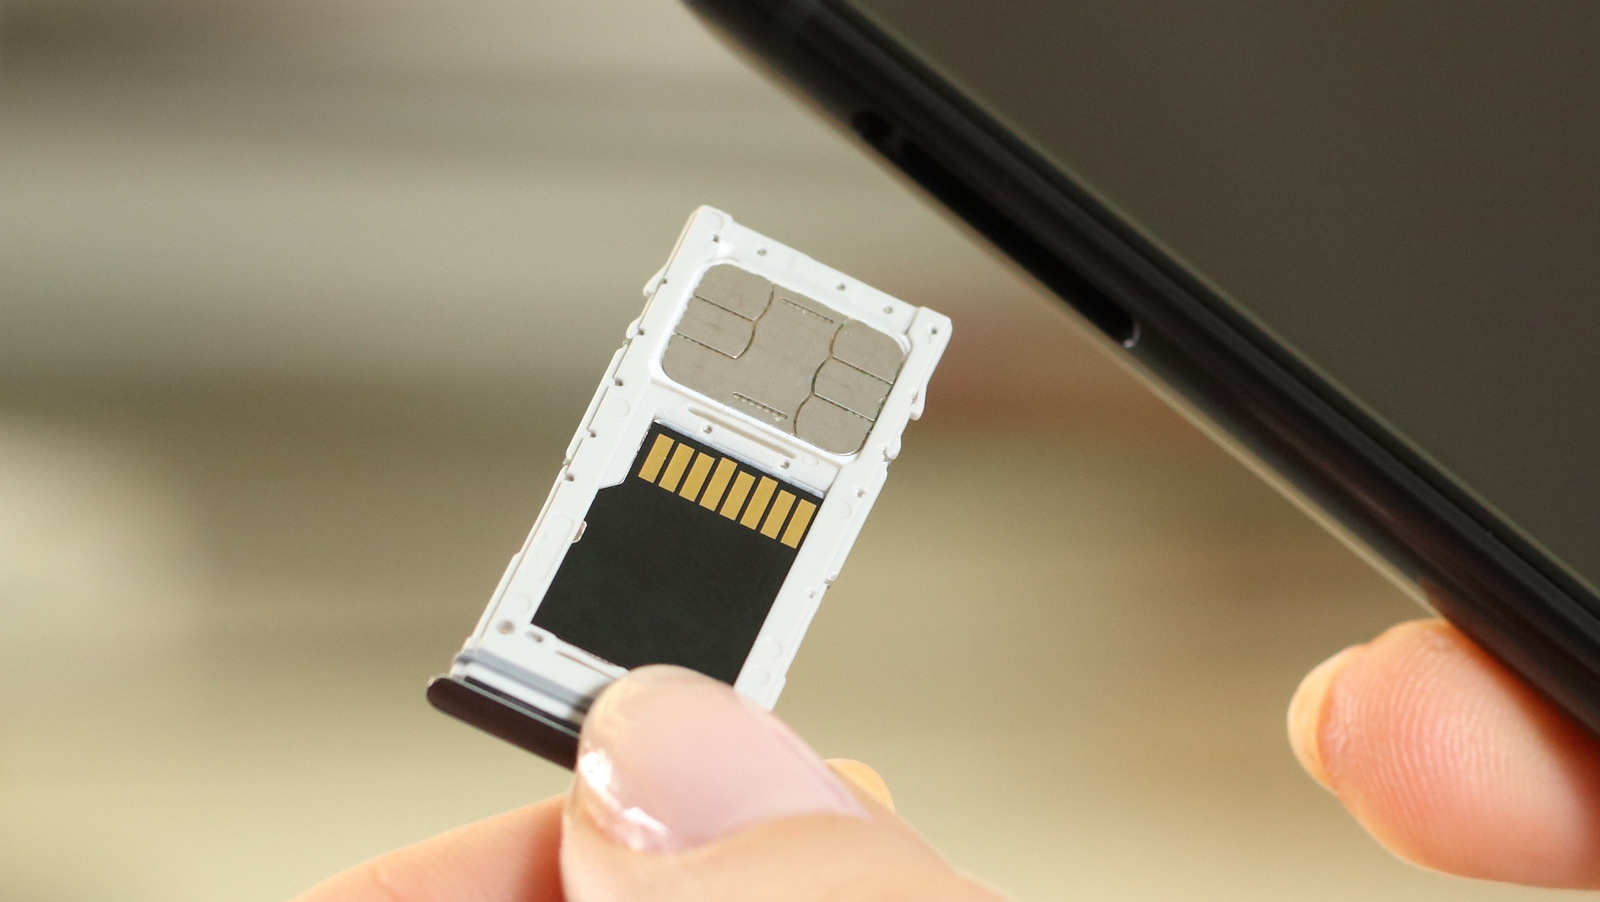
Step 4: Eject the SIM card tray – Apply gentle pressure using the tool to push the SIM card tray out of the iPhone 14
Now that you have located the SIM card tray on your iPhone 14, it’s time to eject it and remove the SIM card. Here’s how you can do it:
1. Take the SIM card ejector tool that came with your iPhone 14. Insert one end of the tool into the small hole next to the SIM card tray slot. Make sure to push the tool in straight and firmly, but be gentle to avoid damaging any internal components.
2. Apply gentle pressure using the tool to push the SIM card tray out of the iPhone 14. You may feel a slight resistance, but that’s normal. Keep applying even pressure until the tray pops out slightly.
3. Once the tray is partially ejected, carefully remove the tool and use your fingers to fully pull out the SIM card tray from the iPhone 14.
4. Take note of the orientation of the SIM card in the tray. Most SIM cards have a small corner cut, which should align with the corresponding corner of the tray. This ensures that the SIM card is inserted correctly when you reinsert it.
5. Remove the existing SIM card from the tray, if you’re replacing it with a new one. If you’re just temporarily removing the SIM card, make sure to keep it in a safe place, such as a SIM card holder or a small container, to prevent losing it.
6. Once you’ve removed the SIM card or replaced it, carefully insert the empty or new SIM card back into the tray. Make sure the SIM card is properly aligned with the tray, and gently slide the tray back into the iPhone 14 until it locks into place.
Remember, handling the SIM card tray and the SIM card itself requires a delicate touch. Avoid applying excessive force or bending the tray, as it can cause damage to your iPhone 14. Take your time and be patient throughout the process to ensure a successful SIM card removal or replacement.
Step 5: Remove the SIM card – Carefully remove the SIM card from the tray
Once you have successfully ejected the SIM card tray using any of the methods mentioned above, it’s time to remove the SIM card itself. This step requires a gentle touch and precision to avoid any damage to the SIM card or the iPhone.
Before removing the SIM card, ensure that your hands are clean and dry. This will prevent any dirt, dust, or moisture from getting on the SIM card or affecting its functionality.
Take a closer look at the SIM card tray. You will notice a small slot or groove in which the SIM card is placed. Use your fingers or a pair of tweezers to carefully lift the SIM card from the tray.
Hold the SIM card with your fingers or tweezers by its edges. Make sure not to touch the metal contacts on the card as oils from your skin can interfere with the SIM card’s performance.
Gently pull the SIM card out of the tray, ensuring that you do not apply excessive force or bend the card. Take your time and be patient during this process to prevent any accidental damage.
Once the SIM card is removed, double-check the tray and make sure there are no debris or foreign objects left behind. Use a soft cloth or compressed air to clean the tray if necessary.
Now that you have successfully removed the SIM card from the tray, you can proceed with any necessary tasks, such as replacing the SIM card, inserting a new SIM card, or troubleshooting SIM-related issues with your iPhone 14.
Remember to handle the SIM card with care and keep it in a safe place. If you are not immediately replacing the SIM card, store it in a protective case or a SIM card holder to prevent loss or damage.
By following these steps, you can safely and effectively remove the SIM card from your iPhone 14 without causing any harm to the device or the card itself.
Step 6: Reinsert the SIM card tray- Align the SIM card tray properly and push it back into the iPhone 14
Once you have successfully removed the SIM card from your iPhone 14, it’s time to reinsert the SIM card tray. Follow these steps to ensure proper alignment and insertion:
1. Take the SIM card tray and make sure it is clean and free from any dust or debris. This will help prevent any damage to the SIM card or the iPhone.
2. Gently place the SIM card into the tray, ensuring that the gold contacts are facing downwards. Make sure the card sits flush and is not sticking out of the tray.
3. Carefully align the tray with the SIM card slot on the side of your iPhone 14. The tray should fit snugly into the slot without any resistance.
4. Once the tray is properly aligned, gently push it back into the iPhone until you feel it click into place. Be careful not to apply too much force, as this could cause damage to the SIM card or the iPhone’s internal components.
5. After reinserting the tray, give it a gentle tug to ensure that it is securely in place. If it comes out easily, remove it and repeat the process to ensure a proper and secure fit.
By following these steps, you can safely and effectively reinsert the SIM card tray into your iPhone 14. Once the tray is securely in place, you can power on your device and enjoy all the features and capabilities of your iPhone.
Step 7: Check the SIM card connection – Make sure the SIM card is securely inserted and the tray is flush with the iPhone
After successfully inserting the SIM card into the iPhone 14, it’s crucial to check the connection to ensure everything is in place. Follow these steps to check the SIM card connection:
- Inspect the SIM card slot: Carefully examine the slot where the SIM card is inserted. Ensure there is no debris or damage that could interfere with the connection.
- Verify the SIM card is securely inserted: Gently push down on the SIM card to ensure it is properly seated in the tray. A flush fit is essential for a reliable connection.
- Confirm the tray is aligned: Make sure the SIM card tray is aligned correctly with the iPhone’s body. It should be flush with the surface of the device, without any protrusions or misalignment.
- Test the SIM card: Finally, turn on your iPhone 14 and check if the SIM card is detected. Go to the device’s settings and look for the SIM card information to ensure it is recognized and active.
By following these steps, you can ensure that your SIM card is securely inserted and that the tray is properly aligned with your iPhone 14. This will help maintain a reliable connection and prevent any issues related to SIM card connectivity.
Step 8: Power on your iPhone 14 – Turn on your iPhone 14 and ensure it recognizes the SIM card properly
After successfully inserting the SIM card into your iPhone 14, it’s time to power it on and make sure that the device recognizes the SIM card. Follow the simple steps below to get your iPhone 14 up and running:
1. Press and hold the power button located on the side or top of your iPhone 14 until the Apple logo appears on the screen. Release the button once the logo is displayed.
2. Wait for a few moments as your iPhone 14 boots up. The startup process may take a short while, so be patient and let the device complete the initialization.
3. Once your iPhone 14 is fully powered on, you will be prompted to choose your language and region. Follow the on-screen instructions to make your selections.
4. Next, you will be asked to connect to a Wi-Fi network. If you have access to a Wi-Fi connection, select your network and enter the password if required. If not, you can choose to set up your iPhone 14 without a Wi-Fi connection by selecting the option that suits your needs.
5. Once connected to the internet, your iPhone 14 will begin the activation process. This may take a few minutes, and during this time, your device will communicate with the cellular network to verify the SIM card and activate your phone number.
6. After the activation process is complete, you will be prompted to set up Touch ID or Face ID for added security. Follow the instructions on the screen to complete the setup.
7. Finally, your iPhone 14 will display the home screen, indicating that the SIM card has been recognized, and you are ready to use your device with cellular services.
It is important to note that if your iPhone 14 does not recognize the SIM card or you encounter any issues during the setup process, you may need to check the compatibility of your SIM card with the device or contact your cellular service provider for further assistance.
By following these steps, you can power on your iPhone 14 and ensure that it recognizes the SIM card properly. Now you can start enjoying all the features and functions this amazing device has to offer!
After going through this comprehensive guide, you now have a clear understanding of how to remove the SIM card from an iPhone 14. The process is relatively simple and can be completed in just a few easy steps. Remember to power off your iPhone before starting, and always use a SIM card removal tool or a paperclip to avoid damaging the SIM card tray. Whether you need to replace your SIM card, switch carriers, or troubleshoot connectivity issues, being able to remove your SIM card confidently is a valuable skill for any iPhone user.
FAQs
Q: How do I remove the SIM card from an iPhone 14?
A: To remove the SIM card from an iPhone 14, follow these steps:
1. Locate the SIM card tray on the side of the iPhone 14.
2. Insert the SIM card ejector tool or a small paperclip into the tiny hole next to the tray.
3. Gently push the tool or paperclip into the hole until the tray pops out slightly.
4. With your fingers, carefully pull the SIM card tray out of the iPhone.
5. Remove the SIM card from the tray and reinsert the tray back into the iPhone.
Q: Can I use my old SIM card in the iPhone 14?
A: Yes, the iPhone 14 is generally compatible with most standard SIM cards. However, if your old SIM card is larger or smaller than the nano-SIM size used in the iPhone 14, you may need to obtain a new SIM card or use a SIM card adapter to fit it properly.
Q: Will removing the SIM card delete my data?
A: No, removing the SIM card from your iPhone 14 will not delete any data or affect the content stored on your device. The SIM card primarily holds your cellular information, such as your phone number and carrier details.
Q: How do I find the SIM card tray on my iPhone 14?
A: The SIM card tray on the iPhone 14 is usually located on the right-hand side of the device, near the volume buttons. It may be flush with the side of the phone, and you can access it by using a SIM card ejector tool or a small paperclip.
Q: What should I do if I accidentally damage the SIM card tray?
A: If you accidentally damage the SIM card tray on your iPhone 14, it is recommended to visit an Apple Store or an authorized service provider for assistance. They can help you repair or replace the damaged tray to ensure proper functionality.