
Are you the proud owner of the new iPhone 13? Congratulations! With its advanced features and sleek design, it’s no wonder you want to make the most of your device. One task that you may need to do at some point is removing the SIM card. Whether you want to switch carriers, upgrade your SIM card, or troubleshoot connectivity issues, removing the SIM card is a straightforward process. In this article, we will guide you through the steps to remove the SIM card from your iPhone 13. You’ll be able to do it with ease, ensuring that you can stay connected and enjoy all the features your iPhone 13 has to offer. So, let’s dive in and learn how to remove the SIM card on your iPhone 13!
Inside This Article
- Overview of SIM Card Removal on iPhone 13
- Step 1: Gather the necessary tools
- Step 2: Locate the SIM card tray
- Step 3: Insert the SIM card removal tool
- Step 4: Eject the SIM Card Tray
- Step 5: Remove or replace the SIM card
- Step 6: Reinsert the SIM card tray
- Conclusion
- FAQs
Overview of SIM Card Removal on iPhone 13
The iPhone 13 is the latest smartphone model from Apple that comes with a sleek design and powerful features. One of the essential components of any mobile device is the SIM card, which allows you to connect to cellular networks and make calls, send messages, and access the internet. If you need to switch to a new SIM card or troubleshoot network connectivity issues, you might find yourself needing to remove the SIM card from your iPhone 13.
In this article, we will provide you with a step-by-step guide on how to remove the SIM card from your iPhone 13. We’ll go through each step in detail, ensuring that you have the necessary tools and knowledge to perform the task with ease and confidence.
Whether you’re a new iPhone 13 user or someone who’s been using iPhones for years, this guide will help you navigate the process smoothly and ensure that you handle your SIM card and device with care.
So, let’s dive into the detailed steps to remove the SIM card from your iPhone 13 and make any necessary changes or replacements.
Step 1: Gather the necessary tools
Before you begin the process of removing the SIM card on your iPhone 13, it’s essential to gather the necessary tools. Having the right tools will make the process much smoother and help prevent any accidental damage to your device. Here are the tools you’ll need:
1. SIM card removal tool: This small piece of metal is specifically designed to eject the SIM card tray from your iPhone. It usually comes bundled with your device or can be purchased separately from Apple or any electronics store.
2. Microfiber cloth: It’s advisable to have a microfiber cloth on hand to wipe the iPhone’s screen and keep it free from any smudges or fingerprints during the SIM card removal process.
3. Optional: Gloves or anti-static wrist strap: To further protect your iPhone from potential static electricity or accidental drops, you may consider wearing gloves or using an anti-static wrist strap while handling the device.
Once you have gathered these tools, you are ready to move on to the next step of removing the SIM card from your iPhone 13.
Step 2: Locate the SIM card tray
Before you can remove the SIM card on your iPhone 13, you’ll need to locate the SIM card tray. The SIM card tray is a small slot where the SIM card is inserted and held securely. It is generally located on the side or top edge of the iPhone, depending on the model.
To find the SIM card tray on your iPhone 13, start by inspecting the sides of the device. Look for a small pinhole or a thin slot that appears to be slightly recessed compared to the surrounding area. This is typically where the SIM card tray is located.
If you have trouble locating the SIM card tray visually, you can also consult the device’s user manual or refer to the manufacturer’s website for specific instructions on your iPhone 13 model.
Once you’ve identified the SIM card tray, you’re ready to proceed to the next step, which involves inserting the SIM card removal tool.
Step 3: Insert the SIM card removal tool
Inserting the SIM card removal tool is a crucial step in the process of removing your SIM card on an iPhone 13. The SIM card removal tool is a small, thin metal pin that is provided with your iPhone.
To insert the SIM card removal tool, follow these simple steps:
- Locate the SIM card tray on your iPhone 13. It is usually located on the side or the top of the device, depending on the model.
- Take the SIM card removal tool and hold it firmly between your thumb and index finger.
- Insert the SIM card removal tool into the small hole on the SIM card tray. Apply gentle pressure until the tray pops out slightly.
- Once the tray is slightly popped out, remove the SIM card removal tool from the hole and set it aside.
When inserting the SIM card removal tool, make sure to apply steady and controlled pressure. Avoid using excessive force as it can damage the SIM card tray or the internal components of your iPhone.
If you are having trouble locating the SIM card tray or inserting the removal tool, refer to your iPhone’s user manual or seek assistance from an authorized service provider.
Remember, the SIM card removal tool is specifically designed for this purpose and using any other sharp object may cause irreparable damage to your iPhone.
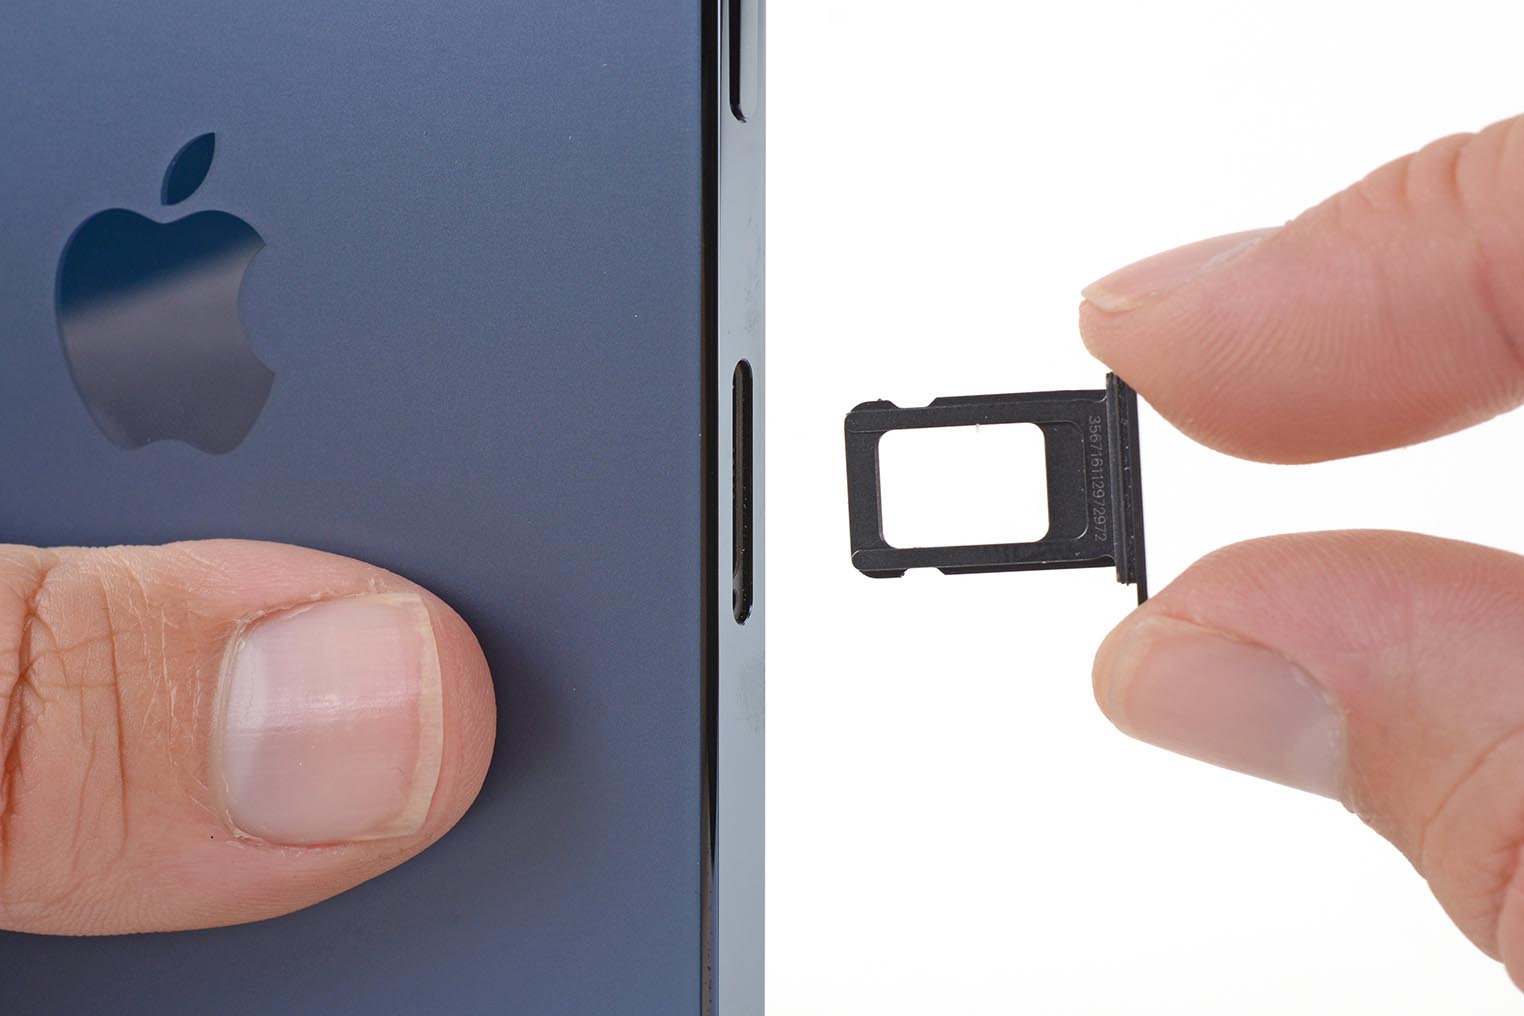
Step 4: Eject the SIM Card Tray
Now that you have located the SIM card tray on your iPhone 13, it’s time to eject it. Ejecting the SIM card tray is a simple process, and you can follow these steps to do it effortlessly:
- Step 1: Take the SIM card removal tool that came with your iPhone. It is a small metal pin-like object that you can find inside the iPhone packaging.
- Step 2: Insert one end of the SIM card removal tool gently into the small pinhole on the SIM card tray. Apply a small amount of pressure until you feel the tray slightly pop out.
- Step 3: Once you feel the tray pop out, pull it gently towards you using the other end of the SIM card removal tool or your fingers. Be careful not to apply too much force as it may damage the tray or your device.
By following these steps, you should be able to eject the SIM card tray on your iPhone 13 without any issues. But what should you do if you encounter any difficulties or if the tray is stuck?
If you find the tray is difficult to eject or stuck, make sure you are using the correct tool and that you are inserting it correctly. Apply gentle pressure and wiggle the tool slightly to dislodge the tray. Avoid using excessive force as it can cause damage to your device.
If the SIM card tray is still stuck, it is recommended to contact Apple Support or visit an authorized service provider to avoid causing any further damage to your iPhone.
Now that you have successfully ejected the SIM card tray, it’s time to move on to the next step: removing or replacing the SIM card.
Step 5: Remove or replace the SIM card
Once you have successfully ejected the SIM card tray, you can now proceed to remove or replace the SIM card on your iPhone 13. Here are the steps to follow:
- Inspect the SIM card and tray: Take a close look at the SIM card and the tray to ensure they are in good condition and free from any debris or damage. If you notice any issues, such as a bent SIM card or a damaged tray, it’s best to contact Apple or your service provider for assistance.
- Remove the old SIM card (if applicable): If you are replacing the SIM card, gently pull it out from the tray using your fingers or a pair of tweezers. Be cautious and make sure not to use excessive force, as this could damage the card or the tray.
- Place the new SIM card (if applicable): If you have a new SIM card that needs to be installed, align it with the designated slot on the tray. Make sure the gold contacts on the SIM card are facing down, and the notched corner matches the inner cutout on the tray.
- Insert the SIM card tray back into the iPhone: Carefully place the SIM card tray back into the iPhone’s SIM card slot. Ensure that it fits securely and flush with the device.
- Power on your iPhone: Once you have reinserted the SIM card tray, power on your iPhone by pressing and holding the power button until the Apple logo appears. It may take a few moments for your iPhone to establish a connection with the new or existing SIM card.
- Verify SIM card functionality: After your iPhone has powered on, go to the Settings app and navigate to “Cellular” or “Mobile Data” to ensure that your SIM card is recognized and functioning properly. If there are any issues, try restarting your device or contacting your service provider for further assistance.
Removing or replacing the SIM card on your iPhone 13 is a straightforward process that requires gentle handling and careful alignment. By following these steps, you can easily manage your SIM card and ensure seamless connectivity on your device.
Step 6: Reinsert the SIM card tray
After removing or replacing the SIM card, it’s time to reinsert the SIM card tray back into your iPhone 13. Follow these steps to properly reinsert the SIM card tray:
- Hold the SIM card tray with the gold contacts facing down and the notch in the corner.
- Gently align the SIM card tray with the SIM card slot on the side of your iPhone 13.
- Keyword: Gently Keyword: Align Keyword: SIM card tray Keyword: SIM card slot
- Carefully slide the tray back into the slot, making sure it goes in smoothly and doesn’t get stuck.
- Keyword: Carefully Keyword: Slide Keyword: Tray Keyword: Slot
- Push the tray all the way in until it is flush with the side of your device.
- Keyword: Push Keyword: Tray
- Give the tray a gentle tug to ensure that it is securely in place.
- Keyword: Give Keyword: Tray Keyword: Gentle tug
Once you have reinserted the SIM card tray properly, you can turn on your iPhone 13 and check if the device recognizes your SIM card. If you have inserted a new SIM card, you may need to follow the activation process provided by your service provider.
Remember, always handle the SIM card tray with care and take your time when reinserting it to avoid any damage to your iPhone 13 or the SIM card itself.
Removing the SIM card on your iPhone 13 is a simple process that can be done in just a few steps. Whether you need to replace your SIM card or switch to a new phone, knowing how to remove the SIM card is important. By following the steps outlined in this article, you can confidently remove the SIM card without any hassle.
Remember to always handle your SIM card with care to avoid any damage. Be sure to power off your iPhone before removing the SIM card and use the SIM card eject tool or a paperclip to safely remove it from the SIM tray. Once you have successfully removed the SIM card, you can easily insert a new one or transfer it to another device.
Now that you have learned how to remove the SIM card on your iPhone 13, you can confidently manage your SIM card needs with ease. Whether it’s for upgrading to a new phone or troubleshooting connectivity issues, you have the knowledge to handle it like a pro. By following the steps in this guide, you can ensure a smooth SIM card removal process every time.
FAQs
1. How do I remove the SIM card on iPhone 13?
To remove the SIM card on an iPhone 13, follow these steps:
- Locate the SIM card tray on the side of your iPhone 13.
- Insert a SIM card removal tool or a straightened paperclip into the small hole next to the tray.
- Gently push the tool into the hole until the tray pops out.
- Remove the SIM card from the tray by pulling it gently.
- Insert the SIM card tray back into the iPhone.
2. Can I use any SIM card with an iPhone 13?
Yes, the iPhone 13 is typically sold unlocked, allowing you to use any compatible SIM card from a supported carrier. However, it’s essential to ensure that the SIM card you want to use is compatible with your iPhone’s network bands and supported by your carrier. It’s recommended to check with your carrier or refer to Apple’s official documentation to confirm before inserting a new SIM card.
3. What if I accidentally damage or lose the SIM card tray?
If you accidentally damage or lose the SIM card tray for your iPhone 13, you can purchase a replacement SIM card tray from Apple or authorized retailers. Alternatively, you can visit an Apple Store or an authorized service provider to have the tray replaced.
4. Do I need to remove the SIM card before selling or trading in my iPhone 13?
Yes, it’s always advisable to remove the SIM card from your iPhone 13 before selling or trading it in. This ensures that your personal information, such as contacts and messages, remains secure. Additionally, removing the SIM card prevents any unexpected charges on your account if the new owner were to use the SIM card in another device.
5. Can I use two SIM cards simultaneously on an iPhone 13?
Yes, the iPhone 13 supports the use of two SIM cards using Dual SIM functionality. This feature allows you to have two active phone numbers on a single device, usually using one physical SIM card and an eSIM. With Dual SIM capability, you can have separate personal and work phone numbers, or use local and international SIM cards when traveling.