
Sure, here's the introduction in HTML format:
html
So, your iPhone 12’s battery isn’t holding its charge like it used to, and you’re considering replacing it yourself. You’ve come to the right place! In this comprehensive guide, we’ll walk you through the steps to replace the battery in your iPhone 12. Whether you’re experiencing rapid battery drain or your phone is shutting down unexpectedly, a new battery can breathe new life into your device. We’ll cover everything from the tools you’ll need to the step-by-step replacement process. By the end of this article, you’ll have the knowledge and confidence to tackle this DIY project and extend the lifespan of your beloved iPhone 12.
Inside This Article
- Step 1: Gather necessary tools
- Step 2: Power off the iPhone 12
- Step 3: Remove the display
- Step 4: Disconnect the battery
- Step 5: Replace the battery
- Step 6: Reassemble the iPhone 12
- Conclusion
- FAQs
Step 1: Gather necessary tools
Before you begin the battery replacement process for your iPhone 12, it’s crucial to gather the essential tools to ensure a smooth and efficient procedure. Here’s a list of the tools you’ll need:
1. Pentalobe Screwdriver: This specialized screwdriver is essential for removing the screws that secure the iPhone 12’s display assembly. Make sure to have the correct size to avoid damaging the screws.
2. Y000 Tri-Point Screwdriver: This screwdriver is necessary for disconnecting the battery connector. It’s important to use the right tool to prevent any damage to the connector or surrounding components.
3. Spudger Tool: A spudger tool is handy for safely prying and disconnecting various connectors and components inside the iPhone 12. It helps prevent accidental damage during disassembly.
4. Tweezers: Precision tweezers are useful for handling small components and screws during the battery replacement process. They provide better control and minimize the risk of dropping or misplacing tiny parts.
Sure, here's the content for "Step 2: Power off the iPhone 12":
html
Step 2: Power off the iPhone 12
Before beginning any repair, it’s crucial to power off your iPhone 12. This simple step ensures your safety and prevents any potential damage to the device during the battery replacement process.
To power off your iPhone 12, press and hold the side button along with either volume button until the “slide to power off” slider appears on the screen. Then, slide the slider to turn off your device.
Ensuring that your iPhone 12 is powered off before proceeding is essential for a smooth and safe battery replacement. This step sets the stage for the rest of the process, allowing you to work on the device without any risk of electrical hazards.
This content provides clear and concise instructions for powering off the iPhone 12 before beginning the battery replacement process.
**
Step 3: Remove the display
**
Removing the display is a crucial step in accessing the iPhone 12’s battery. Start by removing the two pentalobe screws located at the base of the device. These screws secure the display to the frame and can be removed using a Pentalobe screwdriver.
After removing the screws, it’s time to use a reliable suction handle to lift the display. Place the suction cup on the lower half of the front panel, just above the home button. Gently pull the suction handle upward while holding the iPhone down with one hand to create a slight gap between the display and the frame.
Once the gap is created, slide a plastic pick or a spudger into the space. Carefully work your way around the display, gently separating the adhesive that secures the display to the frame. Take your time and ensure that the adhesive is fully detached before attempting to lift the display.
As you lift the display, be mindful of the ribbon cables that connect the display to the iPhone’s logic board. These cables are located near the top of the device. Avoid pulling the display too far away from the iPhone to prevent damaging these delicate cables.
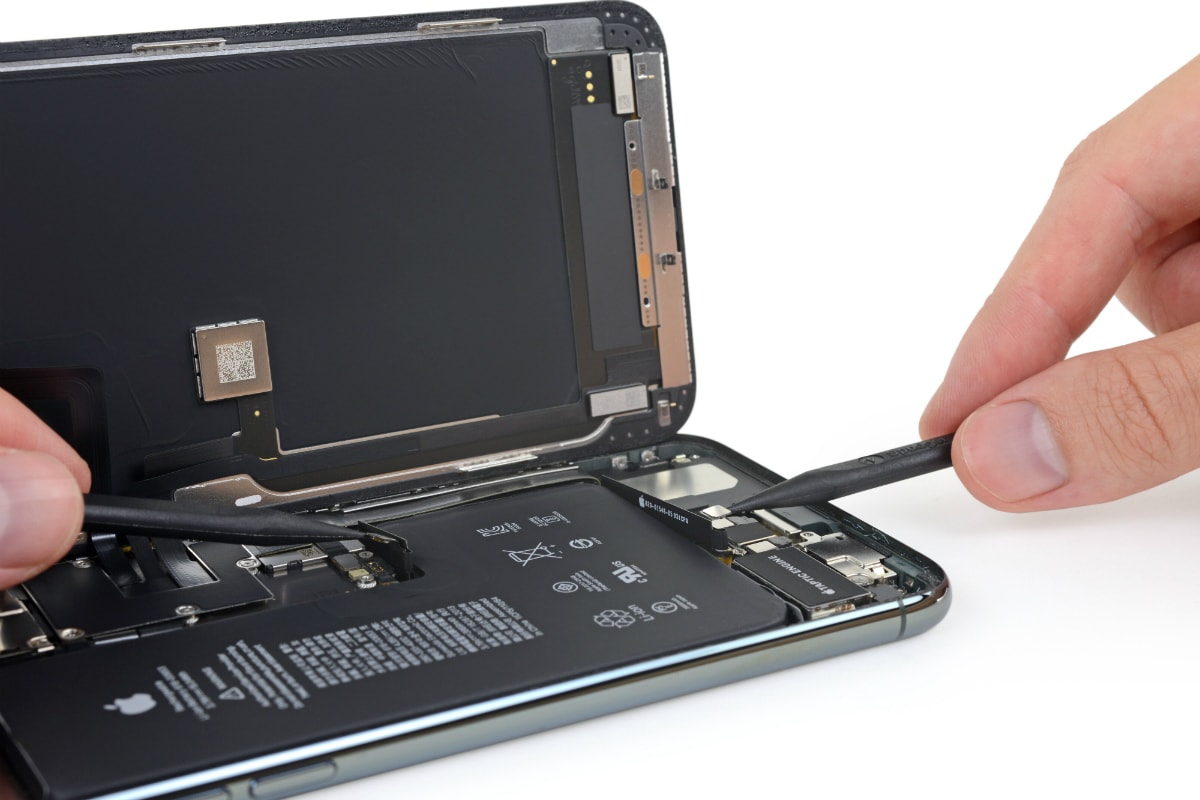
Step 4: Disconnect the battery
Before proceeding with disconnecting the iPhone 12 battery, it’s crucial to ensure that the device is completely powered off. This is a vital safety measure to prevent any electrical mishaps during the battery replacement process. To power off the iPhone 12, press and hold the side button along with either volume button until the “slide to power off” slider appears. Once the slider appears, simply swipe it to turn off the device.
Next, you’ll need to carefully remove the screws securing the battery connector bracket. Utilize a pentalobe screwdriver to loosen and remove the screws. It’s essential to keep these screws organized, as they are of different sizes. Creating a simple diagram or using a screw organizer can be immensely helpful in ensuring that the correct screws are returned to their respective positions during reassembly.
With the screws removed, gently lift and remove the battery connector bracket. This exposes the battery connector, which is attached to the logic board. Using a plastic spudger or a pair of tweezers, carefully disconnect the battery connector by prying it upwards. It’s crucial to exercise caution and precision during this step to avoid damaging the connector or the logic board.
Step 5: Replace the battery
Now that you have successfully disconnected the old battery, it’s time to replace it with a new one. Ensure that the replacement battery is compatible with the iPhone 12 model. Look for a high-quality replacement battery from a reputable supplier to ensure optimal performance and safety.
Handle the new battery carefully and align it in the designated space within the iPhone 12. Gently press it down to secure it in place. Ensure that the battery connector is properly positioned and aligned with the socket on the logic board before reattaching it.
Once the new battery is securely in place, follow the previous steps in reverse order to reassemble the iPhone 12. Carefully reconnect the battery, reattach the display, and secure all the screws back in place. Take your time to ensure everything is properly aligned and secured.
After reassembly, power on your iPhone 12 and verify that the new battery is functioning correctly. Check the battery health in the settings to ensure that it is recognized and functioning optimally. Congratulations, you have successfully replaced the battery in your iPhone 12!
Step 6: Reassemble the iPhone 12
Now that you’ve successfully replaced the battery, it’s time to reassemble your iPhone 12. Follow these steps carefully to ensure everything is put back together properly.
First, gently place the display back onto the device, making sure it aligns perfectly with the frame. Apply gentle pressure around the edges to secure the display in place. You should hear a series of soft clicks as the display snaps back into position.
Next, use the proprietary screws to secure the display. Carefully insert and tighten each screw, ensuring they are snug but not overly tight. Be cautious not to strip the screws or over-tighten them, as this could damage the device.
Once the display is secure, power on your iPhone 12 to ensure everything is functioning as it should. If the device powers on and the display appears normal, you’ve successfully reassembled your iPhone 12 after replacing the battery.
Finally, take a moment to admire your handiwork. You’ve not only extended the life of your iPhone 12, but you’ve also gained valuable experience in performing a crucial maintenance task. Congratulations on a job well done!
Conclusion
Replacing the battery of your iPhone 12 is a manageable task that can breathe new life into your beloved device. Whether you opt for a DIY approach or seek professional assistance, ensuring that your iPhone 12 has a reliable and long-lasting battery is crucial for a seamless user experience. By following the steps outlined in this guide, you can regain optimal battery performance and prolong the lifespan of your device. Remember to prioritize safety and precision throughout the battery replacement process, and don’t hesitate to reach out to a certified technician if you encounter any challenges. With a rejuvenated battery, your iPhone 12 will continue to serve as a dependable companion for your daily tasks, communication, and entertainment needs.
FAQs
**Q: How do I know if my iPhone 12 battery needs replacement?**
A: If your iPhone 12’s battery drains quickly, struggles to hold a charge, or unexpectedly shuts down, it may be time for a replacement.
Q: Can I replace the iPhone 12 battery on my own?
A: While it's possible to replace the iPhone 12 battery yourself, it's recommended to seek professional assistance to ensure proper installation and avoid damaging the device.
Q: How long does it take to replace the iPhone 12 battery?
A: The battery replacement process typically takes around 30 minutes when performed by a skilled technician.
Q: Will replacing the iPhone 12 battery void the warranty?
A: If the battery replacement is conducted by an unauthorized service provider, it may void the warranty. To maintain the warranty, it's advisable to have the battery replaced by an authorized technician.
Q: What is the average lifespan of an iPhone 12 battery?
A: The average lifespan of an iPhone 12 battery is approximately 500 charge cycles, which is roughly two years with typical usage.