
If you're experiencing a dwindling battery life on your iPhone 11, it might be time for a battery replacement. The iPhone 11 is a remarkable device, but over time, the battery's capacity can diminish, leading to shorter usage periods between charges. In this article, we'll delve into the process of replacing the battery in your iPhone 11. Whether you're a tech-savvy individual or simply looking to understand the steps involved, we'll guide you through the necessary procedures, offering insights and tips to ensure a successful battery replacement. So, if you're ready to breathe new life into your iPhone 11, let's explore the journey of rejuvenating its power source.
Inside This Article
- Preparing for Battery Replacement
- Tools and Materials Needed
- Steps to Replace Battery in iPhone 11
- Testing the New Battery
- Conclusion
- FAQs
Preparing for Battery Replacement
If you’ve noticed a significant decrease in your iPhone 11’s battery life, it might be time for a battery replacement. Before diving into the process, it’s crucial to prepare adequately to ensure a smooth and successful battery replacement. Here’s what you need to do to get ready for the task.
First, make sure to back up all your important data on your iPhone 11. This includes photos, videos, contacts, and any other essential information. You can back up your data using iCloud or iTunes to ensure that nothing is lost during the battery replacement process.
Next, it’s important to power off your iPhone 11 and remove any SIM card that may be inserted. This will prevent any potential damage to the device and ensure a safe environment for the battery replacement. Additionally, having the SIM card removed will give you more space to work with inside the phone.
It’s also a good idea to gather all the necessary tools and materials for the battery replacement. This includes a pentalobe screwdriver, a suction handle, a spudger, and a new replacement battery specifically designed for the iPhone 11. Having these items readily available will streamline the process and minimize any potential delays.
Lastly, find a clean and well-lit workspace to perform the battery replacement. A clutter-free environment will help you keep track of small components and screws, while good lighting will ensure that you can see everything clearly. By preparing your workspace in advance, you can work efficiently and with greater precision.
Tools and Materials Needed
Before embarking on the journey of replacing the battery in your iPhone 11, it’s crucial to gather the essential tools and materials. Here’s a comprehensive list to ensure you have everything you need:
Tools:
- Pentalobe screwdriver
- Y-type screws driver
- Suction cup
- Spudger tool
- Tweezers
- Phillips screwdriver
Materials:
- Replacement battery compatible with iPhone 11
- Adhesive strips
- Isopropyl alcohol
- Cloth for cleaning
- Plastic cards for prying
- Heat gun or hairdryer (optional for adhesive removal)
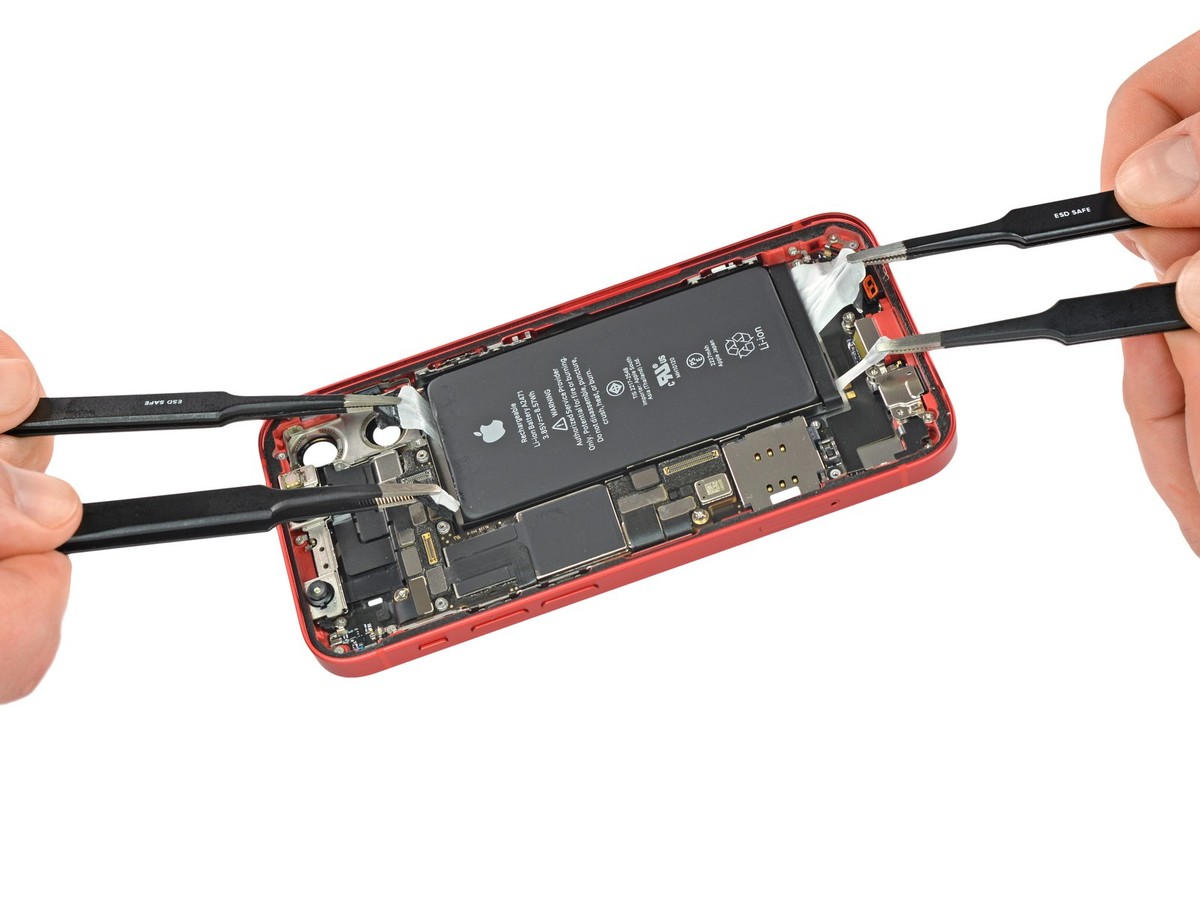
Steps to Replace Battery in iPhone 11
Replacing the battery in your iPhone 11 can breathe new life into your device, ensuring it stays powered up throughout the day. Here are the steps to replace the battery in your iPhone 11:
Step 1: Gather the Necessary Tools and Materials
Before you begin, make sure you have the right tools and materials on hand. You’ll need a pentalobe screwdriver, a tri-point screwdriver, a spudger, a new iPhone 11 battery, and adhesive strips designed for iPhone battery replacement.
Step 2: Power Off Your iPhone 11
Prior to starting the battery replacement process, power off your iPhone 11 to prevent any potential electrical mishaps.
Step 3: Remove the Screws
Use the pentalobe screwdriver to remove the two screws located at the bottom of your iPhone 11. These screws secure the display to the chassis.
Step 4: Separate the Display
Once the screws are removed, use a suction handle or a strong piece of tape to lift the display slightly. Then, carefully insert a spudger between the display and the frame to separate them. Take care not to damage the display cables.
Step 5: Disconnect the Battery
After separating the display, locate the battery connector and use the tri-point screwdriver to remove the screws securing the bracket. Once the bracket is removed, carefully disconnect the battery connector from the logic board.
Step 6: Replace the Battery
With the old battery disconnected, carefully remove it from the iPhone 11. Then, place the new battery into position and reconnect it to the logic board using the previously removed bracket and screws.
Step 7: Reassemble Your iPhone 11
Once the new battery is securely in place, carefully reattach the display to the chassis and secure the two pentalobe screws at the bottom of the device.
Step 8: Power On and Test
After reassembly, power on your iPhone 11 and ensure that the new battery is functioning properly. Check the battery health in the settings to confirm the successful replacement.
By following these steps, you can successfully replace the battery in your iPhone 11, extending the lifespan of your device and ensuring it remains powered up when you need it most.
Testing the New Battery
Once you’ve successfully replaced the battery in your iPhone 11, it’s crucial to ensure that the new battery is functioning properly. Testing the new battery will give you peace of mind and confirm that your device will operate optimally.
First, power on your iPhone 11 and allow the new battery to initialize. Check the battery percentage to ensure it’s increasing as expected. If the percentage remains stagnant or decreases, there may be an issue with the replacement.
Next, use your iPhone 11 as you normally would, paying attention to the battery life. If the device drains rapidly or exhibits erratic behavior, it could indicate a faulty replacement. Conversely, if the battery performs efficiently, it’s a positive sign.
Consider running battery-intensive tasks such as gaming or video streaming to gauge the new battery’s performance under stress. This will provide valuable insights into its stability and longevity during heavy usage.
Lastly, monitor the temperature of the device during usage. A significant increase in temperature could indicate an underlying issue with the new battery, warranting further inspection or professional assistance.
Conclusion
Replacing the battery in your iPhone 11 is a feasible task that can breathe new life into your device. By following the step-by-step guide and considering the essential tips, you can successfully replace the battery and enjoy extended usage without the need for frequent recharging. Remember, a well-maintained battery contributes to the overall performance and longevity of your iPhone 11. With the right tools, a bit of patience, and attention to detail, you can confidently embark on this DIY project and revitalize your device. As technology continues to evolve, empowering yourself with the knowledge and skills to perform basic maintenance tasks can be both rewarding and cost-effective. So, go ahead and give your iPhone 11 a new lease on life by replacing its battery!
FAQs
-
How do I know if my iPhone 11 battery needs replacement?
If your iPhone 11's battery drains quickly, doesn't hold a charge, or unexpectedly shuts down, it may be time to replace the battery. -
Can I replace the iPhone 11 battery myself?
Yes, you can replace the iPhone 11 battery yourself by following the appropriate steps and using the necessary tools. -
Where can I purchase a replacement battery for my iPhone 11?
Replacement batteries for the iPhone 11 are available for purchase from authorized Apple resellers, Apple stores, and reputable online retailers. -
Is it necessary to calibrate the new battery after replacement?
Calibrating the new battery after replacement is not necessary for the iPhone 11, as the device automatically calibrates the battery. -
How long does it take to replace the battery in an iPhone 11?
The process of replacing the battery in an iPhone 11 typically takes around 30 to 45 minutes when done carefully and methodically.