
Are you struggling to assemble the Ranger 55 Tripod monopod? Don’t worry – we’ve got you covered! In this comprehensive guide, we’ll walk you through the step-by-step process of assembling your Ranger 55 Tripod monopod so that you can start capturing stunning photos and videos in no time. Whether you’re a professional photographer or a hobbyist, having a stable and reliable monopod is essential for achieving sharp and steady shots. With its impressive features and sturdy construction, the Ranger 55 Tripod monopod is a popular choice among photography enthusiasts. So, grab your Ranger 55 Tripod monopod and let’s dive in to learn how to assemble it effectively. Let’s get started!
Inside This Article
- Components of the Ranger 55 Tripod
- Assembling the Monopod
- Tips for Using the Monopod
- Conclusion
- FAQs
Components of the Ranger 55 Tripod
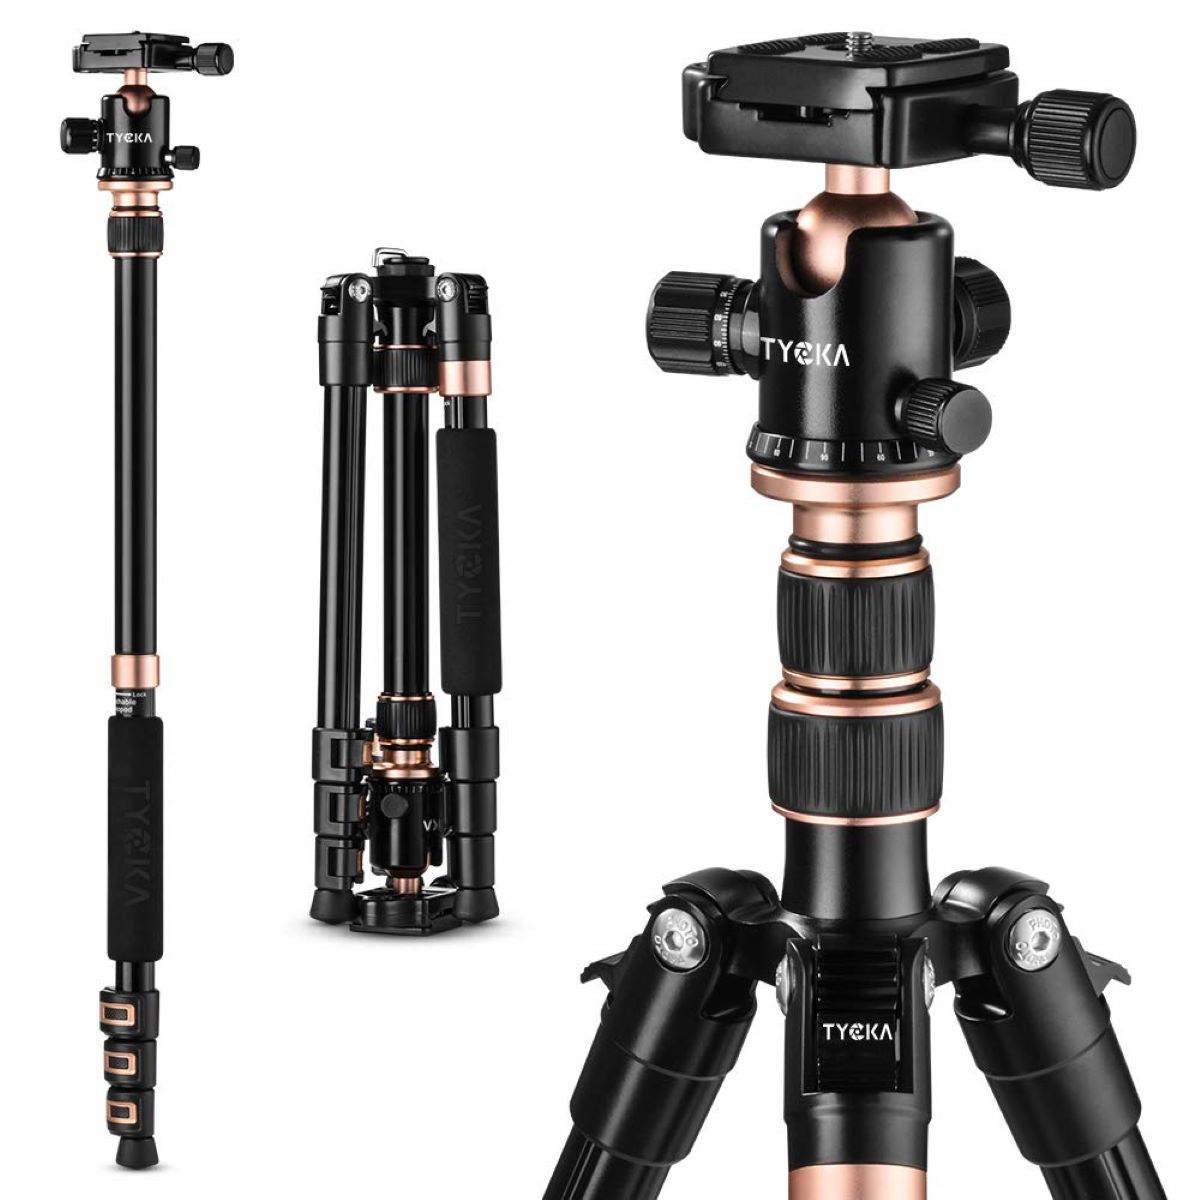
The Ranger 55 Tripod is a versatile and durable photography accessory that enhances stability and flexibility during photo and video shoots. The tripod is made up of several key components, each playing a crucial role in its overall functionality. Understanding the different parts of the Ranger 55 Tripod will help you assemble and use it effectively to capture stunning images and videos.
1. Legs: The tripod legs are the primary support structure of the Ranger 55 Tripod. They are typically made of sturdy materials like aluminum or carbon fiber and feature adjustable leg sections. These sections can be extended or collapsed to adjust the height of the tripod, making it suitable for various shooting scenarios. The legs also have locking mechanisms to secure them in place once extended.
2. Center Column: The center column connects the legs of the tripod and provides additional height adjustment. It can be raised or lowered according to your desired shooting angle. Some tripods may feature a reversible center column that allows for low-angle shots or macro photography.
3. Mounting Plate: The mounting plate is where your camera or other photographic equipment attaches to the tripod. It provides a secure and stable connection, ensuring that your gear stays in place during the shoot. The mounting plate usually features a quick-release mechanism for easy attachment and detachment of your camera.
4. Tripod Head: The tripod head is responsible for holding the camera in place and enabling smooth movements. It allows you to pan, tilt, and rotate your camera to capture different angles and perspectives. Tripod heads come in various types, including ball heads, pan-tilt heads, and gimbal heads, each offering different levels of flexibility and control.
5. Leg Locks: The leg locks are mechanisms located on the tripod legs that secure them in the extended or collapsed position. They ensure that the tripod remains stable and steady during use. Common leg lock types include twist locks and flip locks, each offering their own advantages in terms of ease of use and reliability.
6. Feet: The tripod feet are the contact points between the tripod and the ground. They provide stability and grip, particularly on uneven or slippery surfaces. Some tripod models feature rubberized or spiked feet that can be interchanged based on the shooting environment.
Each of these components plays a vital role in the overall performance and functionality of the Ranger 55 Tripod. Understanding how they work together will help you assemble and utilize the tripod with confidence, ensuring optimal stability and capturing amazing shots.
Assembling the Monopod
Assembling the monopod of the Ranger 55 tripod is a straightforward process that can be completed in just a few simple steps. Follow the guide below to ensure a smooth and successful assembly:
1. Start by identifying the monopod leg among the tripod accessories. It is usually a single tubular section that is slightly longer than the tripod legs.
2. Extend the monopod leg fully by pulling it out of its collapsed position. You may need to release any locking mechanisms or twist the leg to unlock it.
3. Once the monopod leg is fully extended, locate the mounting plate at the top. This plate is usually equipped with a standard 1/4-inch screw, designed to attach and securely hold your camera or other accessories.
4. Align the mounting plate with the threaded hole at the top of the monopod leg. Gently screw it in, making sure it is securely fastened but not overly tightened, as this may cause damage.
5. Once the mounting plate is attached, your monopod is ready to use! You can now adjust the height of the monopod leg according to your preference by unlocking any locking mechanisms and sliding it up or down.
Remember to double-check that the mounting plate is correctly attached and secure before using the monopod. This will help prevent any accidents or damage to your equipment during use.
With the monopod assembled, you can now enjoy the benefits of added stability and flexibility while capturing photos or videos. Whether you are shooting in crowded areas, capturing fast-moving action, or need to stabilize heavy equipment, the monopod is a valuable accessory to have in your photography toolbox.
Take some time to familiarize yourself with adjusting the monopod’s height and finding the optimal angle for your shots. With practice, you’ll be able to maximize the potential of your Ranger 55 tripod and enhance your photography experience.
Tips for Using the Monopod
When it comes to using a monopod, there are a few tips and tricks that can help you achieve the best results. Whether you’re a professional photographer or a hobbyist, these tips will help you maximize the potential of your Ranger 55 tripod monopod. So, let’s dive in!
1. Find a Stable Position: When using a monopod, stability is key. Look for a solid surface or use your body to create stability by positioning your feet shoulder-width apart and keeping your arms close to your body. This will help minimize camera shake and ensure sharp images.
2. Use the Correct Height: Adjusting the height of your monopod can make a big difference in your shooting experience. Experiment with different heights to find the one that suits your shooting style and subject the best. Remember, the monopod should be an extension of your arm, so choose a height that allows you to comfortably hold and maneuver your camera.
3. Grip it Right: Proper gripping technique plays a crucial role in using a monopod effectively. Hold the monopod handle firmly but not too tight, and ensure a comfortable grip. Avoid gripping too close to the camera to prevent your hand from accidentally showing up in the frame.
4. Use a Remote Shutter Release: Using a remote shutter release or a self-timer can help eliminate camera shake caused by pressing the shutter button manually. This ensures crisp and shake-free images, especially when shooting with slower shutter speeds.
5. Brace Against Objects: If you find yourself in a situation where a stable surface is not available, brace your monopod against a wall, tree, or any other solid object. By doing so, you can effectively utilize the stability of the object, reducing the chances of camera shake.
6. Choose the Right Monopod Head: The monopod head you choose can make a significant difference in the smoothness and flexibility of your camera movement. Consider a fluid head for silky-smooth panning and tilting, or a ball head for quick and versatile adjustments.
7. Practice Proper Breathing: Believe it or not, your breathing can affect the stability of your shots. As you prepare to capture an image, take a deep breath, exhale slowly, and gently press the shutter button at the end of your breath. This technique can help minimize any minor movements caused by breathing.
8. Experiment with Angles: Don’t be afraid to experiment with different angles and perspectives when using a monopod. Try shooting from low angles or getting creative with high angles to add variety and interest to your photos.
9. Use Image Stabilization: If your camera or lens has image stabilization capabilities, make sure to use them when using a monopod. It can further enhance the stability and sharpness of your images, especially in low light or challenging shooting conditions.
10. Practice and Experiment: The more you use your monopod, the better you’ll become at utilizing its full potential. Practice different techniques, experiment with various settings, and have fun exploring the capabilities it offers. Remember, it’s all about finding what works best for you and your photography style!
With these tips in mind, you’re equipped to make the most of your Ranger 55 tripod monopod. So, go out there and capture stunning images with stability and precision!
Conclusion
Assembling the Ranger 55 Tripod monopod is a simple and straightforward process that allows you to extend your photography versatility. By following the step-by-step instructions outlined in this article, you’ll be able to quickly and effortlessly assemble your monopod and start capturing stunning shots.
The Ranger 55 Tripod monopod offers great stability, portability, and flexibility, making it an essential tool for photographers of all levels. Whether you’re an amateur photographer looking to enhance your skills or a professional seeking to expand your creative possibilities, the Ranger 55 Tripod monopod is a fantastic accessory to add to your toolkit.
Remember to always handle your monopod with care and follow the manufacturer’s instructions for best practices. With proper use and maintenance, your Ranger 55 Tripod monopod will serve you well and help elevate your photography to new heights.
FAQs
1. How do I assemble the Ranger 55 Tripod?
To assemble the Ranger 55 Tripod, follow these simple steps:
- Start by extending the tripod legs by unlocking the leg locks and pulling them outwards.
- Once the legs are extended, tighten the leg locks securely to ensure stability.
- Next, attach the center column to the tripod by inserting it into the hole at the top of the tripod legs.
- Secure the center column by tightening the center column lock.
- Lastly, attach the tripod head to the center column using the provided mounting plate and screw.
2. Can I use the Ranger 55 Tripod for both photography and videography?
Absolutely! The Ranger 55 Tripod is a versatile accessory that can be used for both photography and videography. Its adjustable height, stable construction, and smooth panning capabilities make it suitable for capturing stunning photos and shooting professional videos.
3. What is the maximum load capacity of the Ranger 55 Tripod?
The Ranger 55 Tripod has a maximum load capacity of XX pounds. It is designed to safely support a wide range of cameras, lenses, and other accessories, making it perfect for photographers and videographers with different gear setups.
4. How portable is the Ranger 55 Tripod?
The Ranger 55 Tripod is designed with portability in mind. It features a lightweight and compact design, making it easy to carry around during your outdoor adventures or professional shoots. It comes with a convenient carrying bag to protect the tripod during transport.
5. Can I adjust the tripod’s height?
Yes, the Ranger 55 Tripod offers adjustable height options. Each leg can be individually adjusted using the leg locks. Additionally, the center column can be extended or shortened to achieve your desired shooting height. This flexibility allows you to capture various angles and perspectives with ease.