
Mounting a beanbag on a monopod can be a game-changer for photographers and videographers looking to capture stable shots in various situations. Whether you’re out in the wild, shooting wildlife, or capturing action-packed events, this ingenious combination offers a portable and versatile solution. A beanbag provides a stable and cushioned platform for your camera, while a monopod adds height, flexibility, and the freedom to move around. In this article, we will guide you through the process of mounting a beanbag on a monopod, step by step. We will cover the equipment you need, the setup process, and share some tips for maximizing stability and comfort. So, whether you’re a professional or just getting started with photography, let’s get ready to take your shots to the next level with this innovative setup.
Inside This Article
- Materials Needed
- Step 1: Attaching the Mounting Plate
- Step 2: Securing the Beanbag
- Step 3: Mounting the Monopod
- Step 4: Adjusting the Beanbag Position
- Conclusion
- FAQs
Materials Needed
Before you begin mounting a beanbag on a monopod, it’s important to gather all the necessary materials. Here’s a list of items that you will need:
- Beanbag: Choose a beanbag that is large enough to safely accommodate your camera equipment. Look for one that has a non-slip bottom to ensure stability.
- Monopod: Select a monopod that is sturdy and lightweight. Consider the weight of your camera and lens when choosing the monopod to ensure it can support the weight.
- Mounting Plate: You will need a mounting plate that is compatible with your camera or lens. Check the specifications of your camera or lens to determine the correct mounting plate to use.
- Velcro Straps: Velcro straps will be used to secure the beanbag to the monopod. Make sure you have enough straps to provide a secure attachment.
- Camera Equipment: Of course, you will need your camera and any additional equipment like lenses, filters, or flashes that you plan to use during your photography session.
- Optional Accessories: Depending on your specific needs, you may also consider additional accessories such as remote triggers or cable releases to enhance your shooting experience.
Once you have gathered all the materials mentioned above, you will be ready to proceed with mounting the beanbag on a monopod. Ensure that you have chosen high-quality materials to ensure the stability and safety of your camera equipment during use.
Step 1: Attaching the Mounting Plate
Attaching the mounting plate is the first step in successfully mounting a beanbag on a monopod. The mounting plate serves as the connection point between the monopod and the beanbag, providing stability and support. Here’s how you can easily attach the mounting plate:
1. Begin by identifying the mounting plate that is compatible with your monopod. Most monopods come with a mounting plate included, but if you don’t have one, you can purchase a universal mounting plate separately.
2. Locate the mounting screw on the mounting plate. This screw is used to secure the plate to the monopod. Ensure that it is tightened securely to prevent any movement or wobbling.
3. Position the mounting plate on the top of your monopod. The plate should align with the mounting socket on the monopod, ensuring a snug fit.
4. Once the mounting plate is in position, press it firmly against the monopod to ensure a secure attachment. Wiggle it slightly to check for any loose connection. If it feels loose, tighten the screw further to ensure a strong hold.
5. Double-check the mounting plate to ensure it is properly aligned and securely attached to the monopod. This will guarantee stability while using the beanbag.
By following these simple steps, you can easily attach the mounting plate to your monopod, setting the foundation for securely mounting a beanbag.
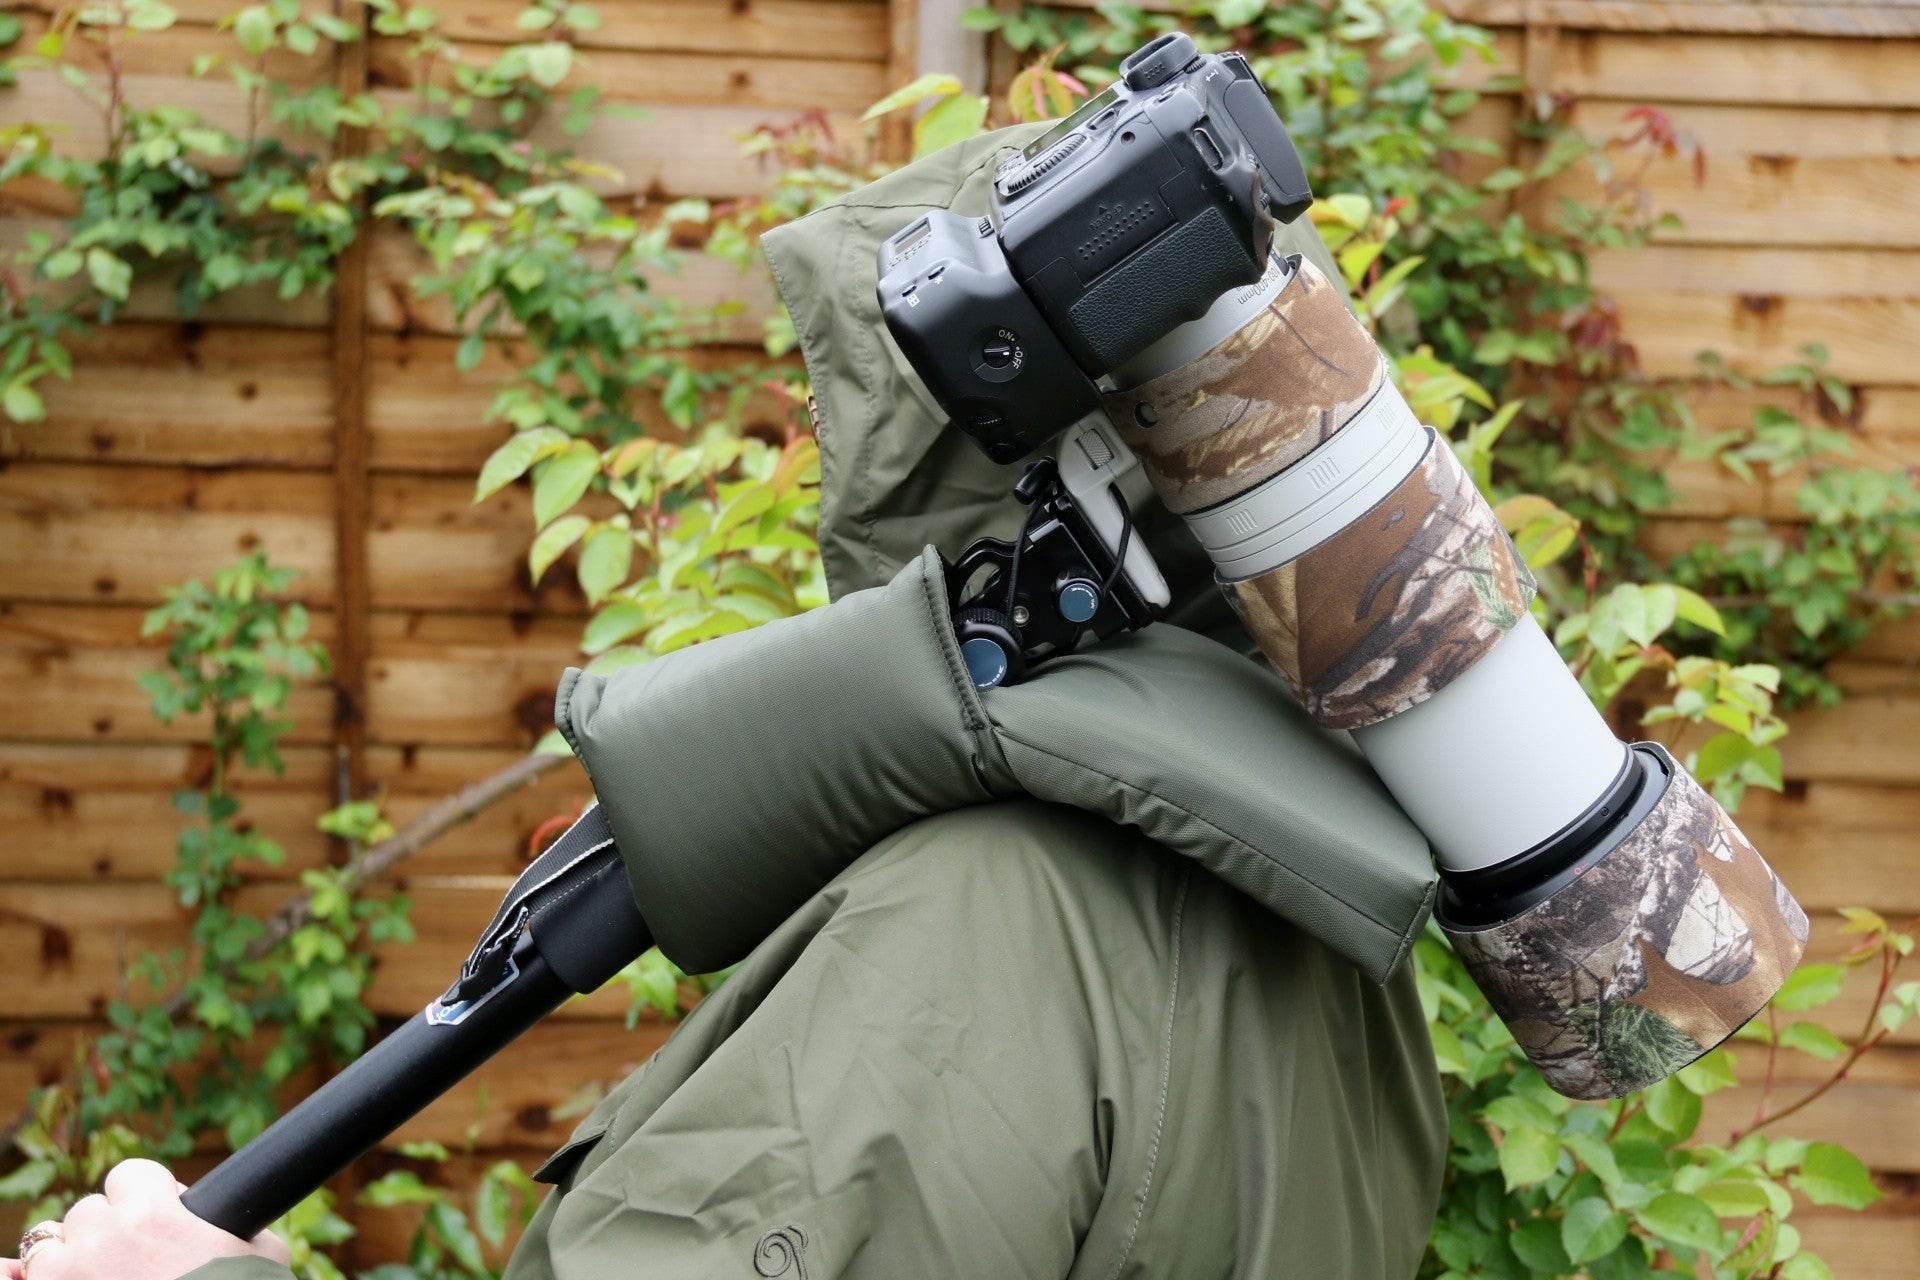
Step 2: Securing the Beanbag
Once you’ve attached the mounting plate securely to your monopod, it’s time to move on to securing the beanbag. The beanbag serves as a stable base for your camera or other equipment, providing support and minimizing vibrations. Follow these easy steps to ensure that your beanbag is securely attached:
1. Choose the Right Beanbag: Select a beanbag that is the appropriate size and weight for your equipment. It should be large enough to hold your camera or device, but not so large that it becomes unstable. Look for a beanbag specifically designed for photography or videography purposes, as these often have features like non-slip bottoms or adjustable straps for added stability.
2. Place the Beanbag on the Mounting Plate: Position the beanbag on top of the mounting plate, ensuring that it covers the entire plate surface. The beanbag should sit snugly on the plate and not have any loose or empty spaces. This will help distribute the weight evenly and prevent any wobbling or shifting during use.
3. Adjust the Beanbag Position: Once the beanbag is in place, take a moment to adjust its position. Ensure that it is centered and aligned with the mounting plate. This will help maintain balance and stability while using the monopod. If needed, you can gently shift the beanbag or apply slight pressure to position it correctly.
4. Secure the Beanbag: Depending on the design of your beanbag, there may be various methods to secure it to the mounting plate. Some beanbags have straps or velcro attachments that can be used to fasten them securely. Others may have built-in pockets or drawstrings that can be tightened around the mounting plate. Follow the instructions provided with your beanbag to ensure proper attachment and a secure fit.
5. Test for Stability: Once the beanbag is secured, gently shake the monopod to ensure that it remains stable. If you notice any movement or instability, recheck the attachment and make any necessary adjustments. It’s important to have a firm and secure connection between the beanbag and the mounting plate to prevent any accidents or damage to your equipment.
6. Re-evaluate if Necessary: If you find that the beanbag is not providing the desired stability or if you experience any issues during use, it may be worth considering alternative mounting options. There are various specialized mounts available in the market that can provide additional stability and security for your equipment. Explore these options to find the best solution for your specific needs.
By following these steps, you can ensure that your beanbag is securely attached to the monopod, providing a stable base for your camera or equipment. This will help you capture clearer, sharper images and videos without any unwanted vibrations or movement.
Step 3: Mounting the Monopod
Now that you have securely attached the mounting plate and positioned the beanbag, it’s time to mount the monopod. The monopod provides stability and additional support to your camera setup, ensuring sharp and steady photos even in tricky shooting conditions. Here’s how to mount the monopod:
1. Extend the monopod: Start by extending the monopod to your desired height. Most monopods have multiple sections that can be adjusted, allowing you to find the ideal shooting position.
2. Attach the monopod to the mounting plate: Locate the mounting screw on top of the monopod and align it with the mounting plate on the beanbag. Insert the screw into the threaded hole on the mounting plate and tighten it securely.
3. Ensure stability: Once the monopod is attached, double-check that it is stable and securely fastened. Give it a gentle shake to make sure there’s no wobbling or movement. If needed, adjust the monopod’s legs or tightening mechanisms to achieve maximum stability.
4. Fine-tune the position: Take a moment to reassess the positioning of your camera setup. Check if the monopod’s height and angle align with your desired composition. Make any necessary adjustments before proceeding to your photography session.
5. Test the stability: Before you start shooting, test the stability of your setup by taking a few test shots. Look for any signs of wobbling or vibrations in the images. If you notice any issues, recheck the tightness of the mounting plate and adjust the monopod as needed.
Remember, the stability of your monopod setup is crucial for capturing sharp and high-quality photographs. Take your time to ensure that the monopod is securely mounted and that your camera is positioned correctly. With a stable setup, you can confidently focus on capturing stunning images without worrying about any unwanted movement.
Step 4: Adjusting the Beanbag Position
Once the beanbag is securely attached to the monopod, you will need to adjust its position to ensure stability and the best shooting angle. Follow these simple steps to achieve the optimal beanbag position:
1. Assess the levelness: First, check if the monopod and beanbag assembly is level. You can use a spirit level or visual inspection to determine if it is balanced. Adjust the monopod legs or the beanbag positioning as needed to achieve a flat and stable base.
2. Fine-tune the height: Depending on your shooting needs, you may need to adjust the height of the monopod and beanbag assembly. Extend or retract the monopod legs while keeping the beanbag balanced on top until you reach the desired height. Be sure to lock the leg adjustments securely to maintain stability.
3. Angle adjustment: The next step is to adjust the angle of the beanbag to align with your shooting target. You can tilt the monopod slightly forward, backward, or to the sides to find the perfect shooting angle. Remember, the beanbag should provide support and stability to keep your camera or device in position.
4. Fine-tune the position: With the height and angle set, you can now fine-tune the beanbag’s position to ensure optimal stability. Gently push or adjust the beanbag to distribute the weight evenly and minimize any wobbling or movement. Utilize the flexibility of the beanbag’s filling material to mold it into the desired shape and provide a secure foundation for your camera or device.
5. Test and adjust as necessary: Once you have adjusted the beanbag position, it’s important to test it by mounting your camera or device and taking a few test shots. Observe if there are any vibrations, instability, or discomfort. If necessary, make additional adjustments to the height, angle, or position until you achieve the desired stability and shooting angle.
Remember, finding the perfect beanbag position might require some trial and error. Take your time and experiment with different adjustments until you find the most stable and comfortable setup that suits your shooting needs.
Mounting a beanbag on a monopod provides a practical solution for photographers and videographers seeking stability and versatility in their equipment. By securely attaching a beanbag to the top of a monopod, you can enjoy the benefits of a stable platform while still maintaining the freedom to adjust angles and positions on the go.
This innovative setup offers advantages in various shooting scenarios, from wildlife photography to sports events, where stability is crucial. The beanbag provides additional support, reducing camera shake and allowing for smoother panning and tracking shots. Plus, the portable nature of a monopod makes it easy to carry and maneuver, making it an ideal accessory for both indoor and outdoor shoots.
With some creativity and experimentation, you can explore different mounting options to suit your specific needs. So, whether you’re capturing breathtaking nature shots or documenting fast-paced action, mounting a beanbag on a monopod will undoubtedly enhance your photography and videography experience.
FAQs
Q: Can I mount a beanbag on a monopod?
A: Yes, you can mount a beanbag on a monopod. It provides stability and support for your camera or other devices.
Q: Why would I want to mount a beanbag on a monopod?
A: Mounting a beanbag on a monopod can help you achieve a higher level of stability for your camera, especially in situations where a tripod may not be feasible or practical to use.
Q: How do I mount a beanbag on a monopod?
A: To mount a beanbag on a monopod, simply wrap the beanbag around the top portion of the monopod and secure it tightly. You can adjust the position of the beanbag to ensure stability and balance.
Q: What are the benefits of using a beanbag on a monopod?
A: Using a beanbag on a monopod provides several benefits, including increased stability, reduced camera shake, and the ability to adapt to various shooting conditions. It also provides a comfortable and cushioned surface for your camera to rest on.
Q: Can I use any type of beanbag to mount on a monopod?
A: Ideally, you would want to use a beanbag that is specifically designed for camera support. These beanbags are often filled with materials like plastic pellets or rice, which can conform to the shape of the monopod and provide optimal stability.