
If you’re tired of dropping your phone or struggling to find a comfortable grip, then you need to learn how to attach a PopSocket. These nifty little accessories have become incredibly popular for their ability to provide a secure grip, prevent accidental drops, and even act as a kickstand for your phone. Attaching a PopSocket to your phone is a simple process that can make a world of difference in your day-to-day phone usage. In this article, we will guide you through the steps to attach a PopSocket to your phone, ensuring that you can enjoy a more secure and comfortable grip while using your device. Say goodbye to fumbling and dropping your phone, and say hello to the convenience and functionality of a PopSocket!
Inside This Article
- What is a Popsocket?
- Step 1: Choosing the Right Popsocket
- Step 2: Preparing Your Phone or Device
- Step 3: Attaching the Popsocket
- Step 4: Testing and Adjusting the Popsocket
- Conclusion
- FAQs
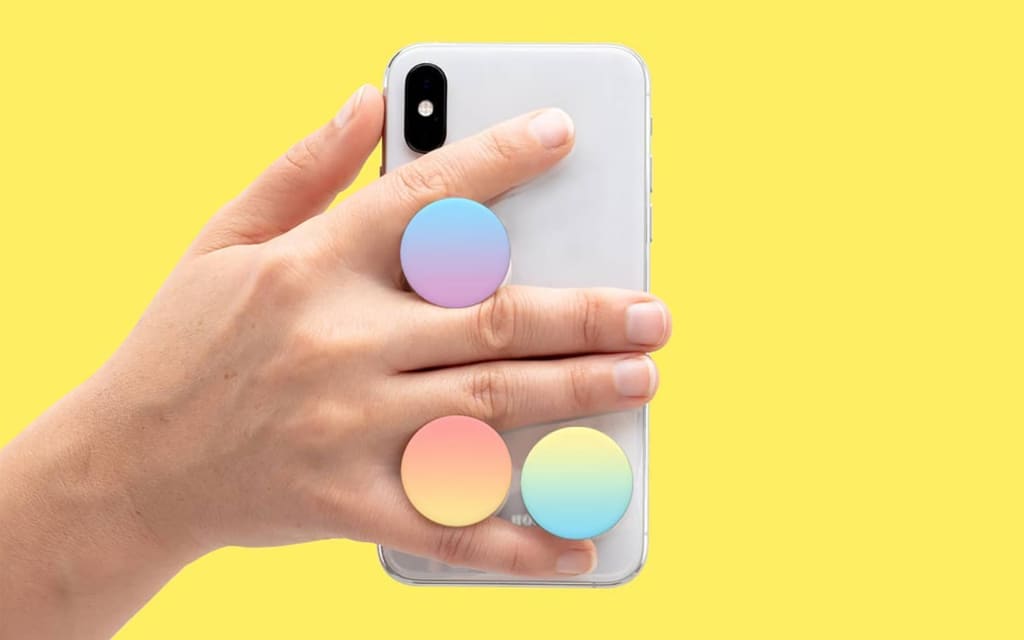
What is a Popsocket?
If you’ve ever struggled with holding onto your phone while texting, watching videos, or taking selfies, then a Popsocket might just be the solution you’ve been looking for. A Popsocket is a small but powerful accessory that attaches to the back of your phone or phone case, providing you with a secure grip and added convenience.
The main feature of a Popsocket is its ability to expand and collapse. When not in use, it lays flat against the back of your phone, making it easy to slide into your pocket or bag. However, when you need a better grip on your device, you can simply “pop” it out by pulling or pushing it with your fingers. It extends to create a small handle or stand that you can hold onto or prop your phone up with.
Popsockets come in a variety of designs, colors, and patterns, allowing you to personalize your device while getting the functionality you need. Whether you want a funky geometric print, a solid color that matches your phone case, or even a Popsocket with your favorite sports team’s logo, there’s a wide range of options to choose from.
So, how does a Popsocket actually attach to your phone? It uses a strong adhesive that sticks to the back of your device or phone case. The adhesive is designed to be secure and long-lasting, ensuring that your Popsocket stays in place even with repeated use.
If you’re concerned about damaging your phone or leaving behind residue when you remove the Popsocket, don’t worry – most Popsockets are easily removable and won’t leave any sticky residue behind. However, it’s always a good idea to test it out on a small, inconspicuous area of your phone first.
Once you’ve decided where you want to place your Popsocket, simply peel off the adhesive backing and firmly press it onto the back of your phone or case. It’s important to ensure that you’re attaching it to a smooth and clean surface for the best adhesion.
Once your Popsocket is attached, you can start enjoying the benefits of having a secure grip on your phone. Whether you’re texting with one hand, taking a selfie at an angle, or binge-watching your favorite show, the Popsocket provides added comfort and stability.
So, if you’ve been struggling with holding onto your phone or just want to add a bit of style to your device, consider getting a Popsocket. It’s a small investment that can make a big difference in your daily phone usage.
Step 1: Choosing the Right Popsocket
When it comes to attaching a Popsocket to your phone, the first step is to choose the right one. There are various Popsocket designs and styles available in the market, catering to different preferences and needs. Here are a few things to consider when selecting a Popsocket for your device:
- Design: Popsockets come in a range of designs, from solid colors to trendy patterns, and even customizable options. Consider your personal style and the overall aesthetic you want to achieve with your phone. Whether you prefer something subtle or eye-catching, there’s a Popsocket design out there for you.
- Functionality: Think about how you plan to use your Popsocket. Some individuals primarily use it for a better grip while holding their phone, while others use it as a stand for hands-free viewing. Take into account what you intend to use it for and choose a Popsocket that offers the desired functionality.
- Compatibility: It’s essential to ensure that the Popsocket you choose is compatible with your phone model. Most Popsockets are designed to be universal, but double-check the specifications to ensure a proper fit.
- Quality: Consider the quality of the Popsocket you are purchasing. Look for reputable brands and read reviews from other users to get an idea of the durability and longevity of the product. You want a Popsocket that will securely attach to your phone and withstand regular use without losing its adhesive properties.
- Personalization: If you want to add a personal touch to your Popsocket, look for options that can be customized with your own images or designs. Many companies offer personalized Popsockets that allow you to showcase your creativity and individuality.
By taking these factors into account, you can choose a Popsocket that not only suits your style but also meets your functional needs. Once you have selected the perfect Popsocket, you can move on to the next step of attaching it to your phone.
Step 2: Preparing Your Phone or Device
Before attaching your Popsocket to your phone or device, it’s important to properly prepare the surface. This will ensure a secure and long-lasting attachment. Follow these steps to prepare your phone or device:
- Clean the surface: Start by wiping the back of your phone or device with a microfiber cloth or an alcohol wipe. This will remove any dirt, dust, or oils that could affect the adhesive.
- Choose the placement: Decide where you want to attach the Popsocket on your phone or device. The ideal spot is usually in the center of the back, aligned with your index finger when holding the device. However, you can also choose a location that is more comfortable for your grip or matches your personal preference.
- Remove any case: If your phone or device has a case, it’s best to remove it before attaching the Popsocket. This will allow for better adherence between the Popsocket and the surface.
- Check the compatibility: Ensure that your phone or device is compatible with a Popsocket. Some devices, especially those with a textured or rubberized back, may not provide a suitable surface for the adhesive. If you are unsure, consult the manufacturer’s guidelines or reach out to Popsocket customer support for assistance.
By following these steps, you will be properly preparing your phone or device for the attachment of your Popsocket. This will ensure that the Popsocket adheres securely and remains firmly in place, providing you with a comfortable and convenient grip.
Step 3: Attaching the Popsocket
Now that you have prepared your phone or device, it’s time to attach the popsocket. Follow these steps to ensure a secure and proper attachment:
- Clean the back of your phone or device: Before applying the adhesive, make sure the surface is clean and free from any dust, oil, or debris. Use a gentle cleaning solution or wipe to clean the area where you plan to attach the popsocket.
- Remove the adhesive backing: Peel off the protective film from the adhesive on the back of the popsocket. Take care not to touch the sticky surface with your fingers to maintain its effectiveness.
- Position the popsocket: Decide on the placement of your popsocket. You can choose to position it in the center, towards the top or bottom of your phone’s back, depending on your preference and how you typically hold your device. Once you have decided, firmly press the adhesive side of the popsocket onto the desired spot.
- Apply pressure: Apply pressure to the popsocket for about 15 seconds to ensure a strong bond between the adhesive and your phone or device. Applying consistent and firm pressure will help the adhesive adhere properly.
- Let it set: Allow the popsocket to set and bond with your phone or device for at least one hour. During this time, avoid any excessive movements or pulling on the popsocket as it needs time to fully adhere.
It’s important to note that once the popsocket is attached, it is not recommended to remove and reattach it multiple times as this may weaken the adhesive over time. If you need to reposition the popsocket, it’s best to remove it carefully and apply a new one.
Congratulations! You have successfully attached your popsocket to your phone or device. It’s now ready to provide you with a more secure, comfortable, and convenient grip for all your mobile activities.
Step 4: Testing and Adjusting the Popsocket
Once you have successfully attached the Popsocket to your phone or device, it’s time to test its stability and adjust it if necessary. This step is crucial to ensure that your Popsocket provides optimal functionality and support for your phone.
Here are some tips and guidelines for testing and adjusting your Popsocket:
1. Stability Test
Gently but firmly grip your phone with the Popsocket attached. Apply some pressure and check if the Popsocket holds securely in place. It should not wiggle or feel loose. If you notice any instability, it may be necessary to reattach the Popsocket using a stronger adhesive or choose a different location on your phone.
2. Swivel Test
Popsockets are designed to rotate and swivel, allowing you to adjust the angle and position of your phone. Test the swivel function by gently rotating the Popsocket clockwise and counterclockwise. It should rotate smoothly without any resistance. If you encounter any difficulty or stiffness, you may need to adjust the Popsocket or consider replacing it.
3. Compatibility Test
If you plan to use your phone with various accessories or mounts, make sure the Popsocket does not interfere with their functionality. Test your phone’s compatibility by attaching it to a car mount, a selfie stick, or any other accessory you commonly use. Ensure that the Popsocket does not obstruct the attachments or prevent them from functioning properly.
4. Height Adjustment
If you find that the height of your Popsocket is not suitable for your comfort or the way you hold your phone, you can adjust it. Carefully peel off the adhesive holding the Popsocket and reposition it at the desired height. Make sure to press firmly and give the adhesive enough time to bond before testing its stability again.
5. Replacing the Adhesive
If you need to adjust or replace the adhesive on your Popsocket, it is recommended to use a reputable adhesive like 3M VHB tape. Follow the instructions provided by the manufacturer and ensure that the adhesive is applied evenly and securely. Allow sufficient time for the adhesive to set before testing the Popsocket’s stability.
Remember, testing and adjusting your Popsocket may require some trial and error. Don’t be afraid to experiment with different positions and heights to find the most comfortable and functional setup for your phone.
By properly testing and adjusting your Popsocket, you can maximize its usability and enjoy the added convenience and stability it provides while using your phone.
Conclusion
Attaching a PopSocket to your cellphone is a simple and effective way to enhance its functionality and style. Whether you want to have a better grip on your device, take better selfies, or conveniently prop it up for hands-free viewing, a PopSocket can do it all.
By following the step-by-step guide outlined in this article, you can easily attach a PopSocket to your cellphone without any hassle. Remember to choose a clean and smooth surface, allow the adhesive to cure properly, and avoid excessive force that may cause damage to your phone.
With the wide variety of PopSocket designs available, you can personalize your device and make a fashion statement. From vibrant patterns to trendy themes, there is a PopSocket to suit every style and preference. Additionally, PopSockets are easily interchangeable, allowing you to mix and match to suit your mood or outfit.
So, give your cellphone a practical and stylish upgrade by attaching a PopSocket. Not only will it provide added convenience and functionality, but it will also add a touch of personalization to your device. Once you experience the benefits of using a PopSocket, you won’t want to go back to your old phone grip.
FAQs
1. What is a PopSocket?
A PopSocket is a small circular gadget that attaches to the back of your mobile phone or mobile phone case. It serves as a grip, stand, and cord wrap all in one. With its expandable and collapsible design, a PopSocket provides a secure and comfortable grip for your device, making it easier to hold and use your phone with one hand.
2. How do I attach a PopSocket to my phone?
Attaching a PopSocket to your phone is easy. Simply peel off the adhesive backing of the PopSocket and firmly press it onto the desired location on the back of your phone or phone case. Make sure to choose a smooth and clean surface for optimal adhesion. It is recommended to let the adhesive set for a few hours before using the PopSocket.
3. Can I remove and reposition a PopSocket?
Yes, PopSockets are designed to be removable and repositionable. To remove a PopSocket, gently pull it away from your phone or case starting from the edges. If the adhesive loses its stickiness, you can clean it with water and let it air dry to restore its original adhesive properties. This allows you to reposition the PopSocket or transfer it to a different device if needed.
4. Will a PopSocket damage my phone or case?
PopSockets are designed to be safe for use on mobile phones and cases. The adhesive used on PopSockets is strong enough to securely attach to your device but should not leave any residue or damage when removed properly. However, it is always recommended to remove the PopSocket carefully to avoid any potential damage to the phone or case surface.
5. Can I still use wireless charging with a PopSocket attached?
Depending on your phone model and the placement of the PopSocket, you may still be able to use wireless charging. PopSockets can be collapsed, allowing for a slimmer profile when not in use. To ensure compatibility with wireless charging, it is recommended to position the PopSocket towards the bottom or middle of your phone to avoid interfering with the charging coil.